Saturday, December 9, 2017

PE 2018: IFOEdit And Looping DVD-VIDEO

INTRODUCTION

The following is a copy of the INTRODUCTION to the June 24, 2013 blog post titled "PE: Looping DVD-VIDEO on DVD Disc". Full blog post found HERE.

Premiere Elements (any version) does not offer a feature that takes its Timeline content and burns it to DVD disc in DVD-VIDEO format which loops. Some have found that the easy way out is use of the player repeat function to loop the DVD-VIDEO format on DVD disc that the Premiere Elements produces.
However, the VIDEO_TS from Premiere Elements' burn to folder or the VIDEO_TS ripped from the DVD from Premiere Elements' burn to disc can be used in conjunction with 3rd party software to get the looping DVD-VIDEO movie. Two popular 3rd party software for this task are IfoEdit and Pgcedit.

The basic Windows Only scheme is

  • Edit the VTS_01_0.IFO  in the VIDEO_TS Folder in IFOEdit or PgcEdit
  • Burn just the VIDEO_TS Folder which includes the edited VTS_01_0.IFO file to a DVD disc with a program such as the free ImgBurn which will place the DVD structure on the DVD disc in the correct disc file system.
ISSUE

It was decided that it was time now in December 2017 to revisit the June 24, 2013 details given for how Premiere Elements can contribute to the creation of a DVD disc in DVD-VIDEO format which loops during playback. In the revisit for this task, the current contributors to the individual tasks include

Premiere Elements 2018 Windows 64 bit
For saved .iso file
The Expert workspace Timeline was taken to the DVD ISO Image (.iso file saved to Documents) using Premiere Elements 2018 Export & Share/Disc/DVD with type = ISO Image (4.7 GB). The burn to Folder option to get the VIDEO_TS Folder was removed from Premiere Elements 14/14.1 and later).

7-Zip 17.01 beta (2017-08-28) for Windows (See HERE)
For getting the VIDEO_TS Folder from the saved .iso file
Right click of saved .iso file, followed by selection of 7-Zip and its Extract Files option generates a folder which contains the needed VIDEO_TS Folder.* 

IFOEdit (v 0.971) (See HERE)
For edit of VIDEO_TS Folder's VTS_01_0.IFO file to achieve looping of DVD-VIDEO content on DVD disc in player
Consult the detailed How To/IFOEdit section found HERE. For this work, the IfoEdit How To details of the 2013 blog post were tested** many times to verify that they work and work consistently. Time did not permit revisiting the PgcEdit content of that 2013 blog post.

ImgBurn (v2.5.8.0) (See HERE)
Edited VIDEO_TS Folder burn to DVD disc in DVD-VIDEO format which will loop at playback of disc

COMMENTARY

The above worked successfully when performed on Windows 7 Professional SP1 64 bit or Windows 10 Home 64 bit, using DVD .iso file from Premiere Elements** 14/14.1, 15, or 2018. Refer to footnote* for additional Premiere Elements version information.

 ___________________________________________________________________________
*The burn to DVD ISO Image option was introduced to Premiere Elements in Premiere Elements 13/13.1. In that version, the burn to DVD Folder as well as DVD ISO Image were available. The saved Folder in that case contained the VIDEO_TS Folder, eliminating the need for a 7-Zip for extraction. The burn to DVD Folder (containing VIDEO_TS Folder) goes back at least to the days of Premiere Elements 4.
**In all 2017 test conditions, the wording "PGC Command Table" was found to be present in the
IFOEdit editing; consequently, the alternative use of "Add Post Command" workaround was not needed as in the 2013 tests.

ATR.

Thursday, November 30, 2017

PE 2018: 4K Export And Hardware Acceleration Preference

INTRODUCTION

Adobe released a Help document dated October 4, 2017 and titled "Adobe Premiere Elements Does Not Export To 4K With High Bitrate". This document can be found HERE. In this document, Adobe points to the Issue as
Adobe Premiere Elements does not export a file to 4k with high bitrate (100 mbps), if you change the quality slider to high in Export & Share > Devices > Computer.
and gives an issue solution related to the setting of the project's Hardware Acceleration preference. The document's "Applies to:" information = Premiere Elements.

For important background information on the Hardware Acceleration preference of Premiere Elements 13/13.1 and later, please see

PE 13/13.1: Hardware Acceleration Preference (August 23, 2015)
http://atr935.blogspot.com/2015/08/pe-13131-hardware-acceleration.html

ISSUE

The principles for the Issue and Solution given by Adobe in this October 4, 2017 "Premiere Elements" document may or may not exist, but surely there exists flaws in the details given for the Issue.
  • In spite of the document's generalized "Applies to: Premiere Elements", it is not clear if the basic issue applies only to Premiere Elements 2018 or to Premiere Elements 13/13.1, 14/14.1, and 15 as well as 2018. See point 3 related to bitrate choice when Quality is set for low, mid, or high.
  • For the "export a file to 4K", the Adobe document's Figure for the Export & Share/Devices/Computer/ shows HD 1080 1920 x 1080 (MP4 - H.264) selected and not the 4K Ultra HD 3840 2160 (MP4 - XAVC-S).
  • The Premiere Elements 2018 4K Ultra HD 3840 2160 Quality choice offers bitrates of low = 40 Mbps, mid = 60 Mbps, and high = 100 Mbps (classically, Mbps = megabits per second). In contrast*, Premiere Elements 14/14.1, and 15 each has 4K Ultra HD 3840 2160 Quality bitrate values of low = 30 Mbps, mid = 100 Mbps, or high = 200 Mbps.
With the Hardware Acceleration preference selected in Premiere Elements 2018, the 4K Ultra HD 3840 2160 export was explored using the Quality bitrate = high 100 Mbps to determine if this preference setting affects the outcome.

RESULTS

With the Hardware Acceleration preference active, no problems were encountered exporting the Premiere Elements 2018 Timeline full 4K video to a 4K file set for video bitrate = 100 Mbps in Export & Share/Devices/Computer/4K Ultra HD 3840 2160 settings. The successful export to 4K file included
  • Export with Duration = 1 minute 21 seconds/File Size = 970 MB with burn time about 28 minutes
  • Export with Duration = 2 minutes 42 seconds/File Size = 1.93 GB with burn time about 54 minutes
  • Export saved to and found in the designated Documents on the Local C drive, and exported file playable with the QuickTime player v 7.7.9.

Details
Premiere Elements 2018 Expert workspace with Edit Menu/Preferences/General with a check mark next to the preference "Use Hardware Acceleration (Intel HD Graphics 2000 and newer)"  

Source video file used in these preliminary tests was a Panasonic GH4 4K video/audio file with the following properties**

Video Codec = avc1 with File Extension = .mp4
Frame Size = 3640 x 2160 pixels
Frame Rate = 29.97 fps with Frame Type = Progressive
File Size = 97.26 MB
Pixel Aspect Ratio = 1.0
Bitrate = 30.0 Mbps
Duration = 27.27 seconds

Audio Format = AAC with Audio Codec ID = 40
Bitrate = 157 Kbps with Maximum Bitrate = 237 Kbps
Sampling Rate = 48.0KHz 

Tests were run with either 3 or 6 of this file on the Premiere Elements 2018 Expert workspace Timeline. Computer was Windows 10 Home 64 bit.

COMMENTARY

My studies did not confirm the Issue reported by Adobe in its document
"Adobe Premiere Elements Does Not Export To 4K With High Bitrate". Consequently, more information from Adobe is needed to understand the conditions that caused Adobe to publish this document.

The overall impression is that this Adobe document used Premiere Elements 2018 for its model. More work needs to be done to determine if this specific Adobe Hardware Acceleration preference issue exists in versions of Premiere Elements earlier than 2018. As an aside, I have seen reports of a Hardware Acceleration preference issue involved in other problems in versions of Premiere Elements earlier than 2018. Refer to Introduction from HERE.


_____________________________________________________________________________
*In contrast to 2018, 15, and 14/14.1, Premiere Elements 13/13.1 has Publish + Share/Computer/XAVC-S and presets (two of which are MP4 - H.264 3840 x 2160 29.97p 30 Mbps and MP4 - H.264 3840 x 2160 29.97p 200 Mbps). In 13/13.1, this 4K export bitrate can be customized to 100 Mbps or higher in the Advanced/Export Settings dialog of the XAVC-S palette.
**Properties are from MediaInfo program.

Updates on this topic will be reported immediately as they develop and are seen.

ATR

Tuesday, November 28, 2017

PE2018: ClipMate

INTRODUCTION

ClipMate in conjunction with PremiereElements has been used to copy/paste insert between Premiere Elements projects. Prior blog posts here on the topic give history and specifics for the Premiere Elements versions. Important to refer to

PE: Copy Paste Opportunities Overview (May 6, 2017)
http://atr935.blogspot.com/2017/05/pe-copy-paste-opportunities-overview.html

PE: ClipMate Copy/Paste Between Projects (May 23, 2013)
http://atr935.blogspot.com/2013/05/pe-clipmate-copypaste-between-pe.html 

ISSUE

Does ClipMate 7.5 (latest version) work in conjunction with Premiere Elements 2018 (latest version) to do copy/paste inserts between Premiere Elements 2018 projects?

RESULT

Yes, Premiere Elements 2018 was found to work in conjunction with the tryout ClipMate 7.5 for copy/paste inserts between Premiere Elements 2018 Windows projects. The protocol for the current testing was the same as described in the May 23, 2013 blog post cited above. Key elements for the copy/paste insert between projects included successful paste inserts for transitions and audio as well as correct placement of narration in the Voice track and soundtrack in the Music track of the second project. However, important to remember that work was done using Video track 1/Audio track 1 and Voice and Music tracks arranged a described. Use of other track arrangements have not been explored  in depth in these works.

Correct ClipMate workspace selections continue to be important. And, ClipMate's Edit Menu/Capture Special check offs are just PPro/MZ/Cookie and PProAE/Exchange/TrackItem.

Also, getting the Paste Insert option in the second project's Edit Menu/Paste Insert remains sensitive in detail. What was true in 2013 is similar to what exists now. Refer to following excerpt from 2013 post cited above:
(f) Now the critical details of the paste insert in the second project. With this second Premiere Elements project window and the ClipMate window visible at the same time on the computer monitor screen (cascaded windows), make sure that the ClipMate entry for this copy/paste insert is highlighted, and then, in that second Premiere Elements project, Edit Menu/Paste Insert. Give the procedure a few seconds to complete. Most of the time those straight forward steps do not work. What consistently seems to work is

  • make sure correct ClipMate entry is highlighted in the ClipMate interface.
  • click once on a blank area in the second project's Video 1 track
  • then Edit Menu/Paste Insert, giving Edit Menu opening, the Paste Insert availability, and Paste Insert action a few seconds to be active.

COMMENTARY 

It was found that, for all intents and purposes, Premiere Elements 2018 and 15 work the same in the Premiere Elements/ClipMate copy/paste insert feature.

Also of interest, I may revisit this topic to explore what happens to blocks of paste insert content in the second project when tracks other than 1 are copied in first project - quick exploration is that Edit Menu's copy/paste insert option works for the physical copy paste but that the paste inserted content may not place where intended automatically.

Also, remember that ClipMate is a Windows only program.

Work in progress.

_______________________________________________________________________________

ATR

Wednesday, October 18, 2017

PE 2018: File Exports Set For H.264 Blu-ray, MPEG2 Blu-ray, Or H.264 AVCHD Formats

INTRODUCTION

Blu-ray and AVCHD burn to disc or ISO Image exists in Premiere Elements 15 (previous version), but has been removed in Premiere Elements 2018 (latest version just released). However, 2018 does appear to have some Blu-ray and AVCHD opportunities for file exports with the H.264 Blu-ray, MPEG2 Blu-ray, or H.264 AVCHD formats (See Export & Share/Devices/Custom/Advanced Settings.) The Multiplexer setting for the export dialog's selected format will determine whether or not the Timeline content exports a single file or multiple files. Generalizing, Multiplexing set for "Other Than None" = Timeline content export as single file; Multiplexer set for "None" = Timeline content as multiple files export.

ISSUE

Going from 15 to 2018, changes in available export settings were seen for Multiplexer for H.264 Blu-ray, H.264 AVCHD, and MPEG2 Blu-ray formats. Noted is the removal from 2018 of the TS Multiplexer option for these formats. No attempt was made here to go deeper into important related topics of using these exported file(s) for playback, for authoring to Blu-ray disc format on Blu-ray disc, for making quality and other comparison of Multiplexed (single file) and non Multiplexed (separated files) exports.

OBSERVATIONS

General

H.264 Blu-ray Format Premiere Elements 2018
Multiplexer choice only for None
H.264 Blu-ray Format Premiere Elements 15
Multiplexer choice for TS or None
H.264 AVCHD Format Premiere Elements 2018
Multiplex choice only for None
H.264 AVCHD Format Premiere Elements 15
Multiplexer choice of TS or None
MPEG2 Blu-ray Format Premiere Elements 2018
Multiplexing choice only for None

MPEG2 Blu-ray Format Premiere Elements 15
Multiplexing choice of TS or None

File(s) Export Related to Multiplexer Setting

Timeline video used in the tests below was 1920 x 1080/29.97 fps interlaced .mov file with PCM audio and bitrate about 47 Mbps (properties obtained from file's MediaInfo readout). The export dialog's Video tab settings were set for 1920 x 1080/29.97 fps interlaced (upper field first); Audio tab and Multiplexer tab settings were as indicated in tests below.

Premiere Elements 2018 Series
Test 1a
H.264 Blu-ray Format Premiere Elements 2018/Multiplexer = None/Audio Choice Only PCM
When Timeline exported, 4 files were obtained
.m4v (video)
.m4v.xmp (informational)
.m4v.xmpses (informational)
.wav (audio)

Test 2a
H.264 AVCHD Format Premiere Elements 2018/Multiplexer = None/Audio Choice Only PCM
When Timeline exported, 4 files were obtained
.m4v (video)
.m4v.xmp (informational)
.m4v.xmpses (informational)
.wav (audio)

Test 3a
MPEG2 Blu-ray Format Premiere Elements 2018 Multiplexer = None/Audio Choice Only PCM
When Timeline exported, 4 files were obtained
.m2v (video)
.m2v.xmp (informational)
.m2v.xmpses (informational)
.wav (audio)

Premiere Elements 15 Series

Test 1b
H.264 Blu-ray Format Premiere Elements 2018/Multiplexer = None Instead of Alternative TS/Audio Choice PCM Instead Of The Alternative Dolby Digital Choice In That Export Dialog 
When Timeline exported, export dialog Audio set for PCM instead of the alternative Dolby Digital choice in that export dialog, 3 files were obtained
.m4v (video)
.m4v.xmpses (informational)
.wav (audio)
Note: No .m4v.xmp file was obtained as obtained in 2018 comparable results. When Test 1b was repeated but with Audio choice of Dolby Digital instead of PCM, then the audio file obtained was an .ac3 file instead of .wav.

Test 2b
H.264 AVCHD Format Premiere Elements 2018/Multiplexer = None Instead Of Alternative TS/Audio Choice PCM Instead Of The Alternative Dolby Digital Choice In That Export Dialog
When Timeline exported with the export dialog Audio set for PCM instead of the Alternative Dolby Digital choice in that export dialog, 3 files were obtained
.m4v (video)
.m4v.xmpses (informational)
.wav (audio)
Note: No .m4p.xmp file was obtained as obtained in 2018 comparable results. When Test 2b was repeated but with Audio choice of Dolby Digital instead of PCM, then the exported audio file obtained was an .ac3 file instead of .wav.

Test 3b
MPEG2 Blu-ray Format Premiere Elements 2018 Multiplexer = None Instead Of Alternative TS/PCM Only Audio Choice
When Timeline exported, x files obtained
.m2v (video)
.m2v.xmpses (informational)
.wav  (audio)

Note: When Test 1b, 2b, 3b were repeated with Multiplexer = TS, the Timeline content for each exported as one file with a .m2t file extension.

COMMENTARY

In going from 15 to 2018, exporting with H.264 Blu-ray, H.264 AVCHD, or MPEG2 Blu-ray formats  in the path Export & Share/Devices/Custom/Advanced Settings
  • loss of the export setting for Multiplexer's TS option which would offer export of Timeline as the single file (.m2t file extension)
  • Timeline content exported as 4 files instead of 3 when Multiplexer = None
  • addition of a .xmp file to the list of files generated when Timeline content is exported as multiple files in the Multiplexer = None condition....See HERE for a description of .xmp file extension and HERE for a description of the .xmpses file extension.
The above details were not seen in October 4, 2017 Adobe document "Common settings for sharing" found HERE.


Work in progress

ATR

Thursday, October 12, 2017

PE 2018: Keyboard Shortcuts

INTRODUCTION

The Premiere Elements 2018 Windows keyboard shortcuts found in the Expert workspace's Edit Menu/Keyboard Shortcuts/Application and Windows categories are listed in this blog post. For earlier blog posts written on the topic for other versions, please see

PE 13: Keyboard Shortcuts
http://atr935.blogspot.com/2014/10/pe-13-keyboard-shortcuts.html
PE 14: Keyboard Shortcuts
http://atr935.blogspot.com/2015/10/pe-14-keyboard-shortcuts.html 
PE 15: Keyboard Shortcuts
http://atr935.blogspot.com/2016/10/pe-15-keyboard-shortcuts.html

ADOBE PREMIERE ELEMENTS FACTORY DEFAULTS FOR VERSION 2018

Application


                                                                         more Clip


                                                                         more Text


more Help


Windows


                                                                         more Monitor


 COMMENTARY

There exists just a few changes in the Keyboard shortcut function/command opportunities going from Premiere Elements 13, 14, 15, and 2018. The above was prepared from what was seen in my Premiere Elements 2018 Windows 7 Professional SP1 64 bit (Expert workspace/Edit Menu/Keyboard Customization/Application and Windows categories). All is being triple checked for accuracy in what is presented here. If any errors found in the above, it will be reported here immediately.


IMPORTANT

The original Tables published in this blog post have been replaced today October 13, 2017 with corrections that escaped notice when this blog post was originally published here. Apologizes for corrections due to Save failures during correction of Master files to 2018 information. I will continue to monitor for any further oversights.


ATR

Tuesday, October 10, 2017

Premiere Elements 2018 Daily Discoveries

INTRODUCTION

I am still in the early stages of doing an overall "First Look" at Premiere Elements 2018. See HERE for that work in progress. The Daily Discoveries for this newly released version will be included below as they catch my attention in going through the "First Look" and moving forward with the new version (currently using the Trial version on Windows 7 Professional SP 64 bit).

October 10, 2017. Editing Theme Title Text In The Newly Formatted Elements Organizer 2018 Slideshow.
The Elements Organizer 2018 Slideshow offers 7 slideshow themes named: WaterColor, Black & White, Woods, Pan & Zoom, City Lights, and Classic. They all appear to open with a default title for the applied theme, that is, title "Memories" and a subtitle that appears to be related to the date that the medium was taken. That default title and subtitle text can be changed when in the Preview Media workspace by
  • Clicking on the Media tab at top left of the Preview Media's workspace to bring up the display of media that have been included in the slideshow
  • Bringing up the dialog for the theme title change by double clicking the thumbnail for the theme or right clicking the thumbnail for the theme, followed by clicking on Edit option.
Also refer to Adobe Premiere Elements Slideshow documentation found HERE.

October 11, 2017. Accessing A Guided Edits Tutorial From Guided Workspace In Order To Work With That Tutorial in Expert or Quick Workspace.
In Premiere Elements 14/14.1, the path to a Guided tutorial  to be followed in the Expert workspace was started by clicking on Expert tab followed by Guided tab in the row of Premiere Elements 14/14.1 workspace tabs. At that point and moving forward, both the Expert and Guided workspace tabs remained highlighted in black during this feature. Use of Quick Guided also displayed highlighting of both Quick and Guided workspace tabs.

In the case of Premiere Elements 15 and 2018, the selection path is Expert tab (or Quick tab if tutorial is done in Quick workspace) followed by Guided tab, but then only the Guided tab remains highlighted in this feature.

October 12, 2017. Camera Raw Version Shipped With Premiere Elements 2018 and Photoshop Elements 20l8. 
Both Elements 2015 (prior version) and Elements 2018 (newly released version) have Camera Raw plugin version 9.12.0.784 as its latest supported Camera Raw version. The Premiere Elements 2018 Photoshop Elements 2018 (newly released Trail versions) being explored show the Camera Raw plugin version 9.12.0.784 with no opportunity for update for it at this time October 12, 2017. (See project's Help Menu/Updates).

However, there is a Camera Raw 12.12.1 version that was released September 6, 2017. This Camera Raw 12.12.1 seems not to have made it yet to the Elements family. This latest Camera Raw version now supports Nikon D850 raw nef images. (As expected, a Nikon D850 raw ref image would not open in Photoshop Elements 15 or 2018 with Camera Raw version 12.12.0.784).

The Adobe document "Camera Raw Differences Between Photoshop and Photoshop Elements" may be of interest. See HERE.


October 12, 2017. Reminder: For Those Considering Premiere Elements 13/13.1 "Burn to" Bluray or AVCHD Opportunities As Alternative To Premiere Elements 2018's Lack Of Support For Bluray And AVCHD "Burn To".
Please refer to
PE: Important Announcements Sticky Blog Post and the March 1, 2016 Entry
http://atr935.blogspot.com/2016/03/pe-important-annoucements-sticky-blog.html
PE: ISO Images (Burn to, Opening, Virtual Burners/Virtual Discs)
http://atr935.blogspot.com/2016/03/pe-iso-images-burn-to-opening-virtual.html

The "Burn to" flaws in Premiere Elements 13/13.1 have not made that version my version of choice for Premiere Elements Windows "Burn to" workflows. This situation was first reported by another and confirmed by others as well as myself.

October 15, 2017. Premiere Elements 2018 Windows 64 bit Guided Lessons: Basics, Video Adjustments, Audio Adjustment, And Fun Edits Categories And Content In Each (As Seen Within Project's Guided Category).
Basics
Get Started
Trim and split clips
Add Transitions between clips
Add titles
Video Adjustments
Fix brightness, color, and contrast
Color Pop
Animate graphics
Add an adjustment layer
Fix action cam footage (NEW)
Audio Adjustments
Add narration
Add a music score
Fun Edits
Put a video inside your title
Create slow or fast motion effect
Create a picture-in-picture effect
Apply an effects mask
Create a freeze frame with a motion title (NEW)
Create an animated social post (NEW)
Create Bounce Back Effect

October 16, 2017. Expert Workspace Video And Audio fx Effects Count For
Premiere Elements 2018 Windows 64 bit:
The video and audio fx Effects in 2018 versus 15 appear to be the same.
For the Expert workspace, under the fx icon/Video tab, there is a total of 20 categories/372 effects which are itemized below as category/number of effects in category:

Under Video Tab
Advanced Adjustments/8
Blur & Sharpen/5
Channel/2
Color Correction/3
Distort/8
Generate/2
Image Control/4
Keying/14
New Blue Art Effects Elements/9
New Blue Cartoonr Plus/1
New Blue Film Look/1
Perspective/4
Pixelate/1
Render/2
Stylize/10
Time/2
Transform/8
Videomerge/1
Presets
...Bevel Edges/2
...Blurs/2
...Color Effects/13
...Drop Shadows/8
...Horizontal Image Pans/12
...Horizontal Image Zooms/12
...Mosaics/2
...PiPs
......25% PiPs/96
......40% PiPs/96
...Solarizes/2
...Twirls/2
...Vertical Image Pans/12
...Vertical Image Zooms/12
Hollywood Looks/16 

Under Audio Tab
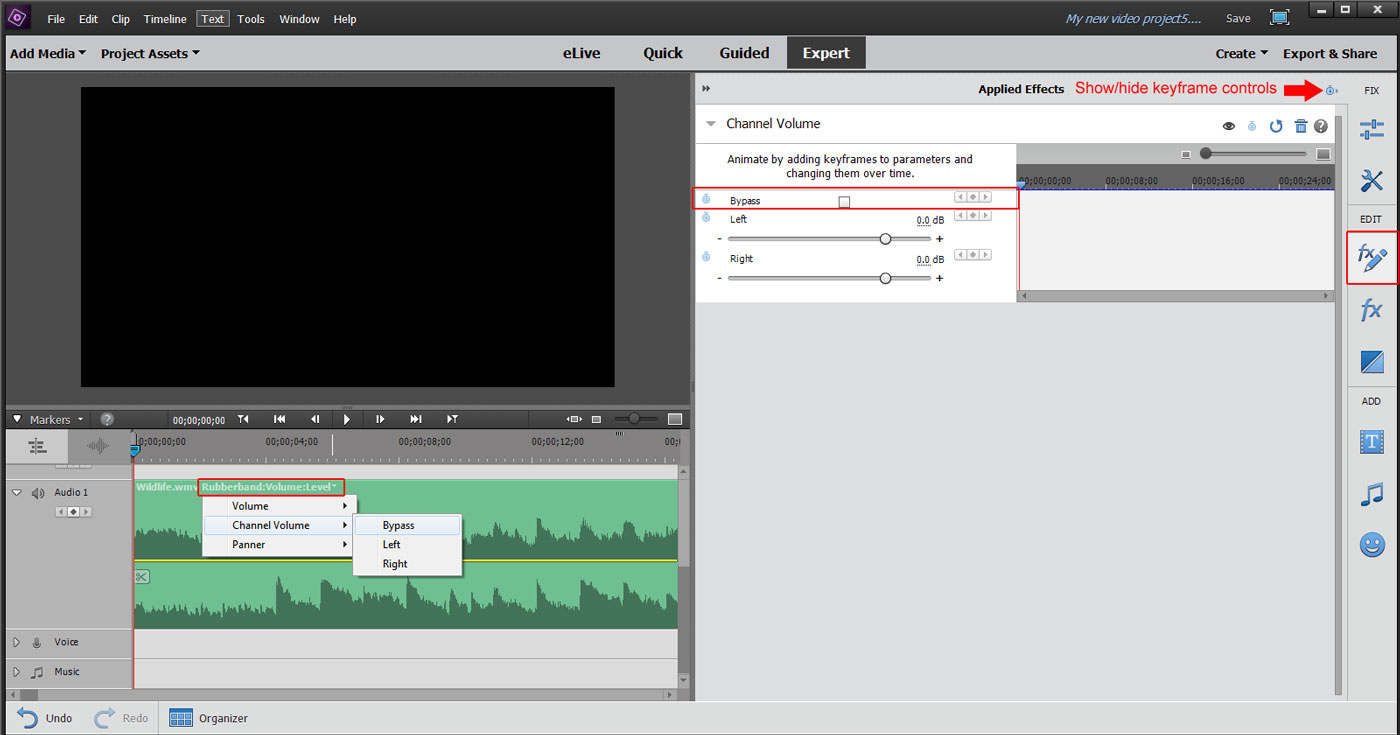
For the Expert workspace, under the fx icon/Audio tab, there are no categories/19 effects which are:
Channel Volume
Delay
De Noiser
Dynamics
Fill Left with Right
Fill Right with Left
Highpass
Invert
Lowpass
New Blue Audio Polish
New Blue Auto Mute
New Blue Cleaner
New Blue Hum Remover
New Blue Noise Fader
New Blue Noise Reducer
PitchShifter
Reverb
Simple Notch Filter
Swap Channels
Note: The "Simple Notch Filter" in 2018 seems to be just a rename of Notch found in 15 (same Center (Hz) and Q sliders as well as a Bypass option). 
Reminder: For both 2018 and 15, no audio effects are in Quick workspace, and there are only 20 of the 372 video effects that are available in Expert workspace.   

October 16, 2017. Expert Workspace Graphics Count For Premiere Elements 2018 Windows 64 bit.
No new graphics were found under the Graphics icon located in the vertical bar to the right of the 2018 Expert workspace. As it is in 15, 2018 Graphics offers 13 categories/359 graphics which are itemized below as category/number of graphics in category. Underlined category below contains graphics content that must be downloaded in the opened project before use. Refer to content availability principle HERE.

Animals Birds and Insects/13
Animated Objects/18
Baby/21
HD Animated Objects/12
Costumes/39
Thought and Speech Bubbles/24
Food/12
Holidays and Special Occasions/55
Home/31
Miscellaneous/67
Music/6
Nature/46
Sports and Hobbies/15

Reminder: For both 2018 and 15, Quick workspace only offers 15 of the numerous graphics available in the Expert workspace.

October 18, 2017. Expert Workspace Video And Audio Transition Count For
Premiere Elements 2018 Windows 64 bit:
The video and audio Transitions offered in 2018 versus 15 appear to be the same.
For the Expert workspace, under Transitions icon/Video tab, there is a total of 15 categories/103 transitions which are itemized below as category/number of transitions in category:

Under Video Tab
3D Motion/10
Dissolve/8
Iris/7
Map/2
New Blue 3D Explosions Elements/8
New Blue 3D Transformations Elements/6
New Blue Art Blends Elements/8
New Blue Motion Blends Elements/7
Page Peel/5
Picture Wipes/3
Slide/12
Special Effects/2
Stretch/4
Wipe/17
Zoom/4

Under Audio Tab
For the Expert workspace, under the Transitions icon/Audio tab, there is 1 category/2 transitions which are itemized below as category/number of transitions in category:

Crossfade/2

Reminder: For both 2018 and 15, no audio transitions are available in Quick workspace, and Quick workspace has only 16 of the 103 video transitions that are available in Expert workspace.

October 18, 2017. Expert And Quick Workspaces Music Count For Premiere Elements 2018 Windows 64 bit:
In going from 15 to 2018, the same music scores and sound effects are found. And, in either version, the Quick workspace has available to it all the music scores and sound effects available in the Expert workspace. Under the ADD/Music tab/Music Score, there are 7 categories/52 music scores. Each music score  must be downloaded in the opened project before use. Refer to content availability principle HERE. Under the ADD/Music tab/Sound Effects, there are 13 categories/268 sound effects. The music scores and sound effects are itemized below as category/number of items in category:

Music Score
Ambient/6
Atmospheric/8
Blues/2
Country/5
Rock-Pop/22
Urban/4
Weddings/5

Sound Effects
Ambience/49
Animals/10
Cartoon Effects/20
Crashes/10
Fire and Explosions/18
Foley/30
Impacts/20
Industry/10
Liquids/10
Science Fiction/30
Technology/30
Transportation/11
Weather/20

October 18, 2017. "Outdoor Adventure" Instant Movie Theme Error Still Has Not Been Fixed In The Newly Released Premiere Elements 2018.
Missing media patches continue to display in the finished Instant Movie which is created with the Event/"Outdoor Adventure" theme. This problem and possible fix for the issue were described HERE back in 2014 in the blog post "PE: Instant Movie Theme "Outdoor Adventure Glitches".
Note: It is not clear why this known issue has not been fixed by Adobe.

October 18, 2017. 2018 Expert And Quick Workspaces Instant Movie Themes Count For
Premiere Elements 2018 Windows 64 bit.
No new Instant Movie themes were found for Instant Movie feature in the new version. As it is in 15, 2018 Instant Movie offers 5 categories/41 themes which are itemized below as category/number of themes in category. With the exception of the default Slideshow/Pan and Zoom theme, each theme must be downloaded in the opened project before use. Refer to content availability principle HERE.

Slideshow/2
Events/12
Memories/3
Pets/2
Style/22

Theme availability is the same in the Expert and Quick workspaces.

October 27, 2017. Camera Raw For Photoshop Elements 2018/Premiere Elements 2018 Updated To Camera Raw Version 10. (For My Earlier Information On The Camera Raw Version For Elements 2018, Also Refer To The October 12, 2017 Entry In This Daily Discoveries Blog Post.)
New Camera Raw Version 10 was found available for updating under the Help Menu/Updates accessed from either the Photoshop Elements 2018 Editor or Premiere Elements Editor. The following are some links to related Adobe documents:
Updates for Photoshop Elements and Camera Raw
https://helpx.adobe.com/photoshop-elements/release-note/update.html 
Cameras supported by Camera Raw
https://helpx.adobe.com/photoshop-elements/release-note/update.html
Process camera raw image files
https://helpx.adobe.com/photoshop-elements/using/processing-camera-raw-image-files.html
Adobe Digital Negative Converter
https://helpx.adobe.com/photoshop/using/adobe-dng-converter.html 

Reminder/Example: Install of Photoshop Camera Raw plug-in now enables editing Nikon D850 nef raw (or dng) image format in the Camera Raw 10 dialog which opens in Photoshop Elements 2018, but only allows for importing the Nikon D850 nef raw (and .dng) images into a Premiere Elements 2018 project. The requirements for the processes involve

  • Camera Raw version must support the camera that created the raw image format
  • Photoshop Elements/Premiere Elements version must support the version of Camera Raw installed
December 9, 2017. Language Set During Program Installation...Photoshop Elements 2018 Versus Premiere Elements 2018.
The installation language options were found to be the same for those in try out version as compared to purchased Photoshop Elements 2018/Premiere Elements 2018 combination on DVD installation disc.
Note: Photoshop Elements 2018 installation language options included Korean, Traditional Chinese, Simplified Chinese whereas Premiere Elements 2018 installation language choices included Simplified Chinese but not Korean and Traditional Chinese. Same situation exists for Photoshop Elements 15/Premiere Elements 15.

February 7, 2018. Possible Source Of Confusion Related To How Adobe Named Its Latest Premiere Elements Version.
Naming of the latest version of Premiere Elements was pointed to at the beginning of the Premiere Elements 2018 First Look blog post found HERE and read
According to online reports, on October 4, 2017 Adobe announced the release of Premiere Elements 2018 as the latest version of Premiere Elements, the successor to Premiere Elements 15. What's New appears to be headed by a change in the version numbering. Starting with this latest release, the version name for subsequent versions will take on the upcoming year of the release rather than following the prior numbering system of 1, 2, 3, 4, 7, 8, 9, 10, 11, 12, 13, 14, and 15.
Although the latest version of Premiere Elements is marketed as Premiere Elements 2018, the installed "Premiere Elements 2018" has places where the program is identified as "16". This "16"  would be in keeping with the prior numbering system of 1, 2, 3, 4, 7, 8, 9, 10, 11, 12, 13, 14, and 15. Recently I saw one instance where Premiere Elements 2018 was referred to as Premiere Elements 18. At this time, it is not known how frequently "18" is being used instead of "2018" especially in online posts, and I wonder about the potential for confusion between 18, 2018, and 16 in sorting out versions moving forward.
Work in progress, always rechecking for accuracy.

ATR

Wednesday, October 4, 2017

Premiere Elements 2018 First Look

INTRODUCTION

According to online reports, on October 4, 2017 Adobe announced the release of Premiere Elements 2018 as the latest version of Premiere Elements, the successor to Premiere Elements 15. What's New appears to be headed by a change in the version numbering. Starting with this latest release, the version name for subsequent versions will take on the upcoming year of the release rather than following the prior numbering system of 1, 2, 3, 4, 7, 8, 9, 10, 11, 12, 13, 14, and 15.

I will be taking a first hand look at all aspects of Premiere Elements 2018 in this blog post in the days to come.

Today, the following Adobe online information for this new version caught my attention

http://www.adobe.com/products/premiere-elements/buying-guide.html
The page includes links for Features, Reviews, Learn & Support, Buying Guide, Free Trial, Elements 2018 Family, and Buy Now. The "buying guide" information includes the comparison of Premiere Elements 13, 14, 15, and 2018. The "Elements 2018 Family"  members are pointed to as Photoshop Elements 2018, Premiere Elements 2018, and Photoshop Elements 2018 in combination with Premiere Elements 2018.

Download of Premiere Elements 2018 was started using the Free Trial link in the Adobe link cited above. After the sign in with the Adobe ID and Password, the System Requirements seen before download include Windows 64 bit only requirement (same as for Premiere Elements 15). When actually setting up for the download, language selection includes
Windows
French
Italian
Japanese
Dutch
Polish
Russian
Swedish
Turkish
Chinese - Traditional (here, but not included in the System Requirements Free Trial details)
Chinese - Simplified  (here, but not included in the System Requirements Free Trial details)
Czech
German
English
Spanish
Mac
French
English
Japanese
German

I set the Free Trial for the English language. The name of the file downloaded to the my computer Downloads was PremiereElements_2018_LS31_win64.exe. Install was shown as 5.6 GB. In the Options dialog during installation, the language selection included (as written)
English (North America)
Deutsch
Espanol
Francais
Italiano
Nederlands
Svenska
Polski
Cesky
Pyccknn
日本語 (Characters for Japanese)
简体中文 (Characters for Simplified Chinese)

The Free Trial period of use was listed as 30 days.

For those interested in Photoshop Elements 2018, Adobe's overall getting started information for that product can be found at the following Adobe link which includes a Free Trial download link.
https://www.adobe.com/products/photoshop-elements/download-trial/get-started.html 
It was interesting to note that during installation of Photoshop Elements 2018 (install 4.0 GB), the Option dialog's language selection included Traditional Chinese and Korean as well as Simplified Chinese.

WHAT'S NEW
(at first glance)

According to the Adobe "What's New In Adobe Premiere Elements" document
https://helpx.adobe.com/premiere-elements/using/whats-new.html 
the Premiere Elements 2018 "New Features" include the following

Candid Moments
Adobe how to details found at
https://helpx.adobe.com/premiere-elements/using/candid-moments.html 

Smart Trim
Adobe how to details found at
https://helpx.adobe.com/premiere-elements/using/smart-trim.html

Create A Freeze Frame With Motion Title Guided Edit
Adobe how to details found at
https://helpx.adobe.com/premiere-elements/using/freeze-frame-with-motion-title.html

Create Bounce Back Effect Guided Edit
Adobe how to details found at
https://helpx.adobe.com/premiere-elements/using/create-bounce-back-effect.html 

Fix Action Cam Footage Guided Edit
Adobe how to details found at
https://helpx.adobe.com/premiere-elements/using/create-bounce-back-effect.html 

Create An Animated Social Post Guided Edit
Adobe how to details found at
https://helpx.adobe.com/premiere-elements/using/creating-animated-social-post.html

Also, the Elements Organizer 2018 slideshow has a new format and is described by Adobe HERE. That Adobe document also includes a link to the Elements Organizer 2015 slideshow details.

A separate "First Look & Try" blog post will be created for each of the above. The Adobe documentation appears to be comprehensive for the new features; nonetheless, the new features will be "road tested" and commented on in the blog posts here moving forward.

WHAT'S DIFFERENT
(at first glance)

New Version Naming System.
Release year in new version name instead of sequential numbering; consequently, new release is named Premiere Elements 2018 instead of Premiere Elements 16.
Note: In Expert workspace Help Menu/About Adobe Premiere Elements, the rolling display is topped with name Adobe Premiere Elements 2018 with Adobe Premiere 16 in small print underneath that.

Burn To Disc, ISO IMAGE, And Folder Opportunities Gone For Blu-ray And AVCHD.
Export & Share/Disc presents with a DVD tab only with Type choices of Disc, ISO Image (4.7 GB), ISO Image (8.5 GB) and with Resolution for SD 576 720 x 576 or SD 480 720 x 480. A standard versus standard widescreen burn to appears to be related to need for the NTSC DV versus PAL DV project preset.

This feature removal is a serious consideration for those considering going to Premiere Elements 2018 from a Premiere Elements version earlier than Premiere Elements 2018. Also see Adobe's October 4, 2018 document "How To Share To DVD or Blu-ray"
This link content states "Blu-ray and AVCHD disc burning is not supported in Adobe Premiere Elements 2018". Although not stated and no Blu-ray and AVCHD tabs were found under Export & Share/Disc, it is assumed that Premiere Elements 2018 also does not support Blu-ray and AVCHD burn to ISO Image or Folder or Disc.

TOUR OF PREMIERE ELEMENTS 2018 Windows 64 Bit WORKSPACES 
(with comparisons to prior version Premiere Elements 15 Windows 64 bit details..reference "Premiere Elements 15 First Look found HERE and follow the companion "Premiere Elements 2018 Daily Discoveries" blog post found HERE.)

The Premiere Elements 2018 program opens to workspaces that look the same as those seen in Premiere Elements 15. Minor differences, if any, are found opening a workspace's tabs and menus.

Figure 1. Premiere Elements 2018 Windows 64 bit Expert Workspace.
Figure 2. Premiere Elements 2018 Windows 64 bit Quick Workspace.
Figure 3. Premiere Elements 2018 Windows 64 bit Guided Workspace.
Expert Workspace (refer to Figure 1)
  • Add Media: 2018 and 15 options same.
  • Project Assets Palette: 2018 and 15 options same.
  • Workspaces Availability: 2018 and 15 same tabs for Expert, Quick, Guided, and, in some countries, eLive.
  • Easy Access Tabs Found In Middle Of Screen At Project Start Up open to same features in 2018 as in 15. Easy Access Tab's "Add Media" opens the Add Media Tab at the top left of the Expert workspace; "Create a template based movie" opens Create Tab to reveal Video Story, Instant Movie, and Video Collage; "Tell a story using Titles" opens to Titles display; "Learning video editing" opens to Guided workspace/Guided Edits choices.
  • Create Tab still houses the features for Video Story, Instant Movie, and Video Collage.
  • Export & Share Tab still houses choices of Quick Export, Devices, Disc, Online, Audio, and Image, but...now there is only a DVD choice under Disc, no more Blu-ray or AVCHD opportunities...more on this area to come.
  • File, Edit, Clip, Timeline, Text, Tools, Window, and Help Menus have same options (2018 vs 15) with following exceptions: Tools Menu now includes the Candid Moments option and no longer includes Favorite Moments.
  • FIX, EDIT, ADD opportunities in vertical bar to right of Expert workspace have same content (2018 vs 15) with the following exceptions: under Tools icon in that vertical bar, Candid Moments has been added to the options there, and no longer includes Favorite Moments. No new effects were found under EDIT/fx Effects (video and audio), EDIT/Transitions (video and audio), ADD/Music (Music Score and Sound Effects), and ADD/Graphics. More later on Titles content accessed in this vertical bar. Note: only the EDIT/fx Effects (video and audio), EDIT/Transitions (video and audio), ADD/Transitions (video and audio), ADD/Music (music scores and sound effects), and ADD/Graphics counts have  been done so far.
  • Organizer Tab is located at bottom left of workspace for an access to the Elements Organizer.


Quick Workspace (refer to Figure 2)
  • Add Media: 2018 and 15 options same.
  • No Project Assets Palette: 2018 and 15 options same.
  • Easy Access Tabs Found In Middle Of Screen At Project Start Up open to same features in 2018 as in 15. Easy Access Tab's "Add Media" opens the Add Media Tab at the top left of the Quick workspace; "Create a template based movie" opens Create Tab to reveal Video Story, Instant Movie, and Video Collage; "Tell a story using Titles" opens to Titles display; "Learning video editing" opens to Guided workspace/Guided Edits choices.
  • Create Tab still houses the features for Video Story, Instant Movie, and Video Collage.  
  • Export & Share Tab still houses choices of Quick Export, Devices, Disc, Online, Audio, and Image, but...now there is only a DVD choice under Disc, no more Blu-ray or AVCHD opportunities...more on this area to come.
  • File, Edit, Clip, Timeline, Text, Tools, Window, and Help Menus have same options (2018 vs 15) with following exceptions: Tools Menu now includes the Candid Moments option and no longer includes Favorite Moments. Reminder: Remove Effects option is only option available in Quick workspace Clip Menu (2018 or 15).
  • FIX, EDIT, ADD opportunities in vertical bar to right of Quick workspace have same content (2018 vs 15) with the following exceptions: under Tools icon in that vertical bar, video tools now has Candid Moments included, and Favorite Moments has been removed. No new effects were found under Edit/fx Effects, EDIT/Transitions, and ADD/Graphics. More later on Titles content accessed in this vertical bar. Note: only the EDIT/fx Effects, EDIT/Transitions, ADD/Music (music scores and sound effects), and ADD/Graphics counts have been done so far. Reminder: Quick workspace (2018 or 15) has only 20 of the numerous video fx Effects, 16 of the numerous video transitions, all of the music scores and sound effects, and 15 of the numerous graphics that are available in the Expert workspace.
  •  Organizer Tab is located at bottom left of workspace for an access to the Elements Organizer.


Guided Workspace (refer to Figure 3)

In Premiere Elements 2018 Windows 64 bit, same lesson themes are use in both the Quick Guided and Expert Guided workspaces. The lesson themes are
  • Basic (4)...same in 2018 and 15.
  • Video Adjustments (5)...1 new in 2018: "Fix action cam footage" plus 4 same in 2018 and 15.
  • Audio Adjustments (2)...same in 2018 and 15.
  • Fun Edits (7)...3 new in 2018: "Create a freeze frame with a motion titles", "Create an animated social post", and "Create Bounce Back Effect" plus 4 same in 2018 and 15.

Reminder:
In Premiere Elements 14/14.1, the path to a Guided tutorial  to be followed in the Expert workspace was started by clicking on Expert tab followed by Guided tab in the row of Premiere Elements 14/14.1 workspace tabs. At that point and moving forward, both the Expert and Guided workspace tabs remained highlighted in black during this feature. Use of Quick Guided also displayed highlighting of both Quick and Guided workspace tabs.

In the case of Premiere Elements 15 and 2018, the selection path is Expert tab (or Quick tab if tutorial is done in Quick workspace) followed by Guided tab, but then only the Guided tab remains highlighted in this feature
.


___________________________________________________________________________

To be continued
Work in progress, always rechecking for accuracy.

For miscellaneous notes to myself during this Premiere Elements 18 First Look, please refer to the Premiere Elements 2018 Daily Discoveries blog post found HERE (also a work in progress).


ATR


Wednesday, September 27, 2017

PE 15: DVdate Plugin For Timecode Within Timeline Video Clip

INTRODUCTION

The DVdate plugin for Adobe Premiere Elements* allows the user to apply a timecode within the Timeline video clip. I last explored this plugin in 2014 in Premiere Elements 10, 11, and 12. It worked well. For details, please refer to a Premiere Elements forum discussion** back in 2014. See HERE. The following important DVdate source and setup details from that discussion are excerpted for convenience

I just downloaded the DVdate plug-in. Road tested 10, 11, or 12 Premiere Elements with Windows 7 64 bit).

Download DVdate plug-in from link given in post 1.

It is a bit of a detour for 11 and 12, but...

Double click the downloaded DVdateSetup.exe to start its installation.
When you get to the dialog for selection the destination, select
Target Application
"Adobe Premiere Elements 10.0, 11.0 (64 bit)"
and, below that, for Folder accept
"C:\Program Files\Adobe\Adobe Premiere Elements 10\Plug-ins\en_US"

This will put the plug-in in the version 10 location. After the installation is successful in 10, then I copied the DVdate Folder in the 10 en_US Folder and pasted it in the comparable location for versions 11 and 12.

In versions 11 and 12, the DVdate plug-in is found in Expert workspace/fx Effects Tab/Video/DVdate. After you drag the effect into the clip, you edit the effect via Applied Effects/Applied Effects Palette/DVdate Panel. In the DVdate Panel is a Setup icon. Click on that for the complete setup.

Version 10, its Edit Header/Effects/Video Effects/Video/DVdate. And, then Edit Effects for the Properties Palette and its DVdate Panel with the Setup icon.

The DVdate Folder in the en_US Folder contains files named 409.Ing, 419.Ing, DVdate.prm, DVdate409.chm, and DVdate419.chm. Open the DVdate409.chm for how to use in project. The author of the DVdate409.chm file is Ilya Topolnitsky with copyright dated 2012. 

ISSUE

When that DVdate Folder stored from the 2014 time was copied in 2017 into Premiere Elements 15
C:/Program Files/Adobe/Adobe Premiere Elements 15/Plug-ins/en_US (on Windows 7 Professional SP1 64 bit or Windows 10 Home 64 bit) it functioned well.

If a user has the DVdate Folder still installed on his/her computer, this DVdate plugin should work for him/her as described above. The DVdate Setup.exe appears to be no longer available online. Please refer to DVdate plugin availability comment in the COMMENTARY section of this blog post.


SOLUTION

In the absence of using stored older download, there appears to be no solution for use of DVdate plugin in conjunction with Premiere Elements when wanting to insert timecode into Premiere Elements Timeline video. The unavailability of the DVdate Setup.exe/DVdate Folder appear to be the limiting factor.

COMMENTARY

I am still searching online for possible archived DVdate plugin files. The following may be a possible source, but I am hesitant to download from an archived web site that is unknown to me. The link referred to is
https://archive.is/73WLO which I have left inactive in this post.

A program named DVMP-Pro 6.3 might be a consideration for insertion of a timecode within Timeline video, but it is not free, and I have not downloaded nor tested it in conjunction with any version of Premiere Elements.

ADD ON entered into this blog post on December 10, 2017.
Current version 2018 as well as earlier versions of Premiere Elements do not come with a built in feature for applying timecode to a video.

_______________________________________________________________________________
* With my computers, I did not experience any security issues when opening the active link https://archive.is/WLVqF used here for the archived description of the exact 2014 source of my DVdate plugin.
** I no longer visit the Adobe Premiere Elements forum, consequently I will not respond to 2017 follow up questions added to that 2014 thread. Hopefully, the details above will update my views of the DVdate plugin used in conjunction with Premiere Elements.


ATR

Tuesday, September 26, 2017

PE: Audio Volume/Audio Effects Bypass Option

INTRODUCTION

In a Premiere Elements forum in 2015 I gave the following description of Volume Bypass to a Premiere Elements user who was then using version 10. The following is an excerpt of what I wrote at that time:

When your audio comes into the project, it is assigned a 0 dB value. That value represents the volume of the file as recorded by the recording device.
You can lower or increase the volume at the Timeline level by moving the audio file's orange "Volume Clip Volume" rubberband up or down. All the way to the top represents +6 dB, and all the way to the bottom represents infinity. The "Volume Bypass" option is going to work for you as long as the Volume reading is no longer 0 dB.
The "Volume Bypass" orange line rubberband is a different line than that for the "Volume Clip Volume". "Volume Clip Volume" deals with setting the Volume whereas "Volume Bypass" allows you to decide what segments of the Volume change that you want be to heard without going back to Volume Clip Volume to make Volume adjustments.
When you set the audio clip for Volume Bypass, it is normal for the Volume Bypass orange line to be all the way to the bottom (Off) because that represents the Volume Bypass letting you hear the Volume change that you made. It is allowing you to hear however you adjusted the Volume away from 0 dB. With Volume Bypass, you decide what segments of that Volume change across the clip you want heard and do not want to be heard without having to go back to the Volume Clip Volume's orange rubberband. In the Volume Clip Volume phase, if you have set audio fade in and fade out, then you make sure that Volume Bypass is Off at those times. Also, consider, do you really need or want Volume Bypass in your workflow? What benefit is it to your audio for the effect that you are trying to achieve?
Also refer to the following related follow ups to the topic

PE12: Audio Features
May 2, 2014
http://atr935.blogspot.com/2014/05/pe12-audio-features.html

PE: Rubberband Options Detailed
March 20, 2014
http://atr935.blogspot.com/2014/03/pe-rubberband-options-detailed.html

PE 11: Video and Audio Track Content Rubberband
June 9, 2013
http://atr935.blogspot.com/2013/06/pe11-video-and-audio-track-rubberband.html

ISSUE

Since not yet reported here for current version Premiere Elements 15 and since there was some interest in the topic, the ON/OFF for Premiere Elements 15's Audio Bypass options were revisited at the levels of the Timeline rubberband, Audio Adjustments, audio effects found under Applied Effects.

OBSERVATIONS

Audio Bypass Options

Applied Effects/Audio Effects
After application of any of the audio effects found under fx Effects/Audio/Audio Effects, the related Applied Effects Palette then contains the audio effect's viewing/editing panel which includes a Bypass option*. That Bypass option
  • is keyframeable with views for setting/editing/and viewing the set keyframes when "Show/hide keyframe controls" is activated in the Applied Effects Palette.
  • has an On Off feature with On = check mark in its box, and Off = removal of any check mark in its box (single click on box toggles this On Off).
Figure 1. Premiere Elements 15. Audio Effects Bypass Option in Applied Effects Palette. Channel Volume Audio Effect Is Used For Demonstration Purposes. Show/Hide Keyframe Controls View.
The audio Bypass here can be seen at the rubberband Timeline level as well as the Applied Effects/"Show/hide keyframe controls" level. But extra steps are needed to work with the Bypass keyframes at the Timeline level.
  • The audio clip's default rubberband is for Volume Level and needs to be changed to "Rubberband: Channel Volume:Bypass" in the clip's title (in Figure 1 Timeline, see Channel Volume/Bypass after click on the tiny triangle at the end of the clip's title).
  • Must do step - right click Timeline audio clip, select "Show Clip Keyframes"/Channel Volume/Bypass. The Bypass keyframes are editable at the rubberband level.
  • At the Timeline rubberband level, the audio Bypass is Off when the rubberband is at the bottom of the clip and On when the rubberband is at the top of the clip.
Adjustments/Audio Adjustments

Audio clips placed on the Timeline present with adjustment options for Volume, Balance, Treble, Bass, and Audio Gain. None of the panels in the Adjustment Palette were found to offer a Bypass option. With the exception of Audio Gain, the other adjustments were each found to be keyframeable when done with "Show/hide keyframe controls" activated view of its opened panel. It appeared that any Bypass option for these adjustments are in conjunction with the Timeline rubberband activity.

Figure 2. Premiere Elements 15. Audio Adjustments In Conjunction With Timeline Rubberband Access To An Audio Bypass Option. Bass Adjustment Is Used For Demonstration Purposes. Adjustment Palette's Show/Hide Keyframe Controls View.
In order to get a Bypass option for the Audio Adjustments
  • Select the Audio Clip in the Timeline. Bass adjustment is used for demonstration purposes.
  • The audio clip's title is changed to "Rubberband:Bass:Bypass". In order to have the Bass option appear in  the Rubberband options (as in Figure 2) the Bass value needs to be changed to other than 0.0 dB.
  • Must do step - right click audio clip, select "Show Clip Keyframes" and the wanted option in order to see the wanted type of keyframes (in this demonstration, that is, "Show Clip Keyframes"/Bass/Bypass).
Volume Level And Volume Bypass At Timeline Rubberband Level

Please refer to references cited in the INTRODUCTION. For all intents and purposes, the Volume Level and its Bypass Option at the Timeline Rubberband Level appear to be the same from at least Premiere Elements 10 through 15.

______________________________________________________________________________
*Also see Adobe document titled "Adding and Removing Effects/Apply An Audio Effect" found
https://helpx.adobe.com/premiere-elements/using/applying-removing-effects.html

ATR


Tuesday, August 29, 2017

PE 15: More Related To eLive Workspace Have And Have Not

INTRODUCTION

An eLive workspace was introduced in Premiere Elements 13/13.1, and it is also found in Premiere Elements 14/14.1 and 15. It is a help type workspace in which its featured online link offerings are classed as Learn, News, or Inspire. This workspace does not appear in all "language versions" of the installed Premiere Elements. For important background information, please consult
  • September 30, 2016 blog post "PE: 13/13.1 and 14/14.1: eLive Workspace" found HERE
  • October 17, 2016 blog post "PE 15: eLive Workspace" found HERE.
The Premiere Elements users' comments on eLive seem to fall into at least three categories: those who have the eLive workspace and are happy with it included in the product, those who have the eLive workspace and want to get rid of or disable it, and those who do not have the eLive workspace.

ISSUE

It was decided to explore further "This workspace does not appear in all "language versions" of the installed Premiere Elements 15 Windows 64 bit" with the Windows Region & language setting kept at English (United States) and the Premiere Elements 15 install language either English (North American), French, Japanese, Russian, or Simplified Chinese. Premiere Elements 15 was run under a purchased serial number.

Language for Premiere Elements 15 is set during its installation in the Language field of the Options dialog. See Figure 1.

Figure 1. Premiere Elements 15 Installation Language Setting Found In Options Dialog. In This Case, The Language Was Set In The Options Dialog To Simplified Chinese.

And, there is a "Country/Region Selection" preference that can be set in an opened project after the program is installed.

EXPLORATIONS

Using Windows 10 Home 64 bit, Premiere Elements 15 was installed from the download found HERE at the Adobe web site.
Windows: 64-bit Download (1.9 GB)
Languages: Czech, Dutch, English, French, German, Italian, Japanese, Polish, Russian, Spanish, and Swedish
Simplified Chinese is found as a language choice although it is not cited in that Adobe download description.

Protocol: During the installation of the download, the language was set at English (North American), French, Japanese, Russian, or Simplified Chinese. After the installation with one of these languages, it was noted whether the opened project displayed the eLive workspace. Results were:

e-Live Workspace Displayed
English (North American)

e-Live Workspace Not Displayed
French
Japanese
Russian
Simplified Chinese

Each install (using the Language as English or one of the other languages used) had a eLive folder in its Program Files. No differences were seen in the eLive configuration file (CEMConfig.xml) for Premiere Elements 15 in any of these languages. See .....C Drive\Program Files\Adobe\Adobe Premiere Elements 15\ELive\Config folder which contains the CEMConfig.xml file which can be opened in Notepad.

The Country/Region Selection preference in the opened Premiere Elements 15 project did not appear to impact the eLive have and have not situation. This preference is found in the project's Edit Menu/Preferences/General/"Region/Country Selection".Of note, in all cases, the default for this preference appeared to be the United States (written United States for English as language exploration, but United States translated to whatever the test language was set at.)

A note of interest - if I took a project.prel file created in Premiere Elements 15 installed with the Simplified Chinese language (no eLive workspace) and opened it in Premiere Elements 15 installed with the English language, the project that opened had an eLive workspace. Conversely, if I took a project.prel file created in Premiere Elements 15 installed with the English language (eLive workspace) and opened it in Premiere Elements 15 installed with the Simplified Chinese language, the project that opened had no eLive workspace. 

COMMENTARY

To date I have not found a way to turn on or off the eLive workspace in Premiere Elements 15, and online search did not bring up any insights into the Adobe programming for the eLive workspace feature. At this time I have not gone deeper into the subject, and it is hoped that the Premiere Elements 15 eLive workspace online links will be a workaround for the situation for the "have not" users until it is determined if anything can be done at the user level for control of eLive workspace on or off. As always, work in progress to detect any significant advances and clarifications in the topic.

PREMIERE ELEMENTS 15 WINDOWS ELIVE WORKSPACE OFFERINGS
(As of August 20, 2017. The links are as displayed* in the Premiere Elements 15 Windows eLive workspace and are provided only for informational and non promotional purposes. At this time there appears to be 50 links offerings displaying in my Premiere Elements 15 Windows Home 64 bit eLive workspace.)

Collages aren't just for photos!
https://www.youtube.com/watch?v=xJ_lI90AY00
Learn Tab 

Tips on shooting videos of your vacation travels
http://fitfabandforeign.com/how-to-shoot-travel-videos-people-actually-want-to-watch/
Learn Tab 

How to Zoom In, and Zoom Out.
https://www.youtube.com/watch?v=JMKZ7jRiOrg
Learn Tab 

Create a Video Collage.
https://helpx.adobe.com/premiere-elements/how-to/create-video-collage.html?set=premiere-elements--fundamentals--editing&trackingid=GHMVYKPZ&mv=other
Learn Tab

Video tips & tricks.
https://www.opensesame.com/blog/video-tricks-tips-and-shortcuts-beginners 
Learn Tab

Customizing music with Music Remix.
https://helpx.adobe.com/premiere-elements/how-to/customize-third-party-music-remix.html?set=premiere-elements--fundamentals--editing&trackingid=GMCWYFYY&mv=other
Learn Tab 

Use the library of Guided Edits for fantastic results.
https://helpx.adobe.com/premiere-elements/how-to/use-guided-edits-library.html?set=premiere-elements--fundamentals--editing&trackingid=GR3XYB7X&mv=other 
Learn Tab

Use the Video Haze removal tool.
https://helpx.adobe.com/premiere-elements/how-to/use-video-haze-removal-tool.html?set=premiere-elements--fundamentals--editing&trackingid=F4KHZXSC&mv=other
Learn Tab

Embed home videos directly into greeting cards with OR codes!
http://damasklove.com/diy-video-holiday-cards/ 
News Tab 

Remix music to the perfect length.
http://www.adobe.com/products/premiere-elements/features.html?trackingid=ZKD5FJ2L&mv=other#remix 
Learn Tab 

Clear the haze.
http://www.adobe.com/products/premiere-elements/features.html?trackingid=ZSV7F8LJ&mv=other#dehaze
Learn Tab 

Bring collages to life.
http://www.adobe.com/products/premiere-elements/features.html?trackingid=12B9F14G&mv=other#collages 
Learn Tab 

Get started with Premiere Elements 15
https://helpx.adobe.com/premiere-elements/user-guide.html?trackingid=49F59S1L&mv=other
Learn Tab

Take a quick tour of Premiere Elements 15!
http://www.adobe.com/products/premiere-elements/features.html?trackingid=ZP46FDBK&mv=other#prefeatureoverview
News Tab

It is a big day out for little Ethan!
https://vimeo.com/102371956 
Inspire Tab

Create a motion path using the Pan & Zoom tool.
https://helpx.adobe.com/premiere-elements/how-to/create-motion-path-pan-zoom.html?set=premiere-elements--whats-new--2015-09 
Learn Tab

School is back in session!
https://vimeo.com/blog/post/5-tips-to-instantly-improve-your-compositions 
Learn Tab

Create titles with title themes.
https://helpx.adobe.com/premiere-elements/how-to/create-titles-with-themes.html 
Learn Tab

Arrange clips in a movie.
https://helpx.adobe.com/premiere-elements/archive/pre-11-tutorials/arrange-clips-movie.html 
Learn Tab

Antarctica.
https://vimeo.com/124858722 
Inspire Tab

The Adventures of Walter the Office Pug.
https://vimeo.com/68704007 
Inspire

Memories of Tokyo.
https://vimeo.com/130746973 
Inspire Tab

Guidance at every step.
https://www.youtube.com/watch?v=UOXS2jKli64&feature=youtu.be 
Learn Tab

Summer memories.
https://vimeo.com/50296655 
Inspire Tab

Tell dazzling stories with motion titles.
https://www.youtube.com/watch?v=VYhDBn-iiLY 
Learn Tab

Take a quick tour of Premiere Elements 14.
https://www.youtube.com/watch?v=99A9tE2oFBE
News Tab

Introducing Adobe Premiere Elements 14!
http://blogs.adobe.com/photoshop/2015/09/introducing-adobe-photoshop-elements-14.html 
News Tab

Share your videos!
https://helpx.adobe.com/premiere-elements/how-to/share-videos-youtube-facebook-vimeo.html
Learn Tab

Create your own movies.
https://www.youtube.com/watch?v=wvl9tEmEwm8 
Learn Tab

Learn time lapse photography using Premiere Elements.
https://www.youtube.com/watch?v=PcF7DPARNXk 
(opens to YouTube video which is unavailable)
Learn Tab

Share your vidoes on social sites.
https://helpx.adobe.com/premiere-elements/how-to/share-videos-youtube-facebook-vimeo.html 
Learn Tab

Stabilize shaky videos.
https://helpx.adobe.com/premiere-elements/how-to/stabilize-shaky-videos.html 
Learn Tab

Organize by events.
https://helpx.adobe.com/elements-organizer/using/events.html 
Learn Tab

Guided Edits
https://helpx.adobe.com/premiere-elements/archive/pre-12-tutorials/guided-edits-video.html 
Learn Tab

Sunday it rained.
https://vimeo.com/113110919 
Learn Tab

Create effects using Adjustment Layers.
https://helpx.adobe.com/premiere-elements/archive/pre-12-tutorials/apply-video-effects-adjustments-layers.html 
Learn Tab

Use mattes and keys to blend video together.
https://www.youtube.com/watch?v=kIkOy4dD4HI 
Learn Tab

A simple clip of a 3 year olds perspective.
https://vimeo.com/94278758 
Inspire Tab

How to add multiple effects to a video.
https://www.youtube.com/watch?v=Mkp3LwavS8E
Learn Tab

Adding Audio Effects.
https://www.youtube.com/watch?v=Pqmp8lHjdI4 
Learn Tab

Use Motion Tracking to add objects that move with your subject.
https://helpx.adobe.com/premiere-elements/archive/pre-12-tutorials/spotlight-motion-tracking.html 
Learn Tab

Suddenly I feel light.
https://vimeo.com/channels/staffpicks/82123812 
Inspire Tab

The world beyond the world.
https://vimeo.com/89216531 
Inspire Tab

Swinging solo: video1Love letter #1.
http://cherish365.com/2013/12/swinging-solo-video-love-letter-1.html 
Inspire Tab

Trampoline.
https://vimeo.com/95686450 
Inspire Tab

Adjust your video's color with Auto Smart Tone.
https://helpx.adobe.com/premiere-elements/archive/pre-12-tutorials/adjust-video-color-brightness-auto-smart-tone.html 
Learn Tab

3 easy ways to make movies.
https://www.youtube.com/watch?v=XvppYqs_sT8&index=2&list=PLPzkxRKAxnCAxJ2N6p0RQwGDrFJ7A6MFe 
Learn Tab

Easily tell your big life stories.
https://www.youtube.com/watch?v=BF4XMwa9PkE&list=PLPzkxRKAxnCAxJ2N6p0RQwGDrFJ7A6MFe&index=5 
Learn Tab

Favorite Moments, fast movies.
https://www.youtube.com/watch?v=km9gp6pYlCw&index=3&list=PLPzkxRKAxnCAxJ2N6p0RQwGDrFJ7A6MFe 
Learn Tab

Smooth out the shakes.
https://www.youtube.com/watch?v=Ee_SWNma-Nw&feature=youtu.be
Learn Tab  
                  
_______________________________________________________________________________
*Premiere Elements 15 on Windows Home 64 bit. Browser used was Mozilla Foxfire, latest version 55.0.3 (32-bit). Photoshop Elements 15 was uninstalled during these explorations in Premiere Elements 15.
**At this time August 2017, the Premiere Elements 15 eLive workspace content was found to be very much the same as displayed in October 2016. However, it appears that a few additions to this workspace's content were made by Adobe from October 2016 to August 2017. Refer to comments in earlier eLive workspace blog posts cited in the INTRODUCTION.

             
ATR


________________________________________________________________________________