Monday, March 30, 2015

PE: Where Are The Blend Modes?

INTRODUCTION

Blend modes are Photoshop and Photoshop Elements (photo editors) features that did not come to Premiere Elements (video editor) until Premiere Elements 11. The choices of blend modes and concept of how they work are similar in Photoshop Elements and Premiere Elements. One application of blend mode in Premiere Elements might be to lighten or dark a video or still clip that is too light or too dark. Like Photoshop Elements, Premiere Elements blend mode concept needs two instances of a  file. When other than "Normal" blend mode is selected, the two files interact as per the details of the blend mode selected. See above link.

A typical Premiere Elements workflow with regard to blend mode might include
  • Original video or still clip (which is too light or two dark) on Video Track 1
  • Duplicate of original video or still clip on Video Track 2 directly above original on Video Track 1
and then
  • Selection of Video Track 2's duplicate and application of blend mode to the duplicate (if too dark, try blend mode Lighten or Screen; if too light, try blend mode Darken or Multiply)
An understanding of how each blend mode works will help predict the results when selecting a blend mode for a given effect, but there is still a lot of exploration and experimentation that needs to be done to get the wanted effect.


ISSUE

Where are the blend modes in Premiere Elements 11, 12/12.1, and 13/13.1?

SOLUTION

In Premiere Elements 11, 12/12.1, and 13/13.1, blend modes can be found Expert workspace* Applied Effects Tab/Applied Effects Palette/Opacity Panel expanded. Refer to Figure 1.

Figure 1. Premiere Elements 13/13.1 Blend Mode "Normal" For Jpeg Still

Some examples when different blend mode applied to same Video Track 2 jpeg still clip (Opacity 100%).

NORMAL

 LIGHTEN


SCREEN
DARKEN
MULTIPLY
DARKER COLOR


Some examples when different blend mode applied to same Video Track 2 video clip (SD MPEG4.avi) when 2 video clips were used instead of 2 jpeg still clips (Opacity 100%).

NORMAL
LIGHTEN
SCREEN
DARKEN
MULTIPLY
 DARKER COLOR


COMMENTARY

Lots to explore and experiment with regarding using blend modes in Premiere Elements 11, 12/12.1, or 13/13.1...here done on Windows 7, 8, or 8.1 64 bit. The blog post has dealt with 2 clips, one original and one a duplicate of the other and the blend mode applied to the Video 2 duplicate clip.
Also look at
  • Blend mode with Video 2 clip graphic instead of duplicate of the Video 1 clip
  • Video 2 with the original clip to which the blend mode is applied and Video 1 as a color matte with varying colors.


_______________________________________________________________________________
*Details for Quick workspace and applying blend mode in Opacity Panel expanded.....
The Opacity Panel expanded with the blend mode options is seen in the Quick as well as the Expert workspace. But, the issue here goes to how to create the overlay (duplicate) for the Filmstrip's scene slot's original file. What worked was dragging the original's file from its hard drive save location into the Quick workspace's Monitor and, from the pop up menu, selecting "Place On Top".


Work In Progress


 ATR


PE13/13.1: 13.1 Update Failures/Solutions

INTRODUCTION

Premiere Elements 13 was updated by Adobe to 13.1 which contains some new features and some defined and undefined fixes. Those details can be found
This 13.1 Update is available only from within the Premiere Elements 13 opened project's Help Menu/Update.

ISSUE

Failures in the updating process have been appearing online. For many, doing the update with the antivirus and firewall(s) disabled has been the solution to the updating failures. But, for others, updating to 13.1 was not possible. Often an error code of U44M1l210 is associated with the 13.1 Update failures.

SOLUTION

The intent of this blog post is to summarize the suggested fixes for the Premiere Elements 13.1 Update failures

1. Classically, do the update with antivirus and firewall(s) disabled.

2. Today in the Adobe Premiere Elements Forum, Adobe Staff (Anwesha) posted with a suggestion to resolve a 13.1 Update failure. The link to the thread is
I am getting this Error Code: U44M1I210  when I try to do the update on Adobe elements 13.1
and the quote from that thread is
          "This error normally  occurs when the patch download is corrupt.
Please try deleting the following folder and then try to apply the update:
C:\Users\<user name>\AppData\Local\Adobe\AAMUpdater\1.0"
3. One suggestion has been to do the 13.1 Update using a new user account with administrative privileges. This was pointed to in the discussion included at the end of the following online article
http://blogs.adobe.com/contentcorner/2015/02/13/adobe-premiere-elements-13-1-update/

 COMMENTARY

To date (March 30, 2015), we have not seen any reports of success from the "patch download" or "new user account with administrative privileges" perspectives. We will update this blog post as new information is available. And, we will try to keep track of the proposed solutions and the success rate for each.

13.1 Update Failure Solution Count, Starting March 30, 2015
Solution 1
Solution 2
.....March 30, 2015, worked 1.
.....March 31, 2015, did not work 1.
Solution 3

Work In Progress

______________________________________________________________________________

ATR

Wednesday, March 25, 2015

PE13/13.1: News Reel Movie Menu Theme Unusable

INTRODUCTION

The News Reel Movie Menu theme first appeared in Premiere Elements in version 9. It works there. The theme is continued in 10 and 11. It works there also. However, in version 12/12.1 and 13/13.1, the News Reel Scene Selection page is unusable.

The situation is bizarre since, if version 11's News Reel files (which work in 11) are moved into Premiere Element 13/13.1 on the same computer, they are not usable there. But, if version 13/13.1's News Reel files (which do not work in 13/13.1) are moved into Premiere Elements 11 on the same computer, they are completely usable there.

The News Reel theme requires content download and can be found for Premiere Elements 13/13.1 Windows 7, 8, or 8.1 64 bit in the path
Local Disk C\Program Data\Adobe\Premiere Elements\13.0\Online\DVD Templates\All_Lang\Movie Genre\(A) News Reel

The (A) News Reel Folder includes a main menu and scene selection menu set for formats of "s" standard, "w" widescreen, and "hd" high definition. All the sets appear to be similarly affected.
standard
newsreel_pal_s_mm.psd
newsreel_pal_s_sm.psd
widescreen
newsreel_pal_w_mm.psd
newsreel_pal_w_sm.psd
high definition
newsreel_hd_mm.psd
newsreel_hd_sm.psd
The project preset setting will determine which of these sets will be available to the project in the Movie Menu customization area of the project. So, if you do not edit all 3 sets, make sure that you edit the set that you know will be used by the project.*

ISSUE

Main Menu Page

Problem: 
  • Overlapping Play Movie and Scenes Buttons, but Play Movie and Scenes Buttons as well as background can be customized in the Movie Menu customization area of the project. See Figure 1.

Figure 1. News Reel Main Menu in Movie Menu Customization Area When First Opened From Tools Menu/Movie Menu.
Scene Selection Page 

Problems: 
  • Major red frame around entire Scene Selection page, Adjustments Palette displaying options for Menu Background for Scene Selection page. See Figure 2.
  • When screen is clicked on, Adjustments Palette opens to Menu options for the buttons, highlight is for whatever last scene thumbnail is on the page, handles appear on the major red frame, and all is frozen at that situation....if one of the handles of the major red frame is dragged on, it is the last scene thumbnail on the page that is moved and reduced in size.

Figure 2. News Reel Scene Selection in Movie Menu Customization Area When First Opened From Main Menu's Scenes Button.

SOLUTION

Main Menu Page

The overlapping Play Movie and Scenes buttons are easily corrected within the Movie Menu customization area
  • With the mouse cursor move the Play Movie button away from the Scenes button on the same strip of film where they were placed by Adobe
         or
  • With the mouse cursor move the Scenes button to another strip of film to the right of the one where the Play Movie is positioned.
Scene Selection Page

To resolve the Scene Selection Page issues, a new (%) video layer in each of the 6 scene buttons Layer Sets needs to be created and the following layers deleted from the button's (+) scene Layer Set
  • frame
  • Hue/Saturation
  • (%) video
  • mask
For (+) Scene 1 Layer Set, before and after solution is shown in Figure 3.

Figure 3. (+) Scene 1 Layer Group Before And After Solution.

For (+) Scene 2 Layer Set only, there is an additional step taken to correct the position of Scene 2's original highlight layer which appears to be out of place.
  • Drag the (=1) copy layer into the folder icon of the (+) Scene 2 Layer Set panel. This takes that layer to the bottom of the layers in the (+) Scene 2 Layer Set.
  • Then move the (=1) copy layer to immediately above the frame layer, and rename it (=1) highlight.
  • Then go about the remove the 4 layers indicated in Figure 4.
  • Then place a newly created (%) video layer under the (=1) highlight layer.

Figure 4. (+) Scene 2 Layer Group Before And After Solution, Including Correcting Misplaced Original Highlight Layer.

For (+) Scene 3, 4, 5, and 6 Layer Sets, before and after solution is shown in Figure 3. If not already, for all 6 buttons, assure that the "after" shows the highlight layer with the name (=1) highlight. In the "after", the layer below the new (%) video layer was left unedited.

The next part will detail how the new (%) video layer is created.

HOW TO

Creation of New (%) Video Layer (Abbreviated Version for Now)

STEP 1
Open News Reel Scene Selection ...sm.psd in Photoshop 5.1 Extended (Photoshop CS or higher).
Close all the Layer Sets in the Layers Palette of the .psd file except (+) Scene 1.

Open (+) Scene 1 Layer Set, leaving the subLayerSet named (^^) closed.

STEP 2
Set the Photoshop 5.1 extended's Color Picker to Black as foreground color.
In (+) Scene 1 Layer Set, go to the layer named frame. Ctrl click the thumbnail of that layer to bring up marching ants around the Scene 1 thumbnail seen on screen.

Create a new layer. With the new layer selected and the marching ants still marching, use Alt Backspace to fill the selection with the color black.

Position that new layer to immediately below the (=1) highlight layer. Rename that new layer to read  (%) video. Refer to Figure 3.

STEP 3
Leave (+) Scene 1 Layer Set opened as previously described, and open (+) Scene 2 Layer Set.
Duplicate the (+) Scene 1 Layer Set's new (%) video layer, and move it upward into the opened (+) Scene 2 Layer Set to a position immediately below the (=1) highlight layer. Change the name of this duplicate to (%) video.

At this point, a black thumbnail will not be seen for Scene 2 thumbnail on screen. That is due to the fact that a Scene 1 duplicate is involved, and the duplicate is still hidden behind Scene 1 thumbnail on screen. Select the (+) Scene 2 Layer Set's new (%) video layer, hit Ctrl+T to see a bounding box around Scene 1 thumbnail on Screen. Use the right arrow key to move the duplicate to its position for the Scene 2 thumbnail. Hit Enter to commit. Close (+) Scene 2 Layer Set. Refer to Figure 5.

Figure 5. Creating New (%) Video For Scene 2 Thumbnail.

 STEP 4

Continue to leave (+) Scene 1 Layer Set opened and duplicate its new (%) video layer for (+) Scene 3, 4, 5, and 6 Layer sets using the above scheme.


 COMMENTARY

The Premiere Elements 13/13.1's Movie Menu theme "News Reel" was made useable within a Premiere Elements 13/13.1 project** after the above modifications were made to its main menu and scene menu .psd files. However, all the whys are not neatly in place at this time. The tentative whys
based on what worked to produce the theme usability
  • main menu needed repositioning of Play Movie button and Scene button to avoid the overlapping of these buttons (non critical)
  • scene menu needed replacement of (%) video layer and elimination of some related layers in the Layers Palette of the scene menu .psd (critical)


 ________________________________________________________________________________
* SD project uses the "s" set of the theme; Widescreen project has been found to use either "s" or "w" set of the theme; HD project uses the "hd" set of the theme. Before version 13/13.1, the user could  open the Notepad document for the saved project file to read which Movie Menu theme set the project was using. This has been found to be no longer possible for version 13/13.1.
**Windows 7 Professional SP1 64 bit computer used.


ATR


Sunday, March 22, 2015

PE13/13.1 Tracking Player In Sports Video Ideas

INTRODUCTION

Frequently there are questions about how best to track a son or daughter or other in a sports video.
There are various approaches to doing this. Some more involved than others.

ISSUE

What are some quick ideas for tracking a son or daughter or other in a sports video?

SOLUTIONS*

Freeze Frame - Arrow Technique

With the video on Video Track 1, place the Timeline Indicator at the spot where you want to have an arrow point to the player. Go to Tools Menu/Freeze Frame, and in the Freeze Frame dialog that opens
  • Set Freeze Frame Duration = 1 second**
  • Click on Insert in Movie
The Freeze Frame will insert in the Timeline Video Track 1 at the location of the Timeline Indicator.
Using Add Media/Files and Folder/Project Assets, import a png or psd file with the arrow image.
Drag the arrow image to the Timeline Video Track 2 to span just the duration of the Freeze Frame on Video Track 1 directly below. Size and position the arrow accordingly.

Repeat the above for as many places on the video that the player is to be pointed to by an arrow.

In the example to be given, the finished Expert workspace appeared as seen in Figure 1.

Figure 1. Freeze Frame/Arrow Workflow in Expert Workspace For Pointing To Player In Sports Video.

And, a wmv export of that Timeline is represented in the following demo video.


Freeze Frame/Arrow Pointing to Player In Sports Video

And if a circle file was used on Video 2 instead of an arrow file, the result would look like what is shown in the following demo vide.


Freeze Frame/Circle Focusing On Player in Sports Video

The arrow can be created in Photoshop Elements, and the circle can be created in the Premiere Elements Titler as described in the following earlier blog post.
"PE11: Titler Shapes For Highlighting"


Motion Tracking - Arrow Technique

Start by clicking on the Timeline Video Track 1 video in order to select it.
Go to Tools Menu/Motion Tracking. The Motion Tracking workspace opens, and sequence that follows includes
"Select Object" to be tracked
"Track Object", results in a yellow frame around the selected object
Into the yellow frame dragging the object to do the tracking - yellow frame turns blue
Resize, position, click Done.


Figure 2. At The Stage Where The Arrow From Project Assets Is About To Be Dragged Into The Yellow Frame At The Small Robot's Head.

Figure 3. At The Stage Where The Arrow From Project Assets Has Been Dragged Into The Yellow Frame At The Small Robot's Head And Frame Has Turned Blue.
Probably the most important thing to remember here is that the user is not confined to use the project's Graphics Tab choices for the tracking object. The Elements Organizer and Project Assets media can be used instead. This is fully explained in the October 2013 blog post
"PE12: Motion Tracking/What To Use To Track Objects"

With this Motion Tracking approach, the tracking was lost when the small robot reached the large robots. To point to the smaller robot after it had gone between the two large robots, some "maneuvers" were needed which included 
  •  doing a second motion tracking for the end
  • adding a freeze frame to maintain the end view
The finished Expert workspace workflow is as represented in Figure 4.


Figure 4. Motion Tracking/Arrow Finished Expert Workspace Timeline View At Finish Of Creation.
 The wmv video from the export of the completed project's Timeline can be seen in the following demo video.

 
COMMENTARY

The Freeze Frame/Arrow or Circle way would be my preference. Motion Tracking can be made to create interesting effects, but, in this example, had its problems. I first became aware of the Freeze Frame approach several years ago when reading the works of Disneyzell/Drew. Thanks Drew.

______________________________________________________________________________ 
 *Study was done with Premiere Elements 13/13.1 Windows 7 64 bit project set with project preset
 NTSC AVCHDFull HD1080i30.

**In Freeze Frame/Arrow example, before export, all duration for the freeze frame and the arrow file were changed to from 1 to 0.5 second (00;00;00;15) using Time Stretch. Seemed to give better results. A duration of 1 second is the lowest Freeze Frame duration that can be set by the Freeze Frame dialog.

Work In Progress

ATR

PE 13: Multi Text Lines With Continuous Fade In By Character

INTRODUCTION

The July 2013 blog post describes how to apply Titler animation to one or more lines of text in the same title created in the Titler. And, some interesting examples are given.

ISSUE

Recently the question was asked about applying Titler's animation "Fade In By Character" to 4 lines of text, so that the characters of the 4 lines would fade in sequentially from the first character of the first line to the last character of the fourth line. At this time, the task was found doable, but not with all 4 lines within the same title file. No easy crop or garbage matte approach was found to create this text effect all in one title*.

SOLUTION**

To achieve the Titler's animation "Fade In By Character" effect sought and which is described in ISSUE, a title file was created for each line of text, and each title file was placed on progressively higher track in a train like fashion. The Expert workspace for the finished creation is represented in Figure 1.


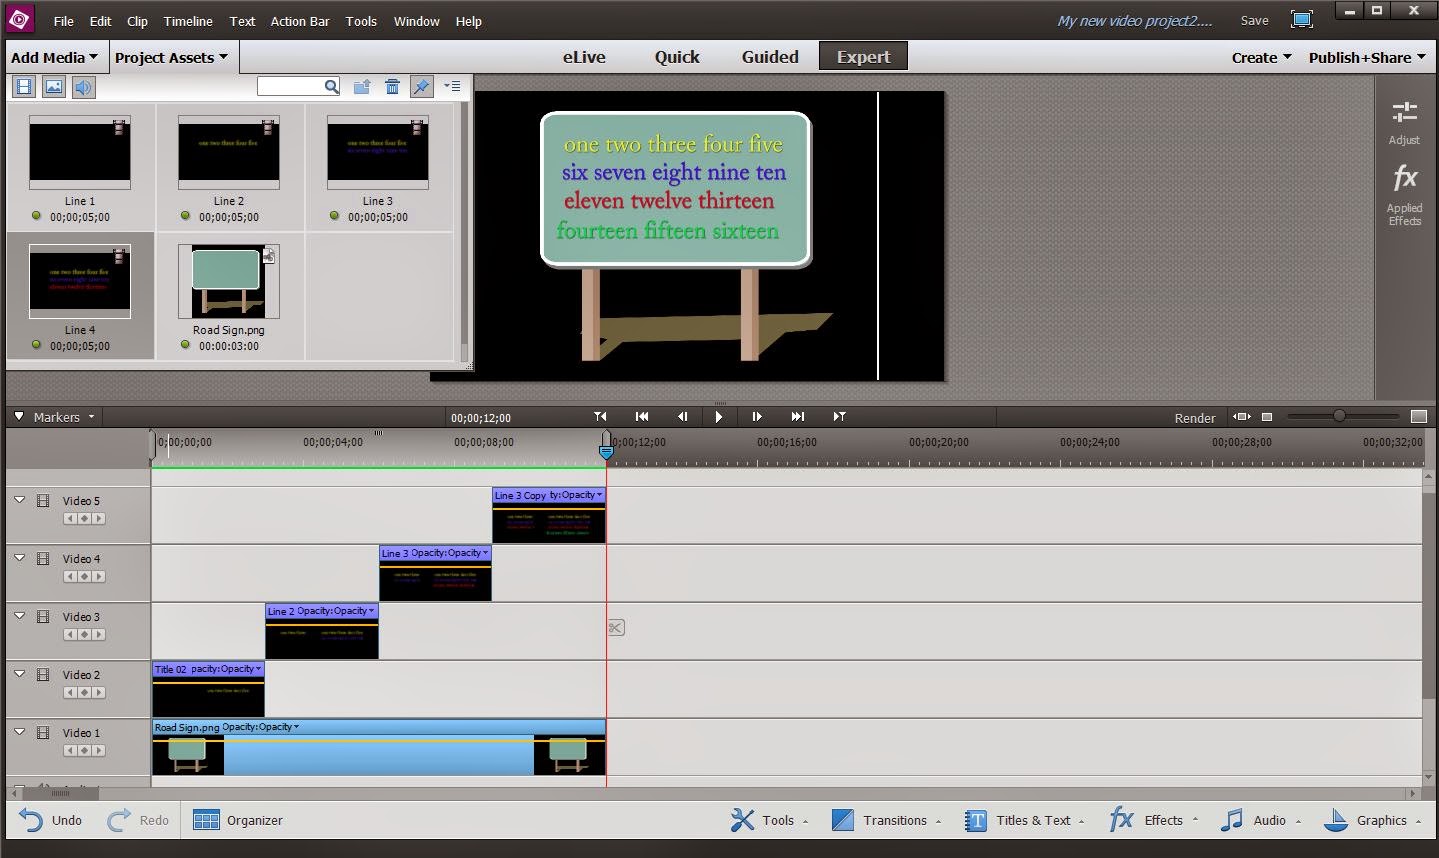
Figure 1. Premiere Elements 13/13.1 Expert Workspace Finished "Fade In By Character" For 4 Lines Of Text.
And, when the Timeline content in Figure 1 was exported to a wmv file, the effect can be seen in the following demo video


The how to for this effect follows.


HOW TO

STEP 1
Create Line 1 Title In The Titler
Text Menu/New Text/Default Text
Duration: 5 seconds
Font: Adobe Caslon Pro
Size 123
Color Palette Icon: Yellow, R 217, G 227, B 32; Drop Shadow with check mark, and then close Color.

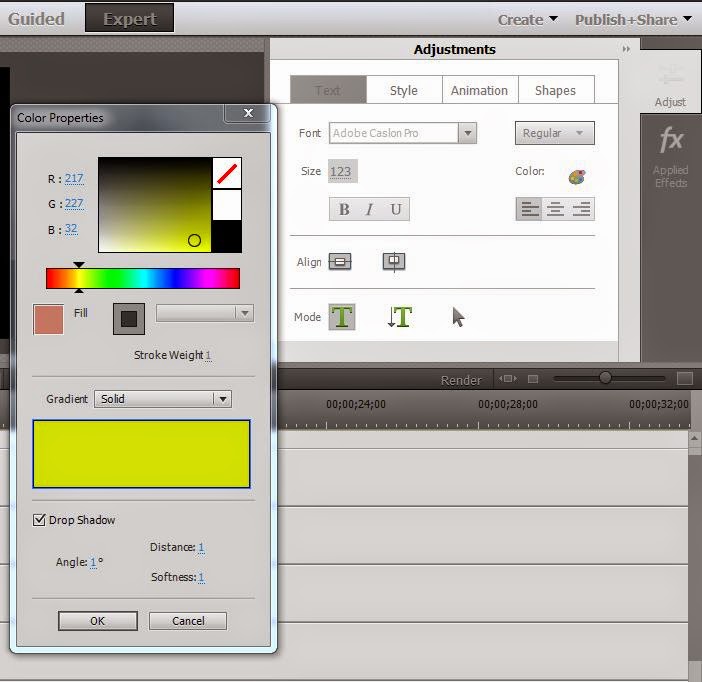
Figure 2. Text Section Of The Titler And Some STEP 1 Details.

In the Text section of the Titler, type Line 1 text using the Horizontal Type Tool, and then use the Selection Tool there to select the Line 1 text and position it. Leave the Line 1 text selected.

Go to the Titler's Animation section, select/highlight the animation "FadeInByCharacter" and hit Apply at the bottom of the Animation listings.

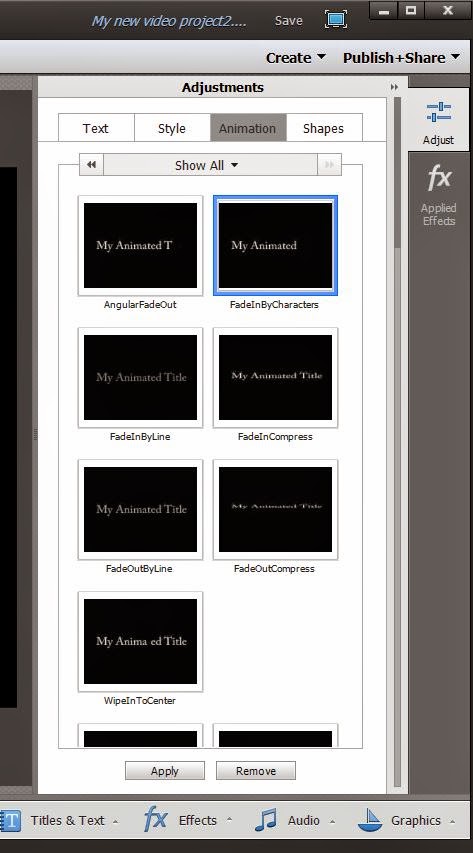
Figure  3. Animation Section Of The Titler And Some STEP 2 Details.
 Close the Titler, place the Line 1 title at the beginning on Video track 2.

STEP 2.
Create Line 2 Text In The Titler

Go to Project Assets, opened it, find the thumbnail for line 1 text file. Right click it, and change the thumbnail name from Title 01 to Line 1. Then right click Line 1 thumbnail, and click on Duplicate from the drop down menu. Right click the Duplicate created, and rename this Duplicate to Line 2. Drag Line 2 thumbnail to the Timeline Video Track 3 at the 5 second mark. Double click Line 2 Timeline title to open the Titler to create the Line 2 title. Do the following
  • With the Text section Selection Tool, select the Line 1 text on screen if it is not already selected.
  • Go to the Animation section, with FadeInByCharacters selected, hit Remove at the bottom of the Animation Section listings.
Go back to the Text section and, using the Horizontal Type Tool,  type in Line 2 text. This time the text color is going to be dark purple. See Color Palette Icon and set R 71, B 18, and G 230, and do not forget the check mark for Drop Shadow in the Color Properties. Position Line 2 text with the Text section's Selection Tool. With Line 2 text selected, end with
  • Go to the Titler's Animation section, select/highlight the animation "FadeInByCharacter" and hit Apply at the bottom of the Animation listings.
Close out of the Titler.

STEP 3
Create Line 3 Text In The Titler

Go to Project Assets, open it, find the thumbnail for Line 2 text file. Duplicate the Line 2 text thumbnail, and rename that thumbnail to read Line 3. Drag Line 3 thumbnail to Timeline Video Track 4 at the 10 second mark. Double click Line 3 Timeline title to open the Titler to create Line 3 title. Do the following
  • With the Text section Selection Tool, select Line 2 text if it is not already selected.
  • Go to the Animation section, with FadeInByCharacters selected, hit Remove at the bottom of the Animation Section listings.
Go back to the Text section and, using the Horizontal Type Tool, type in Line 3 text. This time the text color is going to be red . See Color Palette Icon, and set R 224, B 9, and G 38, and do not forget the check mark for Drop Shadow in the Color Properties. Position Line 3 text with the Text section's Selection Tool. With Line 3 text selected, end with
  • Go to the Titler's Animation section, select/highlight the animation "FadeInByCharacter" and hit Apply at the bottom of the Animation listings.
Close out of the Titler.

STEP 4
Create Line 4 Text In The Titler

Go to Project Assets, open it, find the thumbnail for Line 3 text file. Duplicate the Line 3 text thumbnail, and rename that thumbnail to read Line 4. Drag Line 4 thumbnail to Timeline Video Track 5 at the 15 second mark. Double click Line 4 Timeline title to open the Titler to create Line 4 title. Do the following
  • With the Text section Selection Tool, select Line 3 text if it is not already selected.
  • Go to the Animation section, with FadeInByCharacters selected, hit Remove at the bottom of the Animation Section listings.

Go back to the Text section and, using the Horizontal Text Tool, type in Line 4 text. This time the text color is going to be green . See Color Palette Icon and set R 11, B 219, and G 80, and do not forget the check mark for Drop Shadow in the Color Properties. Position Line 4 text with the Text section's Selection Tool. With Line 4 text selected, end with
  • Go to the Titler's Animation section, select/highlight the animation "FadeInByCharacter" and hit Apply at the bottom of the Animation listings.
Close out of the Titler.

STEP 5
Miscellaneous

In the example workflow, one of the program's Graphics named Road Sign was placed on Video Track 1 as a background for the 4 lines of text. See Figure 1.

In the example workflow, the duration of each text title was changed from the original 5 seconds to 3 second using Time Stretch.


_____________________________________________________________________________
* The sequential appearance "by line" of 4 lines of text within 1 title can easily be obtained by keyframing Crop or a garbage matte effect. See fx Effects/Transform/Crop or fx Effects/Keying/and Four-Point Garbage Matte, Eight-Point Garbage Matte, or Sixteen-Point Garbage Matte.

** Workflow using Premiere Elements 13/13.1 NTSC AVCHD Full HD1080i30 project (Windows 7 Professional SP1 64 bit). Workflow also applies to Premiere Elements 11, 12/12.1, and 13/13.1 and in principle to earlier versions of the program.
 
  
ATR


Sunday, March 1, 2015

PE 13/13.1: No Disk Error Solution

INTRODUCTION

No Disc error has appeared in versions other than Premiere Elements 13/13.1. And, each version
seems to have its own fix for its No Disc error. In Premiere Elements 11, the go to fix appeared to be related to the SmartSound feature*. But, the SmartSound feature is no longer a part of Premiere Elements 13/13.1 to point to as the cause of the No Disc error.

ISSUE

The question becomes "How to get rid of No Disc Error in Premiere Elements 13?" The 13.1 Update recently released by Adobe did not resolve the issue.


SOLUTION

In the Adobe Premiere Elements Forum, Adobe's PRE_help has provided a solution for Premiere Elements 13/13.1 No Disc error. And, it has worked for all those who tried it and reported back with the results.


The solution is:

Deleting or disabling the OldFilm.AEX file in the Windows 7, 8, or 8.1 64 bit path
Local Disk C
Program Data
Adobe
Adobe Premiere Elements 13
Plug-ins
Common
NewBlue
and in the NewBlue Folder is the OldFilm.AEX file that is deleted or disabled by renaming
it from OldFilm.AEX to OldFilm.AEXOLD.

According to Adobe's PRE_help, the features affected by the OldFilm.AEX deleting or disabling:

In Expert workspace

fx Effects/NewBlue Film Look/Old Film

fx Effects/Hollywood Looks/News Reel

fx Effects/Hollywood Looks/Old Film

In Quick workspace (assumed)

fx Effects/Video Effects/Old Film

COMMENTARY**

This matter can also be seen described earlier in Premiere Elements 13 Daily Discovery blog found
HERE at item 0014.

________________________________________________________________________________
*For one example, please see posts 2 and 7 in the following link
https://forums.adobe.com/thread/1112810
The user attributes the SmartSound fix to Adobe Tech.

**Update: Additional information May 8, 2015.
PRE_help's response to Premiere Elements 13 user with No Disc Error which was not fixed with usual delete or disable OldFilm.AEX fix.
So the detailed steps are:
1. Rename the OldFilm.AEX to OldFilm_AEXOLD (Note that the extension is removed. this is only to make sure it is not recognized)
2. Go to registry from Start -> Run and type "regedit" and hit enter
3. In the registry, browse to HKEY_CURRENT_USER\Software\Adobe\Premiere Elements\13.0 folder and delete the PluginCache.64 folder
4. Relaunch Premiere Elements 13/13.1 and then see if you still get the error.

We do not have any known case other than the OldFilm.AEX plugin where we get this error. So if you still see the problem, we may have to troubleshoot the issue on your machine through a session to understand it better.
 The above is a copy/paste from the following Adobe Premiere Elements Forum thread, post 5
https://forums.adobe.com/message/7524477#7524477


ATR