Thursday, June 26, 2014

PE 12: Scary Halloween Main Menu Default Highlight Sequence

INTRODUCTION

The Scary Halloween disc menu theme exists as a "plus member only" theme in Premiere Elements earlier than 11, but, in those versions, it cannot be accessed nor used any longer by the users of those programs since photoshop.com and photoshop.com plus is discontinued. But the theme survives in versions 11 and 12 as part of the regular set of disc menus that come with 11 and 12.

The Scary Halloween theme is found in 11 and 12 under Tools Menu/Movie Menu/Holidays and Events or Tools Tab/Movie Menu/Holidays and Events whether the Expert or Quick workspace is used. When the theme is applied to a project and previewed in the Movie Menu customization area of a project, it first presents with the main menu which includes the"Play" or "Scenes" choices. See Figure 1.

Figure 1. Scary Halloween Disc Menu In Preview Of Premiere Elements 12, Displaying A Main Menu Default View.
Unlike many others of these themes, the default is the highlight targeting first the "Scenes" choice and not the "Play" choice as shown in Figure 1.

ISSUE

How to change the default highlight sequence so that the red highlight first targets the "Play" choice and not the "Scenes" choice?

SOLUTION

The solution to the issue was found in the reordering of the Layer Sets in the theme's main menu psd file that the project preset directed the program to display in the Movie Menu customization area of the program
  • halloween_hd_mm.psd (if HD project)
  • halloween_w_mm.psd (if SD project, widescreen)
  • halloween_s_mm.psd (if SD project, standard)
This reordering (editing) of the theme's psd file was done in Photoshop Elements 12* since the task required moving the Layer Sets and not opening them.

The original order of the main menu psd Layer Sets that provided for "Scenes" red highlight displaying initially as the default can be seen in Figure 2.

"Scenes" Red Highlight Default

Figure 2. Scary Halloween. Original Order Of Layer Sets In Theme's Main Menu .PSD File Named Halloween_HD_MM.PSD.

The revised order of the main menu psd Layer Sets that provided for "Play" red highlight displaying initially as the default can be seen in Figure 3.

"Play" Red Highlight Default

Figure 3. Scary Halloween. Revised Order Of Layer Sets In Theme's  Main Menu .PSD File Named Halloween_HD_MM.PSD

HOW TO

STEP 1
Copy/Paste Scary Halloween .PSD Files to Computer Desktop 

The original Scary Halloween main menu and scene menu .psd files are

Intended for use if HD project
halloween_hd_mm.psd
halloween_hd_sm.psd

Intended for use if SD project, widescreen
halloween_w_mm.psd
halloween_w_sm.psd 

Intended for use if SD project, standard
halloween_s_mm.psd
halloween_s_sm.psd

They are found after Movie Menu Content Download

Local Disk C
Program Data
Adobe
Premiere Elements
12.0
Online
DVD Templates
All_Lang
Holidays and Events
(AV) Scary Halloween
and in the (AV) Scary Halloween Folder are the theme's .psd files cited above.

For this example, the HD files were copied and pasted to a desktop folder where they were renamed to avoid confusion. So, at the end of STEP 1, there existed a desktop folder named 2halloween which contained the files
2halloween_hd_mm.psd
and
2halloween_hd_mm.psd

STEP 2
Reordering the Layer Sets in the Main Menu .psd File Named 2halloween_hd_mm.psd

The 2halloween_hd_mm.psd file in the 2halloween Folder was right clicked, Open With selected from the drop down menu, followed by Adobe Photoshop Elements 12. The Layer Sets of the .psd were reordered, displaying as shown in Figure 3. Changes were saved.

STEP3
Placement of the 2halloween Folder in the Correct Hard Drive Location

The 2halloween Folder with the Layers Set revised 2halloween_hd_mm.psd and the original 2halloween_hd_sm.psd was placed in the following path

Local Disk C
Program Files
Adobe Premiere Elements 12
DVD Templates
Common
ATR Specials (created for the occasion)
and in the ATR Specials Folder was placed the 2halloween Folder which contain the .psd files named 2halloween_hd_mm.psd and 2halloween_hd_sm.psd.


COMMENTARY

At this time, I cannot tell if the default highlight sequence seen in 11 and 12 was a consequence of Adobe moving this theme into the regular group of disc menus of 11 and 12 or whether what is is what was.

_________________________________________________________________________________
* Premiere Elements 12 and Photoshop Elements 12 were used in this work and run on Windows 7 Professional SP1 64 bit.


September 03 2014 Add On
Also see blog post
PE: Disc Menu Folders/Files Locations
http://atr935.blogspot.com/2014/09/pe-disc-menu-foldersfiles-locations.html


ATR


Wednesday, June 18, 2014

PE12: Audio Losses After Narration Addition

INTRODUCTION

A January 2014 online forum thread  appears to be the first report of Premiere Elements 12 loss of sound on numbered audio tracks and Soundtrack when narration was added to the project using the program's Narration Tool. I could not reproduce the problem in order to work on a resolution to the problem. It was suspected then that this was a "one time issue". However as time passed, the reports of this problem specific to Premiere Elements 12 began to increase. The Premiere Elements 12 to 12.1 Update does not appears to have had any impact on the situation.

ISSUE

Premiere Elements 12 loss of sound on numbered audio tracks and Soundtrack when narration is added to the project using the program's Narration Tool is not a problem encountered by all, including myself. So, how do we correct the problem for those who do run into it in their Premiere Elements 12 workflows?

SOLUTION 

Solutions came from the Premiere Elements 12 users who were caught up in the issue.

One solution to the ISSUE is to create the narration clip in a free audio editor such as Audacity and then import that narration clip into the Premiere Elements 12 project with Premiere Elements 12's Expert workspace Add Media/Files and Folders/Project Assets from where the narration is dragged to the Narration Track.

It was the ID Llamadude99 who discovered how to fix the Premiere Elements 12 problem within Premiere Elements 12 without having to resort to Audacity to produce the narration instead of the Premiere Elements Narration Tool. On March 2, 2014, she wrote
I was trying different things and I went to tools to narration. I removed the mute audio before recording, then deleted the narration I previously did and then pressed undo, to bring it back and my audio returned on my video. Very strange but it worked. 
In May 2014 the ID Dolbaden posted with this Premiere Elements 12 problem and, after being informed of Llamadude99's fix, wrote
I spent hours trying to find a solution and in the end came up with a one similar to Llamadude99.
What I did was to reopen the narration window remove the mute command then press the run button (not the record) then the pause and close the window. The sound had now returned to the other tracks and I still had the narration. I have repeated this a number of times and it seems to work every time.
Also in May 2014 the ID tommy_lop posted with this Premiere Elements 12 problem and, after being informed of Llamadude99's fix, wrote
Yes \ it does seem to work on most clips....

Actually, I think just unmuting narration, hitting play while still in the narration pane, and then hitting done has the same affect without having to do so many steps.
In June 2014 the ID jsgmax posted with this Premiere Elements 12 problem and, after being informed of Llamadude99's fix, wrote confirming the Llamadude99's fix.

Many thanks to all those Premiere Elements 12 Windows and Mac users who brought the ISSUE forward and contributed resolution. Great job.

_______________________________________________________________________________

Information as to the cause of this ISSUE will be posted in this blog post when and if it becomes available.

Update 1

In July 2014 the ID  thedogs2 posted the Premiere Elements 12 problem
Using Adobe Premiere elements 12. Added sound narration. Now Sound from video recording (Audio 1) gone. Sound bar is there and nothing is turned down. Simply not audible
This user reported the fix for that situation as
In my case, I too the microphone off-line and then stopped (cancelled) the mute box in the narrative recording, and that appears to have resolved the problem, though I had to do it again after recording more narrative. 


ATR


Friday, June 13, 2014

PE12: Audio Display Formats - Audio Samples and Milliseconds

INTRODUCTION

A Premiere Elements 12 user wanted greater precision when editing audio. The "Milliseconds" instead of "Audio Samples" (the default) Audio Display Format appeared indicated based on its description in the Adobe document on "Premiere Elements/Project Settings and Presets".
          Display Format (audio)
Specifies whether audio time display is measured by using audio samples or milliseconds. By default, time is displayed in audio samples. However, you can display time in milliseconds for sample‑level precision when you are editing audio.
This Audio Display Format setting is found in version 12 in Expert or Quick workspace under Edit Menu/Project Settings/General. Also set there is Video Display Format 30 fps Drop-Frames Timecode (default), 30 fps Non-Drop-Frame Timecode, or Frames.

When a movie file is imported into a project with the default Video Display Format, its total duration is displayed in Project Assets in a timecode format (00:00:00:00 which represents hours:minutes:seconds:frames). The lowest read is one frame (equivalent to 0.033 seconds in a 30 frames per second setup; 0.040 seconds in a 25 frames per second setup). That same total file duration can be seen at the Timeline level whether the Timeline content is that movie's video portion, video with linked audio, audio with video deleted, or audio unlinked from video.

But, if an audio file is imported, the total duration is represented differently as compared to movie and also differs depending on the Audio Display Format. Compare:

Sleep Away.mp3

Audio Display Format "Milliseconds"
Project Assets
File Duration = 00:03:20:881
Timeline Timecode
File Duration = 00;03;20;27

Audio Display Format "Audio Samples"
Project Assets
File Duration = 00:03:20:38880
Timeline Timecode
File Duration = 00;03;20;27

The data above are data when the Video Display Format in Project Settings was set at 30 fps Drop-Frames Timecode (default). But the data above are essentially independent of the Video Display Format with the following notation - when the Video Display Format is set in Project Settings at Frames instead of one of the timecodes, the File Duration at the Timeline level is 6021 frames instead of 00;03;20;27 in each of the above.

ISSUE

What is the explanation for the Project Assets audio clip file duration displayed when Audio Display Format = "Milliseconds" or "Audio Samples"?

With the "Milliseconds" Audio Display Format, what should be expected for the duration display, at Project Assets as well as at Timeline level? Where is this milliseconds display that we should be looking for at the Timeline level as we seek to take advantage of the "Milliseconds" set and the   expectation for greater sample level precision using that setting when editing audio?

SOLUTION/EXPLANATIONS

What is the explanation for the Project Assets audio clip file duration displayed when Audio Display Format = "Milliseconds" or "Audio Samples"?

Audio Display Format "Milliseconds"
Project Assets
File Duration = 00:03:20:881
Timeline Timecode
File Duration = 00;03;20;27

With the "Milliseconds" set, the 881 in the fourth sector of the file duration in Project Assets was considered to represent milliseconds units to give a total file duration of 3 minutes 20.881 seconds.

Audio Display Format "Audio Samples"
Project Assets
File Duration = 00:03:20:38880
Timeline Timecode
File Duration = 00;03;20;27

With the "Audio Samples" set, the 38880 in the fourth sector of the file duration in Project Assets was considered to represent the audio sample unit. To convert audio samples to milliseconds, audio samples/sampling rate = milliseconds. Therefore, 38880 audio samples/44.1 kHz (audio samples/millisecond) = 881.63 milliseconds. Consequently, the total file duration with the "Audio Samples" set is 3 minutes 20.882 seconds, essentially the same as with the Milliseconds set. Consequently, Project Assets display of total file duration seems to be meeting expectations based on audio sample versus milliseconds concepts.

The Timeline Timecodes seen for the SleepAway.mp3 in this case are not understood by this writer at this time. With either the "Milliseconds" or "Audio Samples" set, the file duration timecode is the same 00;03;20;27. If the fourth sector  of the file duration here = frames, then the file duration would be 3 minutes 20.9 seconds (in a 30 frames per second set up) in close agreement with the Project Assets data for total file duration.

With the "Milliseconds" Audio Display Format, what should be expected for the duration display, Project Assets as well as at Timeline level? Where is this millisecond display that we should be looking for at the Timeline level as we seek to take advantage of the "Milliseconds" set and the expectation for greater sample level precision using that setting when editing audio?

The thought is that, with the "Milliseconds" set, the fourth sector of the Timeline Timecode  File Duration would represent milliseconds instead of frames/samples. It does not appear to be doing that. In the case of the "Audio Samples" set, one might expect the timecode duration to represent hours;minutes;seconds;frames since Adobe frequently uses frame as a counterpart for the audio sample. But, in the case of the "Milliseconds" set, the questions become
  • Is the "Milliseconds" option not working at the Timeline level
or
  • Is the Timeline Timecode duration meaningless and is a behind the scenes operation involved in gaining the greater sample level precision when editing audio? 
The Project Settings' Audio Display Formats were also looked at in Premiere Elements 4, 7, 8.0/8.0.1, 9.0/9.0.1, 10, 11, and 12/12.1 Windows 7 Professional SP1 64 bit with the same Sleep Away.mp3 music file, and essentially the same results were obtained. See Table 1.

Table 1. Sleep Away.mp3 Music File Duration Displays, Premiere Elements 4 Through 12, When Audio Display Format Was Set At "Audio Samples" Versus "Milliseconds"

COMMENTARY

We wonder...when version 12's Audio Display Format is set for "Milliseconds", even though we are seeing the Timeline Timecode = 00;03;20;27, it it really 00:03:20:881 working behind the scene with the Sleep Away.mp3 file?
__________________________________________________________________________


ATR


Sunday, June 8, 2014

PE: 24p Conversion Methods, Pulldowns, and Related Interpret Footage

INTRODUCTION

For a long time I have been trying to figure out what Premiere Elements 24p Conversion Methods in Playback Settings are all about. And, matters were complicated when Premiere Elements 12 (latest version) was released without any signs of Playback Settings dialog which contained the two 24p Conversion Methods choices.

ISSUES

  • 24p DV and 24p HD
  • 24p Conversion Methods in Playback Settings
  • Interpret Footage/Frame Rate/ "Remove 24p DV Pulldown" Option
  • Publish+Share/Computer/MPEG and "Pulldown" Option in Preset for HDTV 1080p24 High Quality and HDTV 720p24 High Quality

SOLUTION

Based on mini test runs in Premiere Elements (various versions) and from what I have read (mostly Premiere Pro sources), I have put together an explanation of the Premiere Elements 24p options for you to review and consider. The 24p DV.mov and 24p HD MPEG2.mpg files used for this study were created in Premiere Elements 11/Publish+Share/Computer/QuickTime with the 24p NTSC video codec and in Premiere Elements 11/Publish+Share/Computer/MPEG with the HDTV 1080p24 High Quality export setting respectively.

24p DV and 24p HD

The Premiere Elements 24p Conversion Methods in its Playback Setting and the related "Remove 24p DV Pulldown" option in Inteterpret Footage/Frame Rate appear to be specific for 24p DV. 

24p Conversion Methods in Playback Settings

The 24p Conversion Methods in Premiere Elements Playback Settings can be thought of as instructions to be used by a connected external NTSC device for converting the 24p DV to 29.976 for playback on external NTSC 29.976 device. If no external device attached, then these 24p Conversion Methods can be ignored. The key words here are 24p DV, not 24p HD, and the need for 24pDV to be converted to 29.976 for playback on external NTSC 29.976 monitoring devices. These 24p Conversion Methods are involved in external monitoring and do not affect the monitor playback within the project.

The Premiere Elements 4 to 11 user using an external NTSC monitoring device can select one of the two 24p Conversion Methods in Playback Settings to obtain the conversion of 24p to 29.976.
  • Repeat Frame (ABBCD)
  • Interlaced Frame (2:3:3:2)*
The focus here will be on the Interlaced Frame (2:3:3:2) method which is seen as the default.

The instruction for the 24p DV to 29.976i conversion is referred to as a pulldown and can be thought of as a flag to be recognized by the connected external device for the 24p to 29.976i conversion for display purposes on the external NTSC device. Probable details of this Adobe 2:3:3:2 pullown flag are discussed in footnote*.

Factoring in the Interpret Footage 24p Related Settings

Irregardless of the import, the Interpret Footage dialog comes with a Frame Rate section which includes
  • Use Frame Rate from File
  • Remove 24pDV Pulldown, with box for with or without check mark
  • Duration

In the case of a video import, "Use Frame from file" will display the Frame Rate from the properties of the imported file. The "Remove 24pDV Pulldown" option will be grayed out unless the imported file is 24pDV. And, the Duration will be representative of the duration of the imported file. If a 24pDV is imported into the project, its associated Interpret Footage dialog will specifically display
  • Use Frame Rate from File 23.9760
  • Remove 24pDV Pulldown will be active with a check mark.
  • Duration will be representative of the duration of the imported file
If the check mark is removed from the Remove 24pDV Pulldown, the "Use Frame Rate from File" becomes 29.9700. The Duration remains as before the removal of the check mark next the "Remove 24p Pulldown". See Figures 1 and 2.

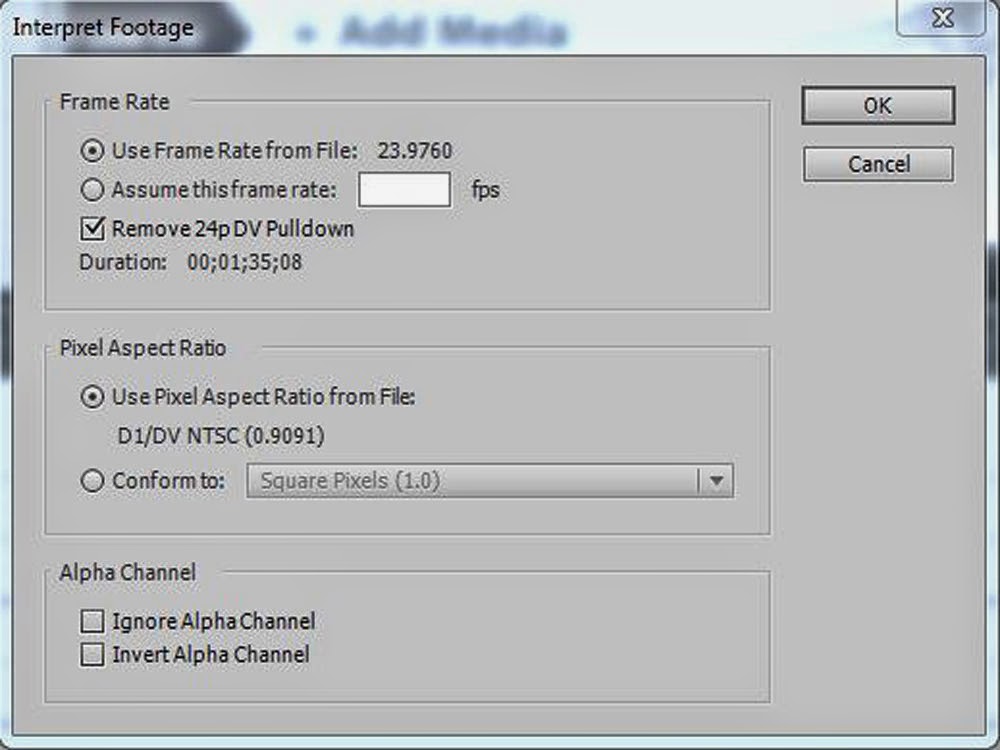
Figure 1. 24pDV File Import's Interpret Footage Dialog. Default View Displaying Check Mark Next To "Remove 24pDV Pulldown" And "Use Frame Rate From File" = 23.9760.


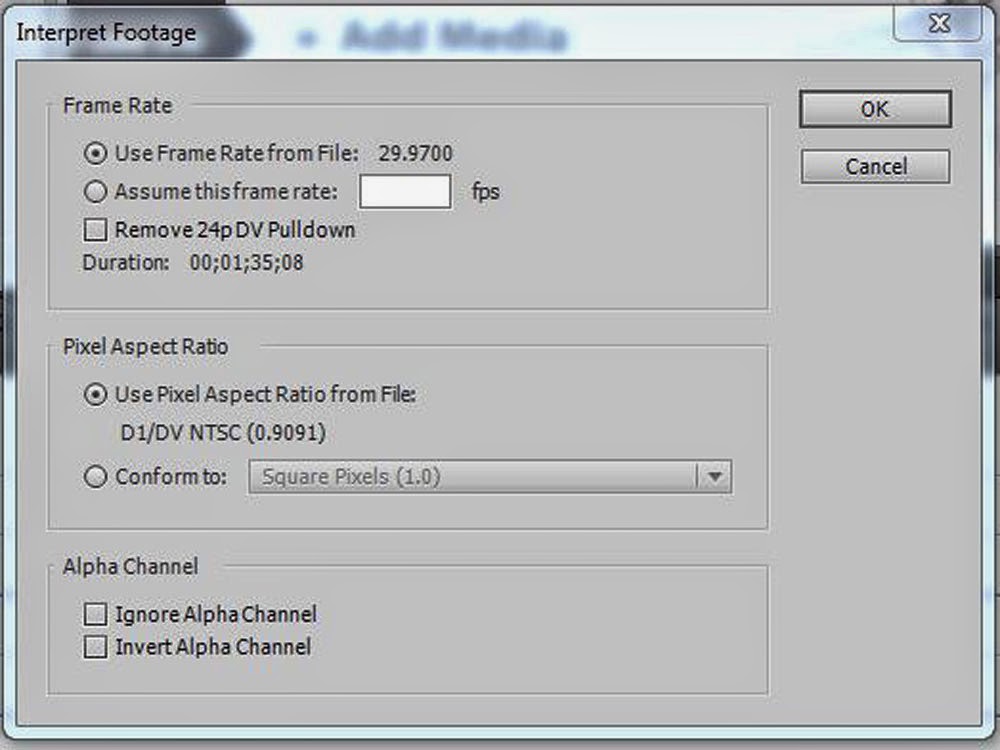
Figure 2. 24pDV File Import's Interpret Footage Dialog. The Default Check Mark Removed Next To "Remove 24pDV Pulldown" And Now Displaying 29.9700, Instead Of 23.9760 For "Use Frame Rate From File".

With or without the check mark next to "Remove 24pDV Pulldown" appears to have nothing to do with actual removal or addition of frames to Timeline content. Without the check mark seems to be directing the Playback Settings to go ahead and use the 24p Conversion Method (Interlaced Frame 2:3:3:2 Pulldown) there for the 24p to 29.976i conversion instructions  to the connected external NTSC 29.976 monitoring device. With the check mark, on the other hand, is directing the Playback Settings to ignore the 24p Conversion Method instructions in its settings.

Bottom line is that all of this can be ignored if there is no external monitoring of the project involved.

HDTV MPEG2.MPG  24p Exports And Pulldown Flags In The Export Settings

The HDTV 1080p24 High Quality and the HDTV 720p24 High Quality presets under Publish+Share/Computer/MPEG were the only Publish+Share presets found to include any option to apply a Pulldown flag to a 24p export. It is presumed that this flag would instruct the NTSC playback device as to what method to use for a conversion of the 24p frame rate to 29.976 interlaced format required by HDTV for display purposes. This Pulldown setting is found under the Advanced Button/Video Tab of the two MPEG2 presets, and the choices are:
  • None (described "interlaced video source")
  • 2:3 (described "progressive source")
  • 3:2 (described "24p source going to NTSC")
See Figure 3.

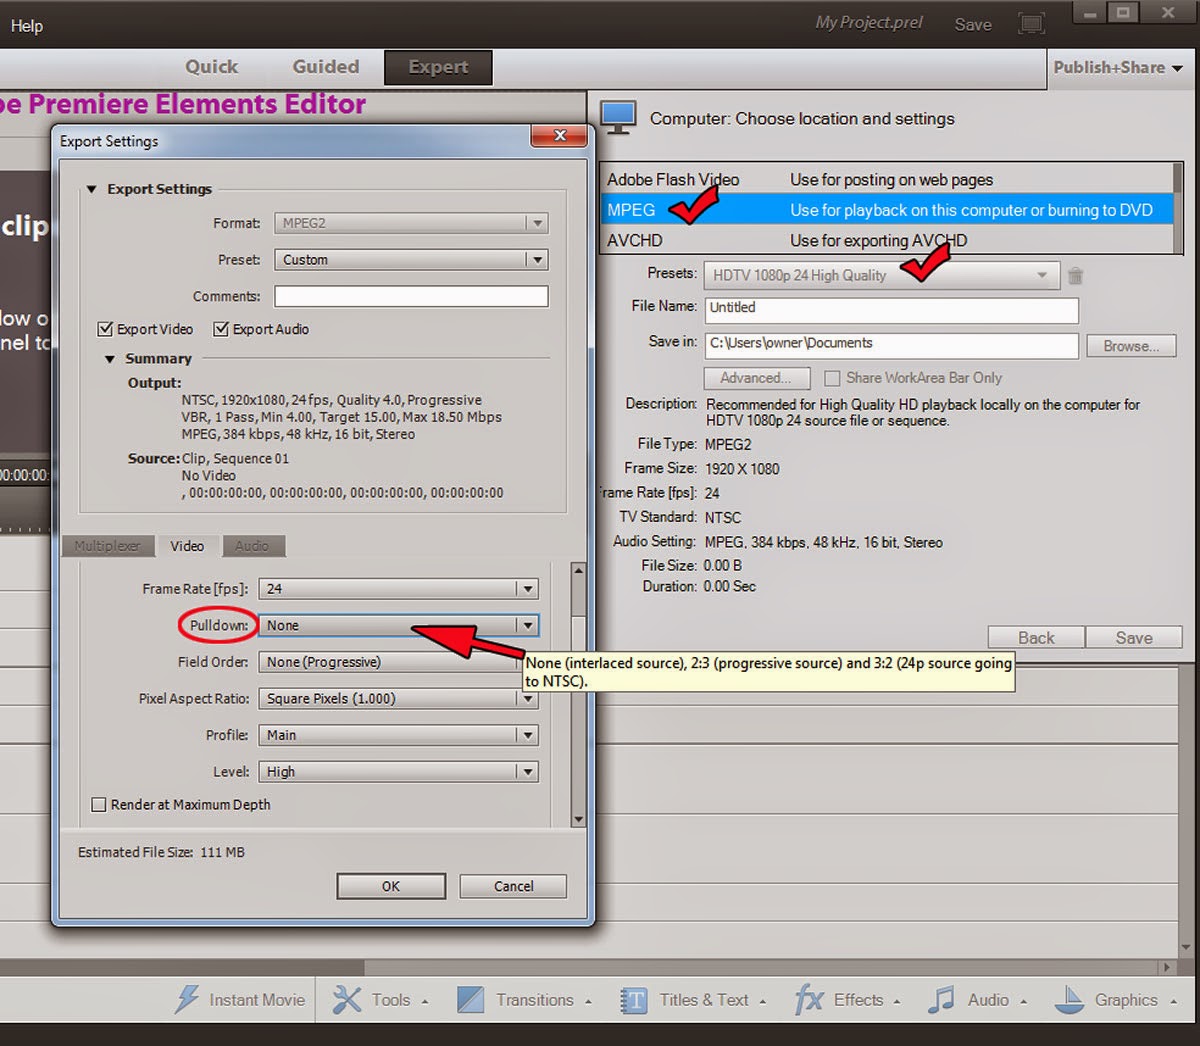
Figure 3. Pulldown Options For MPEG2.MPEG2 HD 24p Export

 
Note, in Figure 3, Export Settings dialog's Frame Rate is at 24 frames per second (the default for that HDTV 1080i24 High Quality preset). At this 24 frames per second set, the Pulldown field automatically shows the "None" choice. However, when the Frame Rate is changed to 23.976 frames per second, the Pulldown field automatically goes to the "3:2" choice.

One of the puzzlements here has been that whether 2:3 or 3:2 is selected for that export Pulldown option, the MediaInfo properties readout for the exported HDTV MPEG2.mpg 24p file shows Scan Order = 2:3. It is unclear if this reflects a MediaInfo inability to distinguish between the subtle difference between 2:3 and 3:2 or a Premiere Elements programming problem.

If the interpretations of all this are correct, then the significance of setting this export settings pulldown option goes to the specifications of the player to be used for playback of the export.

COMMENTARY 

Still a work in progress is the thinking on the rationale for the "None" option in the Pulldown Options for HDTV MPEG2.mpg 24p export. It can be seen why "None" would be applied if frame rate conversion (24p to 29.976i) for playback was not a consideration. But it is still not clear what the relationship is between "None" and its modifier, "interlaced source".

Another work in progress type issue is trying to figure out whether the Premiere Elements Playback Settings' 24p Conversion Method Repeat Frame (ABBCD) instruction to the NTSC device is 24p to 29.976i or 29.976p. The following online article supports my thinking that this instruction is 24p to 29.976p and not 24p to 29.976i.
http://forums.creativecow.net/thread/8/1166301

As mentioned in the INTRODUCTION, Premiere Elements 12 (latest version) was released without any signs of Playback Settings dialog which contained the 24p Conversion Methods options. The same results were obtained in this blog post 24p study when using Premiere Elements 12 or 11, but, in 12, there Playback Settings dialog could not be seen nor accessed with or without an external NTSC device connected to the computer environment.

This writer has no Adobe insider information on what has been written in this blog post. What is written here relects an interpretation of what has been read on the topic and looked at first hand in Premiere Elements to the extent described above. This blog post will be updated as necessary with additional insights into the subject of "PE: 24p Conversion Methods, Pulldowns, and Related Interpret Footage" and/or will be updated with corrections for any mis-interpretations if any of the interpretations are shown to be flawed.

Please review and consider.
_______________________________________________________________________________
*Pulldown Naming Confusion
The classically designated 3:2 Pulldown Flag can have other names, such as
2:3
3-2-3-2
2-3-2-3
A good graphic view of what is happening when the 3:2 Pulldown Flag (24p to 29.97i) is applied to 24p can be found in  
"About 3:2 and 24pA pulldown" section in the Adobe Premiere Pro document
http://helpx.adobe.com/premiere-pro/using/creating-changing-sequences.html
as well as in
http://neuron2.net/LVG/telecining1.html
 
What is that all about as it relates to pulldowns in 24p Conversion Methods in Playback Settings and pulldowns in HDTV MPEG2.mpg export settings? My take on this is as follows.

Pulldowns in HDTV MPEG2.mpg Export....
These Pulldown Flags involve instructions for the conversion of film frames to fields (see details in links above). In the frames to fields scheme of 4 film frames A, B, C, and D, it is the first (A) and third (B) film frames that become 3 fields instead of 2. Therefore
A (3 fields), B (2 fields), C (3 fields), and D (2 fields). If the cycle starts with A and goes to D, then the 3:2. If the cycle starts at B and goes to D and repeats, then 2:3.
http://en.wikipedia.org/wiki/Three-two_pull_down
So, basically in the export area, the 3:2 Pulldown is being used whether it is called 3:2 or 2:3.

Interlaced Frames (2:3:3:2) 24p Conversion Method in Playback Settings
Although similar in concept to the 3:2 Pulldown Flag, this 2:3:3:2 is different with regard to the 3:2 pulldown's  pattern of number of fields from frames. Therefore, the 2:3:3:2 pulldown presents with
A (2 fields), B (3 fields), C (3 fields), and D (2 fields).
http://documentation.apple.com/en/cinematools/usermanual/index.html#chapter=13%26section=3%26tasks=true
as compared to 3:2 pulldown
A (3 fields), B (2 fields), C (3 fields), and D (2 fields).

It is interesting to note that Premiere Pro, like Premiere Elements, lists Interlaced Frame 2:3:3:2 as one of its 24p Conversion Methods in Playback Settings. But each appears to be using a 3:2 pulldown where applicable for a 24p export.