Saturday, December 29, 2018

PE: Slideshow Photos at Music Beats

INTRODUCTION

Placing slideshow photos at music beats has been feature of Premiere Elements at least from 4 through 2019 soundtrack/music track. These versions include
  • "detect beats" choice with manual placement of photos at the beat markers automatically set by "detect beats" choice 
or instead
  • unnumbered markers manual placement coupled with media's Create Slideshow choice for automatic placement of photos at the unnumbered markers.
Especially for Premiere Elements 11 through 2019, refer to HERE for the Adobe document "Using soundtracks" and its section titled "Create beat markers for soundtracks". That document has "Applied to: Premiere Elements" and "Last Published: July 28, 2017". Also, refer to HERE for my comments in the old forum thread titled "Beat Markers" and dated March 26, 2014.

ISSUE

It was decided to share some notes on the subject, pointing out that even the media's Create Slideshow option has survived through Premiere Elements 2019.


OBSERVATIONS

For automatic placement of beat markers and manual placement of photos at those Timeline beat markers -
I used Beat Detect option in called Timeline workspace (versions at least 4 to 10) or called Expert workspace (versions 11 through 2019). Beat Detect Settings dialog and its default settings shown in Figure 1 are representative of that dialog from all the versions.


Figure 1. Beat Detect Settings Dialog And Its Default Settings Representative Of That Dialog In Premiere Elements Versions At Least 4 Through 2019.
Each photo was then dragged to an automatically placed beat marker, and photo was manually  adjusted as needed.


For manual placement of unnumbered markers at music beats heard by user and Create Slideshow automatic placement of photos at Timeline unnumbered markers -
I ran the audio clip, and, as the music played, I hit the * key to place the unnumbered marker(s) across the audio clip duration at spots where I believed I heard a music beat. This worked using the * key of the computer auxiliary keyboard (not the * key above the 8 of the computer main keyboard). Then I went to Project Assets (versions 11 through 2019), selected more than one photo at a time, right clicked in the selection, and clicked on Create Slideshow option. In the Create Slideshow dialog, I made sure that I had a check mark next to "Place Images/Clips at Unnumbered Markers". The Create Slideshow dialog and its settings shown in Figure 2  are representative of that dialog from all the versions.


Figure 2. Create Slideshow Dialog And Its Default Settings Representative Of That Dialog In Premiere Elements Versions At Least 4 Through 2019.
Note: "Place Images/Clips at Unnumbered Markers" was grayed out unless I had the unnumbered markers placed before going to the Create Slideshow which was available from the project media area. In some earlier versions of Premiere Elements (like 4 and 7), the Create Slideshow option was not present unless the media were being viewed and selected in the Project header/List View and a file thumbnail right clicked to get at the Create Slideshow option and dialog.

COMMENTARY

It was interesting to follow the evolution of this topic. Back in the days of Premiere Elements 4 and 7, that Create SlideShow dialog worked for automatic placement of photos at beat markers or unnumbered markers even though the selected option in the Create Slideshow option reads "Place Images/Clips at Unnumbered Markers".

More information to be posted when available.*

____________________________________________________________________________
*Generalization for Premiere Elements 11 - 2019 versions with Video Story and Instant Movie features: Adobe's placement of beat markers as part of an Instant Movie theme can be seen after the completed Instant Movie is broken apart at the Premiere Elements Expert workspace Timeline. There was no sighting of beat marker placement in a Video Story theme, another one of the "template based movie" features.


Monday, December 17, 2018

PE 2019: Quick Workspace Music Remix Adobe Documentation Issues

INTRODUCTION

The music Remix feature was introduced to Premiere Elements in version 15 and carried over to the subsequent versions of 2018 and current version 2019. See HERE for the ATR Premiere Elements Troubleshooting blog "PE 15: Music Remix (NEW), Fitting Music to Movie" dated December 25, 2016.

The Adobe's description is "The music Remix feature in Premiere Elements allows you to easily increase or decrease the length of an audio clip to match the desired duration without losing the continuity of the audio content."  It is supposed to work in the Expert and Quick workspaces. Essentially, the music Remix feature is aimed at allowing the user to change the user personal music file duration without changing the music arrangement - basically a conversion of user personal music file to a music score type.

ISSUE 

The online Adobe Premiere Elements help document for music Remix shows a generalized  "Applies to: Premiere Elements" and a last published date of the other day December 14, 2018. See HERE. The details for the feature in the Expert workspace of 15, 2018, and 2019 and Quick workspace in 15 and 2018  appear to be as advertised; but not so for the feature in the revised Quick workspace of 2019. Shortcoming - the Quick workspace illustration and details are not those for what was actually found in the 2019 revised Quick workspace.

OBSERVATIONS

Music Remix of a soundtrack was possible in the Music Track in Expert workspace of 15, 2018, and 2019 in the absence of an image in Video Track 1. And, Music Remix of a soundtrack was possible in the bar labelled for audio/sound clips in the Quick workspace of 15 and 2018 in the absence of an image in the scene space of the filmstrip.

In contrast, in the 2019 revised Quick workspace's music Remix feature focus appeared to be on a limited "Fit to Movie" although incidentally the fitting might be happening using a music Remix programming.

Noted in the 2019 revised Quick workspace's music Remix feature
  • The imported soundtrack in the audio/sound clips bar presented as a band which had at its right edge a white circle with gray triangle...clicking on the gray triangle gave a pop up which included a "Fit to Movie" option...that option was grayed out unless there was an image in the first scene space of the filmstrip. 
  • Clicking on the "Fit to Movie" option brought up a Remix action dialog with a "preparing your clip for Remix" message. 
  • The end result might best be described as using a "Fit to Movie" option so that the soundtrack was fitted to the total duration of the filmstrip scene space images, and, in this fitting, a music Remix program was used. There is no signs of any remix handles in this new 2019 revised Quick workspace at the level of the imported soundtrack in the workspace's  audio/sound clips bar.

COMMENTARY

The simplest case* for getting through a music Remix workflow in 2019 revised Quick workspace appeared to be:
  • Import one or more images to filmstrip scene spaces
  • Import a single soundtrack into the audio/sound clips bar
  • Use "Fit to Movie" option found in pop up from soundtrack in audio/sound clips bar in order to get soundtrack to fit to total duration of the scene space images.
The Adobe documentation for its Premiere Elements music Remix feature did not agree with what I actually found in Premiere Elements 2019 Quick workspace. Until proven otherwise, it appears that Adobe Premiere Elements 2019 help documentation for its 2019 revised Quick workspace should be looked at by Adobe. It is not understood why Adobe documentation dated only the other day should contain this kind of issue (now about 2 months after release of the 2019 version).

More news to follow on this topic as more information becomes available.** Still reviewing any user misinterpretation versus 2019 documentation update needed from Adobe.

____________________________________________________________________________
*One scenario explored was filmstrip with 6 scene space images (each 5 seconds duration), and two soundtracks in the audio/sound clips bar. To get first soundtrack fitted to first 3 scene space images and the second soundtrack fitted to last 3 scene space images....
3 scene space images  imported
First soundtrack imported
Fit to Movie option applied
then
3 more scene space images imported
Second soundtrack imported
Fit to Movie option applied
**Sound quality of Remixed soundtrack was not good nor smooth in these quick explorations. Music Remix Target duration less than 60 seconds probably impacted that sound quality issue. The latter minimum Remix duration was found to apply to the Remix feature and not the Premiere Elements version/workspaces.  A lot more explorations into music Remix in 2019 revised Quick workspace needed.


ATR

Saturday, December 8, 2018

PE 2019: Picture-In-Picture Effect in Revised Quick Workspace Removed?

INTRODUCTION

"Workspace Basics" dated October 4, 2018 is one of the Adobe Premiere Elements 2019 documents published online at the time of the release of the Premiere Elements 2019 latest version. The document details include those for the 2019 revised Quick workspace as well as those for the prior 2018 Quick workspace. See HERE. There is no mention of the picture-in-picture effect in this document for either version 2019 or 2018. And, the latest Adobe document found to address create a picture-in-picture overlay in Quick view was dated July 28, 2017. See HERE and its sections for "Create a picture-in-picture overlay in the Quick view" as well as "Create a picture-in-picture overlay in Expert view".

ISSUE*

The details for "Create a picture-in-picture overlay in Quick view" were found applicable to Premiere Elements 2018 but not Premiere Elements 2019. No way was found in those details to create a picture-in-picture effect in Quick workspace of Premiere Elements 2019. I had to go to the Premiere Elements 2019 Expert workspace in order to create a picture-in-picture effect in a project. These studies were done with Premiere Elements 2018 and 2019 on Windows 7 Professional SP1 64 bit, Windows 10 Home 64 bit, and Windows 10 Professional 64 bit.

DETAILS

Premiere Elements 2018 Quick workspace picture in picture workflow that will or will not work in Premiere Elements 2019 Quick workspace

STEP 1
Add Media/Files and Folders to import background image (photo or video) with the Open command of the Add Media dialog. Instead of Add Medial/Files and Folder route to the background image, Windows key + E followed by selected image drag and drop into Quick workspace monitor.
Note: worked in 2018 and 2019.

STEP 2
Windows key + E** to bring up Windows Explorer/File Explorer and then navigation to photo or video wanted as overlay. Drag of selected image into monitor of Premiere Elements 2018 Quick workspace monitor, immediately followed by Picture in Picture pop up which included the picture-in- picture option.
Note: worked in 2018, but in 2019 there was no pop up with picture-in-picture option, and the end result was the image in its own scene space and not as an overlay for the background image in its scene space.

STEP 3
Clicked on picture-in-picture option which immediately placed overlay on background image and generated a Picture in Picture dialog which included settings for overlay duration, inserted at, ends at. Clicked Done when finished.
Note: worked in 2018, not applicable to 2019 since no Picture in Picture option in Step 2.

SOLUTION

No explanation nor solution for the above results was found for the Premiere Elements 2019 Quick workspace behavior related to the picture-in-picture effect. Pending further insights into this situation, two workarounds used for this 2019 Quick problems were
  • Better to do picture-in-picture effect in Premiere Elements 2019 Expert workspace - worked for video-in-video, photo-in-video, video-in-photo, and photo-in-photo.
  • But possible in Premiere Elements 2019 Quick workspace, to do opened Titler's Text Menu/Add Image (See HERE) - worked for photo-in-video and photo-in-photo.

More information as it becomes available related to
  • This Premiere Elements 2019 issue
  • Adobe documentation and update needed
  • User misunderstanding
  • Other

COMMENTARY

There is a fine line between "revised workspace" and "feature removed from a workspace". I am still exploring the difference.

FYI note - Adobe's acknowledged list of "no longer supported by Premiere Elements 2019" includes
  • Flash files
  • DVD (Mac only)
  • Quick time format
  • Direct share on Facebook
See HERE for Adobe document containing 2019 removed features details.
 
 _____________________________________________________________________________
*As an aside note, I am also having problems with opening Guided lessons in the Premiere Elements 2019 Quick workspace. See HERE.
**This step also worked by using cascading windows technique instead of Windows key + E.

Tuesday, December 4, 2018

PE 2019: Guided Edits Opening Only For Expert Workspace Based Lessons

INTRODUCTION 

The Premiere Elements 2019 Editor workspaces (modes) are Quick, Guided, and Expert. The Guided mode  is described by Adobe in its October 4, 2018 document titled "Guided Mode" found HERE. The Guided mode offers a variety of lessons (reportedly with Quick and Expert versions). To navigate to the Quick version of a Guided lesson, Adobe says click Quick tab, then click Guided tab. To navigate to the Expert version of a Guided lesson, Adobe says click Expert tab, then click Guided tab.

For Premiere Elements 2019, the titles for the Guided Edits categories and lessons are:
 
Basics
Get Started
Trim and split clips
Add transitions between clips
Add Titles

Video Adjustments
Fix brightness, color, and contrast
Color Pop
Animate graphics
Add an adjustment layer
Fix action cam footage
Luma fade transition effect  (New)

Audio Adjustments
Add narration
Add a musical score

Fun Edits
Put a video inside your title
Crate slow or fast-motion effects
Crate a picture-in-picture effect
Apply an effects mask
Create a freeze frame with motion title
Create an animated social post
Create Bounce Back Effect
Glass pane effect (New)

ISSUE

For Premiere Elements 2019 Editor, it did not matter if Quick tab/then Guided tab or Expert tab/then Guided tab, I find that always the Expert version of the selected lesson opens in the Expert workspace with instructions applicable to the Expert workspace.

In contrast, for Premiere Elements 2018 Editor, that issue was not found to exist. In Premiere Elements 2018, clicking Quick tab/then Guided tab has the selected lesson opening in Quick workspace with instructions applicable to the Quick workspace. And, clicking Expert tab/then Guided tab has the selected lesson opening in Expert workspace with instructions applicable to the Expert workspace.

I have seen this behavior with Premiere Elements 2018 and 2019 on 3 different computers ... Windows 7 Professional SP1 64 bit, Windows 10 Home 64 bit, and Windows 10 Professional 64 bit.

I have not found this issue reported online and am continuously looking for an explanation - program flaw or issue unique to my setup. The Adobe document cited above is dated October 4, 2018 with an Applies to: Premiere Elements. Because of the document dating, I have assumed that the document's instructions are applicable to Premiere Elements 2018 and Premiere Elements 2019.

Future areas of focus 
  • Premiere Elements 2018 used was purchased version; whereas, Premiere Element 2019 was tryout version (which are typically full featured).
  • Adobe October 4, 2018 document's instructions might not have been updated for Premiere Elements 2019.

SOLUTION

No solution found to date. Over the years I have typically preferred the Expert workspace; consequently, the solution for some might be to use the Expert workspace for your projects, Guided or otherwise.

More information to follow as it becomes available.

_________________________________________________________________________

ATR 


Friday, November 30, 2018

PE 2018: Latest Supported Camera Raw Version

INTRODUCTION

The basic considerations for navigating to a decision on what you need to be able to edit your camera raw image in the Adobe Camera Raw Editor in a particular version of Photoshop Elements include:

  • Your camera model must be supported by the Camera Raw version installed
  • The Camera Raw version that supports your camera model must be supported by the particular version of Photoshop Elements

Adobe guides to these considerations can be found

"Cameras supported by Camera Raw" dated November 13, 2018 
https://helpx.adobe.com/camera-raw/kb/camera-raw-plug-supported-cameras.html 

"Camera Raw compatible Adobe applications" dated August 29, 2018 
https://helpx.adobe.com/camera-raw/kb/camera-raw-compatible-applications.html  

Reminders

For Photoshop Elements and Premiere Elements, the updated Camera Raw plugin is obtained via an opened project's Help Menu/Updates. In this process for Elements 10, 11, 12, 13, 14, 15, 16 (aka 2018), the Camera Raw plugin (Camera Raw.8bi) installs in a common location for Photoshop Elements and Premiere Elements in the path
Local Disk (C:)
Program Files
Common Files
Adobe
Plug-Ins
Elements 10, 11, 12, 13, 14, 15, or 16 (aka 2018)
Files Formats

Important for Premiere Elements only users....The Camera Raw Editor opens only in Photoshop Elements; but, the Camera Raw installation will support the import of raw and dng images into the Premiere Elements projects.


ISSUE

What is the last version of Camera Raw that is compatible with Photoshop Elements 2018/Premiere Elements 2018? Adobe's "Camera Raw compatible Adobe applications" data on that question seems to me to be unclear.

FURTHER DETAILS

Further details.....If Help Menu/Updates in the open project does not contain any Camera Raw update waiting to be downloaded and installed for your Elements version, it is typical to believe that the currently installed version of Camera Raw is the latest version for that Elements version.

The Adobe "Camera Raw compatible Adobe applications" document suggests to me that Camera Raw 10.0 should be the last Camera Raw version compatible with Elements 2018. Yet, Elements 2018's Help Menu/Updates in the opened project has a Camera Raw version 10.3 to download and install for Elements 2018. This was true for Elements 2018 on Windows 7 Professional SP1 64 bit and Window 10 Home 64 bit.

The following table summarizes the Adobe "Camera Raw compatible Adobe applications" data versus what was the latest Camera Raw version that I could get from various versions of Elements with its Help Menu/Updates.


Please refer to the ATR Premiere Elements Troubleshooting blog post which details how Camera Raw 8.2 was manually gotten into Elements 11, bypassing the Help Menu/Updates way. See HERE.

The Help Menu/Updates way to Camera Raw 10.3 in Elements 2018 went without issues when the programs were on Windows 10 Home 64 bit. But, with these programs on Windows 7 Professional SP1 64 bit, Photoshop Elements 2018 had to be reinstalled in order to use Help Menu/Updates for getting Camera Raw 10.3 in Elements 2018.

Work is now in progress to determine if Elements 2018 can work with a Camera Raw version greater than 10.3...either by manually forcing the update or by Elements 2018 Help Menu/Updates.

To be continued when more information is available. Just a reminder, the Photoshop Elements 2019 Premiere Elements 2019 Windows (tryouts of this latest version), came with Camera Raw 10.4 installed and the Help Menu/Updates grayed out. In a quick test, it was found that Camera Raw 10.4 (from Photoshop Elements 2019) worked in Photoshop Elements 2018.

__________________________________________________________________________


ATR


Thursday, October 25, 2018

PE 2019: Creating Text and Titles in Revised Quick Workspace

INTRODUCTION

Major revisions to the Quick workspace and workflow were found in the first look at Adobe's latest version, Premiere Elements 2019.  See HERE under Part 3/The Premiere Elements 2019 Editor/Workspaces/Quick Workspace.

ISSUE

One of the changes in the 2019 Quick workspace targets the how to for adding Text (as overlays) and Titles (Motion and Classic).

It was decided to work through this topic in this blog post.

HOW TO

Text 
(overlay, called caption by Adobe)

Step 1
Quick workspace has a Text Menu included with a row of menu choices at the top of its workspace, but the Text Menu's options there are inactive when a new project is first opened. See Figure 1. The access points for creation of Titles (Motion Titles and Classic Titles) is evident, but not for creation of Text overlays (text that will display on screen over the image that is in the scene space).

Figure 1. Premiere Elements 2019 Revised Quick Workspace In Search Of Options For Creating Text (Overlays) and Titles (Templates). Getting Started Look.
Step 2
Adding Text as an overlay (caption) for a clip in a scene space was found possible only after adding a clip to that scene space. After a clip was imported and clicked once in a scene space, a white bar with a T+ (with contextual text "click to add caption text") appeared above the clip. See Figure 2.

Figure 2. Premiere Elements 2019 Revised Quick Workspace Finding Text Overlay Opportunity Once Image Was Added To The Scene Space.
Step 3
Clicking the T+ in the white bar simultaneously opened the Titler and converted the white bar to a blue bar with clock icon/Change caption duration (for Duration, Starting settings), T+ icon/Edit caption, and triangle icon/Click to see more options (for Fade In, Fade Out, Delete settings). At this point, the Text Menu options were finally active, except for New Text and New Motion Title. See Figure 3.

Figure 3. Premiere Elements 2019 Revised Quick Workspace Showing Text Overlay (Caption) Opportunity After Image Imported Into Scene Space And Titler Opened. Text Menu Options Are Then Available, Except for New Text and New Motion Title.

Step 4
After the Titler is closed, the bar remains over the clip but as a white bar with icons for Change caption duration, T+ (Edit caption), and Click to see more options (for Fade In, Fade Out, Delete settings). Although the Titler opens with the default text of Add Text at the middle of the bottom of the image - typical location for a caption, that text can be repositioned. See Figure 4. The Text duration could not be made to exceed the duration of the clip; further, that duration of the Text file for a scene space image could not be dragged out to overlay images in adjacent scene spaces.

Figure 4. Premiere Elements 2019 Revised Quick Workspace When The Text Overlay (Caption) Was Done And The Titler Closed.


Title
(Motion Titles and Classic Titles)

Clicking on any one of the Quick workspace's Add Titles access points results in opening of Add/Titles in the vertical tools bar at the far right of the workspace. Drag/drop of one of these Motion and Classic Titles there has a destination of the next available empty scene space. With one of these Motion or Classic Titles in a scene space, there is no bar that is generated above the title in that scene space.

Editing the Motion Title was found available in a Motion Titles - Adjustments Palette, which displayed after the Motion Title in the scene space was double clicked. The editing/saving options in this Palette included Text, Graphics, Background/Save as New Title. See Figure 5.  
Note: Even with the "Motion Titles - Adjustments Palette" opened, the Quick workspace Text Menu options were all grayed out.

Figure 5. Premiere Elements 2019 "Motion Titles - Adjustments" Palette Used For Editing of Motion Title

Unlike Motion Titles editing, Classic Titles editing was done in the classical Titler (Text/Styles/Animation/Shapes), which opened when the Classic Title in the scene space was double clicked. See Figure 6.
Note: With the "Titler" opened, the Quick workspace Text Menu options were active, except for New Text and New Motion Title.


Figure 6. Premiere Elements 2019 "Titler" Used For Editing Of Classic Title.

COMMENTARY

Over the years I have used and have encouraged other users of Premiere Elements to use the Expert/Timeline workspace rather than the Quick workspace because the Expert/Timeline workspace has more assets, allows me and the users to see better what is going on and thus gives us more control over the project. I still maintain that point of view. And, switching between Quick and Expert workspaces in the same project can be very confusing whether using version 2019 or earlier. All that being said, back to the topic of this blog post - creating Text and Titles in 2019 revised Quick workspace.

An Adobe description of the 2019 revised Quick workspace as well as the 2018 Quick workspace can be found in the Adobe document titled "Workspace Basics", found HERE, and dated October 4, 2018.

The first First Look 2019 Quick workspace "attention getter" was needing to create text and opening project to find inactive options under Text Menu of the 2019 Quick workspace. See this blog post's details on that.

Not being able to drag one Text file to extend over images in adjacent scene spaces.

And, from the point of view of image overlays, not being able to create PIP (Picture in Picture) effect in 2019 Quick workspace using the "old" way of dragging an image into the Quick workspace monitor from Windows Explorer. See HERE.

Major revision in Quick workspace - no Graphics category in it right vertical toolbar - Add Media limited to Elements Organizer and Files and folder - spaces for videos and photos, but no pre-made  bars for Text, Narration, and Audio - no PIP effect dragging photo from Windows Explorer into Quick workspace monitor image - to name a few.

Again, the above information may or may not impact every reader...the "may not" user might include one:
  • who works in the Expert workspace
  • who is a new user who is not familiar with what used to be
Nonetheless, it is hoped that the above will be of service to most.

_________________________________________________________________________
*Until more 2019 Quick workspace PIP information is available from Adobe, I found that
a PIP could be created in 2019 Quick workspace opened Titler with workflow using Text Menu/Add Image with the assist from Text Menu/Transform/Scale and Text Menu/Arrange/Bring Forward or Send Backward, and PIP settings. By this means, PIP worked in the Quick workspace for jpg in jpg or jpg in video; video in a jpg or video in a video required Expert workspace.


Work remains in progress triple checking details for accuracy.

ATR


Thursday, October 18, 2018

PE 2019: New Guided Edit Lessons

INTRODUCTION

"Luma Fade Transition Effect" and "Glass Pane" are the two new Guided lessons that Adobe has  added to the Premiere Elements 2019 Guided workspace. See Adobe documents

"Create a Luma Fade Transition effect - Guided Edit"
https://helpx.adobe.com/premiere-elements/using/luma-fade-transition.html
document dated October 4, 2018

"Create a Glass Pane effect - Guided Edit"
https://helpx.adobe.com/nz/premiere-elements/using/glass-pane-effect.html 
document dated October 4, 2018

Although these guided lessons are new, the key tools for creating either of the above are not, with one exception; Adobe has added 5 new mattes (Expert Workspace/Graphics/Video Overlays) which can be used in Glass Pane.

To clarify, there is no Luma Fade transition that has been added to the program's list of video transitions. "Luma Fade Transition Effect" is basically an Adobe suggested application for the Gradient Wipe video transition that has existed in Premiere Elements Video Transitions/Wipes since at least version 4. Glass Pane appears to be an Adobe suggested application for a matte in conjunction with common  Track Matte and other fx Effects (like blurs and tints)

ISSUE

It was decided to explore "Luma Fade Transition Effect" and "Glass Pane Effect" and offer the findings in this blog post.

FINDINGS

"Luma Fade Transition Effect"

Video 1 below displays 3 different effects obtained when I was experimenting with the project's Gradient Wipe video transition and this "Luma Fade Transition Effect". The looks included a Black to White Colorizing Effect, a Drawing to Colorizing Effect, and a Face Changing Effect.

Video 1

The Expert workspace Timeline for the above .mp4 export is shown in Figure 1.

Figure 1. Premiere Elements 2019 Expert Workspace Setup Used For Creating Three Different Looks When Experimenting With Gradient Wipe Video Transition and "Luma Fade Transition Effect".
Referring to Figure 1, Expert workspace's Video Track 1 content - left to right

1. Hostas Flower jpg with Image Control/Black & White fx video effect applied
2. Same Hostas Flower jpg with original color
3. Hostas Flower jpg with /New Blue Cartoonr Plus Elements/Cartoonr Plus fx video effect applied
4. Same Hostas Flower jpg with original color
5. Angry Face from Graphics/Animated Objects
6. Sad Face from Graphics/Animated Objects
7. Smiley Face from Graphics/Animated Objects

A Freeze Frame was created at first frame of 2, 4, 6, and 7, and each was saved to a computer hard drive location.

A Gradient Wipe video transition was applied between 1 and 2, 3 and 4, 5 and 6, and 6 and 7. The application of this transition triggers a Gradient Wipe Settings pop up which includes Select Image (from a hard drive source) and a Softness slider (range 0 to 127, with default 10). In this example, there was
  • Gradient Wipe between 1 and 2, Select Image was Freeze Frame 2 from save on hard drive
  • Gradient Wipe between 3 and 4, Select Image was Freeze Frame 4 from save on hard drive
  • Gradient Wipe between 5 and 6, Select Image was Freeze Frame 6 from save on hard drive
  • Gradient Wipe between 6 and 7, Select Image was Freeze Frame 7 from save on hard drive
The Softness slider was left at the default 10.

After clicking OK to Gradient Wipe Settings pop up, there is a Transition Adjustment pop up which includes settings for the transition's Duration and opportunities under "More" for Alignment (Left clip, Between clip, Right clip), Start/end points, Reverse, and Custom. In this example Duration was set at 3 seconds Gradient Wipe between each 1 and 2, 3 and 4. A 2 seconds Gradient Wipe was used between 5 and 6, 6 and 7. All were with Alignment set at Between clips.

"Glass Pane"

Video 2 below compares the different Glass Pane effects generated when each of the 5 new Graphics/Video Overlays (01, 02, 03, 04, and 05) was used in conjunction with same image, Track Matte, Image Control/Black & White effect.

Video 2

Video 3 below displays 3 different Glass Pane looks that were created using Matte 01 with the same image, Track Matte, but using different fx effect applied to image copy on Expert workspace's Video Track 1. In this example, the fx effects looked at were None, Image Control/Black & White, and Fast Blur.

 Video 3

The Expert workspace Timeline for Video 2 is shown in Figure 2.

Figure 2. Premiere Elements 2019 Expert Workspace When Exploring The 5 New Graphics/Video Overlays In Conjunction With "Glass Pane Effect", Same Images, Same Track Matte, Same fx Image Control/Black & White.

COMMENTARY 

Lots of variations in these effects are possible. The above represents just a first look.

Because of my genealogy interests, I revisited the Gradient Wipe transition as a means to creating a composite image of a family member at different ages. For privacy reasons, I have used Premiere Elements Angry Face, Sad Face, and Smiley Face graphics to demonstrate this point rather than a image of a person. Refer to Video 1 and Figure 1.

All this might be an incentive to head to the Premiere Elements Titler to try to create new mattes for the Gradient Wipe transition. Looks like a "can do" in Premiere Elements Titler.
Note: The program files for Premiere Elements 2019 Expert workspace Graphics/Video Overlays are found on the computer hard drive at Local Drive (C:)/Program Files/Adobe/Adobe Premiere Elements 2019, Clip Arts, Common, Video Overlays. Based on MediaInfo data, it appears that Adobe created its Graphic/Video Overlays as videos with properties which include
Video Codec = avc1
File Extension = .mp4
Frame Size = 1920 x 1080
Frame Rate = 29.97 fps (constant) progressive
Duration = about 5 to 9 seconds
Bitrate = about 381 to 783 Kbps

As you can see from the Adobe watermarks in the blog figures and videos here, I am still working with the Premiere Elements 2019 tryout version that I downloaded from Adobe. I have still not gotten the Guided Edits to open in the Quick workspace. Still trying to determine what is going on there.

___________________________________________________________________________

As usual, work remains in progress for triple checking for accuracy.

ATR


Thursday, October 11, 2018

PE 2019: Instant Movie "Outdoor Adventure" Theme Issue Adobe Fix

INTRODUCTION

Over several years and Premiere Elements versions, there is an issue with use of the Instant Movie "Outdoor Adventure" theme. As late as the last version (version 2018), the issue presented with displays of a Media Off-Line message scattered throughout in the Instant Movie. See HERE for full details and suggested user solutions for the problem.

ISSUE

The appearance of these Media Off-Line messages is related to an "outdoor-adventure_s_texture.png" file that is associated with this theme.This is all explained in the blog post which is named PE: Instant Movie Theme "Outdoor Adventure" Glitch and which is referenced above.

For the latest version of Premiere Elements (2019) just released, Adobe appears to have addressed the issue and corrected it. My observations on this matter are described below in the ADOBE'S SOLUTION section.

ADOBE'S SOLUTION

Premiere Elements 2019 Instant Movie/Outdoor Adventure Theme 

Result:  No "Media Off-Line" messages glitches at Timeline and export levels were found.
My Comments: Using the workspace's Export & Share/Custom, the finished Timeline Instant Movie/Outdoor Adventure was exported as .wmv to demonstrate the absence of the "Media Off-Line messages in the 2019 Instant Movie/Outdoor Adventure.


The Instant Movie/Outdoor Adventure broken apart in the 2019 Timeline is shown in Figure 1 immediately below. The red dot points to the outdoor-adventure_texture.png file which Adobe renamed to replace the problematic outdoor-adventure_s_texture.png file.

Figure 1. No Media Off-Line Glitches In Premiere Elements 2019 Instant Movie/Outdoor Adventure. Shown Is The Completed Instant Movie/Outdoor Adventure Broken Apart In Timeline. Red Dot Points To Outdoor-Adventure_Texture.Png Which Adobe Named To Replace The Problematic Outdoor-Adventure_s_Texture.Png.
A key to all this...this outdoor-adventure_texture.png in the opened project now relates back to a file correspondingly named outdoor-adventure_texture.png found Local Disk (C)/Program Data/Adobe/Premiere Elements/17.0*/Online/Movie Themes/All_Lang/Event/Outdoor Adventure. 

by comparison with same theme, source media, Instant Movie default settings, and computer

Premiere Elements 2018 Instant Movie/Outdoor Adventure Theme 

Result: Several "Media Off-Line" messages scattered throughout at the Timeline and export levels.
My Comments: Using the workspace's Export & Share/Custom, the finished Instant Movie/Outdoor Adventure was exported as .wmv from the Timeline to demonstrate the presence of the "Media Off-Line messages in the 2018 Instant Movie/Outdoor Adventure. See video immediately below:


The Instant Movie/Outdoor Adventure broken apart in the 2018 Timeline is shown in Figure 2. The red X point to the outdoor-adventure_s_texture.png file, the target in this issue.

Figure 2. Media Off-Line Glitches In Premiere Elements 2018 Instant Movie/Outdoor Adventure. Shown Is The Completed Instant Movie/Outdoor Adventure Broken Apart In Timeline. Red X Points To Outdoor-Adventure_s_Texture.Png Problem Files.
A key to all this here is that the outdoor-adventure_s_texture.png in the opened project does not have a correspondingly named file outdoor-adventure_s_texture.png in Local Disk (C)/Program Data/Adobe/Premiere Elements/16.0*/Online/Movie Themes/All_Lang/Event/Outdoor Adventure. It just has an outdoor-adventure_texture.png there.

COMMENTARY**

Again, as suggested in the INTRODUCTION of this blog post, see HERE for full details and suggested user solutions for the problem in Premiere Elements versions earlier than version 2019.


____________________________________________________________________________
*Adobe Premiere Elements 2019 master files are often seen on the hard drive under "2019" as well as "17" headers.
**Work done with Premiere Elements on Windows 7 Professional SP1 64 bit. All the Instant Movie settings were left at defaults, including selection of Instant Movie: Auto Edit and Auto-Analyzer with Apply to: Entire Movie.


ATR


Saturday, October 6, 2018

PE 2019: Keyboard Shortcuts

INTRODUCTION

The Adobe list of Premiere Elements 2019 factory default keyboard shortcuts (commands and shortcuts) can be accessed in the Premiere Elements 2019 Editor from Expert or Quick workspaces under the workspace's Edit Menu/Keyboard Customization. The feature offers an Application and a Windows category.

In 2019, Application category has the subcategories of
File
Edit
Clip
Timeline
Tools
Text
Window
Help

In 2019, Windows category has the subcategories of
Properties Window
Trimming Window
Monitor Window
Media Window
Sceneline Window
Timeline Window

FINDINGS

With the following few exceptions, the findings for Premiere Elements 2019 keyboard customization are the same as those reported in my blog post "PE 2018: Keyboard Shortcuts", which is dated October 12, 2017. Consequently, see HERE and use the specific details there for the available commands and shortcuts opportunities in version 2019.

The 2019 Application category/Edit/Preferences no longer includes command for "Auto Analyzer".

The 2019 Application category/Timeline/ no longer includes the command Zoom In with the shortcut of = and the command Zoom Out with the shortcut of - 
These commands and shortcuts are now listed under 2019 Application category/Help.

(Just a reminder, this shortcut refers to zooming in/out of the Timeline and not zooming in/out related to the monitor view.)

Narration, Organizer, Disc Layout Window, and History subcategories are gone under the 2019 Windows category. 


Work continues in progress.

ATR


Thursday, October 4, 2018

Premiere Elements 2019 Daily Discoveries

INTRODUCTION

This morning I learned that Adobe has released Premiere Elements 2019. Today I will download from Adobe the tryout and take a first look at this latest version of the software. My report will be an in depth work in progress. The following was the first news that I saw online regarding the nature of this release. So in the meanwhile, please take a look at the 2019 features and other introductory details put online by Adobe.
https://www.adobe.com/products/premiere-elements/features.html 

Coming soon here, details in my Premiere Elements 2019 First Look and Premiere Elements 2019 Daily Discoveries blog posts.

ATR

Let us begin...

Item 1. October 4, 2018. Premiere Elements 2019 Helpful Links.

"Download Adobe Premiere Elements | 2019, 2018, and 15"
https://helpx.adobe.com/download-install/kb/premiere-elements-downloads.html 

"Premiere Elements Product Comparison"
https://www.adobe.com/products/premiere-elements/buying-guide.html

"Adobe Premiere Element User Guide"
https://helpx.adobe.com/premiere-elements/user-guide.html 


Item 2. October 4, 2018.  Premiere Elements Version Name.
Be aware that, in some places on your computer, the installed Premiere Elements 2019 will be referred to as version 17. Reminder, in the case of Premiere Elements 2018 (previous version), Premiere Elements 2018 in some places on the your computer will be referred to as version 16.

Item 3. October 4, 2018. Premiere Elements 2019 Add Media/Importing Video Created With Variable Frame Rate (VFR). 
In the past, Premiere Elements has had audio sync and other problems when dealing with imported video that was created with a variable frame rate (VFR). According to the Adobe document "Add Media" dated October 4, 2018, NEW "Premiere Elements 2019 automatically synchronizes the audio with videos that have VFR footage". See HERE.

Item 4. October 4, 2018. The New Home Screen 35 Topic Choices (as of this writing).
The Premiere Elements 2019 Home Screen topic choices at this time include:

Get started with Photoshop Elements 2019 or Get started with Premiere Elements 2019
Create a Slideshow
Get started quickly with the home screen
Add speed effect to your photo
Bring in your photos and videos
Enjoy auto-generated creations
Tips for great vacation videos
Tag family and friends
Make fun memes
Create a Zoom Burst 
Create multi-photo text
Create a panorama
Turn part of your photo into a sketch
Copy from one photo to another
Make movies more easily than ever
Tweet a photo
Create glass pane effects
Share photos and videos
Add text and border overlays
Create watercolor effect
Add luma fade transitions
Trim a video
Extract photos from your footage
Brighten a photo
Create a fun bounce-back effect
Create dramatic transition
Find your best photos
Organize Using Albums
Replace a photo's background
Add a vignette effect
Create Photo Text
Create slo-mo effect
Share a video to YouTube
Remove distractions
Auto Creations - Import more media for Auto Creations

Not all the topic choices target Premiere Elements.

Item 5. October 4, 2018. Premiere Elements 2019 Timeline Uploading To YouTube, Vimeo, Facebook.
In previous version, Export & Share/Online offered Timeline uploading to YouTube, Vimeo, and Facebook. In Premiere Elements 2019, the Facebook option appears to have been removed from Export & Share/Online, leaving the choice there at YouTube or Vimeo, each with H.264 video format and AAC audio at settings under HD1080 1920 x 1080, HD720 1280 x 720, or SD480 640 x 480. Frame rate was found to be dependent on project preset (NTSC 29.97 fps or PAL 25 fps).

Item 6. October 8, 2018. HD Animated Graphics Category Removed From Premiere Elements 2019 Expert Workspace Graphics.
The Premiere Elements 2018 Expert workspace Graphics/HD Animated Graphics was not carried over to Premiere Elements 2019 Expert workspace Graphics. In 2018, those HD Animated Graphics included: AngryFace-HD, Bird Circling-HD, Butterfly-HD, Dust-HD, ExclamationMark-HD, Heart-HD, Lightbulb-HD, Question Mark-HD, SadFace-HD, SmileyFace-HD, Stars-HD, and Stormcloud-HD. But, a non HD version of each of these is available in Premiere Elements 2019 Expert workspace Graphics under the category named Animated Objects.

Item 7. October 19, 2018. Home Screen Auto Creations Not Working In Premiere Elements 2019 Windows Tryout.
Now into the 15th day of the Premiere Elements 2019 tryout from Adobe, I have never gotten this Auto Creations feature to appear in the Home Screen and work as advertised. Troubleshooting of this problem has included "the wait approach" as well as making sure the "Generate Auto Creations" preference was enabled in the Elements Organizer 2019 Edit Menu/Preferences/Media-Analysis. Finding the solution in the following was unsuccessful:

What's new in Adobe Premiere Elements/Auto Creations section
https://helpx.adobe.com/premiere-elements/using/whats-new.html#auto_creations 

View and share auto-created collages, slideshows, and more
https://helpx.adobe.com/elements-organizer/using/auto-creation.html 
This Adobe document includes a Frequently asked questions section which includes the question "I'm unable to view Auto Creations on the Home Screen. Why?" The answer given there did not help me resolve this issue. Still troubleshooting, trying to determine if the problem is (a) feature does not work in tryout, (b) my misunderstanding of Adobe description of feature, (c) feature does not work in Windows 7 Professional SP1 64 bit (the computer in use for the tryout), or (d) other. 

Add on regarding Home Screen Auto Creations issue, see Adobe Photoshop Elements forum post dated October 13, 2018 and found HERE. Follow up on this issue is in progress.

Item 8. October 20, 2018. Adobe List For Premiere Elements 2019 Removed Features.
The list for Premiere Elements 2019 removed features can be HERE and, according to Adobe,  includes:
  • Flash files
  • DVD (Mac Only)
  • Quick time format, noting that "Codecs supported by native operating systems continue to work
  • Direct share on Facebook, noting "You can save your creations to your computer and share those on Facebook separately. For more information about this issue and the workaround, see Unable to upload photos and videos to Facebook." This document that Adobe points to goes into Facebook removal issue, reasons, impact, and suggested workarounds.
Item 9. October 22, 2018. Adobe Photoshop Camera Raw Latest Version For Photoshop Elements 2019/Premiere Elements 2019.
Photoshop Elements 2019/Premiere Elements 2019 tryouts that were explored in this blog post each came with Adobe Camera Raw 10.4 installed and no opportunity for updates. In a tryout project's Help/Updates, each has Updates grayed out there.

A Camera Raw 10.5 (along with 10.4, 10.3, 10.2, 10.1, 10.0) is described in its 2018 releases document titled "Features Summary | Adobe Camera Raw | 2018 Releases" and dated October 15, 2018. See HERE. The document's has an Applies to: Photoshop.

Furthermore, Adobe reports a Camera Raw version 11 in its document titled "What's new in Camera Raw CC?" which is dated October 15, 2018 and has an Applies to: Photoshop. That document can be found HERE. It is not known by this writer at this time when and if a Camera Raw 10.5 and/or 11 will be available for Photoshop Elements 2019/Premiere Elements 2019 via each in project's Help Menu/Updates. More on this as more information is available.

Item 10. December 25, 2018. Adobe Photoshop Camera Raw 11.1 Recently Available For Photoshop Elements 2019 and Premiere Elements 2019.
Help Menu/Updates in the Photoshop Elements 2019 and Premiere Elements 2019 workspaces is now active for use in downloading and installing Camera Raw 11.1, the latest Camera Raw update for the 2019 version of Elements. Additional information can be found

Cameras supported by Camera Raw (dated December 20, 2018)
https://helpx.adobe.com/camera-raw/kb/camera-raw-plug-supported-cameras.html

Camera Raw (dated December 10, 2018)
https://helpx.adobe.com/camera-raw/using/supported-cameras.html 

Side Note: Camera Raw.8bi file for Camera Raw 11.1 could not be made to work in Elements 2018  when it was moved from Elements 2019 to Elements 2018. Paths used for the from and to were:
From: Local Disk (C:)/Program Files/Common Files/Adobe/Plug-Ins/Elements 17/File Formats
To: Local Disk (C:)/Program Files/Common Files/Adobe/Plug-Ins/Elements 16/File Formats


Work in progress.

ATR


Premiere Elements 2019 First Look

INTRODUCTION

This morning I learned that Adobe has released Premiere Elements 2019. Today I will download from Adobe the tryout and take a first look at this latest version of the software. My report* will be an in depth work in progress. The following was the first news that I saw online regarding the nature of this release. So in the meanwhile, please take a look at the 2019 features and other introductory details put online by Adobe.
https://www.adobe.com/products/premiere-elements/features.html 

Coming soon here, details in my Premiere Elements 2019 First Look and Premiere Elements 2019 Daily Discoveries blog posts.

ATR

Let Us Begin....

PART 1
DOWNLOAD/INSTALLATION

Adobe's published System Requirements for Premiere Elements 2019 can be found HERE (publish date October 4, 2018). For the comparison of Adobe System Requirements for versions 13, 14, 15, 2018, and 2019, see HERE (publish date October 4, 2018). Although Adobe states support for 2019 on Windows 7 SP 1, Windows 8.1, and Windows 10 (all 64 bit), it does state a recommendation for Windows 10 64 bit.

The Language Versions listed in the 2019 System Requirements Adobe document are
For Windows
Czech, Dutch, English, French, German, Italian, Japanese, Polish, Russian, Spanish, Swedish.
For Mac
English, French, German, Japanese.

At the Installation Options stage of the Premiere Elements 2019 tryout from Adobe, the settings are for Language and Location. It was noted that the Installation Options had a Language choice for Simplified Chinese, no Korean nor Traditional Chinese. In contrast, the Photoshop Elements 2019 tryout from Adobe includes Korean, Simplified Chinese, and Traditional Chinese at the Installation Options stage of its Installation. For my study, I selected Language = English (North American) and Location = Default.

I am using Windows 7 Professional SP1 64 bit for this First Look. After the try out installation, the Windows 7 Control Panel/Programs and Features/ shows Adobe Premiere Elements 2019 with file size 2.04 GB. It is interesting to note that, in some places in the computer, version 2019 is referred to as 17, similar to the prior version 2018, which, in some places of the computer, is referred to as 16.
Side Note: The tryouts for Premiere Elements 2019 and Photoshop Elements 2019 were both downloaded from Adobe this morning and installed on the same Windows 7 Professional SP1 64 bit computer. Right now the focus is the Premiere Elements 2019 tryout. 

PART 2

Home Screen (Replacement For Welcome Screen)

Premiere Elements 2019 program opens to the Home Screen which is replacing the Welcome Screen of prior versions. The new format and design of this Home Screen can be seen in Figure 1 and differs from the Welcome Screen used in recent versions of Premiere Elements. For a quick contrast, refer to Premiere Elements 2018 Welcome Screen in Figure 2.

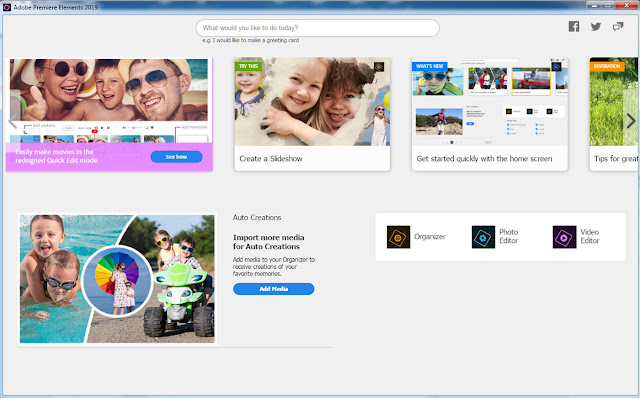
Figure 1. Premiere Elements 2019 New Home Screen.
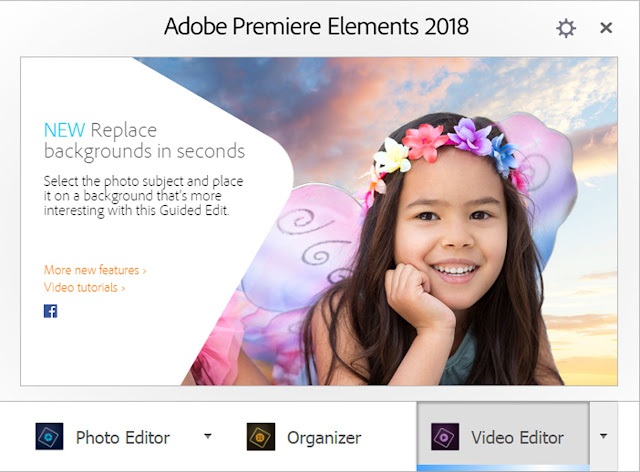
Figure 2. Premiere Elements 2018 Welcome Screen.

The Premiere Elements 2019 Home Screen is topped by a fill in space for the answer to the question "What would you like to do today?". The top right has 3 access points: one to facebook.com/Premiere Elements, one to twitter.com/Adobe Elements, and one to adobe.com/contact support. Running across the top of the Home Screen (and navigated by next/previous buttons) are 35 topic choices whose destinations are to be explored in the Premiere Elements 2019 Daily Discoveries blog post. Direct access to the Video Editor, Photo Editor, and Organizer is via their buttons at the bottom right of the Home Screen. The Video Editor choice in the Home Screen took this user directly to the Premiere Elements 2019 Editor (with default project preset NTSC AVCHD-Full HD 1080i30). On the first opening of 2019, New Project and Open Project choice for the Video Editor button appeared to be gone. However, once a project is saved, its name appears in a Recent Files list which displays below the Organizer/Photo Editor/Video Editor buttons. So, the saved projects can be reopened at the Home Screen Recent Files list or in the opened Premiere Elements Editor File Menu/Open Project. Deleting a saved project was found to remove it automatically from Home Screen Recent Files.

In the opened project, Help Menu/Home Screen can be used to get back to the Home Screen. There is also a Home Screen access button at the bottom of the Quick and Expert workspaces. Bypass of the Home Screen can be accomplished by creating and using a Desktop shortcut to the PremiereElementsEditor.exe file (See Local C/Program Files/Adobe/Adobe Premiere Elements 2019). 

PART 3
THE PREMIERE ELEMENTS 2019 EDITOR
WORKSPACES 

Quick, Guided, and Expert remain as workspace tabs in the Premiere Elements 2019 Editor. The eLive workspace is gone for all users, last included in Premiere Elements 2018. See HERE. To follow are details for major changes in opening 2019 program and what is under its workspace tabs. Depending upon the user's level of confidence, a good jumping into point for this area might be the Adobe document "Workspace basics" dated October 4, 2018 and found HERE and/or the Adobe document "What's new in Adobe Premiere Elements" found HERE and dated October 4, 2018.

Guided Workspace.

Two new Guided Edits (Glass Pane under Guided/Fun Edits category and Luma Fade Transition Effect under Guided/Video Adjustments category) have been added to the 18 Guided Edits carried over from Premiere Elements 2018 to Premiere Elements 2019. Refer to the October 4, 2018 Adobe document "Quick Mode"/Guided Edits section for the titles of Guided Edits under the Guided Edits categories of Basics, Video Adjustments, Audio Adjustment, and Fun Edits. See HERE.

According to the October 4, 2018 Adobe document "Quick Mode"/Guided Edits section (See HERE):
"You can access the Guided Edits from both Quick and Expert modes.
To start exploring and using the available Guided Edits, click the Quick tab or the Expert tab, and then click the Guided tab."
To date, I have not gotten those directions to work for me in Premiere Elements 2019 tryout - all the Guided Edits are opening to lessons in the Expert workspace. The old troubleshooting standby of deleting the Adobe Premiere Elements Pref file and some other ideas have not fixed the situation. Still working on this issue.

Expert Workspace

A. Design

The 2019 Video Editor/Expert workspace choice results in display as seen in Figure 3. The red borders in the Figure represent areas which differ in design between new 2019 and the previous version 2018.

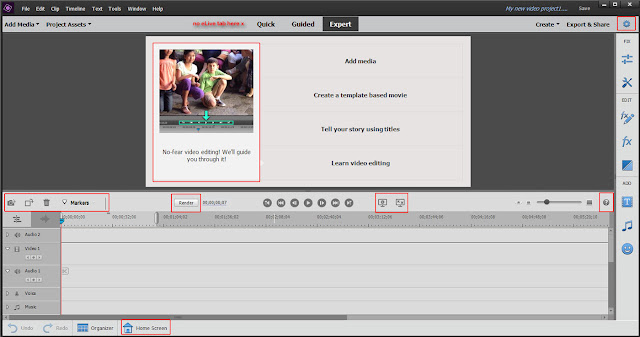
Figure 3. The Modified Premiere Elements 2019 Video Editor/Expert Workspace Design. The Red Borders In This Figure Represent Areas Which Differ In Design Between New 2019 And 2018.
2019 as compared to 2018 Video Editor/Expert workspace design differences include:

top, eLive tab is removed, leaving just Quick, Guided, and Expert tabs.

top/far right, new Open Project Settings tab which opens to Project Settings dialogs.
Note: Project Settings can also be accessed from the Video Editor Edit Menu/Project Settings.

middle, new graphic and text in the default monitor view are found next to the tabs for Add Media, Create a template based movie, Tell your story using titles, and Learn video editing.

in the horizontal bar just below the monitor
...far left, the tabs are for Freeze Frame, Rotate right, Delete, and Markers; whereas, in 2018, there are just two tabs, one for Markers and one ? which opens to an Adobe document "How to arrange clips in the Expert view timeline" found HERE. The ? tab has not been removed from this bar; it has just been moved to the right end of the bar.
...moving left to right on this bar, the Render is found moved to the left of the Timeline timecode.
...moving further left to right on this bar, there are two new icons, one for Settings (Playback quality and Magnification) and one for Play Full Screen. Previously, the Play Full Screen tab appeared to the right of the 2018 Save tab (top right).

in the far left in the bottom horizontal row, the tabs are for Undo, Redo, Organizer, and Home Screen; whereas, in 2018, there are just three tabs, Undo, Redo, and Organizer.
Note: In 2019, Home Screen can also be accessed from the Video Editor's Help Menu/Home Screen.

B. Tabs
(to be explored deeper in later blog posts)

List of primary Editor options under the 2019 Video Editor Expert workspace tabs - New (2019) versus Old (2018)

File - Same
Edit - Same, except no "Auto Analyzer" under Edit Menu/Preferences/Preferences in 2019
Clip - Same
Timeline - Same
Text - Same
Tools - Same
Window - Same
Help - Same, except "Home Screen" replaces "Welcome Screen" in the list.

Add Media - Same

Project Assets - Same

Quick, Guided, Expert - Same, except no eLive.

Create - Same

Export & Share - Same, except no Facebook upload under Export & Share/Online (now in 2019 only YouTube and Vimeo).

Far right vertical bar
...Fix/Adjustments, Same
...Fix/Tools, Same
...Edit/Applied Effects, Same
...Edit/Effects, Same Video and Same Audio
...Edit/Transitions, Same Video and Same Audio
...Add/Titles, Same Motion Titles and Same Classic Titles
...Add/Music, Same Music Score and Same Sound Effects
...Add/Graphics, Same with exceptions of removal of HD Animated Objects and addition of new Video Overlay category with 5 mattes which are each described as MPEG Movie type with 1920 x 1080 image size. An Adobe suggested use for these mattes in found in the Guided/Fun Edits/Glass Pane lesson. See HERE. One of the graphics in the removed HD Animated Objects category is the unique graphic named Lightbulb-HD (Type Shockwave flash object and Image Size 900 x 900). But, a version of it named Lightbulb (Type QuickTime movie and Image Size 720 x 576) can be found in the Animated Objects category in the 2019 Graphics. To point to the Lightbulb graphic, I created in 2019 the following mini video using the 2019 Lightbulb graphic and two others.


Quick Workspace

A. Design

The 2019 Video Editor/Quick workspace choice results in display as seen in Figure 4. The red borders in the Figure represent areas which differ in design between new 2019 and the previous version 2018.

Figure 4. The Modified Premiere Elements 2019 Video Editor/Quick Workspace Design. The Red Borders In This Figure Represent Areas Which Differ In Design Between New 2019 and 2018.
2019 as compared to 2018 Video Editor/Quick workspace design differences include:

top, eLive tab is removed from 2019, leaving just Quick and long with Guided, and Expert tabs.

top/left of Export & Share tab, there is a new Open Project Settings tab which opens to Project Settings dialogs.
Note: Project Settings can also be accessed from the Video Editor Quick workspace Edit Menu/Project Settings.
There is no "View and install available updates" tab to the left of Create tab.

in the middle of 2019 opening Quick workspace, gone is the default monitor view of a graphic accompanied by the text: Add Media, Create a template based movie, Tell your history using titles, and Learn video editing. Instead, 2019 opening Quick workspace is displaying a small design with + choice going to Add Media, and triangle choice going to Add Title or Add Media which has same design as used in blank sceneline space.

2018 Quick Sceneline has 4 named bars to be used for text, video and photo clips, narration, and audio clips. In contrast, 2019 Quick Sceneline at the start displays only the bar with spaces for video and photo clips (this bar is unnamed). In 2019, an unnamed text bar does appear after text has been added using T+ in the space immediately above the video or photo import in that space. Note, using the Add Titles accessed using triangle within a blank scene space, adds a title to a new scene space. See Quick workspace's right vertical bar/Titles. More details on adding text and titles in blog posts to come. 2019 Quick workspace Narration bar and opportunities were not found.

in 2019, the Expert workspace Timeline Indicator has a blue stem with a blue head; whereas, it uses a
Quick workspace Timeline Indicator that has a red stem and red head with 3 white vertical stripes. In 2018, both Expert and Quick workspaces uses the Timeline Indicator with the blue stem and blue head.

in the horizontal bar just below the monitor
...far left, the 2019 Quick workspace tabs are for Freeze Frame, Rotate right, and Delete; whereas, in 2018 Quick workspace, there are just two tabs there, one for Markers and one ? which opens to an Adobe document "How to arrange clips in the Expert view timeline" found HERE. That ? tab and the Markers tab could not been found in 2019 Quick workspace.

...moving left to right on this bar, the Render is found moved to the left of 2 Timeline timers which replace the 2018 Quick workspace Timecode. These timers appear to be related to time where Timeline Indicator is located (variable) and time for end of Timeline content (constant)

...moving further left to right on this bar, 2019 Quick workspace has the tabs only for Go to Previous Edit Point (Page Up), Play/Pause Toggle (Space), and Go to Next Edit Point (Page Down); whereas 2018 Quick workspace has the tabs for Go to Previous Edit Point (Page Up), Rewind, Step Back (Left), Play/Pause Toggle (Space), Step Forward (Right), Fast Forward, Go to Next Edit Point (Page Down), and Freeze Frame.

...moving further left, is a new audio volume adjust slider, not seen in 2018 Quick workspace.

...moving further left to right on this bar, there are two icons, one new for Settings (Playback quality and Magnification) and one for Play Full Screen. Previously in 2018 Quick workspace, the Play Full Screen tab appeared to the right of the Save tab (top right).

...moving further left, there is nothing in 2019, no zoom in and out slider and its associated tabs as seen in 2018 Quick workspace.

...in the far left bottom horizontal row, the 2019 tabs are for Undo, Redo, Organizer, and Home Screen; whereas, in 2018, there are just three tabs, Undo, Redo, and Organizer.
Note: In 2019, Home Screen can also be accessed from the Video Editor Quick workspace's Help Menu/Home Screen.

B. Tabs
(to be explored deeper in later blog posts)

List of primary Editor options under the 2019 Video Editor/Quick workspace tabs - New (2019) versus Old (2018)

...File - Same, except File Menu's Add Media option is from only Elements Organizer and Files and folders; whereas, this spot in 2018 Quick workspace, the Add Media option offers all 6 media sources as offered in the 2019
...Edit - Same, except no "Auto Analyzer" under Edit Menu/Preferences list in 2019
...Clip - Same
...Timeline - Same, except no Split Clip, Zoom In, or Zoom Out as in this same spot in 2018 Quick workspace.
...Text - Same
...Tools - Same, except no Movie Menu, Narration, Smart Mix, and Motion Tracking as in same spot in 2018 Quick workspace.
...Window  - Same
...Help - Same, except "Home Screen" replaces "Welcome Screen" in the list.

Add Media - Different, in 2019, only Elements Organizer and Files and folders; whereas, in 2018, Add Media here includes Elements Organizer, Files and folder, Photos from cameras or devices, Videos from cameras & devices, Webcam or WDM, and DVD camera or computer drive.

Project Assets - Same in that there is no Project Assets palette in Quick workspace 2019 or 2018.

Quick, Guided, Expert - Same, except no eLive.

Create - Same

Export & Share - Same, except no Facebook upload under Export & Share/Online (now in 2019 only YouTube and Vimeo).

Far right vertical bar
...Fix/Adjustments, Same with major exception related to audio volume. There are no longer panels generated for Volume and Balance when selection is a video clip with audio. However, reminder that there is now a new audio slider located just under the 2019 Quick workspace monitor.
...Fix/Tools, Same with exceptions related to no Motion Tracking, Movie Menu, Smart Mix, and Narration included as found in 2018 Quick workspace right vertical tool bar Fix/Tools.
...Edit/Applied Effects, Same
...Edit/Effects, Same limited Video effects and no Audio effects as in same spot in 2018 Quick workspace.
...Edit/Transitions, Same limited Video transitions and no Audio transitions as in same spot in 2018 Quick workspace.
...Add/Titles, Same Motion Titles and Same Classic Titles
...Add/Music, Same Music Score and Same Sound Effects
...Add/Graphics, Different. There are no Graphics available (limited or otherwise) in the 2019 Quick workspace; there is in this same spot in 2018 Quick workspace.

Temporary Commentary
First Look PARTS 1, 2, and 3 are essentially complete except for some triple check proof reading. My first impression so far is a lot of moving around and a few disappearances of previous workspace components. The details above may help some decide on which version of Premiere Elements to buy or stay with. The above 2019 and 2018 details comparisons may not serve those who have never worked with Premiere Elements and are therefore not as influenced by what used to be. Yet, it is hoped that the above will be of service to most.

PART 4
SUPPORTED FILE FORMATS
EXPORT & SHARE

A. Supported File Formats

A search for the supported import/export file formats for Premiere Elements 2019 led to the Adobe document which is titled "Supported file formats", dated October 4, 2018, has an "Applies to" notation pointed to Premiere Elements without any particular version named. This "Supported file formats" document is found HERE , and has the information categorized into
Video file Formats - import
Video file Formats - export
Still images and image sequence file formats - import
Still images and image sequence file formats - export
Audio file formats - import
Audio file formats - export

First look attention here targeted

First time support for import of video recorded with variable frame rate (VFR). According to Adobe's Add Media document found HERE
Premiere Elements 2019 automatically synchronizes the audio with videos that have VFR footage.
Project recognition of a video import as a VFR video is confirmed by presence of a "Variable Frame Rate Detected" note included in the file's Properties viewed from opened project's Expert workspace/ Project Assets/Imported File's Thumbnail/Properties. 

For users of the Mac OS 10.13 and later, new support for import of HEVC/H.265 video and HEIF images.
Clarification of this subject to follow in a subsequent blog post.


B. Export & Share

Premiere Elements 2019, like the previous 2018 version, offers the same major categories: Quick Export, Devices, Disc, Online, Audio, Image. Some removals, rather than additions, were found while exploring what is under these categories. Of note, Facebook is removed from Export & Share/Online (now just YouTube and Vimeo), and the MOV - H.264 format has been removed from category/resolution/format choices. See below for 2019 - 2018 difference details.

Quick Export 
Same 
Essentially properties of export trace back to project preset setting.

Devices 
Computer, TV, Mobile, Custom 
Same With Minor Exceptions

Computer

Resolution 4K UltraHD 3840 x 2160
Format MP4 - XAVC-S
Quality - low, mid, or high
Share WorkArea Bar Only choice available

Resolution HD 1080 1920 x 1080
Format MP4 - H.264 only, MOV - H.264 alternative removed
Quality - low, mid, or high
Share WorkArea Bar Only choice available

Resolution HD 1080 1440 x 1080
Format  MP4 - H.264
Quality - low, mid, or high
Share WorkArea Bar Only choice available

Resolution HD 720 1280 x 720
Format MP4 - H.264 or MPEG - PS only, MOV - H.264 alternative removed
Quality - low, mid, or high
Share WorkArea Bar Only choice available

Resolution SD 576 720 x 576
Format AVI - DV, MOV - DV, MP4 - H.264, MPEG - PS, or WMV - VC1
Quality - low, mid, or high
Share WorkArea Bar Only choice available

Resolution SD 480 720 x 480
Format AVI - DV. MOV - DV, MP4 - H.264, MPEG - PS. or WMV - VC1
Quality - low, mid, or high
Share WorkArea Bar Only choice available

TV

Resolution 4K UltraHD 3840 x 2160
Format MP4 - XAVC-S
Quality - low, mid, or high
Share WorkArea Bar Only choice available

Resolution HD 1080 1920 x 1080
Format MP4 - H.264 or MPEG
Quality - low, mid, or high
Share WorkArea Bar Only choice available

Resolution HD 720 1280 x 720
Format MP4 - H.264 or MPEG
Quality - low, mid, or high
Share WorkArea Bar Only choice available

Mobile

Resolution HD1080 1920 x 1080
Format MP4 - H.264
Quality - low, mid, or high
Share WorkArea Bar Only choice available

Resolution HD 800 1280 x 800
Format MP4 - H.264
Quality - low, mid, or high
Share WorkArea Bar Only choice available

Resolution HD 720 1280 x 720
Format MP4 - H.264
Quality - low, mid, or high
Share WorkArea Bar Only choice available

Custom

Custom's Advanced Settings tab


Disc
DVD
Same just DVD tab
 SD 576 720 x 576
Format MPEG
Frame Rate 25
Quality Slider (functional only when "Fit contents to available space" is unchecked)
Fit Contents to available space option exists
Type: Disc, ISO Image (4.7 GB), or ISO Image (8.5 GB)

SD 480 720 x 480
Format MPEG
Frame Rate 29.97
Quality Slider (functional only when "Fit contents to available space" is unchecked)
Fit Contents to available space option exists
Type: Disc, ISO Image (4.7 GB), or ISO Image (8.5 GB)


Online
 YouTube, Vimeo
Same except Facebook Choice Removed

YouTube

Resolution HD 1080 1920 x 1080
Quality Standard or High
File Size view spot
Share WorkArea Bar Only choice available

Resolution HD 720 1280 x 720
Quality Standard or High
File Size view spot
Share WorkArea Bar Only choice available

Resolution SD 480 640 x 480
Quality Standard or High
File Size view spot
Share WorkArea Bar Only choice available

Vimeo

Resolution HD 1080 1920 x 1080
Quality Standard or High
File Size view spot
Share WorkArea Bar Only choice available

More on Facebook removal from Premiere Elements 2019 can be found HERE which includes ISSUE, REASON, IMPACT, SUGGESTED WORKAROUNDS.

Audio
Track, Custom
Same

Track

WAV
Quality low, mid, or high
Share WorkArea Bar Only choice available

MP3
Quality low, mid, or high
Share WorkArea Bar Only choice available

AIFF
Quality low, mid, or high
Share WorkArea Bar Only choice available

AAC
Quality low, mid, or high
Share WorkArea Bar Only choice available

Custom

Custom's Advanced Settings tab

Image
Frame, GIF, Custom
Same 

Frame

HD1080 1920 x 1080
Format Jpeg
Quality low, mid, or high

HD1080 1440 x 1080
Format Jpeg
Quality low, mid, or high

HD720 1280 x 720
Format Jpeg
Quality low, mid, or high

SD480 720 x 480
Format Jpeg
Quality low, mid, or high

GIF

SD480 852 x 480
Format Animated GIF
Share WorkArea Bar only choice available

SD240 320 x 240
Format Animated GIF
Share WorkArea Bar only choice available

Custom

Custom's Advanced Settings tab

The Adobe document on "Export and share your videos" (dated October 4, 2018) can be found HERE.


PART 5
End of First Look Premiere Elements 2019 Tryout

Miscellaneous 

Home Screen Auto Creations
During the 2019 tryout, the Home Screen Auto Creations new feature worked as advertised only once, that once being on the 15th day of the tryout when I turned the feature off/on in Elements Organizer 2019/Preferences/Media Analysis, threw in some computer restarts, Home Screen reloadings, and program idling. With the Auto Creations feature turned off in the Elements Organizer 2019 preferences, the Home Screen Auto Creations section did display "The Auto Creations feature is turned off". This suggested to me some sort of communication between the Auto Creations preference in Elements Organizer and the Home Screen Auto Creations section where the "open" interface was expected to appear. 

Guided Lessons In Quick Workspace
During the whole 30 day tryout, I never was able to open a Guided lesson in the Quick workspace.

Help Menu/Updates
During the entire 30 day tryout, Updates was inactive (grayed out) under Help Menu (Expert or Quick workspaces).

Search For Any New Themes For Features (version 2019 versus 2018)
Video Story 
 Same
5 Categories/8 Themes
General/2                                                       
Birthday/2
Graduation/1
Travel/1
Wedding/2

Instant Movie 
Same
5 Categories/41 Themes
Slideshow/2
Event/12
Memories/3
Pets/2
Style/22

Video Collage
Same
5 Categories/13 Themes
"Grid 3"/3
"Grid 4"/5
"Grid 5"/3
"Grid 6"/1
"Grid 7"/1

Movie Menu
1 Removed
14 Categories/72 Themes
Slideshow/2
Entertainment/6
General/10
Happy Birthday/3
Holidays and Events/9
Kid's Corner/4...............Kid's Room not carried over from 2018
Memories/5
Movie Genre/6
New Baby/5
Pets/2
Seasons/5
Sports/6
Travel/7.......................Long time Outdoor Adventure Theme problem now corrected in 2019
Wedding/2
 
 
COMMENTARY

Work related to triple proofreading for accuracy continues, but further exploration of Premiere Elements 2019 Windows tryout from Adobe will not continue unless needed. See future monthly blog posts in the ATR Premiere Elements Troubleshooting blog for specific feature explorations in non tryout Premiere Elements versions. The Premiere Elements 2019 Daily Discoveries blog post will be update when necessary.

_________________________________________________________________
*Version 2018 counterparts can be found
Premiere Elements 2018 First Looks
http://atr935.blogspot.com/2017/10/premiere-elements-2018-first-look.html
Premiere Elements 2018 Daily Discoveries
http://atr935.blogspot.com/2017/10/premiere-elements-2018-daily-discoveries.html 


ATR