Friday, February 28, 2014

PE10: NVIDIA Video Card Driver Roll Back

INTRODUCTION

Around October, 2013 a growing number of reports began to appear in the Adobe Premiere Elements Forum threads regarding an assortment of Premiere Elements 10 Windows display and unexplained workflow glitches. The typical troubleshooting drill of updating to the latest version of the video card/graphics card driver did not resolve these Premiere Elements 10 issues. Other troubleshooting pursuits were non productive in solving the syndrome that presented.

Sharing of problem details between Premiere Elements 10 users with this type of issue revealed a display type issue specific for Premiere Elements 10 Windows users whose computer used a NVIDIA GeForce video card. And, the user to user fix found for this problem was and is for the Premiere Elements 10 user to roll back the NVIDIA GeForce video card driver as far back as necessary to get rid of the problem. Neither NVIDIA nor Adobe  has taken any corrective action in this regard to date, and none is expected moving forward.

A sampling of the NVIDIA GeForce video cards that have been involved include
GTX 430
GTX 580
GT 610
GT 630M
GTX 640
GTX 660Ti
GTX 760
and the user driver version roll back has typically gone back as far as March - July 2013 in order to get a working Premiere Elements 10.


ISSUE

Attempts were made to keep a history to which Premiere Elements 10 Windows NVIDIA video card users with this type of problem could refer. As well meaning as that was, the feedback data are often incomplete.
http://forums.adobe.com/thread/1317675


SOLUTION

At this time and probably moving forward, there is no solution to the Premiere Elements 10 NVIDIA problem except at the user to user fix level. To assist at the user to user level, aids are
  • Making Premiere Elements 10 NVIDIA users aware of the issue
  • Offering information on how to find older versions for the NVIDIA GeForce video card drivers  involved.

HOW TO

In view of this situation, troubleshooting of any Premiere Elements 10 issue should start by determining if a NVIDIA video card is used by the computer on which Premiere Elements 10 is being run. If NVIDIA is the computer's video card, then the odds are that you have found the source of the Premiere Elements 10 problems. And, rolling back of the NVIDIA video card driver version is your answer to the problem.

Rolling back of the NVIDIA video card driver version is often a problem for some who cannot find older NVIDIA drivers for the roll back. Such older drivers can be found at the NVIDIA web site
http://www.nvidia.com/Download/Find.aspx?lang=en-us

User Example 1 
October 2013 (also typical of the present)

Premiere Elements 10
Windows XP 64 bit
NVIDIA GeForce GT 610
Roll Back to Driver Version 320.49 (July 2013) Needed for Premiere Elements 10 to work properly (suitable driver version found by trial and error).

Figure 1. NVIDIA Driver Downloads. NVIDIA GeForce 320.49 Driver (July 1, 2013) Needed For Premiere Elements 10 On Windows XP 64 Bit.

User Example 2
October 2013 (also typical of the present)

Premiere Elements 10
Windows 8 32 bit
NVIDIA GeForce GTX 660Ti
Roll Back to Driver Version 320.49 (July 2013) Needed for Premiere Elements 10 to work properly (suitable driver version found by trial and error).

Figure 2. NVIDIA Driver Downloads. NVIDIA GeForce 320.49 Driver (July 1, 2013) Needed For Premiere Elements 10 On Windows 8 32 Bit.


The Advanced Driver Search fields as seen in Figure 1 and Figure 2 are
  • Product Type
  • Product Series
  • Product
  • Operating System
  • Language
  • Recommendation/Beta 
To avoid Beta drivers, it is suggested that Recommendation/Beta be set to "Recommended/Certified". Access to the download button for the driver and further information about that driver can be obtained by clicking on the + button to the left of the name of the driver.

Miscellaneous

Several of the Premiere Elements 10 users did not include the computer operating system with the feedback on NVIDIA GeForce driver version roll back. So, the following is an incomplete list of GeForce cards involved and the driver version that the user had to roll back to in order to get Premiere Elements 10 working properly.

GTX 430
to March, 2013

GTX 580
to May, 2013

GT 610
to 320.49

GT 630M
to 331.40

GTX 640
to 320.49

GTX 660Ti
to 320.49

GTX 760
to 320.49

_____________________________________________________________________________

ATR


Wednesday, February 19, 2014

PE: Adding Movie Thumbnails To Disc Main Menu

INTRODUCTION

Premiere Elements 11 user had a project with 18 movies in its Expert workspace Timeline destined for DVD-VIDEO on DVD disc with the Slideshows/Pan and Zoom disc menu theme. The question was how best to navigate those 18 movies with the TV Remote at play back of the end product DVD-VIDEO on DVD disc. A single main menu scheme was envisioned, but there were not enough buttons on the main menu page for that without ending up with 18 Main Menu pages.

The Slideshows/Pan and Zoom disc menu theme has on its Main Menu page one Play Movie text  button, one Scenes text button (to get to the Scene Selection page), and one Main Menu 1 text button (a bonus type button). Refer to Figure 1.
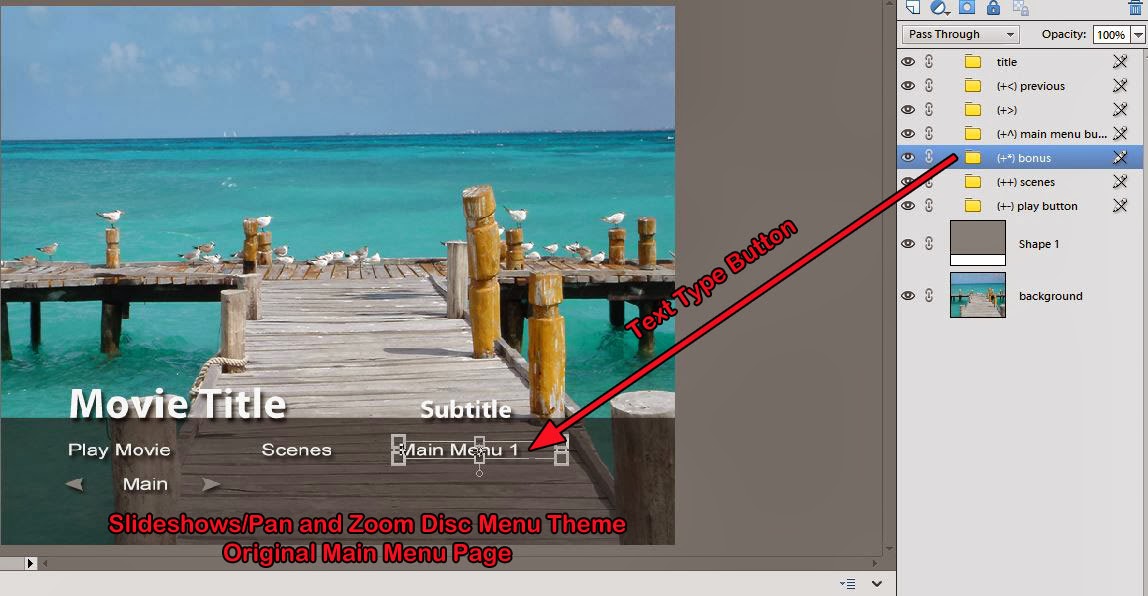

Figure 1. Slideshows/Pan and Zoom Original Main Menu Page, Demonstrating A Text Type Button For Main Menu 1 (Bonus) Entry. View From Photoshop Elements Version Which Is Not Able To Open The Layer Sets In The Layers Palette Of The Theme's .Psd File.

The Scene Selection page has 6 scene thumbnail buttons per page. Refer to Figure 2.
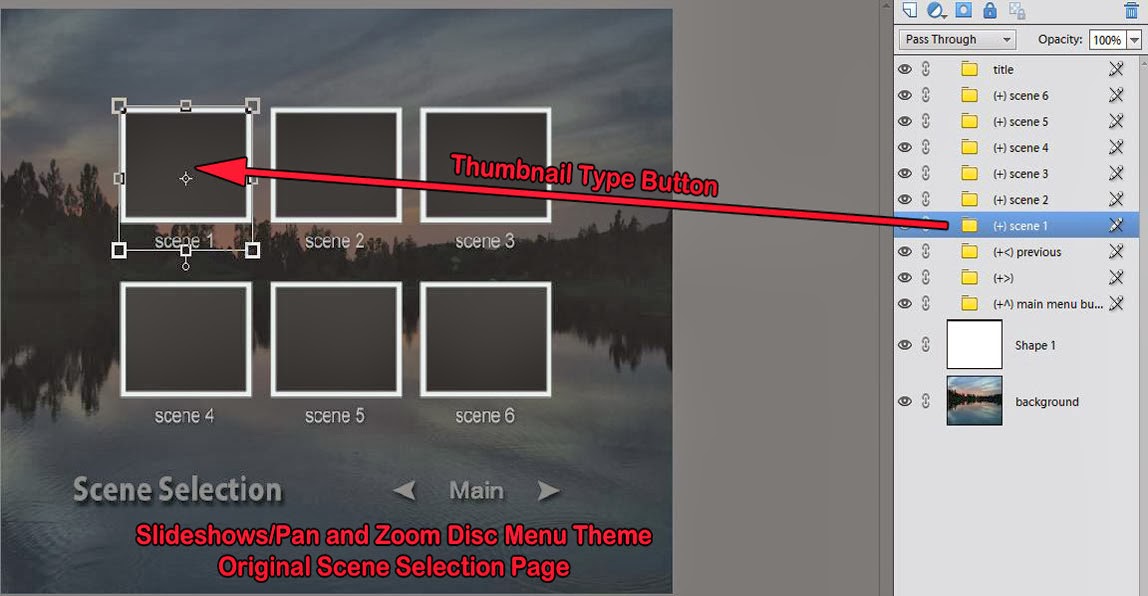
Figure 2. Slideshows/Pan and Zoom Original Scene Menu Page, Demonstrating A Thumbnail Type Button For Scene 1 Entry. View From Photoshop Elements Version Which Is Not Able to Open The Layer Sets In The Layers Palette Of The Theme's .Psd File.

The focus of this blog post is on possible Main Menu schemes and principles to accommodate this  users specific disc menus needs.

"Adding movie buttons" to the Main Menu page could be accomplished by either of two possible ways
  • Renaming the theme's Main Menu and Scene Menu .psds files to switch them, effectively giving a Main Menu page with 6 thumbnail buttons, instead of the original's 1 text type button.
  • Multiple copying of the "Main Menu 1" major Layer Set in the Layers Palette of the Main Menu .psd file,  effectively giving a Main Menu page with 6 text buttons instead of 1.

ISSUES
Renaming the theme's Main Menu and Scene Menu .psds files to switch them, effectively giving a Main Menu page with 6 thumbnail buttons, instead of the original's 1 text type button.

This could be done very easily using Photoshop Elements or Photoshop CS or higher since the specified task (6 thumbnail buttons per page) does not require the opening of the Main Menu .psd file's Layer Sets. More than 6 thumbnail buttons per Main Menu page is possible by multiple copying of Layer Set. But the copying process is associated with an error within the Layer Set which requires Photoshop CS or higher to correct. The error in these copies involves the (^^) subLayers of the Layer Set presenting with the incorrect title of (^) instead of correct (^^).

Multiple copying the "Main Menu 1" major Layer Set in the Layers Palette of the Main Menu .psd file,  effectively giving a Main Menu page with 6 text buttons instead of 1.

This choice would definitely require use of Photoshop CS or higher since copies of "Main Menu 1" major Layer Set would introduce the (^) error that needs correction in the opened Layer Set of the .psd's Layers Palette.

 SOLUTION

Possible solutions to the disc menu choices will be demonstrated by way of the following how tos.

HOW TO

Renaming the theme's Main Menu and Scene Menu .psds files to switch them, effectively giving a Main Menu page with 6 thumbnail buttons, instead of the original's 1 text type button.

STEP 1
Determine the Slideshows/Pan and Zoom theme's .psd files to be modified
Go to Local Disc C\Program Files\Adobe\Adobe Premiere Elements 11\DVD Templates\Common\Slideshows\Pan and Zoom\  and in the Pan and Zoom Folder will be the theme's assets as shown in Figure 3.
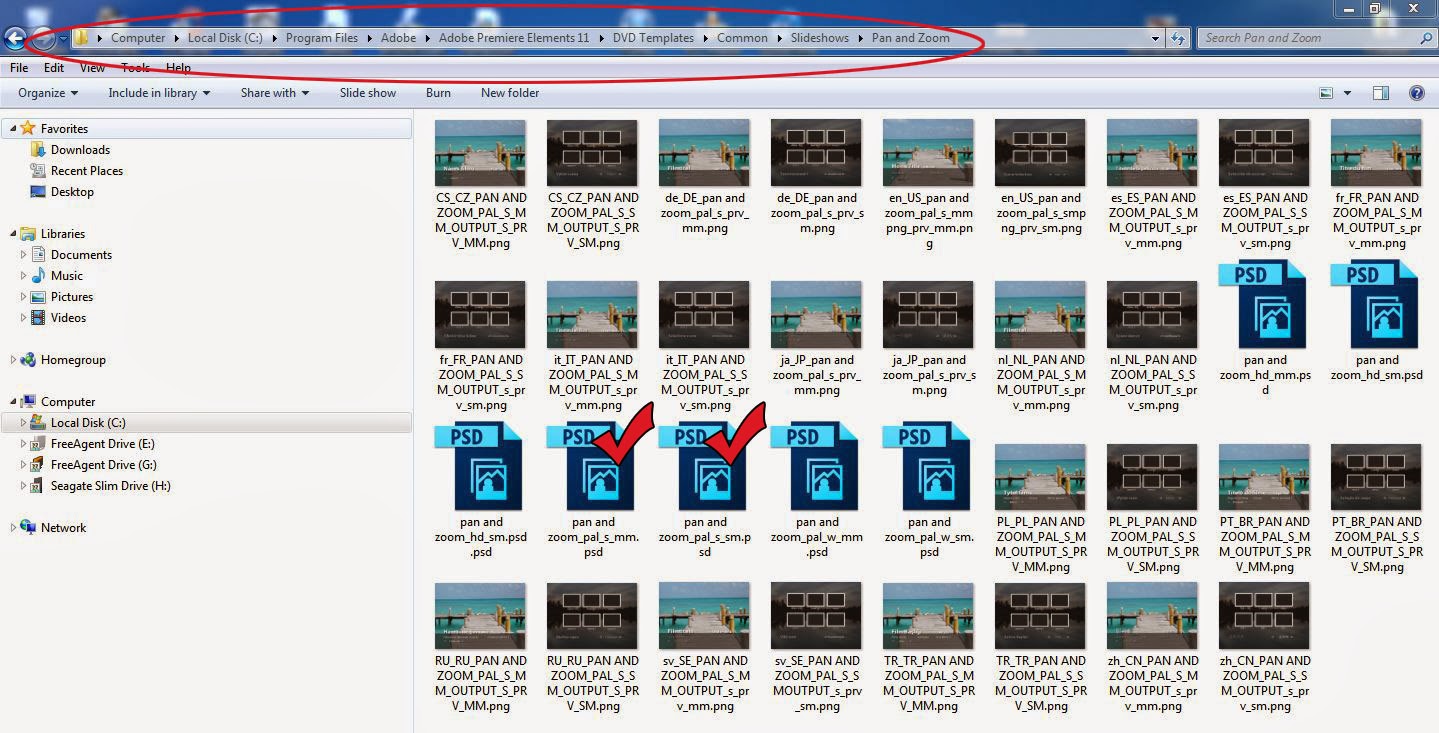
Figure 3. Slideshows/Pan and Zoom Assets. 
This disc menu theme comes in a set of .psd files, a Main Menu and a Scene Menu per set. There are usually 3 different sets available, and which one is available in the movie menus section of the opened project will depend on the project preset selected for the project.

If DV Standard project preset, the set used is
pan and zoom_pal_s_sm.psd
and
pan and zoom_pal_s_mm.psd

If DV Widescreen project preset, the set used is
pan and zoom_pal_w_sm.psd
pan and zoom_pal_w_mm.psd

If one of the HD project presets, the set used is
pan and zoom_pal_hd_sm.psd
pan and zoom_pal_hd_mm.psd

Since the blog post example is using the DV Standard project preset, the set
pan and zoom_pal_s_sm.psd
and
pan and zoom_pal_s_mm.psd 
will be copied to the computer desktop and placed in a folder created for them there. 

STEP 2
Switch the file name of the menu menu and scene menu .psd files, and add a special at the start of the name to differientate them from other files, and place the renamed .psd files in a desktop folder which has a name corresponding to the files.
Change the name of pan and zoom_pal_s_sm.psd to specialpan and zoom_pal_s_mm.psd
Change the name of pan and zoom_pal_s_mm.psd to specialpan and zoom_pal_s_sm.psd
Name the Folder in which these files are to go specialpan and zoom.

STEP 2a
Replace the Background Layer now in the file named specialpan and zoom_pal_s_mm.psd file with the Background Layer now in the file named specialpan and zoom_pal_s_sm.psd file.
In Photoshop Elements open the specialpan and zoom_pal_s_sm.psd, turn off the Visibility Icon for all the Layers except the Background, Save Background as jpg file to the computer desktop.

Figure 4. Slideshows/Pan and Zoom Main Menu Original Background As Jpeg Copy Used In Main Menu Scene Menu Switching.

Then, in Photoshop Elements, open the specialpan and zoom_pal_s_mm.psd, and import into it the Jpeg background, making sure to have it at the bottom of the Layers Palette and named Background. Delete the original Background. Save changes.

STEP 3
Place the specialpan and zoom Folder in the Program Files to Slideshow Folder route cited below.
Local Disk C
Program Files
Adobe
Adobe Premiere Elements 11
DVD Templates
Common
Slideshows


STEP 4
Place Main Menu markers in the Timeline content for each of the movies. The movie thumbnails in the Main Menu page will trace back to the locations of those Main Menu markers on the Timeline. Customize the Main Menu page in the disc menu section of the opened project.
The type of customization that can be done is shown in Figure 4.  In case of the 18 Main Menu markers on the Timeline, the project would have 3 Main Menu pages, each with 6 thumbnails buttons. Renaming on the 6 thumbnail buttons on each of Main Menu pages 2 and 3 would be indicated.
Important Note: When there are only 6 Main Menu markers on the Timeline and this 6 thumbnail buttons per page Main Menu page is used, there will be no page navigation tools seen (previous, next, and "main" in between previous and next). The navigation tools will appear on the first and subsequent pages only when the number of  Timeline Main Menu markers exceeds the number of designed in buttons per page (6).
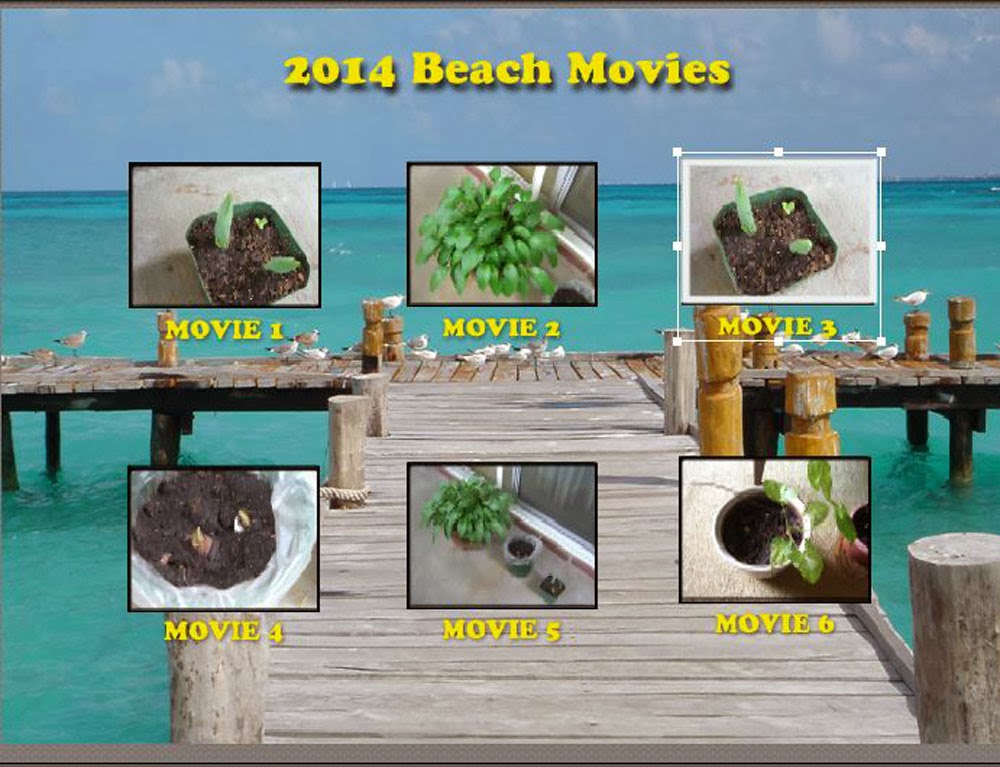
Figure 4. Slideshows/Pan And Zoom Main Menu With 6 Movie Thumbnails And Customized. No Previous-Main-Next Is Shown In This Figure Since The Screenshot Was Taken When There Were Only 6 Timeline Main Menu Markers, Consequently No Addition Pages Beyond Page 1. See Important Note In Body Of Blog STEP 4.
With a multi movie Timeline, stop markers would need to be included in the Timeline content at the end of each movie, EXCEPT the last movie. Stop marker at the end of the last item of the Timeline content causes project failures.
  
Multiple copying the "Main Menu 1" major Layer Set in the Layers Palette of the Main Menu .psd file,  effectively giving a Main Menu page with 6 text buttons instead of 1.

STEP 1
Determine the Slideshows/Pan and Zoom theme's .psd files to be modified
Same as described above.

STEP 2 and STEP 2a
Skip STEP 2 and STEP 2a.
No switching or replacing.

STEP 3
Open the Main Menu .Psd in Photoshop CS or higher and, if making a 6 text buttons per Main Menu page, make 5 more copies of the (+*) bonus Layer Set in the Layers Palette (making sure that the copy error of ^ is corrected to ^^ for each Layer Set subLayer Set. 
Important Note: The Layer Set in the Layers Palette named (+*) bonus represents the Main Menu 1 button.

Position the text buttons on screen. But leave the text as is and edit the text in the opened Premiere Elements movie menu customization area. Save the edited .psd file. And then place the specialpan and zoom Folder in the Slideshow Folder as described in STEP 3 above.

STEP 4
Customize the Main Menu page in the movie menu section of the opened Premiere Elements project.
The Main Menu page with 6 text buttons per page was created and customized. Those results are not shown. Instead the results with a 9 text buttons per page Main Menu are described and displayed in Figure 5 and Figure 6.

When there were 9 main menu markers placed on the Timeline and the edited Main Menu 9 text buttons per page was opened in the movie menu customization area of the project, the main menu displayed as seen in the saved .psd (names of buttons being the generic Main Menu 1 for each of the 9 buttons). And, there was a Play Movie Button there which was not going to be used. See Figure 5.
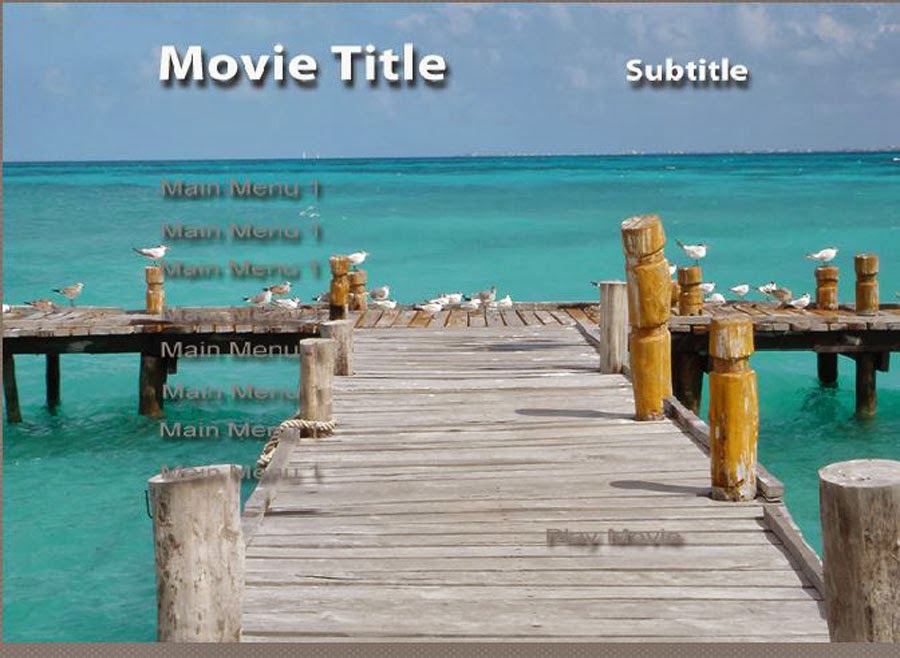
Figure 5. Slideshows/Pan and Zoom Theme Main Menu Edited To Display 9 Text Buttons Per Main Menu Page. View When Menu Was First Applied To Project With 9 Main Menu Markers On The Timeline.

The Main Menu shown in Figure 5 was customized
  • Generic text button names were given names applicable to the project theme
  • An Appropriate Title and Subtitle was given the page
  • The Play Movie Button was removed since no play all command wanted. 
Tip: To get rid of Play Movie button from menu page in the movie menu section of a Premiere Elements project, double click Play Movie button, highlight the Play Movie text in the Change Text dialog that opens, press the Enter Key of the computer main keyboard, and then click OK. The Play Movie button is gone.
In this example, the customized Main Menu page 1 displayed as seen in Figure 6.
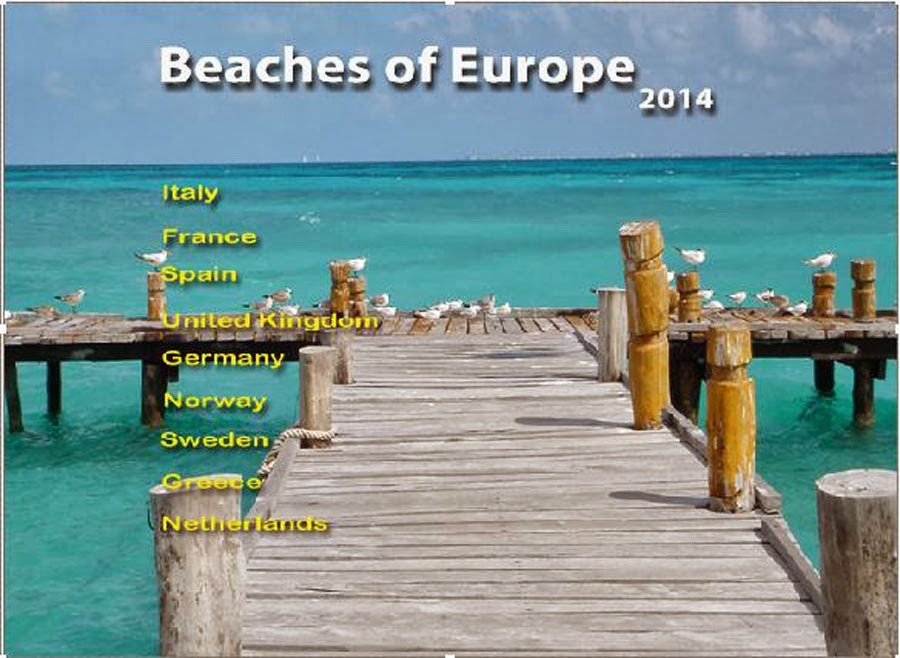
Figure 6, Slideshows/Pan and Zoom Theme Main Menu Edited To Display 9 Text Buttons Per Main Menu Page. View Of Customized Main Menu For Project With 9 Main Menu Markers On The Timeline.
In the case of the 18 Main Menu markers and a Main Menu page with 9 text buttons per page, the project would have 2 Main Menu pages. Renaming of text buttons on Main Menu page 2 would be indicated.

Again IMPORTANT to remember about the page navigation tools (previous, next with "main" in the middle)...
The navigation tools will appear on the first and subsequent pages only when the number of  Timeline Main Menu markers exceeds the number of designed in buttons per page, in this case, 9. Figures 5 and 6 are screenshots when these page navigational tools were not shown because there were no additional pages beyond the first since 9 Timeline Main Menu markers - 9 text buttons per Main Menu page.


_____________________________________________________________________________
For more information of Premiere Elements Disc Menus, please refer to the prior blog posts here
PE: Scene Menu Customization/Decreasing Existing Scene Buttons Per Page
http://www.atr935.blogspot.com/2014/02/pe-scene-menu-customizationdecreasing.html
PE: DVD Menu Navigation/Play All Loss
http://www.atr935.blogspot.com/2013/09/pe-dvd-menu-navigationplay-all-loss.html
PE: One Page 14 Scene Buttons DVD Menu
http://www.atr935.blogspot.com/2013/05/pe-one-page-14-scene-buttons-dvd-menu.html

 
September 03 2014 Add On
Also see blog post
PE: Disc Menu Folders/Files Locations
http://atr935.blogspot.com/2014/09/pe-disc-menu-foldersfiles-locations.html


ATR


Monday, February 10, 2014

PE 9: Disc Menu Lost Replacement Backgrounds

INTRODUCTION

"Disc menu lost replacement backgrounds" seems to have targeted specifically Premiere Elements 9.0/9.0.1 version. The history on this matter can be found in the Adobe thread "PE9 Menu Background" dated November 2010. The thread has 68 entries and extended from November 2010 to September 2011. To date (February 10, 2014) no Adobe patch has been seen for this situation. Back in 2011, we uncovered and described an "Audio Fix" workaround for this situation. The workaround can be found in my post numbered 47 in the Adobe thread.

"AUDIO FIX" WORKAROUND

Preface

In post 45 of the PE9 Menu Background thread, Robert J. Johnson (a known innovator in Premiere Elements workflows) wrote in May 2011
I dropped a WAV file on the audio placeholder and that was enough to keep my background image from disappearing from the scene menus. That was the Fun menu. Did somebody already try that?
Post 47 of the PE9 Menu Background thread contains my reply to Robert J. Johnson's post 45. My reply details my "Audio Fix" workaround which was found before Robert J. Johnson posted question.

PE9 Menu Background Thread, Post 47 dated May 2011, Excerpt
Robert J Johnston

I am in the process of writing up my latest findings on Premiere 9 Menu Background and other Premiere Elements issues related to these menus for DVD and Blu-ray and had intended to post them some time over the extended holiday weekend. But your post has motivated me to respond to your question sooner than later in an abridged sort of way, giving you and others a preview of where I am currently going on this..

As per one of my earlier posts in this thread (post #10)
General/Fun, "This problem does not occur for main menu, but background replacement GONE for scene menu."
General/Aquarium, "Background replacement GONE for both main and scene menu after burn to disc."

With the Fun Scene Menu...The Fun Template, as designed by Adobe, comes with Main Menu audio and no Scene Menu audio. That is done via naming the one music file in the program files/theme folder Fun_mm_bg.mp3. If you wanted Scene Menu audio as well at this program files level, you could include in the Theme Folder a copy of the supplied audio, but name the copy Fun_sm_bg.mp3. However, for the problem in discussion you do not have to involve going into the program files to do that.

If you insert any audio file (.mp3 or .wav) for the Scene Menu in the Disc Menu Section of the program, you will see your replacement background in the playback of the DVD-VIDEO format on DVD disc. If you do not really want music for the scene menu but you do want to see the replacement background in your final product, then you can create a "Stock Muted Audio" .wav file to access and use from the Disc Menu section of the program. (Audacity is a quick tool for creating the "Stock Muted Audio" for this purpose. Digressing, there you could also lower the gain if you think that your menu volume is too loud.")

Now with regard to the Aquarium Main and Scene Menus..There is no music file at all in the Theme Folder in the program files.

So, if you insert any audio (.mp3 or .wav) with sound or muted into the main menu or scene menu in the Disc Menus section of the program, your replacement backgrounds will be seen in the playback of the DVD-VIDEO format on the DVD disc.

I caught onto all this while I was recently looking at comparison of Premiere Elements 4, 7, 8.0/8.0.1, and 9/9.0.1 with regard to quality in the burn to Blu-ray for my new Blu-ray equipment. Originally, this comparison was done for Quality purposes, not directed at the menus replacement background issue. What I ran into in the final Blu-ray product at its playback was main menu play button working, great quality video, but clicking on the scene button did nothing, often froze the player. After extensive checks and cross checks, the answer was to add an audio file to the scene menu!!!! This situation existed for some menus but not all. A list of the dos and don'ts will be supplied at a later time. The menu that started all this was the Wedding/Romantic one that was included in versions 4, 7, 8.0/8.0.1, but NOT 9/9.0.1.

For those who would inject computer OS/video card or other factors into this mix, I add that my findings were repeatable from November 2010 until today May 29, 2011 and repeatable using Windows XP Professional SP3 32 bit (NVIDIA) or Windows 7 Professional SP1 64 bit (Intel HD Graphics). And, the resolution of the files used for the replacement background was NOT at the core of this matter which has all the ring of an Adobe programming matter. In the studies with the Wedding/Romantic theme and other of these matters, the prognosis for the burn to disc typically could be learned ahead of time by seeing the burn to startup as Encoding Menu 1 of 1 instead of Encoding Menu 1 of 2.

So far here I have not mentioned any involvement of the project preset which directs the program to establish what it considers an appropriate choice from the s, w, and hd sets in the program files. Often you see projects with HD project presets using s menu set rather than the w menus. But that is a whole other story.

ATR

BACKGROUND INFORMATION PRIOR TO "AUDIO FIX" DISCOVERY

In My Premiere Elements 9 Daily Discoveries thread, post 8 dated November 2010, Excerpt


PE9 Main Scene Menu Replaced Background Lost On Burn To Disc

More and more reports are surfacing regarding the loss of replaced background for main and scene menus for the Premiere Elements 9 DVD Templates after the burn to disc process.

It looks like this problem also impacts webDVD where these DVD Templates are used to produced the flash files with DVD Menus.

I am currently involved in a discussion of this issue at the Premiere Elements User to User Forum at Adobe and have been posting my findings on the matter there.
http://forums.adobe.com/message/3256833#3256833
(IMPORTANT UPDATE July 17, 2011...please check out post #47 in this May 2011 link...it contains a fix for the matter via inserting muted or non muted audio into the menus in the Disc Menu Section customization area of the program.)

It is an important topic so please keep up to date on the matter in this thread or by following the entries in the thread at the above link. If you are experiencing this problem, please post your own new thread in the Premiere Elements Forum here. Be sure to say what specific DVD Templates are involved, whether main and/or scene menu is affected, and whether they are SD or HD menus.

Thank you.

ATR

Add On

Recently a Premiere Elements 9 user was in a time crunch to get out a wedding DVD-VIDEO widescreen for which he wanted to use the Wedding/Elegant DVD Template. The workaround that I suggested for this problem is as follows.

In this instance, there were two problems:
a. NEW…in spite of the fact that the user had a DV Widescreen project preset, the main menu was presenting as if it were standard while the scene menu was presenting, as expected, as widescreen.
b. ORIGINAL ISSUE…the replaced background for main and scene menus displayed properly in the Disc Menus Section Preview Window after application of the menu to the project, however after burn to disc the replaced backgrounds were gone from main and scene menus, TV displaying the backgrounds designed by Adobe.

Workaround 1.
If you have a Premiere Elements 9 DV Widescreen project and want to use the Elegant DVD Template as is (no customization of main and scene menus), then
a. Go to the Premiere Elements program files
C:\Program Files\Adobe\Adobe Premiere Elements 9\DVD Templates\Common\Wedding\(V) Elegant
And remove the elegant_pal_w_mm_bg.swf file from the Elegant Folder.

Workaround 2.
If you have a Premiere Elements 9 DV Widescreen project and want to use the Elegant DVD Template with customized background for main and scene menus, then you are going to have to modify the .psd for the main menu and the .psd for the scene menu at the Program Files level, using Photoshop or Photoshop Elements.

This user had a 1920 x 1080 image that he wanted to use as a background in main and scene menu. The following is the detailed instructions that I offered and that he reported worked for him.

1. I cropped by source jpeg image to 1027 x 576 pixels in Photoshop Elements 9 and saved that cropped image to the computer Desktop.
2. Then I went to the Premiere Elements 9 program files
C:\Program Files\Adobe\Adobe Premiere Elements 9\DVD Templates\Common\Wedding\(V) Elegant
and made copies of
Elegant_pal_w_mm.psd
and
Elegant_pal_w_sm.psd
and pasted these copies to the computer Desktop. For each of these files, I right clicked the file, selected Properties, unchecked Read Only, followed by Apply, then OK. I re-named the files
ModifiedElegant_pal_w_mm.psd
and
ModifiedElegant_pal_w_mm.psd
At the Desktop, I created a Folder which I named Modified Elegant and in it placed the above renamed .psd files. From there I opened the ModifiedElegant_pal_w_mm.psd into Photoshop Elements 9.

a. Collapsed all the Layer Groups so that I saw just the Layer Groups and not their contents. Clicked on “background” Layer, right clicked it, clicked on Delete to get rid of the original background layer.
b. Then, File Menu/Open and opened the 1027 x 576 photo in Photoshop Element 9…at this point, I had the 1027 x 576 image on screen and the ModifiedElegant_pal_w_mm.psd file could be seen in the Project Bin….with the Move Tool active, dragged the on screen 1027 x 576 image from there into the ModifiedElegant_pal_w_mm.psd in the Project Bin.
c. At this point, I saw the photo inserted into the Layers Palette for the .psd file (in this process the photo is now in a layer named Layer 1)…I.clicked and dragged Layer 1 to the bottom of the Layers Palette and rename it background…for reference, the graphic Layer Group should be directly above this background layer.
d. Looked on screen…if you see that your image is not filling the right and left edges of the template (transparent right and left edge there) hold down the Alt Key and click and drag the bounding box of the image until the left side and right side transparent spaces are filled with the image. Holding down the Alt Key will get both edges done at the same time…only a very minor adjustment is needed here….NO MATTER WHAT YOU SEE ON SCREEN DO NO MORE THAN THAT, DO NOT ATTEMPT TO CORRECT WHAT MIGHT LOOK LIKE DISTORTION.
e. Save and close the modified .psd for the main menu.

Did a similar procedure for the scene menu.

3. At this point I had
ModifiedElegant_pal_w_mm.psd and ModifiedElegant_pal_w_sm.psd in the Modified Elegant Folder on the Desktop.

4. Then I placed the Modified Elegant Folder in the Wedding Folder in the DVD Template Folder. The path was
C:\Program Files\Adobe\Adobe Premiere Elements 9\DVD Templates\Common\Wedding\

5. Then I opened Premiere Elements 9 with a project preset (new project dialog) = PAL or NTSC DV Widescreen and, when in Disc Menus, I selected and applied the menus in the Modified Elegant category and exported (burn to DVD) with the preset for PAL or NTSC DVD-VIDEO.

In My Premiere Elements 9 Daily Discoveries thread, post 26 dated May 2011, Excerpt

Premiere Elements 9 Menu Replacement Background: Latest News

Please refer to the following Adobe Premiere Elements User to User Forum thread and the latest developments on the issue of lost replacement menus in the Premiere Elements 9 burn to disc.

I had intended to present my detailed work at the Premiere Elements Forum here in the next few days, but posts in the Adobe thread made me decide to preview some of my results there to answer a current important question.

http://forums.adobe.com/thread/747429?tstart=0

Remember, keep those Adobe Feature Requests and Bug Reports going to Adobe to help in the cause of gaining resolution what appears to be a complex and widespread issue.
https://www.adobe.com/cfusion/mmform...?name=wishform

Thanks.

ATR

_____________________________________________________________________________


September 03, 2014 Add On
Also see blog post
PE: Disc Menu Folders/Files Locations
http://atr935.blogspot.com/2014/09/pe-disc-menu-foldersfiles-locations.html


Sunday, February 9, 2014

PE: Scene Menu Customization/Decreasing Existing Scene Buttons Per Page

INTRODUCTION

A Premiere Elements DVD Template theme comes in a set consisting of a main menu and a scene menu. The focus in this blog post will be on the scene menu and decreasing the number of existing buttons per scene menu page. The scene menu comes with designed in number of scene buttons per page. And, when the menus are applied, each of the scene buttons traces back to a scene in the Timeline content where a scene marker is placed. The sequential order of the scene markers in the Timeline is reflected in the sequential order in which the scenes are automatically placed and displayed in the DVD Template theme's scene menu page(s). When the number of designed in scenes per page is reached, the program generates a copy or copies of the first to display the rest of the scenes as per the number of scene buttons per page restriction.

Example
Given a Timeline with 12 scene markers placed in the content and a scene menu designed for 5 scene buttons per page. Under those conditions, the resulting scene menu situation would be 3 scene menu pages, 
Page 1 with 5 Scenes
Page 2 with 5 Scenes
Page 3 with 2 Scenes

A certain degree of customization of the scene buttons can be done in the disc menu section of the opened project, but there are certain modifications of these menus that require that user to go into the scene menu's .psd file at the level of the computer hard drive save location for the .psd file involved. The limiting factor in editing one of the .psd files is that each button is represented in the .psd file as a Layer Set in the Layers Palette and, for most editing, one needs to get into the Layer Set for the edit. Programs like Photoshop CS and higher can open these Layer Sets if the edits are inside the Layer Sets. Use of Photoshop Elements for this purpose is problematic.

But in the case where the goal is only to decrease the number of buttons in the scene menu design, there is no need to open any Layer Sets. So, Photoshop Elements as well as Photoshop CS and higher can easily be used for the .psd edit to decrease the number of scene buttons in the scene menu design.

ISSUE

A Premiere Elements 12 user had a HD project with 12 scene markers and wanted to use the DVD Template Memories/Family Memories which comes with 5 scenes per page. She wanted the same number of scenes per each page and not the situation as described in the INTRODUCTION, that is

Page 1 with 5 Scenes*
Page 2 with 5 Scenes*
Page 3 with 2 Scenes*

The project was destined for burn to disc with the NTSC_Widescreen_Dolby DVD export preset.

SOLUTION
  
In order to obtain a Memories/Family Memories scene page with the same number of scenes per page when there were 12 scene markers in the Timeline content, "scene button 5 Layer Set" or "scene button 5 and 4 Layer Sets" were deleted from the Layers Palette of the .psd file, using Photoshop Elements 12 as the .psd editor.

If only Layer Set for "scene button 5" was removed, then the user had 3 scene pages each with 4 scenes per page. If Layer Set for "scene button 5 and 4" were removed, then the used had 4 scene pages each with 3 scenes per page.

The HOW TO described next is demonstrated with Premiere Elements 12 HD project using the Memories/Family Memories Theme (HD set). However, the principles involved remain the same for Premiere Elements 4 through 12 DVD Template scene menus. 

HOW TO

STEP 1

In An Open Project, Assure That Files Needed For The Memories/Family Memories Theme Have Been Downloaded and Installed

The Memories/Family Memories DVD Template is part of the Premiere Elements 12  CONTENT that needs to be downloaded and installed for use. To do that, in the Premiere Elements 12 project, go to Expert workspace Tools Menu/Movie Menu/ and make sure that there is no blue ban at the top right corner of the thumbnail for this DVD Template theme. See Figure 1 with no blue ban at the top right corner of the Family Memories theme. The absence of that blue ban indicates that the Family Memories CONTENT has been downloaded and installed by the user. If there is a blue ban present, then right click the blue ban and select Download Now. See earlier blog posts on PE11 and PE12 CONTENT.

Figure 1. Premiere Elements 12 Expert Workspace Movie Menu Display For Memories/Family Memories Theme When HD Project. The HD Project Preset Directs The Program To Display The HD Version Of The Family Memories Theme. No Blue Ban In Upper Right Corner Of The Thumbnail Indicates That The Theme's CONTENT Has Been Downloaded And Installed Already By The User. Note The HD Markings On The Thumbnail Under The Circumstances.

STEP 2

On The Computer Hard Drive, Locate The Scene Menu .Psd To Be Edited

The Memories/Family Memories theme .psds can be found in the following path (Windows 7, 8, or 8.1 64 bit)

Local Disk C
Program Data
Adobe
Premiere Elements
12.0
Online
DVD Templates
All_Lang
Memories
Family Memories
in the Family Memories Folder, there are 3 sets of .psd files, "s", "w", and "hd". 

Figure 2. Premiere Elements 12 Memories/Family Memories Theme Files. The PSD Files To Be Edited Are Pointed To With A Red Check Mark.

If Project Preset = NTSC DV Standard or PAL counterpart, edit scene menu .psd in the set
memories_s_sm.psd (for scene menu)
memories_s_mm.psd (for main menu)

If Project Preset = NTSC DV Widescreen or PAL counterpart, edit scene menu .psd in the set
memories_w_sm.psd (for scene menu)
memories_w_mm.psd (for main menu)

If Project Preset = a HD preset, edit scene menu .psd in the set
memories_hd_sm.psd (for scene menu)
memories_hd_mm.psd (for main menu)

Tip
To confirm which set of menus that the project is using for the project, open the Notepad document of the saved/closed project file (project.prel), go to Edit Menu of Notepad document, select Find, and type Family Memories in the Find What field to locate details of the menu in that document.

STEP 3

Copy The Original .Psds Found In STEP 2 And Prepare The Scene Menu .Psd For Edit In Photoshop Elements

a, Copy the appropriate original .psd set (.psd for scene menu plus .psd for main menu) and paste them inside a empty folder created on the computer desktop.

b. Rename folder and .psds at the computer desktop level. Since there are 6 variations involved here, the following renaming scheme was used

Standard, 4 scene buttons per scene menu page
Folder name = s4memories
Scene Menu .psd file name = s4memories_s_sm.psd
Main Menu .psd file name = s4memories_s_mm.psd  

Widescreen, 4 scene buttons per scene menu page
Folder name = w4memories
Scene Menu .psd file name = w4memories_w_sm.psd
Main Menu .psd file name = w4memories_w_mm.psd

HD, 4 scene buttons per scene menu page
Folder name = hd4memories
Scene Menu .psd file name = hd4memories_hd_sm.psd
Main Menu .psd file name = hd4memories_hd_mm.psd 

The same type of renaming scheme for the folder and files involved was used when 3 buttons instead of 4 per scene menu page was the goal.

STEP 4

Edit The Scene Menu .Psd In Photoshop Elements 12

Double click the appropriate prepared folder on the computer desktop to open it. (See STEP 3).
Right click the appropriate scene menu .psd inside that folder and select Open With, followed by Photoshop Elements 12 (for that matter, it could be Photoshop Elements 4 through 12).

When opening the scene menu .psd in Photoshop Elements 12, two dialog may pop up. The first asks about text layers update. Click No. The second mentions computer versus TV considerations. Click OK. At this point, the Full Editor should open and display the Family Memories scene menu .psd content as seen in Figure 3.

Figure 3. Photoshop Elements 12 Editing Of Family Memories Theme Scene Menu PSD.
The Layer Set named "(+) scene five" represents the thumbnail named "scene five" on screen. And, the Layer Set named "(+) scene four" represents the thumbnail named "scene four" on screen. If a 3 scene buttons per scene page is required, then right click each of these Layer Set panel, select Delete Group. If a 4 scene buttons per scene page is required, then right click only Layer Set panel for "(+) scene five", and select Delete Group. Go to File Menu/Save when finished. Clicking Save results in a message asking permission to replace the unedited file with the edited one. Click Yes or Replace whichever is the command shown.


At this point, the folder with the edited scene menu .psd and the unedited main menu .psd should be on the computer desktop ready to be placed in the right Premiere Elements 12 Location on the computer hard drive.

STEP 5

Place The Modified Family Memories Folder Into The Right Premiere Elements 12 Location On The Computer Hard Drive

In Windows 7, 8, or 8.1 64 bit, follow the path

Local Disk C
Program Files
Adobe
Premiere Elements 12
DVD Templates
Common
and, in the Common Folder, create a new empty folder named Modified Themes. Open the Modified Themes Folder and place inside it the hd3memories Folder or the hd4memories Folder or both from STEP 4, if the two were created.

The Modified Folder can also be used to contain s3memories, w3memories, s4memories, and w4memories Folders if also produced in the above steps.

_______________________________________________________________________________
*Scene Menu Miscellaneous Information

Scene Menu Page, Scene Naming

Scenes in the scene page have sequential numerical names by default. When the number of Timeline scene markers exceeds the number of designed in scene buttons per scene menu page, the program generates a copy or copies for the spill overs. These additional scene pages are copies of the first. In the example above, 12 Timeline scene markers in a project with a scene menu with 5 designed in scene buttons per page, 
Page 1 scenes would have names Scene 1, Scene 2, Scene 3, Scene 4, Scene 5
Page 2 scenes would have names Scene 1, Scene 2, Scene 3, Scene 4, Scene 5
Page 3 scenes would have names Scene 1, Scene 2

Scenes can be renamed at the Timeline level as well as in the disc menu customization area of the opened program. Results from renaming scenes at the Timeline level seem to reveal what the program is doing when it makes a copy or copies of the first page to take care of the scene spill overs. This "first page" is really a copy of the scene menu page with its sequential numerical defaults before renaming. For example, if at the Timeline level Page 1 scenes were renamed Scene a, Scene b, Scene c, Scene d, Scene e, what would turn up in the disc menu section would be

Page 1 scenes named Scene a, Scene b, Scene c, Scene d, Scene e
but
Page 2 scenes would be named Scene 1, 2, 3, 4, 5
Page 3 scenes would be named Scene 1, 2

and not

Page 1 scenes named Scene a, Scene b, Scene c, Scene d, Scene e
Page 2 scenes named Scene a, Scene b, Scene c, Scene d, Scene e
Page 3 scenes named Scene a, Scene b

Multiple Timeline Movies, Each With Its Own Scene Menu Page

If a project highlights 4 movies in its Main Menu page, each Movie cannot have its own scene menu page.


September 03, 2014 Add On
Also see blog post
PE: Disc Menu Folders/Files Locations
http://atr935.blogspot.com/2014/09/pe-disc-menu-foldersfiles-locations.html


ATR


Monday, February 3, 2014

PE: Delete and Close Gap Failures

INTRODUCTION

Recently at the Adobe Premiere Elements Forum, a Premiere Elements 11 user wanted to know why use of the Delete and Close Gap Timeline command was deleting the selected photo but not closing the gap left by the deletion.

In that instance the Expert workspace Timeline consisted of photos side by side with transitions between the photos on Video 1 and two soundtrack clips on the Soundtrack. Each of the soundtracks had Fade In and Fade Out Audio applied to them. To complicate matters, the Delete and Close Gap command worked for the photos above the second soundtrack clip but not for those above the first soundtrack clip.

The answer was NOT
  • in the formats of the media and type of media (video vs stills vs audio)
  • in the transitions used, or in the Fade In or Fade Out Audio applied to the soundtrack clips
  • in a specific Premiere Elements version (so far issue is found in versions 10 and 12 besides 11) 
  • in the specific audio track involved (the issue existed whether the soundtrack clips were on the Soundtrack, Narration Track, or Audio 1, 2... Track)
  • in the fact that audio files and audio tracks were involved (audio could be taken out of the equation and the problem reproduced with 2 video clips on Video 1/the series of photos on Video 2 OR 2 video clips on Video 2/the series of photos on Video 1)

SOLUTION

The SOLUTION here will reflect the definition of the problem of when and where the Timeline Delete and Close Gap command is working or not, rather than offering any whys for the behavior observed.

Premiere Elements 11 on Windows 7 Professional SP1 64 bit

Given Video Track 1 with 28 still images (jpg) side by side and Soundtrack with 4 audio clips (mp3). The setup was such that there are 7 still images over each of the 4 audio clips.

For this mini test run, the 4th still image in each group was targeted with Delete and Close Gap.

The results were (from left to right on the Expert workspace Timeline)

1st Group, Deleted the 4 th still, but gap was not closed automatically between 3rd and 5th still.
2nd Group, Deleted the 4th still, but gap was not closed automatically between 3rd and 5th still.
3rd Group, Deleted the 4 th still, but gap was not closed automatically between 3rd and 5th still.
4th Group, Deleted the 4 th still and closed the gap between 3rd and 5th stills.

Refer to Figure 1.

When the groups were deleted one by one, from 4th to 1st group, it was always only the last group where the Delete and Close Gap worked. And, when all the groups were deleted except 1st, then 1st group's Delete and Close Gap worked.

An interesting note was the scenario where Audio 2, 3, and 4 were deleted from the Soundtrack and all 28 jpg were lined up side by side on Video 1. In that case, Delete and Close Gap worked for any of the 28 stills on Video 1, be it the first 7 directly above Audio Clip 1 or the remaining 21 which were over the empty Soundtrack space vacated by the deletion of Audio Clips 2, 3, and 4.

Figure 1. Delete and Close Gap Command Behavior.

Referring to Figure 1, this behavior was the same
  • if stills (or videos) were on Video Track 1 and these those audio clips shown were on Narration Track or Audio Track 1, 2,.. or Soundtrack.
  • if stills (or videos) were on Video Track 1 and, instead of those audio clips each with 35 seconds duration  on the Soundtrack, there were 4 stills (or videos) each with 35 seconds duration on Video Track 2 or above.
  • if stills (or videos) were on Video Track 2 or higher and, instead of those audio clips each with 35 seconds duration on the Soundtrack, there were 4 stills or videos each with 35 seconds duration on Video Track 1.

HOW TO FIX

No permanent fix was found for these types of of Delete and Close Gap failures.

Attempts to get the Delete and Close Gap command to work by disabling one or more of the Audio Clips shown in Figure 1 were unsuccessful. Disabling was done by right clicking the audio file and removing the check mark next to Enable.

Filling the gap left by the Close Gap failure after file deletion falls to manual movement of the neighboring clips as a block (if necessary). The mouse cursor can be used to draw a rectangle around a group of clips to select them altogether, and then the block can be moved to fill the gap.

COMMENTARY

Although it is tempting to refer to the Delete and Close Gap behavior reported here as a program glitch or bug, it is not clear what the situation is since whatever this is exists at least in Premiere Elements 10, 11, and 12. So more work needs to be done to differentiate between a not understood  fundamental video editing principle and the glitch/bug explanation.
_____________________________________________________________________________

ATR