Tuesday, June 30, 2015

PE 13/13.1: PCM Stereo & Blu-ray Burn To Disc Presets

INTRODUCTION

Premiere Elements 13/13.1 burn to Blu-ray disc or ISO Image comes with choice of same 6 presets.They are
  • H.264 1440 x 1080i NTSC Dolby
  • H.264 1440 x 1080i PAL Dolby
  • H.264 1440 x 1080p NTSC Dolby NEW
  • H.264 1920 x 1080i NTSC Dolby
  • H.264 1920 x 1080i PAL Dolby
  • H,264 1920 x 1080p NTSC Dolby NEW
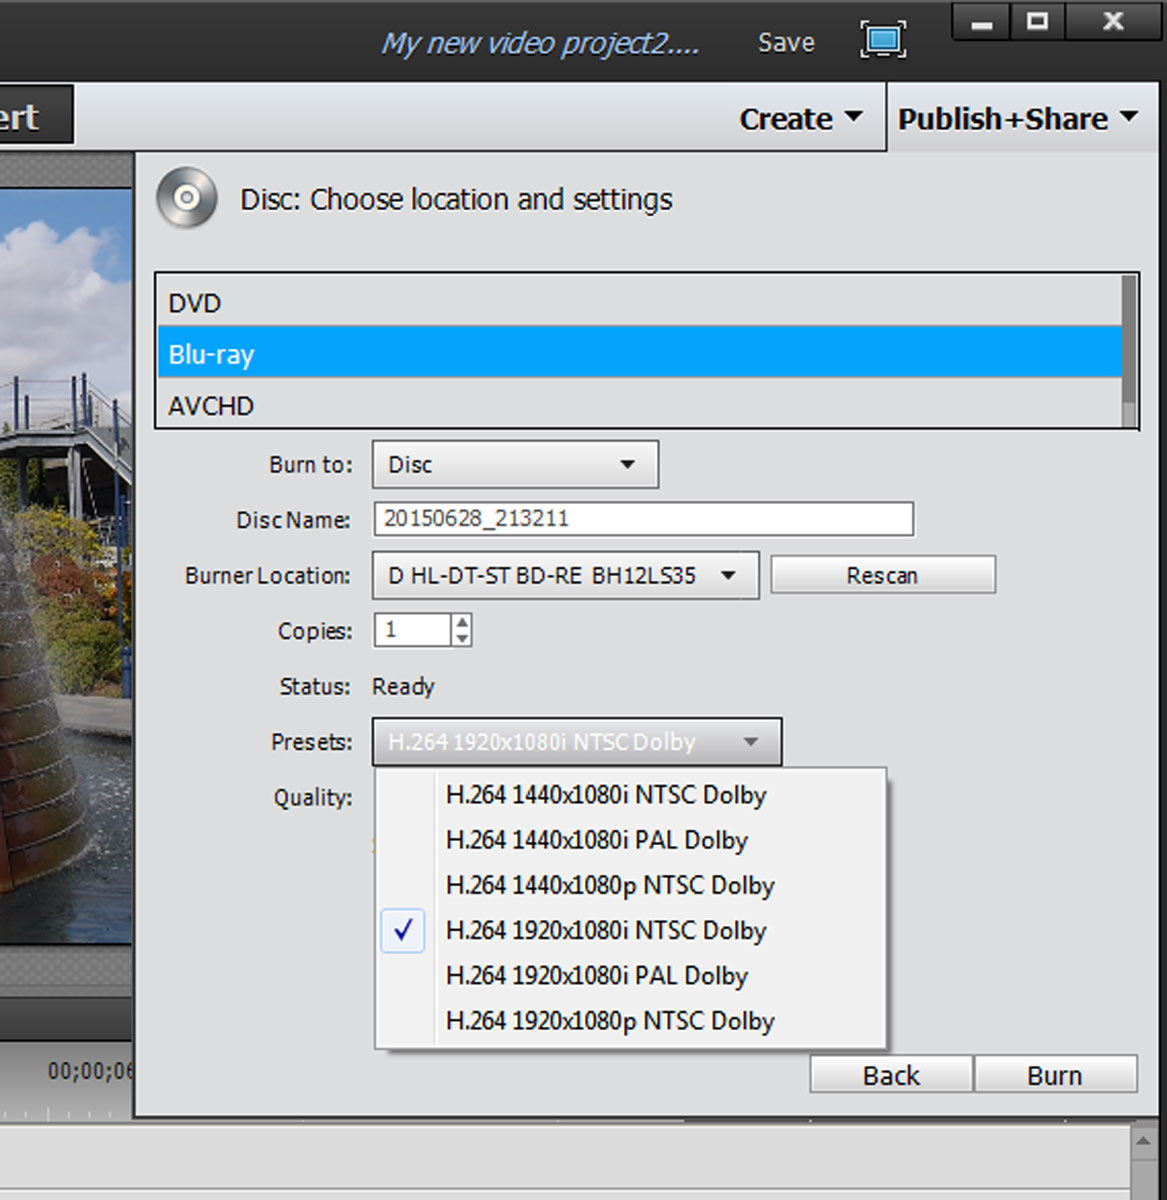
Figure 1. Premiere Elements 13/13.1 Choice For Blu-ray Burn To Presets.
The details of each preset are limited for the most part to whatever is in the name of the title for the preset and whatever is listed in the burn dialog's Quality area for Space Required and Bitrate. There is no Advanced Button for customizing burn to settings for these presets. The user control in this is choice of preset but not customizing the preset selected. For a NTSC setup, the default for these presets appears to be H.264 1920 x 1080i NTSC Dolby.

In the past, MediaInfo has been used to get more information about these Blu-ray burn to presets. In an earlier evaluation, it was found that the presets designated i (interlaced) use frame rate of NTSC 29.97 interlaced frames per second or PAL 25 interlaced frames per second. The presets designated p (progressive) use frame rate of 23.976 interlaced frames per second. Since all the preset names ended with Dolby, it has been assumed all the presets use Dolby Digital Stereo 2 channel audio.

ISSUE

Since all the preset names end with Dolby, it has been assumed that all these presets use Dolby Digital Stereo 2 channel audio. We recently found that this assumption was not true. So, time to take a closer look at the properties of the BDMV Folder video file (00000.m2ts) from a Premiere Elements 13/13.1 burn to Blu-ray disc or ISO Image.

SOLUTION

The name of each of the Blu-ray burn to presets is consistent with the properties of the video format on the Blu-ray end product obtained from using any one of those presets. This is also true for properties of the audio format on the Blu-ray end product from using any one of those presets, with the exception of the preset named H.264 1920 x 1080p NTSC Dolby. The MediaInfo properties readout shows the audio is not Dolby Digital Stereo as suggested by the preset name, but rather PCM Stereo. At this time, it is not understood why the difference between the Dolby in the preset name and the PCM Stereo in the MediaInfo readout for what is on the disc when that particular preset is used for the burn to Blu-ray disc.

Major differences in audio properties between the H.264 1920 x 1080p NTSC Dolby and the rest are
Format: PCM versus AC-3 (Dolby Digital)
Codec ID: PCM  = 128 versus AC-3 (Dolby Digital) = 129.
Bitrate: For PCM, 1536 kbps (kilobits per second) versus Dolby Digital, 192 kbps (kilobits per second)

As might be expected, the audio quality of the end product that used H.264 1920 x 1080p NTSC* preset presented with what seemed to be a more robust sound than when the other presets were used. Listen and decide.

For burn to Blu-ray settings not suggested in the title of the presets, please refer to the following FINDINGS section to see the MediaInfo video audio properties information for the end product of a Premiere Elements 13/13.1 burn to Blu-ray disc using each of these 6 presets.


FINDINGS
Premiere Elements 13/13.1** Project With 1080p60 Project Preset for 1080p60 AVCHD.mov Timeline File For Burn To Blu-ray Disc (BD-RE 25 GB)


MediaInfo Readouts 

Presets With Progressive Frame Rate

Presets = H.264 1440 x 1080p NTSC Dolby
BDMV Folder's Video 00000.m2ts

Figure 2. MediaInfo Video Audio Readout For 00000.m2ts From BDMV Folder From Premiere Elements 13/13.1 Burn To Blu-ray Disc Using Preset = H.264 1440 x 1080p NTSC Dolby.


See Figure 2.
Video
1440 x 1080 HD anamorphic 16:9 @ 23.976 progressive frames per second, as expected.
Audio
AC-3 (Dolby Digital 2 Channel Stereo), expected.

But....

Presets = H.264 1920 x 1080p NTSC Dolby
BDMV Folder's Video 00000.m2ts

Figure 3. MediaInfo Video Audio Readout For 00000.m2ts From BDMV Folder From Premiere Elements 13/13.1 Burn To Blu-ray Disc Using Preset = H.264 1920 x 1080p NTSC Dolby.

See Figure 3.
Video
1920 x 1080p16:9 @ 23.976 progressive frames per second, as expected.
Audio
PCM 2 Channel Stereo, not expect, expected Dolby Digital 2 Channel Stereo.


Presets With Interlaced Frame Rate 

Presets = H.264 1920 x 1080i NTSC Dolby 
BDMV Folder's Video 00000.m2ts

Figure 4. MediaInfo Video Audio Readout For 00000.m2ts From BDMV Folder From Premiere Elements 13/13.1 Burn To Blu-ray Disc Using Preset = H.264 1920 x 1080i NTSC Dolby.
See Figure 4.
Video
1920 x 1080 16:9 @ 29.970 interlaced frames per second, as expected.
Audio
AC-3 (Dolby Digital 2 Channel Stereo), expected.


Presets = H.264 1440 x 1080i NTSC Dolby
BDMV Folder's Video 00000.m2ts

Figure 5 MediaInfo Video Audio Readout For 00000.m2ts From BDMV Folder From Premiere Elements 13/13.1 Burn To Blu-ray Disc Using Preset = H.264 1440 x 1080i NTSC Dolby.
 See Figure 5.
Video
1440 x 1080 HD anamorphic 16:9 @ 29.970 interlaced frames per second, as expected.
Audio
AC-3 (Dolby Digital 2 Channel Stereo), expected.


Presets = H.264 1920 x 1080i PAL Dolby
BDMV Folder's Video 00000.m2ts

Figure 6. MediaInfo Video Audio Readout For 00000.m2ts From BDMV Folder From Premiere Elements 13/13.1 Burn To Blu-ray Disc Using Preset = H.264 1920 x 1080i PAL Dolby.
See Figure 6.
Video
1920 x 1080 16:9 @ 25 interlaced frames per second, as expected.
Audio
AC-3 (Dolby Digital 2 Channel Stereo), expected.


Presets = H.264 1440 x 1080i PAL Dolby
BDMV Folder's Video 00000.m2ts

Figure 7. MediaInfo Video Audio Readout For 00000.m2ts From BDMV Folder From Premiere Elements 13/13.1 Burn To Blu-ray Disc Using Preset = H.264 1440 x 1080i PAL Dolby.


See Figure 7.
Video
1440 x 1080 HD anamorphic 16:9 @ 25 interlaced frames per second, as expected.
Audio
AC-3 (Dolby Digital 2 Channel Stereo), expected.

 COMMENTARY

There is more to the story than just what has been written above. And, no real answers for the whys. Premiere Elements 13/13.1's burn to for AVCHD DVD comes with 6 presets. And, these 6 presets have the same names as the 6 presets for burn to Blu-ray. However, AVCHD DVD's H.264 1920 x 1080p NTSC Dolby preset really does use AC-3 (Dolby Digital Stereo) for its audio according to MediaInfo readout. The audio readout for the AVCHD DVD presets H.264 1920 x 1080i NTSC Dolby and H.264 1920 x 1080p NTSC Dolby are identical and include Format AC-3 and Codec ID: 129 with Bitrate = 192 kbps (kilobits per second).

Work in progress.


________________________________________________________________________________
*Under investigation for what seemed to be a high frequency of "interrupted" burn to Blu-ray disc when the H.264 1920 x 1080p NTSC Dolby preset was used instead of the default H.264 1920 x 1080i NTSC Dolby. These "interrupted" burn tos resulted in .iso image backups which are prone to .iso file size problems.

**Done on Windows 7 Professional SP1 64 bit.


Saturday, June 27, 2015

PE: Timeline Still Duration Changes More Than One At A Time

INTRODUCTION

"How do I change the Timeline still duration for all my Timeline stills so that I get the same new duration for each all at one time?" is a frequently asked question. This can be done
  • BEFORE import: Edit Menu/Preferences/General and re-setting its Still Image Default Duration (works for all stills imported after the setting has been changed)
  • AFTER import: Selecting* the involved Timeline stills all at one time, right clicking anywhere in the selection, selecting Time Stretch in the menu that appears, and then using the Time Stretch dialog's duration to change the still image duration for all those stills which were selected.
ISSUE

Recently a Premiere Elements 13/13.1 user asked about changing the Timeline still image duration for 4 stills all at one time, was given the instructions for the AFTER import/Time Stretch way, and reported that it did not work. Why?

SOLUTION

The AFTER import/Time Stretch way works only when all the stills in the selection have the same duration before the attempted duration change. If one of the stills in the selection has a duration different than the others in the selection, then, when the Time Stretch dialog opens, the duration field is found inactive. The forced decision is then
  • do the still image duration changes for the Timeline stills individually
or
  • set the Still Image Default Duration in preferences BEFORE import of the stills to the Timeline.
The Copy/Paste Effects and Adjustments (or Copy/Paste Attributes**) does not work as a workaround in this case.

The AFTER/Time Stretch way is possible only in Premiere Elements 8.0/8.0.1, 9.0/9.0.1, 10, 11, 12, and 13/13.1. And, the Copy/Paste Effects and Adjustments (or Copy/Paste Attributes*) is not a workaround for AFTER import/Time Stretch in these versions.

COMMENTARY

Occasionally a user with a Time Lapse video project*** will report that he/she could not change the duration of all the stills in the Time Lapse sequence using the AFTER/Time Stretch way. In those cases, it was found that somehow a video clip got mixed in with the still sequence on the Timeline. And, video is more likely to have a different duration than stills. Interestingly, if stills were 5 seconds and 12 seconds video was trimmed to 5 seconds and included in the Timeline with the 5 seconds stills, then the AFTER/Time Stretch way would work to change duration for the Timeline 5 second video and each of the 5 second stills to a new duration.

________________________________________________________________________________
 * To select more than 1 still at a time
  • as the Shift key is being held down, click on each of the stills wanted
  • with the mouse cursor, draw a rectangle around the stills wanted to select them
**Premiere Elements 10 and earlier uses Paste Attributes instead of Paste Effects and Adjustment seen in Premiere Elements 11 and later.

*** http://atr935.blogspot.com/2013/07/pe-time-lapse-video-basics.html


ATR

Thursday, June 25, 2015

PE 13/13.1: Adding User Created Content To Project's Graphics and Titles & Text

INTRODUCTION

Premiere Elements 13/13.1* comes with a large selection of content for Graphics, Titles & Text, Movie Themes, Movie Menus, and Audio from which to choose. Please refer to blog post on Premiere Elements 13 First Look Details. Even so, the user can supplement the Adobe content with user created content or user edited Adobe content. 

ISSUE

If user created content is wanted, where does it go in the program files on the computer hard drive so it can be selected and used from within an open project under the project's Graphic Tab, Titles & Text Tab, and other. This blog post focuses on the answer to this question and offers a generalized basic how to do this for Graphics and Titles & Text.

SOLUTION

User Created Graphics (Clip Arts)

STEP 1.  In Photoshop Elements 13/13.1**, create a graphic (about 880 x 880 pixels) and save it in png format to a folder with name of choice. In this example, the folder name = My Special Graphics.

STEP 2. Follow the path

Local Disk\Program Files\Adobe\Adobe Premiere Elements 13\Clip Arts\Common

And, in the Common Folder, place the My Special Graphics Folder which contains the user created .png graphic.

STEP 3. After that is done, this graphic can be accessed in Premiere Elements 13/13.1 Expert workspace under its Graphics Tab/My Special Graphics category.

STEP 4. Additional new user created graphics can be created, saved as png, placed in this same My Special Graphics Folder, and then be accessed from within the opened project under Graphics Tab/My Special Graphics category.

STEP 5.  These user created graphics created and placed as described show up only in the Expert workspace, no signs of them in the Quick workspace. The Quick workspace by Adobe design does not have all the regular Adobe content that is available in the Expert workspace.  Work in progress trying to determine how Adobe permits certain of its content to exist in Quick workspace, but not all.

User Created Title Template*** and Text Title*** (Created in Project's Titler)

When the Title Template created in the Titler has image (from Titler's Add Image) and text (from Titler's Text, Styles, Animation, Shapes sections), the exported Title Template is based on two files (png for image and prtl for the text). And, these two files are found at different locations on the computer hard drive. The following is a "how to" to get the saved Title Template to show up under Titles & Text Tab within the project as one choice complete with image and text.


STEP 1. In Photoshop Elements 13/13.1**, create the image that will be included in the Title Template, and Save As png file to the computer desktop. For this example the png file is named pink_frame.png. Important: give the .png file the same file name as its companion .prtl file. Then move the pink_frame.png to its destination in the Common Folder in the Windows 7, 8, or 8.1 64 bit path

Local Disk C\Program Files\Adobe\Adobe Premiere Elements 13\Presets\Logos\Common****

Tip: It was found that the desktop save first and then Common Folder save, avoids permission issue that might be encountered if the png is created in Photoshop Elements 13/13.1 and saved directly to the Common Folder.


STEP 2. Use Expert workspace Text Menu/New Text/Default Text to open the Titler. Use the Titler's features in its Text, Styles, Animation, and Shapes sections in creating the Title Template. In addition, with the Titler still open, go to Text Menu/Image/Add Image to add the pink_frame.png image to the Title Template. The Title Template is ready for use within the project. But, if this Title Template is needed for use in another Premiere Elements project, then the Title Template can be exported to .prtl file saved to the computer hard drive for this purpose. In the following steps this Title Template will be saved for future use. So, close the Titler.

STEP 3. Open Project Assets, find and select/highlight the thumbnail for the Title Template just created. Then go to File Menu/Export/Title. Save the Title (in this case, the Title Template created) to a .prtl file named pink_frame.prtl saved to the computer desktop.

STEP 4. Move the pink_frame.prtl file from the computer desktop to the "Pink Folder" in the Windows 7, 8, or 8.1 64 bit path

Local Disk C\Program Files\Adobe\Adobe Premiere Elements 13\Presets\Templates\Common\Special Titles\Pink
The Special Titles Folder and Pink Folder are user created for the path.

STEP 5. When the Premiere Elements 13/13.1 Expert workspace is opened again, the Title Template (pink_frame) created will be found under the Titles & Text Tab as a choice under Special Titles category and the subcategory Pink. The pink_frame Title Template when dragged to the Timeline in a new project will present with both graphic and text components.

If the creation in the Titler is produced with just its Text, Styles, Animation, Shape sections features and no Add Image, the creation will involve only the text component .prtl file which is placed as before
Local Disk C\Program Files\Adobe\Adobe Premiere Elements 13\Presets\Templates\Common\Special Titles\Pink
The Special Titles Folder and Pink Folder are user created

COMMENTARY

The .prtl format appears to be exclusively for Premiere Elements and Premiere Pro title creations in the programs' Titler workspace. The prtl file produced and saved from one appears to be supported for import into the other. If the Titler creation is to include Add Image, then consideration needs to be given for keeping the image connected to the Title Template and project. When there is a title image disconnect from the Title Template, no "Where is the file_____?" missing media message appears as is the case with Add Media imports that become disconnected from the project.


_________________________________________________________________________________

*On Windows 7 Professional SP1 64 bit.
**Photoshop Elements 13/13.1 was selected for convenience to create the .png file.
***For the purpose of this work, Title Template = title created with Add Image + Text in the Titler. And Text Title = title created with just Text in Titler. In either case, Text can have style and animation applied, and shape included.
****A convenient highly recommended location and one used by program for certain png and psd saves. But, other save locations are possible for the pink_frame.png in this example.


Work in Progress.


ATR

Tuesday, June 23, 2015

PE: About Recommended Photo "Do Not Exceed" Pixel Dimensions

INTRODUCTION

Often online and in some books, the Premiere Elements user finds recommended photo "do not exceed" pixel dimensions of 1000 x 750 pixels for "standard definition" projects and 2000 x 1500 pixels for "high definition" projects. Both these recommendations have frame size aspect ratio of 4:3. But, standard widescreen and high definition projects have project aspect ratio of 16:9.

Ultimately, whatever the resolution of the photo, it will be forced into the sizing of the project settings, depending on the photo sizing and project settings. Black borders in the image can be a consideration.

The project preset (project settings) factors into all this via at least two considerations

1. The project preset directs the program as to what space appears for editing in the Edit area monitor. For those project settings which include a 16:9 flag to stretch the frame size for display after encoding, it is the "display" space in the Edit area monitor rather than a frame size space. Refer to NTSC or PAL DV Widescreen 16:9 project preset and those project presets described for NTSC or PAL 1440 x 1080 HD anamorphic 16:9.
  • NTSC DV Widescreen (frame size 720 x 480) has display space of 872 x 480 (not true 16:9)
  • PAL DV Widescreen (frame size 720 x 576) has display space of 1050 x 576 (not true 16:9)
  • A Preset with NTSC or PAL 1440 x 1080 HD anamorphic 16:9 has display space 1920 x 1080 16:9
2. By default, the preference "Default Scale to Frame Size" is enabled in Edit Menu/Preferences/General. When enabled, this preference directs the project to scale as best as possible the imported photo to the frame size of the project preset. This preference can be overwritten in the opened project by right clicking the Timeline photo, and removing the check mark next to Scale to Frame Size in the pop up menu that appears.

ISSUE

The recommended photo "do not exceed" pixel dimensions of 1000 x 750 pixels for "standard definition" and 2000 x 1500 for "high definition" seem to have been  intended for use with the preference "Default Scale to Frame Size" disabled and for the user responsible for scaling the imported photo in the Edit area monitor just to the point where the photo fills the Edit area monitor space without black borders. Yet these specific  recommendations continue to be made in a blanket fashion without mention of any consideration for the "Default Scale to Frame Size" status and NTSC versus PAL. Time to take a look at what is going on.

SOLUTION

Use Of "Not To Exceed" Photo Pixel Dimensions of 1000 x 750 (For SD) and 2000 x 1500 (For HD)

If the recommended "not to exceed" photo pixel dimensions of 1000 x 750 (for SD) and 2000 x 1500 (for HD) are to be used for NTSC and PAL, the recommendation should include "use with the Default Scale to Frame Size" disabled. Here the not excessively oversized photo pixel dimensions and disabled Default to Frame Size can result in more flexibility in applying pan and zoom effect using keyframing of Motion Scale and Motion Position to the photo.  Pan and Zoom Tool (in versions with this tool) can also be used to apply pan and zoom effect to the photo. Please refer to OBSERVATIONS and COMMENTARY sections to follow.

Use Of Specific Photo Pixel Dimensions To Match Size Of Edit Area Monitor Space Created By Choice Of Project Preset

If photos are to be used with no pan and zoom effects or with pan and zoom done with Pan and Zoom Tool found in Premiere Elements 10, 11, 12/12.1, and 13/13.1

NTSC DV Standard - 720 x 480 pixels
PAL DV Standard - 720 x 576 pixels
NTSC DV Widescreen - 872 x 480 pixels
PAL DV Widescreen - 1050 x 576 pixels
NTSC AVCHD Full HD1080i30 - 1920 x 1080 pixels
PAL AVCHD Full HD1080i25 - 1920 x 1080 pixels
NTSC AVCHD HD1080i30 - 1920 x 1080 pixels
PAL AVCHD HD1080i25 - 1920 x 1080 pixels
NTSC DSLR 1080p DSLR 1080p30@29.97 - 1920 x 1080 pixels
PAL DSLR 1080p DSLR 1080p25 - 1920 x 1080 pixels

Import of photos sized for the specific project preset can be done with or without Default Scale to Frame Size enabled. Either way the photo imported should fill exactly the Edit area monitor provided by the project preset.

  • If original photo  is 4:3 and is going into 4:3 project, then resize to above suggested pixel dimensions for the project type
  • If original photo is 3:2 or 4:3 and is going into a 16:9 project, then crop resize to above suggestion pixel dimension for the project type
  • If original is 16:9 and is going into 16:9 project, then resize to above suggested pixel dimensions for the project type

If photos are to have pan and zoom effects applied using keyframing the Motion Panel's Scale Property (for Zoom) and the Position Property (for Pan) in the Motion Panel

If pan and zoom effect is to be applied to photo(s) using keyframing of Motion Panel's Scale and Position, then increase the above suggested pixel dimensions for a project type by a factor of 1.2, 1.5, or 2 depending on extent of pan and zoom in order to gain more room for panning and zooming with Default Scale to Frame Size or Scale to Frame Size disabled.

Use Of Original Photo "As Is"

Depending on computer resources, the pixel dimensions of the photo, and how many photos, import the photo as is into the project with the appropriate project preset and with Default Scale to Frame Size Disabled. Use Pan and Zoom Tool or keyframing of Motion's Scale and Property for creating pan and zoom effect. Then scale the photo in the Edit area monitor so that it fills the space in the Edit area monitor and displays the portion of the photo that is wanted.


OBSERVATIONS

WHAT IS SEEN WITH AND WITHOUT DEFAULT SCALE TO FRAME SIZE DISABLED AND PHOTOS USED ARE 1000 x 750 AND 2000 x 1500
(Using Premiere Elements 13/13.1 on Windows 7 Professional SP1 64 bit computer)


1000 x 750 PIXELS PHOTO
NTSC DV STANDARD PROJECT 
Edit Area Monitor Space 720 x 480*


Default Scale to Frame Size Enabled
Figure 1a. Automatic Scaling Down 1000 x 750 To Fit 720 x 480 Edit Area Monitor Space Established By Project Preset NTSC DV Standard. Note Image Bounding Box After Automatic Scaling Directed By The Enabled Default Scale To Frame Size. The Preference Is Not Scaling The 1000 x 750 To An Exact 720 x 480 Space As Evidenced By Thin Black Borders To Right And Left of Image.

 Default Scale to Frame Size Disabled
Figure 1b. Before Manual Scaling Down 1000 x 750 To Fit 720 x 480 Edit Area Monitor Space Established By Project Preset NTSC DV Standard. Note Image Bounding Box After Default Scale To Frame Size Is Disabled. The 1000 x 750 Image Now Exceeds The Edit Area Monitor 720 x 480 Space, Giving Zoomed In Look. The Bounding Box Can Be Moved Around To Customize The Area Of Image Displayed Without Black Borders Being Introduced.

Figure 1c. After Manual Scaling Down 1000 x 750 To Fit 720 x 480 Edit Area Monitor Space Established By Project Preset NTSC DV Standard. Note Image Bounding Box After A Handle Of Bounding Box Seen Figure 1b Is Dragged In To Scale The 1000 x 750 Image To 720 x 480 Space Without Introducing Black Borders.


1000 x 750 PIXELS PHOTO
NTSC DV WIDESCREEN PROJECT 
Edit Area Monitor Space 856 x 480*

Default Scale to Frame Size Enabled
Figure 2a. Automatic Scaling Down 1000 x 750 (4:3) To Fit 872 x 480 Edit Area Monitor Space Established By Project Preset NTSC DV Widescreen. Note Image Bounding Box After Automatic Scaling Directed By The Enabled Default Scale To Frame Size. The Preference Cannot Scale The 1000 x 750 To Fit Completely The 872 x 480 Space As Evidenced By Large Black Borders To Right And Left Of Image.

  
Default Scale to Frame Size Disabled
Figure 2b. Before Manual Scaling Down 1000 x 750 (4:3) To Fit 872 x 480 Edit Area Monitor Space Established By Project Preset NTSC DV Widescreen. Note Image Bounding Box After Default Scale To Frame Size Is Disabled. The 1000 x 750 Image Now Exceeds The Edit Area Monitor 872 x 480 Space, Giving Zoomed In Look. The Bounding Box Can Be Moved Around To Customize The Area Of Image Displayed Without Black Borders Being Introduced.


Figure 2c. After Manual Scaling Down 1000 x 750 (4:3) To Fit 872 x 480 Edit Area Monitor Space Established By Project Preset NTSC DV Widescreen. Note Image Bounding Box After A Handle Of Bounding Box Seen Figure 2b Is Dragged In To Scale The 1000 x 750 Image To 872 x 480 Space Without Introducing Black Borders.


1000 x 750 PIXELS PHOTO
PAL DV STANDARD PROJECT 
Edit Area Monitor Space 720 x 576*

Default Scale to Frame Size Enabled
Figure 3a. Automatic Scaling Down 1000 x 750 To Fit 720 x 576 Edit Area Monitor Space Established By Project Preset PAL DV Standard. Comments Similar To Those For the NTSC Counterpart In Figure 1a.

Default Scale to Frame Size Disabled
Figure 3b. Before Manual Scaling Down 1000 x 750 To Fit 720 x 576 Edit Area Monitor Space Established By Project Preset PAL DV Standard. Comments Similar To Those For NTSC Counterpart In Figure 1b.

Figure 3c. After Manual Scaling Down 1000 x 750 To Fit 720 x 576 Edit Area Monitor Space Established By Project Preset PAL DV Standard. Comments Similar To Those For NTSC Counterpart In Figure 1c.
 
1000 x 750 PIXELS PHOTO
PAL DV WIDESCREEN PROJECT 
Edit Area Monitor Space 1050 x 576*

Default Scale to Frame Size Enabled
Figure 4a. Automatic Scaling Of 1000 x 750 (4:3) To Fit 1050 x 576  Edit Area Monitor Space Established By Project Preset PAL DV Widescreen. Note Enabled Default Scale To Frame Size Resulting In Large Black Border To Left And Right Of Image Due to Inability of Default Scale To Frame Size To Fit 1000 x 750 4:3 Photo Into The Project's 1050 x 576 Space. Same Overall Look As Seen For the NTSC Counterpart (1000 x 750 4:3 to 872 x 480) In Figure 2a.
Default Scale to Frame Size Disabled
Figure 4b. Before Manual Scaling Of 1000 x 750 (4:3) To Fit 1050 x 576 Edit Area Monitor Space Established By Project Preset PAL DV Widescreen. Note Image Bounding Box After Default Scale To Frame Size Is Disabled. With Default Scale To Frame Size Disabled In This Case, Photo's Width Is Less Than That Of Space (1000 vs 1050). Result Is Black Border Right And Left Of Photo. Photo's Height Exceeds That Of The Edit Area Monitor Space (750 vs 576). Result Is No Black Borders At Top And Bottom Of Photo.

Figure 4c. After Manual Scaling Of 1000 x 750 (4:3) To Fit 1050 x 576  Edit Area Monitor Space Established By Project Preset PAL DV Widescreen. Note Image Bounding Box After A Handle Of Bounding Box Seen Figure 4b Is Dragged In To Scale The 1000 x 750 Image To 1050 x 576 Space Without Introducing Black Border


2000 x 1500 PIXELS PHOTO
NTSC AVCHD FULL HD1080i30 PROJECT PRESET
Edit Area Monitor Space 1920 x 1080 

Default Scale To Frame Size Enabled
Figure 5a. Automatic Scaling Down Of 2000 x 1500 (4:3) To Fit 1920 x 1080 (16:9) Edit Area Monitor Space Established By Project Preset NTSC AVCHD Full HD 1080i30.


Default Scale To Frame Size Disabled
Figure 5b.Before Manual Scaling Down 2000 x 1500 (4:3) To Fit 1920 x 1080 (16:9) Edit Area Monitor Space Established By Project Preset NTSC AVCHD Full HD 1080i30.

Figure 5c. After Manual Scaling Down 2000 x 1500 To Fit 1920 x 1080 Edit Area Monitor Space Established By Project Preset NTSC AVCHD Full HD 1080i30.

COMMENTARY**

There are several points of view as to how to prepare photos for use in a Premiere Elements project. Pros and cons for which approach to use involve frame aspect ratio of the photo, pixel dimensions of the photo, how many photos, and computer resources when the photo pixel dimensions exceed 1920 x 1080 pixels. And, if pan and zoom effects to the photo(s) are to be factored in, then which pan and zoom method can become a consideration.

Point 1

With regard to using photos that are grossly oversized for the project settings, an often overlooked factor is the computer operating system on which Premiere Elements is running and the can do and should do factor. With regard to the cannot do factor, if Premiere Elements is on a 32 bit computer, the program blocks the import of photos whose total pixel count exceeds its limit. See post 6 in https://forums.adobe.com/message/2769944

Point 2

If panning and zooming with the Premiere Elements' Pan and Zoom Tool is in the workflow, there is the consideration that the Pan and Zoom workspace works off the original photo on the hard drive. So, if a 4:3 photo is imported into a 16:9 project and scaled to 16:9 in the Edit area monitor,  the user gets a 4:3 space in which to work in the Pan and Zoom workspace, not a 16:9 space which comes with import of a 16:9 photo. This has particular relevance when the recommendation "do not exceed" photo pixel dimensions of 2000 x 1500 (for HD) are used in the HD 16:9 project.

Point 3

It has been pointed out that definition has been missing for Default Scale To Frame Size and the
recommended photo "do not exceed" pixel dimensions of 1000 x 750 pixels for "standard definition" projects and 2000 x 1500 pixels for "high definition" projects. But, the relevancy of these values also needs to be looked at with regard to pan and zoom method. From most reports, the values were set up so that they would be close enough to the "frame size" of the project preset and yet allow more room for panning and zooming. It would appear that this factor only applies when pan and zoom effects are applied to the photo by keyframing the Motion Position property (for pan) and the Motion Scale property (for zoom).

Point 4

The "As Is" way is a consideration for those who have computer resources to support this approach.... just import the photos as is (with 3:2, 4:3, or 16:9 frame aspect ratio) with the appropriate project preset with the preference Scale to Frame Size disabled.

If pan and zoom effects wanted, use either the program's Pan and Zoom Tool or keyframing of Motion Scale and/or Position. Creating the pan and zoom effect with the Pan and Zoom Tool and applying that same pan and zoom effect to more than one photo at a time does take special thinking through
http://atr935.blogspot.com/2014/08/pe12121-pan-and-zoom-tool-and-video-file.html
Keyframing of Motion Scale and/or Motion Position for creating pan and zoom effect for the photo  lends itself to copy/paste effects and adjustments for attempting to apply the same pan and zoom effect to more than one photo at a time. The extent and nature of the wanted pan and zoom effect will impact the outcome.

As mentioned above, there is the consideration of the original photo pixel dimensions and the 4:3 or 16:9 looking space in the Pan and Zoom workspace.

Point 5

Somewhere along the way, the matter of photo cropping/resizing or resizing will arise. Methods being look at include IrfanView, Microsoft Office (2010) Picture Manager, Photoshop, and Photoshop Elements (crop tool and Process Multiple Files). These will be reported on in an upcoming blog post.


_________________________________________________________________________________

*The space in the Edit area monitor was determined by creating in Photoshop Elements 13 Editor a  still with pixel dimensions to fit exactly the space with and without Default Scale To Frame Size Enabled.
**Work in progress.

ATR


PE 13/13.1: MP4 Export Opportunities

INTRODUCTION

There are opportunities to export the Timeline content as a file with a .mp4 file extension (wrapper format). The video codec that is being wrapped with the .mp4 wrapper/container format can be described as H.264, AVCHD, or XAVC-S.

ISSUE

In Premiere Elements 13/13.1, where are the opportunities to export the Timeline content to a .mp4  file saved to the computer hard drive?

SOLUTION*

Publish+Share/Mobile Phones and Players

Apple iPod, iPad, iPhone

The names of the 7 MP4 presets are

Apple TV, iPad, iPhone4 - 720p25
Apple TV, iPad, iPhone4 - 720p29.97
Apple TV, iPad, iPhone4 - 1080p25
Apple TV, iPad, iPhone4 - 1080p29.97
Apple iPad 2,3,4, Mini; iPhone 4S, 5, 5S; Apple TV 3 - 1080p 23.976 NEW
Apple iPad 2,3,4, Mini; iPhone 4S, 5, 5S; Apple TV 3 - 1080p 25 NEW
Apple iPad 2,3,4, Mini; iPhone 4S, 5, 5S; Apple TV 3 - 1080p 29.97 NEW

Android Phones and Tablets 
The names of the 7 MP4 Android Phones and Tablets presets are
MP4 - 1080p 25
MP4 - 1080p 29.97
Android Tablet - 1280 x 800 25
Android Tablet - 1280 x 800 29.97
MP4 - 720p 23.976
MP4 - 720p 25
MP4 - 720p 29.97

Publish+Share/Computer/AVCHD

The names of the 19 MP4 presets are

MP4 - H.264 1440 x 1080p 24
MP4 - H.264 1440 x 1080p 25
MP4 - H.264 1440 x 1080p 30
MP4 - H.264 1920 x 1080p 24
MP4 - H.264 1920 x 1080p 25
MP4 - H.264 1920 x 1080p 30
MP4 - HD 720p 24
MP4 - HD 720p 50
MP4 - HD 720p 60
MP4 - NTSC DV Standard
MP4 - NTSC DV Widescreen
MP4 - PAL DV Standard
MP4 - PAL DV Widescreen
Tivo Series3 (NTSC)
Tivo Series3 HD
Vimeo HD
Vimeo SD
YouTube Widescreen HD
YouTube Widescreen SD

Publish+Share/Computer/XAVC-S

The names of the 4 MP4 presets are

MP4 - H.264 3840 x 2160 23.976 30 Mbps
MP4 - H.264 3840 x 2160 25p 30 Mbps
MP4 - H.264 3840 x 2160 29.97 200 Mbps
MP4 - H.264 3840 x 2160 29.97 30 Mbps


_________________________________________________________________________________
* Please refer to blog post Premiere Elements 13 First Look for further details on Publish+Share opportunities for other formats as well.
http://atr935.blogspot.com/2014/09/premiere-elements-13-first-look-details.html