Wednesday, December 31, 2014

PE13: Video Cinematic Look

INTRODUCTION

Recently the question was asked "In Premiere Elements 13, how do I create a 1920 x 1080p30 file that will present in the YouTube 16:9 player with a widescreen cinematic look (black border at top and bottom of the frame) with the minimal loss of image?"

SOLUTION

Two ways to achieve the widescreen cinematic look are presented for consideration. Both involve importing as 1920 x 1080p video into 1920 x 1080p project, creating black borders in the image in Edit area of program, and exporting as 1920 x 1080p. The "Black borders in image" in Edit area of program is done in either of the following ways
  • Crop effect applied to top and bottom of Image
  • Interpret Footage Pixel Aspect Ratio changed to HD Anamorphic 16:9 (1.333), followed by scale adjust in project where "Default Scale To Frame Size" is disabled before import of the source into the project.
 HOW TO

Crop Effect Applied to Top and Bottom of Image

STEP 1
Premiere Elements 13 project preset set by user (manual)* or program (automatically) to
NTSC
DSLR
1080p
DSLR 1080p30@ 29.97 or DSLR 1080p30

STEP 2
Edit Menu/Preferences/General with "Default Scale to Frame Size" enabled.
Import the source 1920 x 1080p30 file.

STEP 3
Drag the Crop effect into the Timeline 1920 x 1080 video clip. See fx Effects/Transform/Crop.
And, edit the applied Crop effect under Applied Effects Tab/Applied Effects Palette/Crop Panel expanded. In this example the Crop effect settings are Top 12%, Left 0%, Right 0%, and Bottom 12%.


Figure 1. Black Border At Top And Bottom Of Frame Created With Crop Effect.

STEP 4
Export to either of the following
  • Publish+Share/Social Websites/You Tube with preset of High Definition Video for YouTube - 1920 x 1080.
  • Publish+Share/Computer/AVCHD with Presets = MP4 H.264 1920 x 1080p30 for viewing with computer player or for upload to YouTube at the YouTube website. Note that the preset MP4 H.264 1920 x 1080p30 is using the Pixel Aspect Ratio = Square Pixels (1.0).
The sample video uploaded to YouTube from within the Premiere Elements 13 YouTube feature appeared at YouTube as seen in Figure 2.

Figure 2. YouTube Video's "Widescreen Cinematic Look" When Black Borders Created With Cropping In Edit.


Interpret Footage Pixel Aspect Ratio changed to HD Anamorphic 16:9 (1.333), followed by scale adjust in project where "Default Scale To Frame Size" was disabled before import of the source into the project.


STEP 1
Premiere Elements 13 project preset set by user (manual)* or program (automatically) to
NTSC
DSLR
1080p
DSLR 1080p30@ 29.97 or DSLR 1080p30

STEP 2
Edit Menu/Preferences/General with "Default Scale to Frame Size"DISABLED".
Import the source 1920 x 1080p30 file, using Expert workspace's Add Media/Files and Folders/Project Assets.

STEP 3
In Project Assets, right click the thumbnail for the file. Select Interpret Footage. In the Interpret Footage dialog, go to the Pixel Aspect Ratio section, dot the Conform To:, and set the Conform To: to HD Anamorphic 16:9 (1.333).

STEP 4
Drag the video from Project Assets to the Expert workspace Timeline. Click on that Edit area monitor. Note the bounding box that appears around the image in the monitor. It extends beyond the area of the frame. With the mouse cursor, use the bounding box handle (as soon in Figure 3a) to zoom out so that the whole image fits in the Edit area monitor space for 1920 x 1080.

Figure 3a. Creating The Top Bottom Black Borders The Interpret Footage Pixel Aspect Ratio Way - Preparing To Zoom Out.
When this is done, the result should be the video displaying in the monitor with black border at top and at bottom of frame as shown in Figure 3b.

Figure 3b. Creating The Top Bottom Black Borders The Interpret Footage Pixel Aspect Ratio Way - Zoom Out Completed.

STEP 5
Export to either of the following
  • Publish+Share/Social Websites/You Tube with High Definition Video for YouTube - 1920 x 1080.
  • Publish+Share/Computer/AVCHD with Presets = MP4 H.264 1920 x 1080p30 for viewing with computer player or for upload to YouTube at the YouTube website. Note that the preset MP4 H.264 1920 x 1080p30 is using the Pixel Aspect Ratio = Square Pixels (1.0).

The sample video uploaded to YouTube from within the Premiere Elements 13 YouTube feature appeared at YouTube as seen in Figure 4.

Figure 4. YouTube Video's "Widescreen Cinematic Look" When Black Borders Created With Interpret Footage Pixel Aspect Ratio And Scaling Changes In Edit.
COMMENTARY

The work described above was done with Premiere Elements 13 on Windows 7 Professional SP1 64 bit in a NTSC setup. However, what has been reported here should be applicable in principle to other versions of Premiere Elements on other computer operating systems and using counterpart PAL settings.

The merits of one approach versus the other are still being thought about.

______________________________________________________________________________
*
http://atr935.blogspot.com/2013/04/pe11-accuracy-of-automatic-project.html


Tuesday, December 23, 2014

PE 13: Serious Problem With .MOD Widescreen Files

INTRODUCTION

Classically a .mod widescreen 16:9 file has imported into the Premiere Elements (version earlier than 13) project as if it were .mod standard 4:3. It has been debatable whether Premiere Elements does not recognize the 16:9 flag for that type of file or whether the 16:9 flag is not there. Whatever the case and under the circumstances, the Premiere Elements user who wants to edit .mod widescreen 16:9 files in Premiere Elements has found a solution in changing the Pixel Aspect Ratio of the file in Interpret Footage. This is done by
  • Importing the file into the project set with the DV Widescreen project preset
  • Right clicking the file thumbnail in project media, selecting Interpret Footage from the pop up menu,  and going to the Pixel Aspect Ratio section of the Interpret Footage dialog and changing Conform To: to
    For NTSC set up - D1/DV Widescreen 16:9 (1.2121)
 For PAL set up - D1/DV Widescreen 16:9 (1.4587)

When this is done, the file now appears in the project to fill the Edit area monitor's DV Widescreen space established by the DV Widescreen project preset. All is well to continue.

ISSUE
In Premiere Elements 13 (current version), there appears to be serious issue with Premiere Elements 13, Interpret Footage, and .mod widescreen file. The Premiere Elements 13's Properties and Interpret Footage values for the file are not consistent with those from the same file in the earlier versions. At this point, there is no evidence to suggest that these Premiere Elements 13 readings are "right" for this type of file and every reason to believe there is a serious problem with Premiere Elements 13 Interpret Footage and Properties reads. Without further information, the integrity of Interpret Footage and Properties is to be questioned for .mod widescreen and possibly other formats.

SOLUTION

At this point, there is no solution.The intent of this blog is to point out the observations that sent up flares as to a major problem with Interpret Footage, Properties, .mod widescreen, and possibly other formats. 

Two examples of the problem are to follow using Premiere Elements 12/12.1 and Premiere Elements 13 on Windows 7 64 bit and the same two .mod widescreen files (one PAL based, one NTSC based).

RESULTS
Case 1. Same .MOD Widescreen PAL File* In Premiere Elements 12 and 13.

Premiere Elements 12
Properties
Premiere Elements 13
Properties
Premiere Elements 12
Interpret Footage
Premiere Elements 13
Interpret Footage
Case 2. Same .MOD Widescreen NTSC File In Premiere Elements 12 and 13.
Premiere Elements 12
Properties

Premiere Elements 13
Properties
Premiere Elements 12
Interpret Footage

Premiere Elements 13
Interpret Footage

COMMENTARY
A blanket statement to adjust the Interpret Footage Pixel Aspect Ratio in Premiere Elements to D1/DV Widescreen to correct for the .mod widescreen issue seems to be no longer valid in Premiere Elements 13.
Note that in the .mod widescreen PAL example, the Premiere Elements 13 Interpret Footage Pixel aspect ratio is D1/DV Widescreen prior to any adjusts and still displays incorrectly with regard to aspect ratio.

Also, the Case 1 and Case 2 results were the same whether or not the .mod widescreen file extension was renamed from .mod to .mpeg.

The differences in this regard between Premiere Elements 13 and the prior versions remains unexplainable. It is hoped that this mini study will attract the attention of Adobe who can explain this or correct in.
More information on this as it becomes available.
_______________________________________________________________________________

* MediaInfo Video Readout for .mod widescreen PAL


 **MediaInfo Video Readout for .mod widescreen NTSC 


UPDATE October 22, 2015...Possible for workaround to allow for use of .mod widescreen in Premiere Elements 13/13.1 and 14 which both have the same .mod widescreen

  • Set the project preset manually to NTSC DV Widescreen or PAL DV Widescreen
  • Go to Expert workspace Edit Menu/Preferences/General and remove the check mark next to the preference "Default Scale to Frame Size".
  • Import the .mod widescreen into the project with the project's Add Media/Files and Folders/Project Assets, and drag the .mod widescreen from Project Assets to the Timeline Video Track 1/Audio Track 1.
  • Click on the Edit area monitor to bring up the image's bounding box with handles. Click and drag on one of the image's bounding box handles to scale the image to the point where it just fits the space provided in the Edit area monitor by the project preset choice.


Saturday, December 20, 2014

PE: Face Blur Track Matte Keying

INTRODUCTION

A frequent Premiere Elements question is "How do I blur a face in my video?" One classical way to do this is using a Track Matte Keying* approach. The following is the result when this was done using Premiere Elements 12/12.1 on Windows 7 Professional SP1 64 bit, NTSC DV Standard project, and an animated 720 x 480 @ 29.97 progressive frames per second Windows Media Video 9.wmv file with a "Robot Video Intruder".


Demo 1. Blurring Face of the Robot Video Intruder.

HOW TO

The details to follow are specific for producing the file shown in Demo 1, but are in principle applicable to other Premiere Elements versions to achieve the Face Blur goal.

STEP 1.**

Video Track 4.  "Matte" is created as a colored circle (white or red will work) to cover the area of the Robot's face. This "Matte" can be created in Premiere Elements Titler and was in this example. In subsequent steps, this circle's position is keyframed to move with the Robot's face which is to be hidden by a blur.

Video Track 3. Original video file with "Robot Video Intruder" traveling in the frame from off screen top right to on screen top left to on screen bottom  left to on screen bottom right.

STEP 2.

Probably the most detailed part of this workflow is keyframing the Position property of the circle (the area that is going to define the transparency in the Robot's face which is going to be replaced by the blur). Next phase below is the keyframing of the circle's Position property.

At this point....
  • Video Track 4. Matte (Titler file with circle shape sized to cover the Robot's face)
  • Video Track 3. Original video.

In the original video, the Robot enters the frame from off screen, top right corner of the frame. So at the beginning of the Timeline, position the Video Track 4 circle off screen just outside the top right corner of the frame.
Tip: To make sure that the correct file is selected for these movements, right click the monitor, select Select, and then click on the file name for the Track Matte before moving the Matte.

Then

  • Select/highlight the Matte on Video Track 4.
  • Go to Applied Effects Tab/Applied Effects Palette/Motion Panel expanded, and click on the Toggle Animation button. See Figure 1.
  • Go back to the Edit area monitor. Remember, with the Matte on Video Track 4 selected. Timeline Indicator is at the beginning of the Timeline content.
  •  Move the Timeline Indicator to the right in order to start the Robot's appearance in stages. Then with the mouse cursor move the circle from off screen to on screen on top of the Robot's face. See Figure 2.
  • Move the Timeline Indicator so that the Robot goes to its next position, and then move the circle so that it covers the Robot's face in the Robot's new position.
  • Continue that circle tracking of the Robot's face until the Robot reaches its final destination at the bottom right corner of the frame.

Figure 1. Initiation Of Position Keyframing With Toggle Animation.


Figure 2. Start Of Staged Matte Tracking Of Robot's Face.

STEP 3.**

Video Track 3. Original video file to which a Track Matte effect is applied via fx Effects/Keying/Track Matte, followed by edit of the Track Matte via Applied Effects/Applied Effects Palette/Track Matte Panel expanded so that the settings are:
Matte = Video 4
Composite Using: Matte Alpha
Reverse WITH CHECK MARK NEXT TO IT.

See Figure 3.

Figure 3. Track Matte Keying To Create Area Of Transparency In Robot's Face Which Will Be Subsequently Filled With Fast Blur.
STEP 4.**

Video Track 2. Original video file to which a Fast Blur has been applied by dragging the Fast Blur effect into this clip from fx Effects/Blur & Sharpen/Fast Blur. This is just a blurred version of the original video - no Track Matte Keying applied.

See Figure 4.

Figure 4. Area Of Transparency Created By Track Matte Now Replaced By Fast Blur.


________________________________________________________________________________
* A description of the Track Matte Key can be found in the Adobe document titled Adobe Premiere Elements Help/Effects reference
http://helpx.adobe.com/premiere-elements/using/effects-reference.html

** Video tracks used in this example were 2, 3, and 4. Video tracks 1, 2, and 3 could have been used.
 
***An alternative setup of the tracks (more frequently seen) for the Face Blur is
  • Video Track 3. Track Matte with shape's position keyframed to track the face
  • Video Track 2. Original Video, with Blur effect as well as Track Matte effect applied to the video. Typically Reverse is unchecked in the Track Matte Panel expanded setup in the Applied Effects Tab/Applied Effects Palette/Track Matte Panel expanded.
  • Video Track 1. Original Video as is.
But in this specific blog's how to example, there is an unwanted blurring in that setup when the Robot Video Intruder's path is behind the Christmas wreath. If that type of situation is not involved in your work, then try the more frequently seen route mentioned in this footnote.


Work in progress on this one. But, seems OK after several proof readings.

ATR

Monday, November 24, 2014

PE 10: AVCHD 1080p60 Project Preset

INTRODUCTION

Recently in a forum discussion mention was made about Premiere Elements 10 not supporting AVCHD 1080p60. True, there is no AVCHD 1080p60 project preset in version 10 as there is in versions 11, 12, and 13.

ISSUE

There is a fine line between "non support" of AVCHD 1080p60 in Premiere Elements 10 and Adobe just not including that particular project preset in its lineup of project presets.

SOLUTION

The Premiere Elements 10 user can create a Premiere Elements 10 AVCHD 1080p60 project preset, import a 1080p60 source video into a Premiere Elements 10 project set with that user created project preset, edit the 1080p60 Timeline content, and export that 1080p60 Timeline content to an AVCHD 1080p60 file. The how to for this will be given in the next section How To. The new AVCHD 1080p60 file will be created by editing the Notepad document of the existing project preset AVCHD LITE 720p60.

HOW TO

Creation of the AVCHD 1080p60 Project Preset

STEP 1. 
Finding the AVCHD LITE 720p60.sqpreset to Edit it to AVCHD 1080p60.sqpreset
Follow the path
Local Disk C/Program Files/Adobe/Adobe Premiere Elements 10/Settings/SequencePresets/NTSC/AVCHD

In the AVCHD Folder, find the file named AVCHD LITE 720p60.sqpreset, right click it, select copy, and paste the copy to the computer desktop.

STEP 2.
Editing the AVCHD LITE 720p60.sqpreset
On the computer desktop, right click the AVCHD LITE 720p60.sqpreset file, select Open With, and then Notepad. The edits in the AVCHD LITE 720p60.sqpreset necessary to obtain the AVCHD 1080p60.sqpreset are

1. Two EditingModeGUID Lines Changes

From:
<EditingModeGUID.Win>fcf18658-5378-4d31-96b1-12fe7071f5a1</EditingModeGUID.Win><EditingModeGUID.Mac>fcf18658-5378-4d31-96b1-12fe7071f5a1</EditingModeGUID.Mac>

To:
<EditingModeGUID.Win>088bb726-9823-467e-b3b7-26f3703d4cf1</EditingModeGUID.Win><EditingModeGUID.Mac>088bb726-9823-467e-b3b7-26f3703d4cf1</EditingModeGUID.Mac>

Figure 1 shows after editing change for these two lines.

Figure 1. AVCHD LITE 720p60 NotePad Document. EditingModeGUID Lines After Edit

 2. </DescriptionItem> for User Language
(In this example, Language is English for United States)

See immediately after the EditinModeGUID lines.

From: 1280 x 720

To: 1920 x 1080

From: 720p

To: 1080p

Figure 2 shows after editing changes for United States (also started to do the same for France).

Figure 2. <DescriptionItem>, AVCHD 1080p60 After AVCHD LITE 720p60 Notepad Document Edit


3. </NameItem> for User Language
(In this example, Language is English for United States)

See immediately after section on </DescriptionItem>

From:

</NameItem>
            <NameItem Version="1" Index="0">
                <Second>AVCHD 720p60</Second>
                <First>en_US</First>

To:

</NameItem>
            <NameItem Version="1" Index="0">
                <Second>AVCHD 1080p60</Second>
                <First>en_US</First>

4.  </Name>

See immediately after section on </NameItem>
Only the following line needs changing

From:

<VideoFrameSize>0,0,1280,720</VideoFrameSize>

To:

<VideoFrameSize>0,0,1920,1080</VideoFrameSize>

The after edited <./Name> area is seen in Figure 3.

Figure 3. </Name>, AVCHD 1080p60 After AVCHD LITE 720p60 Notepad Document Edit.
STEP 3. 
Placing the new AVCHD 1080p60.sqpreset in the NTSC Folder along with the other Adobe .sqpreset files.

Move the newly created AVCHD 1080p60.sqpreset file to the AVCHD Folder in the path

Local Disk C/Program Files/Adobe/Adobe Premiere Elements 10/Settings/SequencePresets/NTSC/AVCHD

After that is done, the project preset AVCHD 1080p60 will be available in Premiere Elements 10 New Project dialog under NTSC/AVCHD with a valid description. See Figure 4.


Figure 4. Premiere Elements 10 New Project Preset Displaying Newly Created AVCHD 1080p60 Project Preset.

When the AVCHD 1080p60 project preset is selected, the project settings as reflected in Edit Menu/Project Settings/General will be the correct ones for AVCHD 1080p60. See Figure 5.

Figure 5. Premiere Elements 10 Edit Menu/Project Settings/General With Newly Created AVCHD 1080p60 Project Preset.


STEP 4.
Suggested Export of the Timeline 1080p60 to a 1080p60 File Save to the Computer Hard Drive

Share
Computer
AVCHD
with Presets = MP4 - HD 720p60
then, under the Advanced Button/Video Tab, customize the preset to 1080p60.
See Figure 6.

Figure 6. Premiere Elements 10. Export Of 1080p60 Timeline Content Using New Created AVCHD 1080p60 Project Preset And Export To AVCHD.MP4 1920 x 1080 @ 59.94 Progressive Frames Per Second.


 The playback quality of resulting AVCHD.mp4 using Window Media Player 11 on Windows 7 64 bit was excellent.

COMMENTARY

From the project preset side of things, if the user is not doing a frame by frame by frame editing of a 1080p60 source video, the DSLR settings for NTSC 1080p30@ 29.97 can be used and the frame rate matter dealt with in export.

One should not be forced to go to a later version for editing a 1080p60 video source in Premiere Elements 10.


ATR


Tuesday, November 11, 2014

PE 13: Elements Organizer 13/Share/Email

INTRODUCTION

Photoshop Elements 13 and Premiere Elements 13 are standalone programs, each coming with an Elements Organizer 13. When the two are on the same computer, they share the same Elements Organizer 13.

In the past, the list of Share opportunities under Elements Organizer/Share have typically included choices for "Photo Mail" and "Email Attachments". However, in Elements Organizer 13/Share, the listings for "Photo Mail" and "Email Attachments" are gone, but now is found a listing for "Email". This "Email" is essentially email attachments for photos and videos.

ISSUES

Internet Provider's File Size Limit

Although size adjustments can be made for photos, this cannot be done for video. And, if the video file size exceeds 10 MB, the user receives a warning notice. The issue here is not the feature, but rather the file size limit of the Internet Provider. It has been found that a 25 MB video could be sent successfully to a Gmail or Verizon email address when the Email Client was Gmail. Proof of success was in the form
  • a message from the feature, announcing emailing success and
  • a copy of the sent email in the user's Email program's Sent Items box. 
 However, the successfully generated emails were rejected by the recipient Gmail or Verizon.

Email Client Setup 

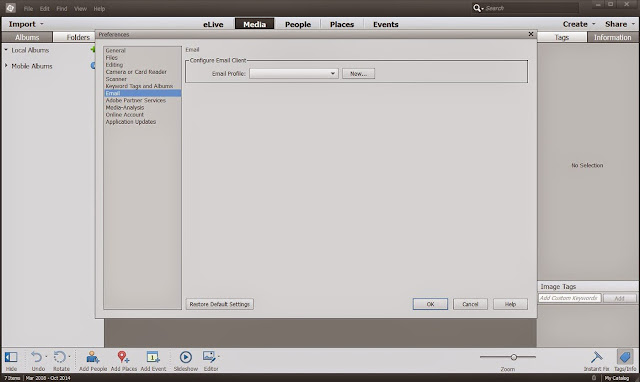
Before use the Email feature needs to be set up in the Elements Organizer 13 preferences via Edit Menu/Preferences/Email and its Email dialog. See Figure 1a.

Figure 1a. Elements Organizer/Share/Email And Its Email Dialog For Selecting And Configuring Email Client.
When New button is pressed to start the Email set up, a New Profile dialog pops up (See Figure lb) with choices of
  • AOL
  • Gmail
  • Yahoo!Mail
  • Microsoft Account
  • Other
Figure 1b. New Profile Dialog Email Client Choices.
If the choice of "Service Provider" is AOL, Gmail, Yahoo!Mail, or Microsoft Account (for Hotmail), the user fills in fields which include
  • Email Address
  • Your Name
  • Password 
and then presses the Validate button in order to get a quick "Credentials validated successfully" message. No more waiting for Adobe email with verification code.

Now the not so good news. If the user selects Other, the user must fill in fields which include SMTP Server, SMTP Port, and Connection Security besides the Email Address, Your Name, and Password. It is the user setting of the SMTP fields that is the major issue. For example, under Other: with Verizon as the Service Provider, none of the expected SMTP settings are working (outgoing.verizon.net with ports 465, 587, or 25). Trying to get Other to work has been resulting in a pile up of names for non functioning Email clients under the Email Profile list. And, no way was found to delete them in the preference area.

SOLUTIONS

The way to clean up the unusable entries that result in the Email Profile list targets a file named email_accounts.xml which is found in Windows 7, 8, or 8.1 64 bit in the path
Local Disk C
Users
Owner
AppData
Roaming
Adobe
Elements Organizer
13.0
Organizer
and, in the Organizer Folder, is the email_accounts.xml file.

What to do with this email_accounts.xml file

a. If the user wants to start new in the preferences Email, then delete the file. A new email_accounts.xml file will be regenerated by the program once the Elements Organizer 13 is opened again.

b. If the user wants to remove just one or more profiles/accounts but not all, then open Notepad and edit the .xml file. To do this in Notepad, File Menu/Open and then browse to and select the email_accounts.xml. In the Notepad document, delete the account that is not wanted. Save the edited Notepad document (File Menu/Save).

Note: In the Notepad document for the email_accounts.xml file, the user can see the SMTP information that was used by Adobe behind the scenes when AOL, Gmail, Yahoo!Mail, and Microsoft Account (Hotmail) choices were validated. Those particular settings do work for validation of these 4 Email Clients under Other.

Still in search of answers for Other.

ATR


Monday, October 27, 2014

PE 11: SmartSound Error Windows 8.1 64 bit

INTRODUCTION
 
The following SmartSound error has been encountered by Premiere Elements 11 Windows 8.1 64 bit users when trying to access the "Use SmartSound" feature under the Music Tab of the Expert and Quick workspaces.
Error: Unable to acquire serial number for Express Track. Please make sure you are connected to the internet and click OK to try again.
I have confirmed this finding and contacted SmartSound Customer Service about the matter. SmartSound representative Frank* responded promptly with the resolution for now.

ISSUES

Some of the issues involved in gaining use of the free SmartSound soundtracks of Premiere Elements 11 SmartSound feature on Windows 8.1 64 bit include
  • Premiere Elements integration with SonicFire Pro will only work with Sonicfire Pro version 5.7.3-5.7.5.
  • Online serial number retrieval process no longer available. New serial numbers for versions of SonicFire Pro less than 5.8 are no longer available
  • SonicFire Pro 5.8 is available only purchase or tryout; nonetheless will not integrate with Premiere Elements.

SOLUTION

STEP 1
Get A New Free Serial Number

According to Frank from SmartSound Customer Service
For now, any Elements users who need a free serial number can email us at support@smartsound.com, preferably after creating an online SmartSound account, and we can provide them with a serial number that way.
STEP 2
Entering The New Free Serial Number Into SonicfirePro5.Exe

With Premiere Elements 11 closed.....
Local Disc C
Program Files (x86)
SmartSound Software
Sonicfire Pro 5
and, in the Sonicfire Pro 5 Folder, is the SonicfirePro5.exe which is opened by double clicking it.
Enter the new serial number to unlock Sonicfire Pro and apply all the updates.

STEP 3
Next, Applying Update Patch To Work With Sonicfire Pro 5.7.5

If Sonicfire Pro less than 5.7.5, SmartSound is recommending application of the update patch so that 5.7.5 is in use. See http://www.smartsound.com/support/updates/?product=sfp5

STEP 4
Open Premiere Elements 11 To Find a Working Music Tab/"Use SmartSound" feature.
______________________________________________________________________________

*Many thanks to Frank at SmartSound Customer Service who represented SmartSound and himself well in this matter - a model of excellent customer service and responsibility to customers.

Work In Progress.
Any further developments will be posted as they become available.


 ATR


Friday, October 24, 2014

PE 13: Blu-ray ISO Image and AACS Folder

INTRODUCTION

Premiere Elements earlier than version 13 does not offer a Blu-ray burn to folder option as there is for DVD and AVCHD. The classical workaround for a Blu-ray burn to folder has been to try to use Phantom Burner in conjunction with Premiere Elements to produce a Blu-ray VDD or ISO image that could be taken to Blu-ray disc with 3rd party software such as ImgBurn and Nero.

Now in Premiere Elements 13, Blu-ray as well as DVD and AVCHD burn to have built in the choice of ISO Image which can be taken to the appropriate disc using, for examples, ImgBurn, Nero, or CyberLink PowerProducer.

ISSUE

If Premiere Elements 13 Blu-ray disc format on Blu-ray disc is produced using the program's burn to disc, only a BDMV Folder and a CERTIFICATE Folder are present on the end product Blu-ray disc. However, with the ISO Image choice for Premiere Elements 13 burn to Blu-ray, the end product Blu-ray disc now has 3 folders: AACS Folder, BDMV Folder, and the CERTIFICATE Folder whether ImgBurn, Nero, or CyberLink PowerProducer is used to produce the Blu-ray disc end product.

What is this AACS Folder? From all that we can determine, the presence of this AACS Folder on the disc means "Movie is encrypted". At this point, the questions are "Why an encrypted movie for a home made movie?" and "What are the implications of this at playback time of this Premiere Elements 13 encrypted Blu-ray disc format on Blu-ray disc?"

SOLUTION

We do not have the answers for the ISSUE questions. This Premiere Elements 13 "encrypted Blu-ray disc format on Blu-ray disc" does play back on our computer CyberLink software without issue. We do not have Blu-ray playback equipment at this time to pursue this.

What this blog will present is the "what is" for Premiere Elements 13 burn to DVD, AVCHD, and Blu-ray with regard to
  • what gets saved to the designated hard drive save location when burn to folder or burn to ISO Image is selected rather than burn to disc
  • the end product disc's file system and folder(s) found on the disc
  • how to for taking the Premiere Elements 13 burn to folder and ISO Image to disc using ImgBurn, Nero, and CyberLink PowerProducer versions that we have and which we are mentioning here for informational and non promotional purposes.

    RESULTS*

    What Gets Saved To The Designated Hard Drive Save Location When Burn To Folder Or Burn To ISO Image Is Selected Rather Than Burn To Disc (See Table 1).

    Table 1. Saves From Burn To Folder And Burn To ISO Image For DVD, AVCHD, And Blu-ray Choices.

    The End Product Disc's File System And Folder(s) Found On The Disc

    Table 2 summarizes and compares the results when Premiere Elements 13 does the burn to disc versus when Premiere Elements 13 produces a Folder or ISO Image which is taken to disc by a 3rd party program. Table 2 results are from a study that used ImgBurn as the 3rd party program.

    Table 2. Premiere Elements 13. Disc End Product File System And Folders On Disc Associated With Burn To Choice Of Disc, Folder, And ISO Image.
    With the ISO Image choice for Premiere Elements 13 Blu-ray, the end product Blu-ray disc now has 3 folders: AACS Folder, BDMV Folder, and the CERTIFICATE Folder whether ImgBurn, Nero, or CyberLink PowerProducer is used as the 3rd party program to produce the Blu-ray disc end product.

    HOW TO

    Burn to Folder for DVD or AVCHD DVD
    ImgBurn

    STEP 1
    Click on "Write to files/folders to disc" choice.
    Because it was available, ImgBurn v 2.5.7.0 was used in these studies. 

    STEP 2
    In interface that opens, go to File Menu/"Browse for a source folder", and navigate to and select the whole VIDEO_TS Folder (from the DVD burn to folder) or the whole BDMV Folder (from the AVCHD DVD burn to folder).

    STEP 3
    Make sure that the name of your burner with DVD disc is set in Destination field. Place a check mark next to Verify. Assure that ImgBurn Options show disc file system ISO9660 UDF 1.02 for DVD folder and disc file system UDF 2.05 for AVCHD DVD. Have a check mark next to Verify. Hit the Build button at the bottom of the setup area.

    Note: ImgBurn automatically adds a CERTIFICATE Folder to accompany a BDMV Folder on the AVCHD DVD disc that it produces using the Premiere Elements BDMV Folder.

    Burn to ISO Image for DVD, AVCHD DVD, or Blu-ray
    ImgBurn

    STEP 1
    Click on "Write image file to disc" choice.
    Because it was available, ImgBurn v 2.5.7.0 was used in these studies.

    STEP 2
    In the interface that opens, go to File Menu/"Browse for source file", and navigate to and select the .iso file for DVD, AVCHD DVD, or Blu-ray ISO Image.

    STEP 3
    Make sure that the name of your burner with DVD or Blu-ray disc is set in the Destination field. Place a check mark next to Verify. Assure that ImgBurn shows disc file system ISO9660 UDF 1.02 for DVD ISO Image, disc file system UDF 2.05 for AVCHD DVD ISO Image, and disc file system  UDF 2.05 for Blu-ray ISO Image. Have a check mark next to Verify. Hit the Build button at the bottom of the setup area.

    Note: ImgBurn automatically adds a AACS Folder to accompany a BDMV Folder and a CERTIFICATE Folder on the end product Blu-ray disc. If Nero or CyberLink PowerProducer replaced ImgBurn in this Blu-ray ISO Image to Blu-ray disc task, an AACS Folder was also added to the Blu-ray disc to accompany the BDMV Folder and CERTIFICATE Folder.

    For CyberLink PowerProducer v5
    Blu-ray Disc Suite
    Utilities
    Burn to a disc image

    For Nero Essentials 9
    Back Up
    Copy Disc
    Nero Express Essentials workspace
    Disc Image or Saved Project


    ________________________________________________________________________________
    *Studies were performed using Premiere Elements 13 tryout on Windows 7 Professional SP1 64 bit.


    Work in Progress

    ATR

    Tuesday, October 21, 2014

    PE 13: Keyboard Shortcuts

    INTRODUCTION

    Premiere Elements 4 through 13 offer Keyboard Customization with Application and Windows categories, each filled with program functions with and without Adobe assigned keyboard shortcusts. All can be customized.

    The distinction between the Application and Windows categories is that Application is categorized according to the menus of the Premiere Elements workspace (for version 13, File, Edit, Clip, Timeline, Text, Action Bar, Tools, Window, and Help); whereas Windows is categorized according to the Windows of Premiere Elements (for version 13, Narration, Organizer, Disc Layout Window, Properties Window, History Window, Trimming Window, Monitor Window, Media Window, Sceneline Window, and Timeline Window.

    Much is the same going from 12 to 13 in this area, but there have been changes with the loss of some function choices and the addition of a few other. Note the Windows/Trimming Window addition. Prior blog posts with Premiere Elements keyboard customization details can be found here for 11 and here (item 0016) for 12.

    The Keyboard Customization (default) listings found in Premiere Elements 13* Edit Menu/Keyboard Customization are:


    PART 1

    APPLICATION


    more Clip


    more Text


    more Help

    PART 2

    WINDOWS 


    more Monitor Window


    _______________________________________________________________________________
    * Information is from Premiere Elements 13 tryout from Adobe, on Windows 7 Professional SP1 64 bit.


    ATR