Tuesday, December 31, 2013

PE: Color Matte Color Matching Experimenting

INTRODUCTION

A user asked if there was a way in Premiere Elements to match the color of an item in a photo or video with Color Matte being used in the same project. For example, creating a Color Matte with the same color as a red rose in a jpg photo.

HOW TO POSSIBILITY

Use of the Color Replace effect under Premiere Elements 12 Windows fx Effects/Image Control/Color Replace was explored as a means to achieve the Color Matte color which matched that of the rose in the jpg photo.

HOW TO EXPERIMENTAL

1. Given you have a Timeline photo showing a red rose whose red color you want to capture in a Color Matte from Project Assets/View/New Items/Color Matte.

2. Photo on Video Track 1. Side by side a Color Matte (any color, light green for this example).

3. Select the Timeline Color Matte clip and, from fx Effects drag in the effect Image Control/Color Replace into the Color Matte clip.

4. Then, with the Color Matte clip selected go to Applied Effects Tab/Applied Effects Palette/Color Replace Panel expanded. (Keep away from the Setup icon on the Color Replace Panel.)

5. Keep the Color Matte clip highlighted (selected), and move the Timeline Indicator to the left to be on the photo clip which is NOT SELECTED.

IMPORTANT: At this point, the photo is not selected, but the Timeline Indicator is positioned on it so that the photo is displayed in the monitor. The Color Matte is selected so that the Color Replace Panel expanded is visible to the right.

6. With the mouse cursor, left click once on JUST the eyedropper for the Replace Color option in the expanded part of the Color Replace Panel. Move the mouse cursor (which presents as an eyedropper) over to the red rose on the Edit Mode monitor screen and click once on the rose in a representative spot.

7. Now move the Timeline Indicator to the right to be on the Color Matte clip which still has its original color. Go to the Setup Icon in the Color Replace Panel.
  • put a check mark next to Solid Color
  • move the Similarity slider to the left to achieve the color match (in this example, the setting was 72)

The Color Matte clip was scaled down and moved to a position directly over the photo with the rose for a closer color comparison.

Figure 1. Color Comparison Of Color Matte Red Color From Red Color Of Rose In Photo.
Note that although the Color Matte displays on screen as red. It is still represented in the Timeline with its original green color since what is on the Timeline traces back to the original which is light green.

More on this another time. Need more sampling to determine usefulness of all this.

____________________________________________________________________________

ATR


PE: Snow for Christmas

INTRODUCTION

"How do I create a falling snow effect for my Premiere Elements video?" is a frequent question. The answer to that question will be offered as a demo on how the following Premiere Elements 12 one minute movie was created with its falling snow effect embellished with a snow scene still, title template, and soundtrack.


HOW TO


Part 1. Creation of the Snow.psd in Photoshop Elements 12 Full Editor

STEP 1.
File Menu/New/Blank File
Preset: Film & Video
Size: NTSC DV (can be changed depending on project settings for Premiere Elements 12 project.)
Width: 720 pixels
Height: 480 pixels
Resolution: 72 pixels/inch
Color Mode: RGB Color
Background Contents: White (leave it at White for now)

STEP 2.
  • Set the Color Picker to the defaults (hit D on computer main keyboard): Black Foreground Color and White Background Color. Then Alt + Backspace key so that the document is filled with Black.
  • As the Alt key is held down, double click the Background Layer in the Layers Palette to change that to a regular layer (Layer 0).

STEP 3.
With Layer 0 highlighted (it is the only one in the Layers Palette), go to Filter Menu/Noise/Add Noise and use the settings:
Amount: 75%
Distribution: Gaussian
Check mark next to Monochromatic
Click OK.

STEP 4.
Then Filter Menu/Blur/Gaussian and use the settings:
Radius: 1.5 pixels
Click OK.

STEP 5.
Set the Blend Mode of Layer 0 in the Layers Palette to Screen.

STEP 6.
Then with Layer 0 selected, Enhance Menu/Adjust Lighting/Levels and use settings
From left to right (black - gray - white), in fields provided,
90 - 1.00 - 120 respectively.

STEP 7.
With the Magic Wand Tool
(Tool Options settings are: Tolerance 32 with check marks next to Anti-alias and Contiguous)
Click on a spot in the "Black" area to select everything but the snow, and then hit Delete.

STEP 8.
Deselect via Ctrl+D. Place photo underneath the snow layer in the Layers Palette, check out the snow, and then remove the photo that was used to check out the snow.

STEP 9.
Next, File Menu/Save As
a. Name: Snow.psd
b. Format: Photoshop (*.PSD, *PDD)
c. Save In: personal choice for hard drive save location.


Part 2. Creating Falling Snow in Premiere Elements 12 (Expert Workspace), Using Snow.Psd Created in Photoshop Elements 12 Full Editor

STEP 1.
Import the Snow.psd file into Premiere Elements 12, using Add Media/Files and Folders/Project Assets. In Project Assets, right click the file's thumbnail, and select Duplicate.
At this point, two files are in Project Assets
snow-1.psd
snow-1.psd Copy
Drag the snow-1.psd file to the start of the Timeline Video Track 2, and with the mouse cursor drag out the file so that its duration is 1 min (00;01;00;02).

STEP 2.
Next, scale the snow-1.psd file on Video Track 2 to 300%. To do this, go to Applied Effects Tab/Applied Effects Palette/Motion Panel expanded/Scale property (with check mark next to Constrain Proportions.)

STEP 3. 
Then comes the keyframing of the Position property of the snow to create the falling snow. Here go to Applied Effects Tab/Applied Effects Palette/Motion Panel expanded/Position property. The specific sequence to follow is:
a. Highlight the snow-1.psd on Video Track 2.
b. Timeline Indicator at the start of Video Track 2, at 00;00;00;00.
c. With the mouse cursor, click and drag the image in the Edit Mode monitor upward until the bottom (white line in Figure 1) of the file's bounding box is sitting on the bottom of the Edit Mode monitor (black box) space. See Figure 1.
Figure 1. Snow-1.Psd Monitor Image After Dragged Upward As Far As Possible Without Moving The Image Off Screen (Out Of The "Black Box" Area.
d. With snow-1.psd selected on Video Track 2, go to Applied Effects Tab/Applied Effects Palette/Motion Panel expanded and click on the Toggle Animation (stop watching looking) icon to initiate the keyframing. Then move the Timeline Indicator to the end of the Timeline content  00;00;01;00;29. Next, click and drag the image in the Edit Mode monitor downward until the top of the file's bounding box is sitting on the top of the Edit Mode Monitor (black box) space. The snow-1.psd image was dragged downward as far as possible without moving the image off the screen (out of the "black box" area). Render the Timeline content by pressing the Enter key of the computer main keyboard to get the best possible preview.

STEP 4
One layer of snow has been created so far. You can stop here. But, to make it more snowy, another layer of snow was added, using the snow-1.psd Copy on Video Track 3.To do this,
  • Drag snow-1.psd Copy from Project Assets to Video Track 3.
  • Drag out the file so that its duration is 1 minute.
  • But, for this file, scale to 200% instead of 300%.
  • Then create the falling snow as you did for the first layer of snow.
If there is any confusion in selection of the file being worked on, then do the snow-1.psd Copy work in a blank area of the Timeline. When finished, position it over snow-1.psd on Video Track 2. Render the Timeline content to view the finished falling snow effect.

Part 3. Embellishments on the Basic Principles

1. The Timeline content that is represented in the export shown at the top of the blog post included
  • Video Track 4 Premiere Elements Titles & Text/Holidays andEvents/blinking_tree_lights_frame
  • Video Track 3. snow-1.psd Copy (Scaled 200%)
  • Video Track 2 snow-1.psd (Scaled 300%)
  • Video Track 1 personal jpg photo (3264 x 2448 pixels)
  • Soundtrack: Premiere Elements 12 Music Score Atmospheric/Is It Love
2. Premiere Elements 12 on Windows 7 Professional SP1 64 bit was used with project preset of NTSC/DV Standard. The export for the Timeline content was Publish+Share/Computer/AVCHD/MP4 - NTSC DV Standard.

3. If a video of just the falling snow was needed for use in another project, only Video Track 2 and 3 were used, and the following export choice was made in order to preserve the transparency of the Timeline content. To do that

Publish+Share
Computer
QuickTime
with Presets = NTSC DV
But, under the Advanced Button/Video Tab of the preset, the key settings were Video codec = Animation and Depth - 32 bit. Also, to avoid an audio track with the export, uncheck Export Audio in the Export settings there.

COMMENTARY

There are all sorts of variations on this work; and, the principles are applicable to versions of Premiere Elements other than just 12.

Our 2011 work on a snow file creation and its application to video had its roots in the following flickr article.
http://www.flickr.com/groups/pse/discuss/72157602694539770/
This blog post updates our 2011 work and expands upon it.

We may update this blog post further at a later date.

I would like to take this opportunity to thank all who have taken the time to read my Premiere Elements writings. Best wishes for a wonderful holiday season. Happy New Year 2014.

ATR

_______________________________________________________________________
After publishing this blog post and watching the video again, I noticed that I forgot to mention that
I experimented with Dip to White video transitions at the end. More on that another time. Needs work.

Tuesday, December 24, 2013

PE: Burner Location: No Burners Found

INTRODUCTION

Recently I was gifted with an Apple TV unit. In preparation for its setup and use, I was checking out iTunes 64 bit (latest version 11.1.3.8) installed on my Windows Professional 7 SP1 64 bit computer and got hit with the following message.

Figure 1. iTunes 64 Bit Windows Missing Drivers Message.
I had not installed other CD or DVD burning software.

When I reinstalled iTunes as suggested by the warning/error message, the above message no longer appeared. However, when I went to open a Premiere Elements 11 project on this computer, there were no burners listed in the Burner Location field of the burn dialog. A System Restore resolved this immediate Windows and Premiere Elements issue. But I was left with the original iTunes issue. This kind of problem appears to be involved with the Gear drivers used in iTunes.

All this seems to be a known* iTunes issue. A sampling of Apple documents that offers fixes for this can be found

http://support.apple.com/kb/ts2308

http://support.apple.com/kb/ts3299

I do not use iTunes to create audio CDs or burn DVDs, and the existing situation was somehow allowing me to import CDs, so, until forced to, I was thinking that I could put troubleshooting this matter aside for another day rather than get involved with Windows/Premiere Elements recognition. of burners.

I thought it important to bring this information to the attention of the Premiere Elements users who suddenly found that there was nothing listed in burner location in the burn dialog and wondered why? The above may not be the answer for all or any. But, if the Premiere Elements user has this burner location empty, one of the possibilities to check would be the status of iTunes if iTunes was part of the computer community.

I was ready to leave the matter unresolved from the point of view of iTunes and be content knowing that Premiere Elements burner location was recognizing the computer's burners, when the solution was found in a iTunes user's comment about step 12 in the Apple document "iTunes for Windows: "Registry settings" warning when opening iTunes".

SOLUTION

The results of the solution to be described include
  • Using iTunes 64 bit (version 11.1.3.8) without problems related to "drivers for importing and burning CDs and DVDs are missing" and consequently no more error message (See Figure 1) when opening iTunes
  • Using Premiere Elements in which its burner dialog/burner location listed system burners
Uninstalled iTunes.....iTunes problem resolved, but Premiere Elements burn dialog/burner location burner listings gone.

System Restore.....iTunes problem back, but Premiere Elements burn dialog/burner location burner listings restored.

Manually deleted the GEAR entries in the Registry as per Solution 3 here, And installed updated GEAR driver (4.020.5) from here according to Solution 3.....that did not resolve the problem.

Subsequent iTunes uninstalls/reinstalls...no solution except that the driver part of the error message was gone so that the message now read only that iTunes was not properly installed.

Then went thru the Gear driver removal from Registry and type in again from here, but this time, at step 12, followed the comment of an iTunes user (b noir) with this type of issue..
At step 12 after typing GEARAspiWDM, press Enter/Return key once prior to clicking OK.
It worked! No more iTunes CD/DVD "importing and burning" issues/no more error message to that effect when opening program and Premiere Elements burn dialog/burner location displaying all burner choices.

_______________________________________________________________________________
*A Google Search revealed numerous Apple and iTunes user articles on this matter.


ATR


Tuesday, December 10, 2013

PE12: Adobe ID/Password Requirement for Sign In.

INTRODUCTION

Recently a Premiere Elements 12 Windows user wanted to know whether it was necessary to Sign In to the program with an Adobe ID and Password in order to use the program. My recollection was generally No, but there are certain features (Adobe Revel for example) where the Adobe ID and Password are required to use the feature. However, my recollection and what is written in the Adobe document (part about Registration not being mandatory) were found to be flawed.

SOLUTION

To refresh the memory on those details, Premiere Elements 12 was deactivated on one Windows  computer and installed on another. A close look at the step by step process of the installation on the second computer revealed the following.

There was no request for an Adobe ID and Password from the initiation of the installation process to the Finish, followed by the request to Restart the computer. However, after the computer Restart, a Sign In Request dialog appeared when trying to create a Premiere Elements 12 project via Video Editor/New Project in the Welcome Screen.
At this point, I had to Sign In with my Adobe ID and Password in order to use the program. The specific message reads

Sign In Required
Signing in with an Adobe ID and registering Adobe Premiere Elements 12 is required within 7 days otherwise it will stop working. 
Enter Adobe ID to register your product.

I did not see any OR possibilities for "Signing in" Adobe ID/Password versus Registration.

If and when the user wants to deactivate the program for any reason, Help Menu/Sign Out is used for that purpose in place of the Help Menu/Deactivate seen in versions of Premiere Elements earlier than 12. Once the program is deactivated on its computer, the program cannot be used again without the Adobe ID and Password as part of the Signing In protocol. A connection to Internet is required whether Signing In or Signing Out.

PREMIERE ELEMENTS 12 STEP BY STEP INSTALLATION
IN SEARCH OF ADOBE ID/PASSWORD REQUESTS IN THE PROCESS 

1. Insert Disc, Run AutoPlay.exe, User Account Control dialog. Yes.

2. "Install Adobe Premiere Elements 12" Panel and selection of that Panel.

3. Adobe Premiere Elements 12 - InstallShield Wizard, English (United States). OK.

4. Preparing to install, Setup. Next.

5. License Agreement. Accept.

6. Setup - Customer Information
User Name (not Adobe ID)
Country
Choice of "Install the trial version" or "I have a serial number. Install the licensed version".
Inserted the purchased serial number and clicked Next.

7. Setup NTSC TV Format or PAL TV Format. Selected NTSC TV Format and clicked Next.

8. Setup. Next.

9. Setup. Ready to Install the Program. Install.

10. Setup. Installing Adobe Premiere Elements 12.

11. Setup. InstallShield Wizard Completed. Finish.

12. Adobe Premiere Elements 12 - Setup. Restart Computer. Yes or No. Selected Yes.

13. After restart of computer, double clicked Desktop Premiere Elements 12 icon.

14. Welcome Screen appeared with Organizer and Video Editor choices. Selected Video Editor, followed by New Project.

15. Sign In Required Dialog appeared and the message was....
"Signing in with an Adobe ID and registering Adobe Premiere Elements 12 is required within 7 days otherwise it will stop work. Enter Adobe ID to register your product." Sign In Now.

16. Next, the Sign In dialog appeared, requesting
Adobe ID (Email Address)
Password
and posting "Your credentials will be stored on this device."
Sign In

17. At this point, the program should open to the Premiere Elements 12 workspace. It did in my case but not without some problems. Please refer to "The Rest of the Story" section below.

THE REST OF THE STORY

Sign In Failures

In this study, Premiere Elements 12 installed on laptop Windows 8.1 64 bit was deactivated in order to go through the step by step looking for Adobe ID and Password requests in the installation process of the program on another computer, a laptop Window 7 64 bit. 

As it turned out, Premiere Elements 12 did not get beyond on the Sign In step on the second computer. Entering my Adobe ID and Password resulted in an endlessly spinning icon in the Sign In  dialog which developed a gray cast. Resetting the Password was tried. No success. Premiere Elements 12 was uninstalled from the second computer in the Control Panel area.

When I went back to Premiere Elements 12 on laptop Windows 8.1 64 bit, I could not sign in. Same syndrome, that is, after I entered my valid Adobe ID and Password, endlessly spinning icon in the dialog which developed a gray case.

Fix

I am not sure of the whys for what follows and if the following will ever help anyone else in a similar situation, but here is how I identified the problem and resolved it.

1. Window 8.1 64 bit Computer/Manage/Event Viewer and the following Error entry....
"The program PDApp.exe version 7.0.0.426 stopped interacting with Windows and was closed. To see if more information about the problem is available, check the problem history in the Action Center.

Log Name: Application
Source: Application hang
Event ID: 1002
Level: Error
User: N/A
OpCode:
Logged: 12/9/2013 9:24:25 PM
Task Category: (101)
Keywords: Classic
Computer: xxxxxx (x's for privacy)

Now the part to success...
C:\Program Files (x86)\Common Files\Adobe\OOBE\PDApp\Core\PDApp.exe

2. When I navigated to the location of the PDApp.exe and double clicked it, the Adobe Application Manager opened. It wanted to install a Camera Raw Update which I let it do.

3. When I tried the Premiere Elements 12 Sign In again, it worked without issue.

_______________________________________________________________________________

ATR


Thursday, December 5, 2013

PE12: Content Downloads From Adobe Considerations

INTRODUCTION

A May 2013 blog post focused on "PE11: No Content Disc - Content Downloads from Adobe". The process can be very slow depending on Internet speed and the status of the Adobe server. To avoid going through that labored process a second time if the program had to be uninstalled/reinstalled, suggestion was made for saving a copy of the Premiere Elements 11 Online Folder (complete) to a USB 2.0 or 3.0 Flash Drive (8 GB capacity) and using it as a replacement for the Online Folder (incomplete) that got installed with the program reinstall.

The same principles involved in Premiere Elements 11 Content Downloads from Adobe are applicable to Premiere Elements 12 Content Downloads from Adobe. The Online Folders of 11 and 12 differ in that 12 has two new folders included with the carryovers from 11.

Online Folder 11*
  • Clips Arts Folder
  • DVD Templates Folder
  • Movie Themes Folder
  • Titles Templates Folder
Online Folder 12*
  • Clip Arts Folder
  • DVD Templates Folder
  • Movie Themes Folder
  • Music Scores Folder (NEW)
  • Sound Effects Folder (NEW)
  • Title Templates Folder
 Except for the addition of these two new folders in the Online 12 Folder, the Online Folder of 11 and 12 are the same.

ISSUE

If the user is going from Premiere Elements 11 to 12 and has the Premiere Elements 11 Online Folder (complete) saved to a USB Flash Drive, how can that be used in 12 to avoid the labored Content downloading in version 12?

SOLUTION

When we first thought about the ISSUE, we forgot about the 2 new folders in the Premiere Elements 12 Online Folder. And, our initial thought was to use the saved  Premiere Elements 11 Online Folder (complete) as a replacement for the Premiere Elements 12 Online Folder (incomplete) that got installed with the Premiere Elements 12 installation.

When we remembered the 2 new folders in the Premiere Elements 12 Online Folder, it was realized that the initial thought was flawed.

Consequently, the current recommendation for the 11 to 12 user in this regard is

  • Keep the original Premiere Elements 12 Online Folder
  • Replace the Premiere Elements 12 Online Folder's Clips Arts Folder (incomplete), DVD Templates Folder (incomplete), Movie Themes Folder (incomplete), and Title Templates Folder (incomplete) with the counterpart Premiere Elements 11 folders (complete) which were saved to the USB Flash Drive.
  • Accept the task of downloading the Music Scores Folder and Sound Effects Folder Content 
  • When all is done, copy to the Premiere Elements 12 Online Folder (complete) to a USB 2.0 or 3.0 Flash Drive (8 GB capacity) for use after any Premiere Elements 12 uninstall/reinstall.

______________________________________________________________________________

 *Path to Online Folders in Windows 7 Professional SP1 64 bit or Windows 8 or 8.1 64 bit.

Premiere Elements 11 Online Folder
Local Disk C\Program Data\Adobe\Premiere Elements\11.0\Online

Premiere Elements 12 Online Folder
Local Disk C\Program Data\Adobe\Premiere Elements\12.0\Online


Sunday, November 17, 2013

PE11 and 12: Christmas Disc Main Menu Audio Limit

INTRODUCTION

The story starts with the Adobe disc menu Holiday and Events/Christmas which comes with a main menu falling snow video background and no audio for the main menu and scene menu.

Disc main menu background adjustments include replacement with video background and/or addition or replacement with audio. These adjustments are characterized by a maximum 30 second duration, looping.

Today a Premiere Elements 12 user found that the Holidays and Events/Christmas menu was limiting the audio addition to 13.4 seconds and not the expected 30 seconds. See Figure 1.

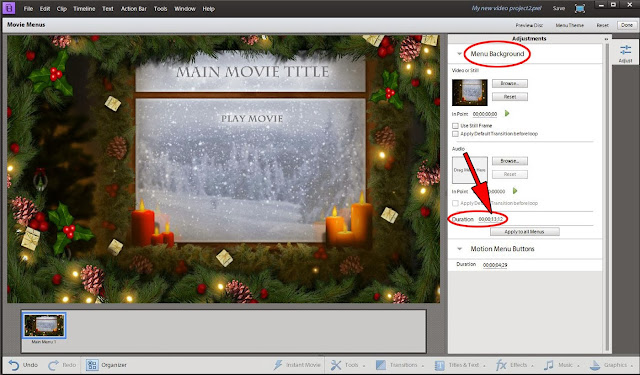
Figure 1. Premiere Elements 11 NTSC AVCHD Full HD 1080i30 Project. Theme Holidays and Events/Christmas (HD Version) Appearance In Movie Menu Workspace After Selection Of Menu In Movie Menu Display Area.

Why? A bug in the menu? A bug in Premiere Elements 12 disc menus? Neither.

The matter goes to the fact that the Christmas menu was designed with a video background (falling snow) whose file duration defines what you get in Movie Menu customization area within the opened project. Basically how this works, the main menu .psd file is created with a still in the Background Layer Set. In the same theme folder as the .psd file is included the video background file. In this case .mpg file. In the project, this .mpg video overrides the still in the .psd's Background Layer Set and becomes the main menu video background. This mpg video duration impacts the audio background duration as well as the video background duration.

ISSUE

The issue becomes what to do if you want to get 30 seconds looping audio in the Christmas menu?

SOLUTION

The solutions to the ISSUE stated above can include:

  • Replacing the video background in the Movie Menu section with a still and then doing the audio addition
  • Taking the Christmas theme folder's .mpg video files into Premiere Elements and editing their duration from 13.4 seconds to 30 seconds and then putting them back into the Christmas theme folder
  • Going into the Christmas theme folder, removing the Adobe's .mpg video background files and then replacing them with 30 seconds .mpg files of your own, with strict adherence to the file naming requirements
  • In the Movie Menu workspace, going to the Video or Still Video Background replacement area, and browsing to and applying your own video with duration of 30 seconds. Then the audio addition is done, resulting in the 30 seconds audio duration, looping.

HOW TO*

The focus will be on
Taking the Christmas theme folder's .mpg video background files into Premiere Elements and editing their duration from 13.4 seconds to 30 seconds and then putting them back into the Christmas theme folder
The 3 Adobe files involved are
  • christmas_s_mm_bg.m1v  (main menu, standard project 4:3)
  • christmas_w_mm_bg.mpg (main menu, standard widescreen project 16:9)
  • christmas_hd_mm_bg.mpg (main menu, high definition project 16:9)
The Windows 7, 8, and 8.1 64 bit path to these files can be found in the path:
Local Disc C
Program Files
Adobe
Premiere Elements
12.0
Online
DVD Templates
All_Lang
Holiday and Events
(V) Christmas


 Editing Scheme**

 christmas_s_mm_bg.m1v

STEP 1
Import into Premiere Elements 11 PAL DV Standard Project

STEP 2
Right click video on Timeline, select Time Stretch, and, in Time Stretch dialog, set duration for 00;00;29;29. (29 seconds and 29 frames, essentially 30 seconds)
.
STEP 3
Export Timeline content and save it to Desktop. For export, use Publish+Share/Computer/MPEG/preset = PAL DV Standard

STEP 4
Rename file to give file name = christmas_s_mm_bg.mpg

christmas_w_mm_bg.mpg

STEP1
Import into Premiere Elements 11 PAL DV Widescreen Project

STEP 2
Right click video on Timeline, select Time Stretch, and, in Time Stretch dialog, set duration for 00;00;29;29. (29 seconds and 29 frames, essentially 30 seconds)

STEP 3
Export Timeline content and save it to Desktop. For export, use Publish+Share/Computer/MPEG/preset = PAL DV Widescreen

STEP 4
Rename file to give file name = christmas_w_mm_bg.mpg

christmas_hd_mm_bg.mpg

STEP 1
Import into Premiere Elements 11 PAL DSLR 1080p DSLR 1080p25 project

STEP 2
Right click video on Timeline, select Time Stretch, and, in Time Stretch dialog, set duration for 00;00;29;29. (29 seconds and 29 frames, essentially 30 seconds)

STEP 3
Export Timeline content and save it to Desktop. For export, use Publish_Share/Computer/MPEG/preset = HDTV 1080p25 High Quality

STEP 4
Rename file to give file name = christmas_hd_mm_bg.mpg

Non Destructive Approach***

If you wanted to leave the Adobe Christmas theme as is and use the above variations when necessary, then the following plan might be a consideration, working with copies.

STEP 1
Create a master folder named Special Menus

STEP 2
Create a folder named schristmas and place in it 
  • christmas_s_mm_bg.mpg (video file) with its 30 seconds duration
  • christmas_s_mm.psd (main menu .psd file)
  • christmas_s_sm.psd (scene menu .psd file)
Then place the schristmas folder in the Special Menus Folder

STEP 3
Create a folder named wchristmas and place in it
  • christmas_w_mm_bg.mpg (video file) with its 30 seconds duration
  • christmas_w_mm.psd (main Menu .psd file)
  • christmas_w_sm.psd (scene Menu .psd file)
Then place the wchristmas folder in the Special Menus Folder

STEP 4
Create a folder named hdchristmas and place in it
  • christmas_hd_mm_bg.mpg (video file) with its 30 seconds duration
  • christmas_hd_mm.psd (main menu .psd file)
  • christmas_hd_sm.psd (scene menu.psd file) 
Then place the hdchristmas folder in the Special Menus Folder

STEP 5
Take the Special Menus Folder (now containing the 3 subfolders) and place it in the Common Folder in the Windows 7, 8, 8.1 64 bit path
Local Disk C
Program Files
Adobe
Adobe Premiere Elements 11
DVD Templates
Common

Then when you want to use the Christmas theme menu with this perk to extend its built in video and audio backgrounds, just select the one wanted Tools/Movie Menu/Special Menus Folder within the opened project.

_______________________________________________________________________________

* The look at the Christmas disc menu theme was done with Premiere Elements 11 on Windows 7 Professional SP1 64 bit. Note that Christmas results apply to Premiere Elements 11 and 12 on Windows 7, 8, or 8.1 64 bit. The principles involved would be expected to be applicable to any of the Adobe disc menus that use this video background concept. Access to Holiday and Events/Christmas in Premiere Elements 10 probably no longer exists since it is "plus members only" for the discontinued photoshop.com.

**These export settings are used whether on NTSC or PAL setup.

***I took the "Non Destructive Approach" in the final test runs of the blog content.


September 03, 2014 Add On
Also see blog post
PE: Disc Menu Folders/Files Locations
http://atr935.blogspot.com/2014/09/pe-disc-menu-foldersfiles-locations.html


ATR

Tuesday, November 12, 2013

PE: Menu Marker Limitation/Implementation Update

INTRODUCTION

First, the good news. Premiere Elements 12 now allows for the use of 99 Timeline menu markers in its project in contrast to Premiere Elements 11, 10, and 9.0/9.0.1 which each have a 25 Timeline menu marker limit. This is confirmed at the Timeline level as well as in the play back of disc to which the menu has been applied.


Back in the April 2013 blog post "PE11: Menu Marker Limit Implementation Problem", it was found that Premiere Elements 11 has the same 25 menu marker limit that versions 10 and 9 have, but, unlike 10 and 9, does not give a pop up with regard to that limitation when the user tries to create the 26th menu marker. And, in that study, that pop up did not appear even when the 75th menu marker was placed in Premiere Elements 11. Under those circumstances, no attempt was made to place more than 75.

In preparing an update blog post on the Premiere Elements Menu Marker limitation and implementation using 110 stills as part of the test protocol, it was discovered that the 25 limit pop up does appear in Premiere Elements 11 but when the user attempts to place the 100th menu marker.

ISSUE

Need for verification and clarification is indicated for version to version
  • menu marker limit
  • pop up menu marker limit warning dialog, the timing of its appearance and the accuracy of its message
SOLUTION
An exploration mission of the ISSUE was carried out with Premiere Elements 4, 7, 8.0/8.0.1, 9.0/9.0.1, 10, 11, and 12 on Windows 7 Professional SP1 64 bit. In each case 110 stills were placed on the Timeline and scene markers placed at the beginning of each as far as could be done.

RESULTS

Premiere Elements 12
99 Timeline menu markers usable
Menu Marker Limit Pop Up appeared at attempt to place the 100th marker...could go no further.
However, the warning message was in error, citing a 25, not 99, menu marker limit.

Figure 1. Premiere Elements 12. Menu Marker Pop Up At Attempt To Place 100TH Menu Marker.

The 99 menu marker limit* was confirmed at the Timeline level and at play back of disc to which the menu was applied. It was suspected that someone had forgotten to up date this pop up going from version 11 to 12.

Premiere Elements 11
25 Timeline menu markers usable
Menu Marker Limit Pop Up appeared only at attempt to place the 100th marker...could go no further.
The Menu Marker Limit Pop Up message appeared as represented in Figure 1 for Premiere Elements 12. Earlier studies missed this Premiere Elements 11 Pop Up because attempted placements of menu markers did not exceed 75. Stopping at 75 at that time seemed justified since placement of menu marker 26 through 75 resulted in 25 Timeline menu markers actually useable.

Premiere Elements 10
25 Timeline menu markers usable
Menu Marker Limit Pop Up appeared at attempted placement of the 26th menu marker...could go no further.

Figure 2. Premiere Elements 10. Menu Marker Pop Up At Attempt To Place 26TH Menu Marker.

Premiere Elements 9.0/9.0.1
25 Timeline menu markers usable
Menu Marker Limit Pop Up appeared at attempted placement of the 26th menu marker...could go no further.

The Menu Marker Pop Up message appeared as represented in Figure 2 for Premiere Elements 10.

Premiere Elements 8.0/8.0.1
98 Timeline menu markers usable
No Menu Marker Limit Pop Up, 110 menu markers actually placed

Premiere Elements 7
98 Timeline menu markers usable
No Menu Marker Limit Pop Up, 110 menu markers actually placed

Premiere Elements 4
98 Timeline menu markers usable
No Menu Marker Limit Pop Up, 110 menu markers actually placed


_____________________________________________________________________________
* DVD Template was used with 6 scenes per Scene Selection page.
  • Premiere Elements 12. 16 Scene Selection pages with 6 scenes each page + 1 Scene Selection page with 3 scenes. 99 scenes total.
  • Premiere Elements 11. 4 Scene Selection pages with 6 scenes each page + 1 Scene Selection page with 1 scene. 25 scenes total.
  • Premiere Elements 10. Same as 11.
  • Premiere Elements 9.0/9.0.1. Same as 11.
  • Premiere Elements 8.0/8.0.1, 7, and 4. 16 Scene Selection pages with 6 scenes each page + 1 Scene Selection page with 2 scenes. 98 scenes total.

Wednesday, November 6, 2013

PE12: Preview Window "Play In to Out"

INTRODUCTION

The question was asked "After I trim a video clip in the Preview Window using the Set In and Set Out points there, how can I play back just the trim, not the whole clip, in the Preview Window when I click the Preview Window's Play button?"

This was looked at*
  • Preview Window opened by double clicking the file thumbnail in Project Assets
  • Preview Window opened by double clicking the Timeline file
The answer appeared to be "no can do" for either case above. It should be mentioned that the trim on the Timeline did display just the trim at playback in the Edit Mode monitor.

Then the idea popped up "What about hidden route to attain the goal?" An example of this type of thinking can be found in the September, 2013 blog post on Slip and Slide Edits which have no tools in the Premiere Elements workspace, but can be made to function in the Premiere Elements workspace via keyboard shortcuts.

ISSUE

"After I trim a video clip in the Preview Window using the Set In and Set Out points there, how can I play back just the trim, not the whole clip, in the Preview Window when I click the Preview Window's Play button?"

SOLUTION

The solution to the stated ISSUE came via the Premiere Elements keyboard shortcuts. (See the September 2013 blog post on keyboard shortcuts for fuller details on customization of Premiere Elements keyboard shortcuts.)

There under the Premiere Elements 12 Expert workspace Edit Menu/Keyboard Customization/Application catagory/Help subcatagory was the "Play In to Out" command with no assigned keyboard shortcut.

Figure 1. Premiere Elements 12. Keyboard Customization/Application/Help/"Play In To Out" Command (Circled In Red To Point Out the Location)
.
It was just a matter of

First.....Assigning a keyboard shortcut (in this example W) to the command "Play In to Out"
(Took the  W from the "Go To Out Point" command which was not going to be used)
Second.....Hitting the computer keyboard's W in the Premiere Elements 12 Expert workspace instead of the Preview Window play button in order to get play back of just the trim created in the opened Preview Window with its Set In and Set Out points.

HOW TO

STEP 1
At the onset the "Play In to Out" panel has a gray background and no keyboard shortcut at the far right of the panel. If the left side of the panel is left mouse clicked once, the whole panel turns blue. If the right side of the panel is left mouse clicked once, the left side of the panel is blue, but the right is a gray area where the keyboard shortcut can be typed in using the computer keyboard key(s). So,
  • click the right side of the "Play In to Out" panel to obtain the gray keyboard shortcut field where the keyboard shortcut is to be typed in
  • with the keyboard keys, type, in this case, W. Figure 2 represents what you would expect to see after the W is entered.
Figure 2. Premiere Elements 12. Keyboard Customization Of "Play In To Out". View After W Is Typed For Command of "Play In To Out".

STEP 2
Click on the Save As button in the Keyboard Customization dialog to bring up the "Name Key Set" dialog. In the "Name Key Set" dialog, assign a "Key set name" for the "Play In To Out" command with the keyboard shortcut W. Click Save in the "Name Key Set" dialog when finished. Then click OK to the Keyboard Customization dialog.

Figure 3. Premiere Elements 12. Naming And Saving of Keyboard Shortcut W For Command "Play In To Out".


STEP 3. The Keyboard Shortcut W for Command "Play In To Out" is ready for use in the Premiere Elements 12 Expert workspace. Whenever you trim a clip in the the Premiere Window and want to play back just the trim there, press keyboard key W instead of Preview Window play button.

____________________________________________________________________________
* Work was done with Premiere Elements 12 running on Windows 7 Professional SP1 64 bit. In principle it should be applicable to other versions of Premiere Elements.


ATR


Monday, November 4, 2013

PE10: Changing Project Preset Without Starting A New Project Revisited

INTRODUCTION

A question has been asked by a Premiere Elements 10 Windows user "How can I change the Premiere Elements 10 Windows project preset from NTSC DSLR 480p60 to NTSC DSLR 1080p24 after the DSLR 480p60 project preset has been set?" See project preset descriptions in new project dialog/Change Settings as shown in Figure 1 and Figure 2.

Originally Set

Figure 1. Premiere Elements 10 Windows 7 Professional SP1 64 Bit. New Project Dialog. Selection Of Original Project Preset NTSC/DSLR/480p/DSLR 480p60.

Should Have Set

Figure 2. Premiere Elements 10 Windows 7 Professional SP1 64 Bit. New Project Dialog. The Project Preset Wanted NTSC/DSLR/1080p/DSLR 1080p24.

The May 2013 blog post "PE11: Changing Project Settings Without Starting A New Project" demonstrated the principles for doing this for Premiere Elements 11 PAL AVCHD Full 1080i25 to PAL DV Widescreen. Although the principles for doing this type of change are applicable to other versions, certain details will differ depending on the circumstances.

So the following will detail the specifics for changing the Premiere Elements 10 project settings without starting a new project so that the project settings reflex 1080p24 instead of 480p60.
In many instances, just starting a new project may be the best choice. But the details are presented for the reader to decide whether it is in his/her best interests to start a new project or to edit the Notepad document of the saved/closed 480p60 project.

ISSUE

"How can I change the Premiere Elements 10 Windows project preset from NTSC DSLR 480p60 to NTSC DSLR 1080p24 after the DSLR-480p60 project preset has been set?"

SOLUTION

The answer to the ISSUE question is found in editing the Notepad document of the DSLR 480p60 saved/closed project file (project.prel) so that it reflects key properties of a DSLR 1080p24 project when the project is reopened.

HOW TO

STEP 1
Save/close the DSLR 480p60 project.

STEP2
Go to the save location of the DSLR 480p60 project file (project.prel), right click it, select Open With, followed by Notepad.

STEP 3
In the Notepad document, go to Edit Menu/Find. In the Find dialog's "Find What" field, type in FrameRect. And, using the dialog's "Find Next", go through the entire Notepad document changing all and only

<FrameRect>0,0,640,480</FrameRect>

to

<FrameRect>0,0,1920,1080</FrameRect> 


Save the changes (Notepad File Menu/Save).

IMPORTANT: Do not change any <FrameRect> unless 00,00,640,480 is shown. Ignore any other FrameRec that has other data.

When finished with FrameRect, then in the Find dialog's "Find What" field, type in FrameRate. And, using the dialog's "Find Next", go through the entire Notepad document changing all and only


<FrameRate>4237833600</FrameRate>

to
 
 <FrameRate>10594584000</FrameRate>


Save the changes (File Menu/Save) 

IMPORTANT: Do not change any <FrameRate> unless 4237833600 is shown. Ignore any other FrameRate that has other data.

STEP 4

That is it. The before and after project settings as in Premiere Element 10 Edit Menu/Project Settings/General should reflect the project settings changes from 480p60 to 1080p24 as represented in Figure 3 and 4.

Project Settings - BEFORE - 480p60

Figure 3. Premiere Elements 10. Windows 7 Professional SP1 64 bit. The 480p Project Settings Before Its Notepad Document Editing.

Project Settings - AFTER - 1080p24


Figure 4. Premiere Elements 10. Windows 7 Professional SP1 64 Bit. The 1080p24 Project Settings After Notepad Document Editing Of The 480p60 Project.Prel.

_______________________________________________________________________________

ATR