INTRODUCTION
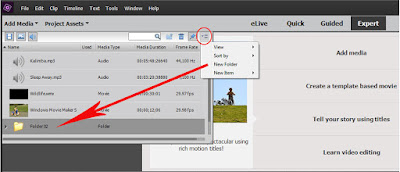
In Premiere Elements 11 through 2019, a Projects Assets Panel exists only in Expert workspace. This panel offers a place for storage of source media in the project. Assess to the Panel Options in the Project Assets Panel is pointed to in Figure 1. The Panel Options categories are View, Sort by, New Folder, and New Item.
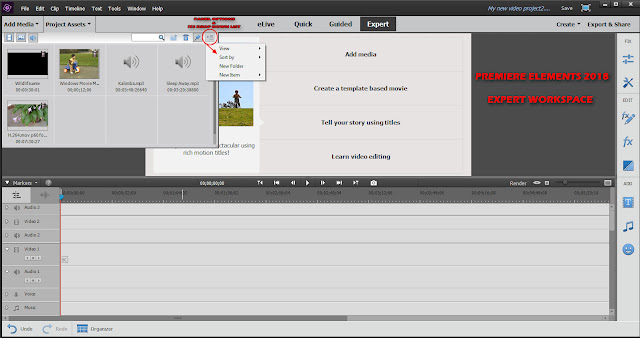 |
| Figure 1. Premiere Elements 2018 Expert Workspace Project Assets/Panel Options Location. |
The above Project Assets/Panel Options information is the same for Premiere Elements 11 through 2019 with the exception that version 11's New Item category in the Panel Options does not include Adjustment Layer which is included in versions greater than 11.
ISSUE
The Panel Options drop down menu expanded consists of
View
Grid View
List View
Sort by
File Name (ascending)
Duration (ascending)
New Folder
New Item
Adjustment Layer (not included in version 11)
Title
Bars and Tone
Black Video
Color Matte
Universal Counting Leader
When browsing through Premiere Elements Project Assets Panel, I discovered that I had not realized that Adjustment Layer and Title were members of the Panel Options New Item category. So, I decided to overview the topic to determine if I had forgotten about or overlooked any other details there.
PANEL OPTIONS OVERVIEW DETAILS
VIEW
Grid View
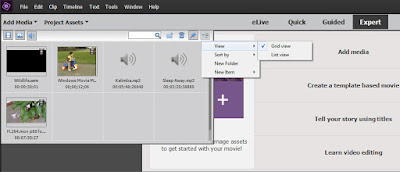 |
| Figure 2. Grid View Display When Choice Of Project Assets/Panel Options View Category Is Grid View. |
List View
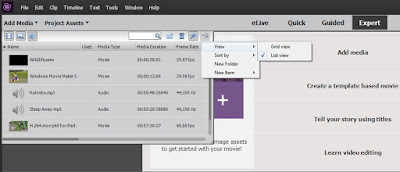 |
| Figure 3. List View Display When Choice Of Project Assets/Panel Options View Category Is List View. |
Notes: Clicking on choice under View placed a check next to the selection. The List View columns are managed in Edit Columns which is accessed by right clicking a blank space in the List View and selecting Edit Columns from the drop down list. Figure 1 and 2 were set to display columns for only Used, Media Type, Frame Rate, and Media Duration. The Project Assets Panel can be resized by dragging on its right edge and/or bottom edge.
SORT BY
File Name (ascending)
Duration (ascending)
A List View/Sort by Duration (ascending) example is shown in Figure 4. Note that clicking on the Sort by choice of File Name (ascending) or Duration (ascending) does not leave a check mark at that choice, but does set the Sort by choice as directed.
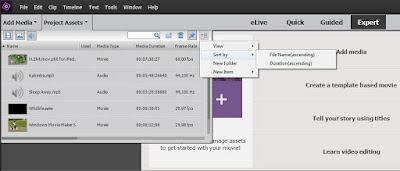 |
| Figure 4. Display When Panel Option Sort By Is Set At Duration (Ascending) In List View. |
|
|
NEW FOLDER
Clicking on New Folder in Panel Options generates an empty new folder which is automatically placed in Project Assets Panel and which is useful for thumbnail organizational purposes in Project Assets. Refer to Figure 5.
 |
| Figure 5. Panel Option New Folder. |
NEW ITEM
Adjustment Layer
Clicking on Adjustment Layer in Panel Options New Item category generates an Adjustment Layer which is automatically placed in Project Assets Panel and which can be dragged to the Timeline for use. The duration of the Adjustment Layer generated will depend on the Still Image Duration set in the Edit Menu/Preferences/General. For Adobe document on Premiere Elements Adjustment Layer, see
HERE.
Title
Clicking on Title in Panel Options New Item category
- generates and places a Default Text file on the Expert workspace Timeline at the location of the Timeline Indicator
- opens the project's Titler
- The duration of the Title file will depend on the Still Image Duration set in the Edit Menu/Preferences/General.
Bars and Tone
Clicking on Bars and Tone in Panel Options New Item category
- generates and places a Bars and Tone file (with linked video and audio components) on the Expert workspace Timeline at the location of the Timeline Indicator as well as placing copy in Project Assets Panel.
- The duration of the Bars and Tone file will depend on the Still Image Duration set in the Edit Menu/Preferences/General.
Figure 6 represents the Expert Workspace display after selection of Bars and Tone Panel Option.
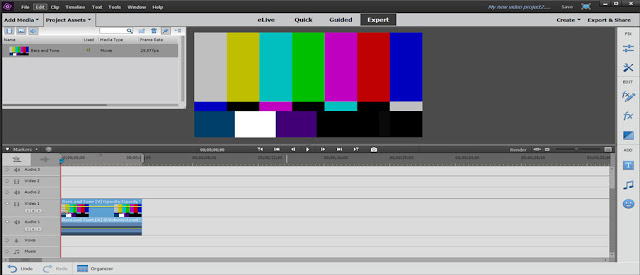 |
| Figure 6. Premiere Elements 2018 Expert Workspace Display After Selection Of Project Assets/Panel Options/New Item/Bars And Tone. |
Use and other information related to Bars and Tone Panel Option can be found in Adobe document "Creating specialty clips" with Applies to: Premiere Elements and Last Published February 15, 2017. See
HERE.
Black Video
Clicking on Black Video in Panel Options New Item category
- generates and places a Black Video file (with only a video component) on the Expert workspace Timeline at the location of
the Timeline Indicator as well as placing copy in Project Assets Panel.
- The duration of the Black Video file will depend on the Still Image Duration set in the Edit Menu/Preferences/General.
Use and other information related to Black Video Option can be
found in Adobe document "Creating specialty clips" with Applies to:
Premiere Elements and Last Published February 15, 2017. See
HERE.
Color Matte
Clicking on Color Matte in Panel Options New Item category
- triggers the opening of the Color Picker which is used to set the color of the Color Matte
- then, generates and places a Color Matte file (with only video component) on the Expert workspace Timeline at the location of the Timeline Indicator as well as placing copy in Project Assets Panel.
- The duration of the Color Matte file will depend on the Still Image Duration set in the Edit Menu/Preferences/General.
Use and other information related to Color Matte Option can be found in Adobe document "Creating specialty clips" with Applies to: Premiere Elements and Last Published February 15, 2017. See
HERE.
Universal Counting Leader
Properties
- Clicking on Universal Counting Leader in the Panel Options New Item category triggers the opening of the Universal Counting Leader Setup dialog which contains settings for Video: Wipe Color, Background Color, Line Color, Target Color, Cue Blip on out, and for Audio: Cue Blip on 2 or Clue Blip at all Second Starts.
- After clicking OK for that Setup dialog, generates and places a Universal Counting Leader file (with linked video and audio components) on the Expert workspace Timeline at the location of the Timeline Indicator as well as placing copy in Project Assets Panel.
- The duration of the Universal Counting Leader file appears to be fixed at 11 seconds.
Use and other information related to Universal Counting Leader Option can be found in Adobe document "Creating specialty clips" with Applies to: Premiere Elements and Last Published February 15, 2017. See
HERE.
Below is a .mp4 export of the Expert workspace Timeline Universal Counting Leader Option whose setup was used with its default video (including Cue Blip on out) and default audio (including Cue Blip on 2).
COMMENTARY
The Premiere Elements workspaces underwent major revision for versions of the program after version 10. It is interesting to look back at the ancestors of versions 11 to 2019 Project Assets and its Panel Options.
In Premiere Elements 10 under its Project header
- List View and Icon View (aka Grid View) each has its own icon.
- There is a separate icon for Sort by with choices of Name (Ascending),
Name (Descending), Duration (Ascending), Duration (Descending).
- There is a separate icon for generating a new folder for the project area.
- New Item has its own icon for access to Title, Bars and Tone, Black Video, Color Matte, Universal Counting Leader, and the now discontinued SmartSound.
- The involved icons can be accessed in Premiere Elements 10's Timeline workspace (to be replaced with Expert workspace after version 10) as well as Sceneline workspace (to be replaced with Quick workspace after version 10).
The versions of Premiere Elements earlier than 10
have similarities and differences compared to 10 and this topic. But, in these earlier versions, the survivors appear to be a New Item list including options for Title, Bars and Tone, Black Video, Color Matte, and Universal Counting Leader.
_____________________________________________________________________________
ATR


