Saturday, August 23, 2014

PE11 and 12: Set Unnumbered Markers Shortcut Glitch

INTRODUCTION

The following computer keyboard shortcuts can be used to apply unnumbered or numbered markers to the running Timeline content during its playback in the Edit area monitor
  • num* is the shortcut for the command "Set Unnumbered Marker"
  • Shift+num* is the shortcut for the command "Set Next Available Numbered Timeline Marker"
This Timeline marker feature exists in at least Premiere Elements 4, 7, 8.0/8.0.1, 9.0/9.0.1, 10, 11, and 12, and these default keyboard shortcuts can be seen in Edit Menu/Keyboard Customization/Application/Help and changed to something else for these particular commands. Such a change in these keyboard shortcuts to execute these particular commands might be indicated if the computer keyboard in use did not come with a numerical keyboard.

The start and stop of the playback of the Timeline content in the Edit area monitor is controlled by pressing the Play/Pause Toggle (Space) button just below the Edit area monitor or by pressing the computer keyboard space bar.

Sounds good, so far, but.....


ISSUE

Does it matter to the Timeline marker feature described if the running Timeline is started by
  • pressing on "Play/Pause Toggle (Space)" button (also known as just the Play button) just below the Edit area monitor 
or
  • pressing the computer keyboard space bar?  
A first impression answer would probably be No. However recently a Premiere Elements 12 user in one of the online forums observed that she was not able to place unnumbered markers to the running Timeline using the num* shortcut when the playback was started with the Edit area monitor's Play button instead of the computer keyboard space bar. This unexpected observation was explored in Premiere Elements 4 through 12 Windows and the results reported in this blog post.

SOLUTION

The answer to the ISSUE question regarding shortcuts and the setting of unnumbered and numbered Timeline markers  in the running Timeline

                 Does it matter if the running Timeline is started by
  • pressing on "Play/Pause Toggle (Space)" button (also known as just the Play button) just below the Edit area monitor 
or
  • pressing the computer keyboard space bar? 
is No for Premiere Elements 4 through 10, but Yes for Premiere Elements 11 and 12. In versions 11 and 12,  pressing the computer keyboard space bar to start the playback is the way to be able to use num* and Shift+num* to place unnumbered and numbered Timeline markers respectively on the running Timeline. The results were the same whether or not the default shortcut (num* or Shift+num*) was changed to something else to execute the command of "Set Unnumbered Marker" or "Set Next Available Numbered Timeline Marker".

DETAILS

The keyboard shortcuts num* and Shift+num* Do Not Work When Running Timeline Is Started For Playback In Edit Area Monitor By Pressing Monitor's Play Button, Instead of Computer Keyboard Space Bar

Applies to Premiere Elements 12 and 11

Timeline Content Running in Edit Area Monitor

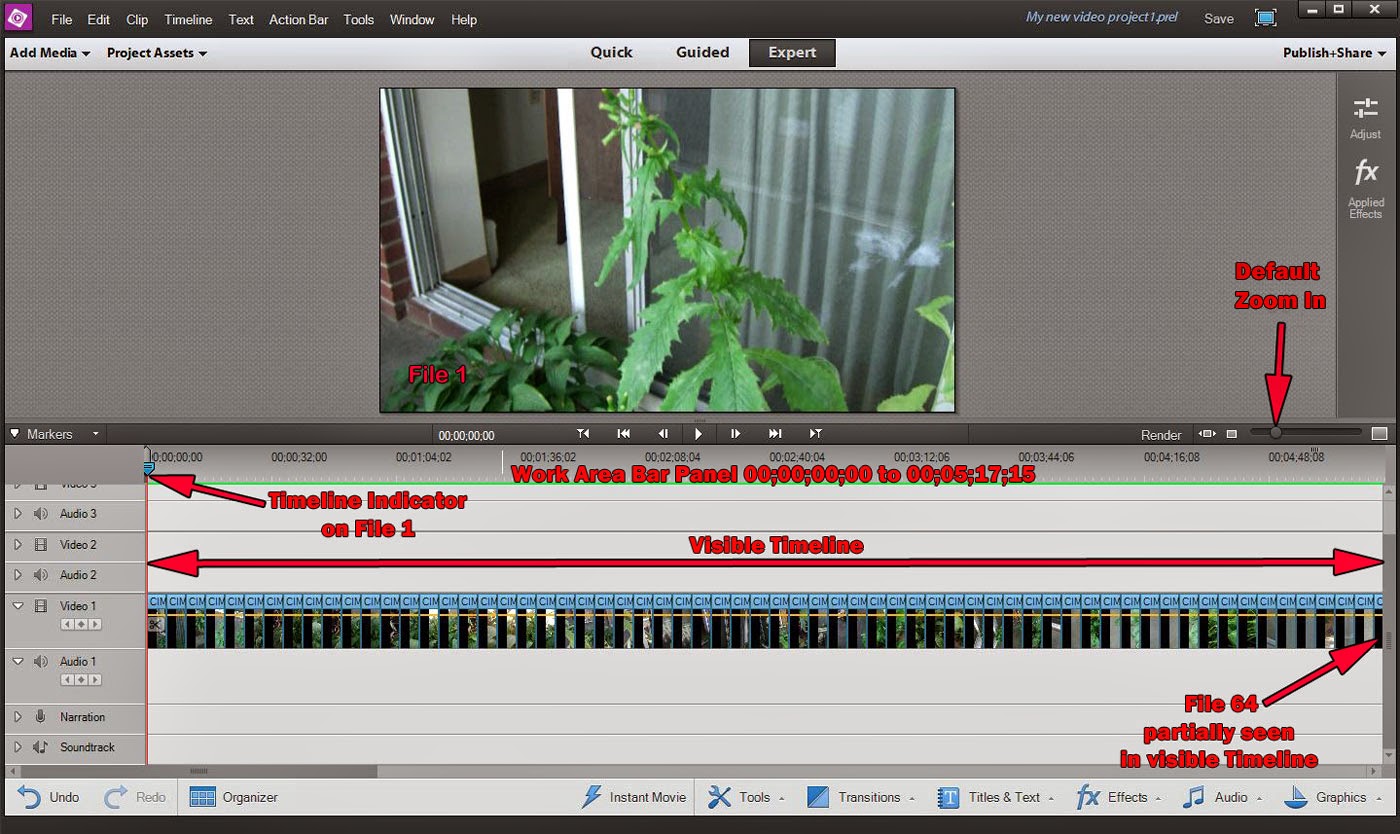
The computer keyboard shortcuts num* and Shift+num* only function to place unnumbered and numbered Timeline markers respectively on the running Timeline content when the Edit area monitor playback is initiated with the computer keyboard space bar. The unnumbered Timeline markers are solid blue tabs; the numbered Timeline markers are blue tabs, each with a sequential number (starting with 0) in its center. Note that they appear above the Timeline content, not in it.
See Figure 1 and compare to Figure 2.

Figure 1. Premiere Elements 12/12.1. num* And Shift+num* Used To Place Unnumbered And Numbered Markers In The Running Timeline Video Track 1 When The Edit Area Monitor Playback Was Started Using The Computer Keyboard Space Bar.


The list of numbered markers placed can be viewed in the "Go to Numbered Marker dialog" by right clicking the numbered marker on the Timeline or the Edit area monitor screen, selecting Go to Timeline Marker/Numbered/. There is no list available for the unnumbered markers placed.

File Selected In Timeline Running in Preview Window

There is a marked difference in the what goes on in the Preview Window in this regard. 
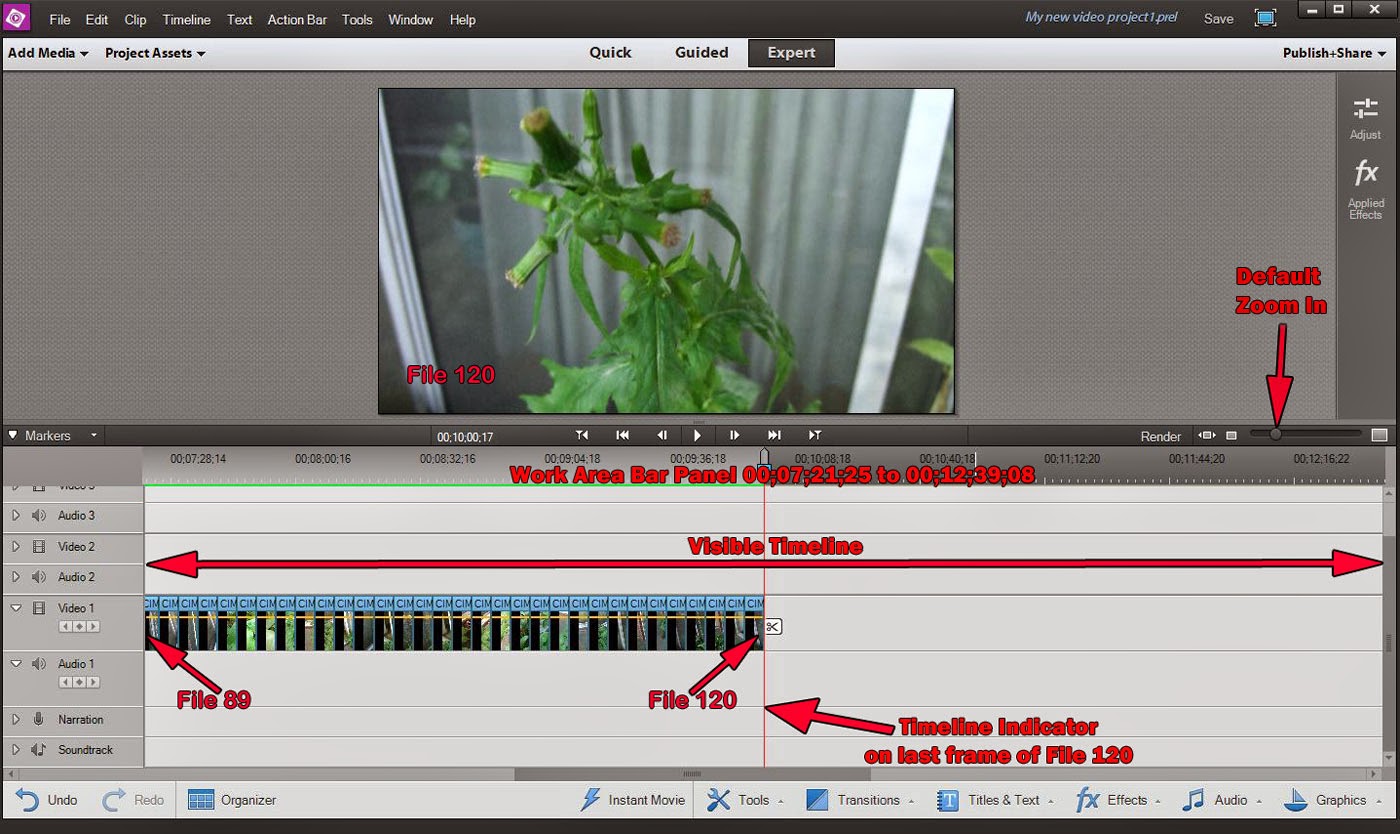
If a file on Video Track 1 is double clicked to select and open it in its Preview Window, computer keyboard shortcuts num* and Shift+num* function to place unnumbered and numbered markers respectively on the running content within the Preview Window whether the Preview Window playback was initiated with the Preview Window Play button or the computer keyboard space bar. The Preview Window markers are simultaneously copied to a corresponding location on the file in Video Track 1 in the Expert workspace. See Figure 2.

Figure 2. Premiere Elements 12/12.1. num* And Shift+num* Used To Place Unnumbered And Numbered Markers Within  The Running Preview Window File When The Preview Window Playback Was Started With the Preview Window Play Button Or Using The Computer Keyboard Space Bar.
Note: The unnumbered and numbered markers are not blue but gray in the Preview Windows and off white for their copies on Video Track 1 file. In spite of the look alike appearance of the Preview Window unnumbered and numbered markers, the numbered markers appear to be numbered markers based 
  • the Preview Window counterparts on Video Track 1 are numbered
  • if Preview Window numbered marker is right clicked, and Go to Clip Marker/Numbered selected from the menu that appears, then a Go To Numbered Marker dialog appears with a list of the numbered markers generated, including numbers, times, and comments associated with numbered markers. 
In Edit Menu/Keyboard Customization/Application/Help, the default keyboard shortcut num* is found for the command "Set Unnumbered Marker", and the default keyboard shortcut Shift+num* is found for the command "Set Next Available Numbered Timeline".


num* and Shift+num* Do Work When Running Timeline Is Started For Playback In Edit Area Monitor By Pressing Monitor's Play Button or using the Computer Keyboard Space Bar

Applies to Premiere Elements 10, 9.0/9.0.1, 8.0/8.0.1, 7, and 4

Other than that, the details given for Premiere Elements 11 and 12 above are the essentially the same with one or two minor exceptions.

In Premiere Elements 9.0/9.0.1 Preview Window, Go To Numbered Marker dialog could only be accessed by right clicking the Preview Window screen and not by right clicking one of the numbered markers in the Preview Window.

In Premiere Elements 9.0/9.0.1, 8.0/8.0.1, 7, and 4, but not 10, 11, and 12, there is a stop with the appearance of a Marker 0 dialog when the first (actually marked 0) numbered Timeline marker is applied to the running Timeline (Edit area monitor, not Preview Windows). To get beyond this point, it is necessary to fill in the dialog and click OK or just click OK. No stops are involved in the next sequential numbered markers applied.


COMMENTARY

This work all started to determine if it made a difference if PLAY button/Edit area monitor or space bar/computer keyboard was used to obtain a running Timeline for the setting of the unnumbered and numbered markers on Video Track 1 using shortcuts. The No and Yes answer evolved into many  other details, including Preview Windows comparisons. The essential findings are presented for consideration.

Also see

Premiere Elements/Working with clip and timeline markers
http://help.adobe.com/en_US/premiereelements/using/WS577D23E8-5A07-4ff8-A962-4A46F814AE6E.html

June 2013 Blog Post, PE: Forget Me Not Clip Details and Timeline Unnumbered Markers
http://www.atr935.blogspot.com/2013/06/pe11-forget-me-not-clip-details-and.html

________________________________________________________________________________

ATR


Wednesday, August 20, 2014

PE12/12.1: Pan and Zoom Tool and Video File

INTRODUCTION

The use of the Premiere Elements Pan and Zoom Tool has been described in several places, including

Adobe's "Premiere Elements/Pan and Zoom to create video-like effect"
http://help.adobe.com/en_US/premiereelements/using/WSeffff8bffc802084-494411db12fd35452dd-8000.html

May 2013 Blog Post, "PE11: Pan & Zoom Tool, More than One Photo at a Time"
http://www.atr935.blogspot.com/2013/05/pe11-pan-zoom-tool-more-than-one-photo.html

Typically the focus is on the pan and zoom effect applied to stills with this tool. But, as pointed out in the Adobe reference cited above, the tool can also be used to apply a pan and zoom effect to a video (with Adobe's qualifying statement for videos "..that have minimal movement of objects in the video".)

This blog post will detail the application of the pan and zoom effect to a video to demonstrate the principles involved.

ISSUE

Some of the details involved in applying the pan and zoom effect to a video are different than those used when a still is involved. And, this difference can often lead to confusion as to how the tool works with video. Consequently, it seemed a good idea to take the time to review the details of Premiere Elements Pan and Zoom Tool/Pan and Zoom Effect applied to video.


SOLUTION

The principles involved in applying the pan and zoom effect to a video will be explored step by step using Pan and Zoom Tool of Premiere Elements 12/12.1 Windows 7 Professional SP1 64 bit and a DV.AVI Standard video clip.

HOW TO

Preface

Given a 29.2 seconds DV.AVI standard video on the Expert workspace Timeline of a Premiere Elements 12/12.1 NTSC DV Standard project......The first frame of that video is as represented in Figure 1, and the last frame of that video is as represented in Figure 2. Figure 3 points to that video's frame for which a pan and zoom effect is wanted.

Figure 1. First Frame Of Timeline Video In Expert Workspace.

Figure 2. Last Frame Of Timeline Video In Expert Workspace.

Figure 3. Expert Workspace Timeline Video Frame For Which A Pan And Zoom Effect Is Wanted.

Whether or not the Timeline Indicator is on the Expert workspace Timeline video frame for which a pan and zoom effect is wanted (as shown in Figure 3), when the special Pan and Zoom workspace opens to the command of Tools Menu/Pan and Zoom, what presents in the special Pan and Zoom workspace is not the Expert workspace selected frame but instead
  • the screen displays the first frame of the video
  • the bin below the screen displays only two thumbnails, one for the first frame of the video (found highlighted in the bin) and the other for the last frame of the video. See Figure 4.
Figure 4. Special Pan And Zoom Workspace After Selecting Expert Worksapce Video Followed By Selection Of Tool Menu/Pan And Zoom Tool.
 This special Pan and Zoom Workspace with video source is characterized by
  • only one Focus Frame possible for every video frame in the video
  • no Hold option ("duration for which the focus stays on an object before panning comes into effect")
  • Pan option related to duration between Focus Frames (could not be reset by clicking on the on screen pan duration value or clicking/dragging Focus Frame markers in the Timeline which is represented by the blue horizontal bar below the screen.)
 Details

Apply Pan and Zoom Effect to Frame @ 00;00;18;11 of this video which has the duration of 00;00;29;06.
(Refer to Figure 3 for the video frame to which a pan and zoom effect is to be applied. See Demo 1 at the end of the STEPs to view the end result which represented 7 focus frames added between the first and last to achieve the pan and zoom effect.)

STEP 1
Highlight/select the Timeline video in the Expert workspace. Go to Tools Menu/Pan And Zoom to open the special Pan And Zoom Workspace.

STEP 2
In the special Pan and Zoom workspace (as shown in Figure 4), move the Timeline Indicator in the blue bar below the screen to the right to review the video frames between the first and last frame of the video.
Tip: If you decide to view the Timeline content using the Play/Pause Toggle to the left of the blue bar under the screen, remember to click "Exit Preview" before attempting to proceed with your pan and zoom effect activities.

Decide on the frames that will be involved in the overall pan and zoom effect. Then the basic plan is to add focus frames between the first and last that were seen when the Pan and Zoom Tool workspace opened.
  • move the Timeline Indicator to the first of the involved frames in the video
  • click on New Frame to generate a Focus Frame - remember, only one Focus Frame possible per video frame
  • position and size the Focus Frame accordingly
Then, move the Timeline Indicator in the blue bar below the screen to the next video frame involved, click on New Frame, position and size the Focus Frame accordingly. In this example, 7 Focus Frames were added between the first and last to achieve the pan and zoom effect as in the Demo video at the end of the STEPs.

Focus Frame 1

Focus Frame 2

Focus Frame 3

Focus Frame 4

Focus Frame 5

Focus Frame 6

Focus Frame 7

Focus Frame 8

STEP 3
Click Done in the special Pan and Zoom Workspace to return to the Expert workspace. Render the Timeline content to get the best possible preview of the playback of that Timeline content in the Edit area monitor.
Note: Unlike a still source, the duration of the panned and zoomed video in the Expert workspace is the same before and after the pan and zoom effect is applied with the Pan and Zoom Tool.
The end result is represented in the Demo 1 which is a wmv export of the Timeline's video to which a pan and zoom effect has been applied with the Pan and Zoom Tool.


       Demo 1. Result From Pan and Zoom Effect Application Described In This Blog Post


_____________________________________________________________________________

Work In Progress


ATR

Sunday, August 17, 2014

PE12/12.1: Timeline Playback Auto-Scrolling

INTRODUCTION

Premiere Elements 12/12.1  Timeline Playback Auto-Scrolling options are found* in preferences (Edit Menu/Preferences/General. See Figure 1).

Figure 1. Premiere Elements 12/12.1 Timeline Playback Auto-Scrolling Options:
 No Scroll, Page Scroll, And Smooth Scroll

The Adobe document titled  "Premiere Elements/Previewing Movies"describes these options
  • No Scroll. Does not scroll the Expert view Timeline
  • Page Scroll. Scrolls the visible section of the Timeline one page at a time
  • Smooth Scroll. Scrolls the Expert view Timeline while the Timeline Indicator (CTI) stays in the center of the visible timeline.

ISSUE

How do the Adobe descriptions of these Timeline Playback Auto-Scrolling options translate when they are actually used for the Premiere Elements project previewing? The Adobe document says
You can set an option to automatically scroll the Expert view timeline from right to left, when a sequence is larger than the visible timeline. This way you don’t have to zoom out to see the entire sequence.
It was found important to define
  •  just what the visible timeline is
  • when a sequence is larger than the visible timeline
  • visible section of the Timeline one page at a time
  •  
RESULTS

Preface

For a file on the project's Expert workspace Timeline to be displayed in the Edit area monitor at playback (previewing) , the Timeline Indicator must be on that file. At Timeline playback in the monitor, two possibilities exist
  • from left to right, the Timeline Indicator goes to each of the Timeline files to be previewed 
  • from right to left, the Timeline files are passed by the Timeline Indicator which is at a fixed position at the center of the visible timeline
The choice of Timeline Playback Auto-Scrolling Options determines which will be the case.

The visible timeline can be controlled by the zoom out/zoom in slider setting above the Timeline. It seems to have a default zoom in** setting independent of the project preset. With this default zoom in setting in effect, the Work Area Bar panel displays timecodes 00;00;00;00 to 00;05;17;15***. Also see footnote ****.


Timeline Playback Auto-Scrolling Options

No Scroll

If there are 120 photos with 5 seconds duration**** imported into a NTSC AVCHD Full HD 1080i30 project, only 63.5 files will fit into the Expert workspace visible timeline over which is the Work Area Bar panel with timecodes ranging from  00;00;00;00 to 00;05;17;15***. See Figure 1.


Figure 1. Basic Expert Workspace Setup For Timeline Playback Auto-Scrolling Options Evaluation.

When the monitor play button or the computer keyboard space bar is pressed, the Timeline Indicator will move from left to right, from the Timeline start 00;00;00;00 to each of the first 64 files that fill the visible timeline, each file displaying sequentially in the monitor as the Timeline Indicator is on each file.

When the Timeline Indicator reaches the end (00;05;17;15) of the visible timeline and is displaying in the Edit area monitor the 64th file at the end of the visible timeline...
  • The same Work Area Bar 00;00;00;00 to 00;05;17;15 panel remains in place
  • The visible timeline remains in place, shown with the Timeline's first 63.5 files filling the visible Video Track 1.
  • However the Timeline Indicator continues to move unseen from left to right, and it and the remaining files are not seen as the Timeline Indicator continues to go (left to right) to file 65 and each of the remaining files sequentially, causing each to display in sequence in the Edit area monitor
  • Important...In the transition from visible timeline to hidden Timeline Indicator and files, the sequence of the files displaying in the Edit area monitor playback of the Timeline files continues to be sequential, file 64 at the end of the visible timeline and file 65 at the beginning of the hidden section.
When the hidden Timeline Indicator gets to the end of the hidden Timeline files (File 120)...
  • The Work Area Bar panel suddenly changes to one with timecodes ranging from 00;07;21;25 to 00;12;39;08***.
  • The visible timeline suddenly changes, showing Video Track 1 starting with and consisting of the last 31.75 files in the 120 series instead of the first 63.5 files of the 120 series as had been the case all along from File 1 to until the hidden Timeline Indicator finished with hidden File 120.
  • The Timeline Indicator is now suddenly in sight at rest at the end of the last frame of the File 120 @ 00;10;00;17 on a visible timeline.

Refer to Figure 2.

Figure 2. No Scroll. When The Hidden Timeline Indicator Gets To The End Of The Hidden Timeline Files (File 120).

The visible timeline involved here is not affected by the placement of the WorkArea Bar gray tabs if the Timeline playback (previewing) is initiated with the computer main keyboard space bar or the Edit area monitor Play button and not the Enter key of the computer main keyboard.

Page Scroll

The beginning scenario described above for No Scroll (See Figure 1) is the same for the Page Scroll choice, that is,

If there are 120 photos with 5 seconds duration imported into a NTSC AVCHD Full HD 1080i30 project, only 63.5 files will fit into the visible timeline over which is the Work Area Bar panel with timecodes ranging from 00;00;00;00 to 00;05;17;15***.

When the monitor play button or the computer main keyboard space bar is pressed, the Timeline Indicator moves from left to right, from the Timeline start 00;00;00;00 toward each of the first 63.5 files that fill the visible timeline, each file displaying sequentially in the monitor when the Timeline Indicator is on the file.

But, when the Timeline Indicator reaches the mid point of the File 61 (about 00;05;03;00) of that 00;00;00;00 to 00;05;17;15 visible timeline, then what happens next differs from what happens if No Scroll were the choice.

With the Page Scroll option in effect, when the Timeline Indicator reaches the mid point of the File 61 (about 00;05;03;00) of the visible timeline and File 61 is displaying in the Edit area monitor, then......
  • The Work Area Bar Panel changes/advances to a new one, displaying timecodes 00;04;45;02 to 00;10;04;21***. It is assumed that this new Work Area Bar panel in this case would be referred to by Adobe as a page, page 2?
  • The visible timeline changes from consisting of Video Track 1 with Files 1 to 63.5 to one consisting of Video Track 1 starting with and consisting of Files 58, 59, 60, 61, 62, 63, 64, and so on to File 120.
    • The Timeline Indicator goes from being on beginning half of File 61 on the visible timeline 00;00;00;00 to 00;05;17;15 to being on second half of File 61 on the visible timeline 00;04;45;02 to 00;10;04;21 as the Edit area monitor displays sequentially the end of File 61, File 62, File 63, File 64 and so on until.....

    When the Timeline Indicator reaches the middle of the File 118 (at about 00;09;48;15) on the visible timeline (00;04;45;02 to 00;10;04;21)  and the beginning half of File 118 is displaying in the Edit area monitor, then.......
    • The Work Area Bar Panel changes/advances to a new one in spite of the fact that the visible timeline (00;04;45;02 to 00;10;04;21) is not full of files in this case. This new Work Area Bar panel timecodes range is 00;09;30;06 to 00;14;50;01***.
    • The visible timeline changes from consisting of Video Track 1 with Files 58 to 120 to one consisting of Video Track 1 starting with and consisting of Files 115, 116, 117. 118, 119, 120.
    • The Timeline Indicator goes from being on beginning half of File 118 on the visible timeline 00;04;45;02 to 00;10;04;21 to being on the second half of File 118 on the visible timeline 00;09;30;06 to 00;14;50;01 as the Edit area monitor displays sequentially the end of File 118, and then File 119 and File 120.
    The Page Scroll behavior was the same if done with Display Format 30 fps Drop-Frame Timecode or 30 fps Non-Drop-frame Timecode.

    Smooth Scroll 

    Smooth Scroll scenario begins like that of No Scroll and Page Scroll initially...See Figure 1.
    If there are 120 photos with 5 seconds duration imported into a NTSC AVCHD Full HD 1080i30 project, only 63.5 files will fit into the visible timeline over which is the Work Area Bar panel with timecodes ranging from  00;00;00;00 to 00;05;17;15***.
    But, when the Timeline Indicator, moving left to right, reaches the center of the visible timeline, the Timeline Indicator stops and becomes fixed at the center of the visible timeline, and the Work Area Bar Panel (with timecodes with progressively greater times) and the Timeline Video Track 1 with its files move right to left.

    Consequently, from about the Timeline File 32 until the last file 120, the Timeline files are going to the Timeline Indicator rather than the Timeline Indicator going to the files.

    The display of the files in the monitor is always in sequence from File 1 to 120.

    The curious part of this option is that Smooth Scroll does not appear to require that the visible timeline be filled with files in order to work as it does. The Scroll Smooth behavior is also seen when "Fit to Visible Timeline" is applied to the Timeline content of 120 files so that there are 120 files plus free space in the visible timeline instead of just the first 63.5 files of 120 filling the visible timeline. The prerequisite for this seems to be that the files extend to just beyond the center of the visible timeline. Because of this observation, the visible timeline is being defined in this blog post as shown in Figures 1 and 2.*****

    COMMENTARY

    In a given project, changes in the zoom out and zoom in default and manual movements in the scroll process cause differences in the details, but not in the principles, cited above for the actions of the No Scroll, Page Scroll, and Smooth Scroll Timeline Playback Auto-Scrolling options.

    Trying to quantify the zoom out and zoom in slider is a work in progress.

    In is interesting to note that Page Scroll appears to be the default Timeline Playback Auto-Scrolling option for Premiere Elements 12/12.1, 11, 10, and 9.0/9.0.1, but Smooth Scroll appears to be the default Timeline Playback Auto-Scrolling option for Premiere Elements 8, 7, and 4.


    _______________________________________________________________________________
     *No Scroll, Page Scroll, and Smooth Scroll are also found as the Timeline Playback Auto-Scrolling options in Edit Menu/Preferences/General of Premiere Elements 4, 7, 8.0/8.0.1, 9.0/9.0.1, 10, and 11. At this time, these options were looked at in depth only with Premiere Elements 12/12.1 but are expected to behave fundamentally the same in version 4 through 12/12.1.

    ** In Premiere Elements 12/12.1, the zoom out and zoom in slider has 11 different positions going from left to right or right ot left.  The position can be set by clicking on the zoom out or zoom in icon at the left or right respectively of the slider. The version 12/12.1 default zoom in appears to be 2 clicks to the right of the maximum zoom out icon.

    In version 11, the slider has 11 positions, but the default zoom in appears to be 1 click to the right of the maximum zoom out icon.

    In versions 4, 7, 8.0/8.0.1, 9.0/9.0.1, and 10, the slider has 10 positions with a default zoom in as 1 click to the right of the maximum zoom out icon.

    ***Work Area Bar panel timecode range for the visible timeline was visually estimated based on existing Adobe Work Area Bar Panel timecodes that Adobe had printed on the Work Area Bar panel.

    ****If the 120 photos were imported with a Still Image Default Duration of 10 seconds instead of 5, the project zoom in default setting and its associated Work Area Bar panel range would remain the same for 10 seconds photos as for 5 seconds ones, but the number of photos that would fill the visible timeline would be 31.75 (with 10 seconds photo duration) instead of 63.5 (with 5 seconds photo duration).

    *****Example: If this Smooth Scroll evaluation was done with 46 jpg photos, the Timeline Indicator would stop at the center 00;02;38;23 of the Timeline range 0 to 00;05;17;15 which is representing the "visible timeline" and on File 32, not 23 which would be 1/2 of the visible files on that Timeline.


    ATR


    Tuesday, August 5, 2014

    PE12: Project Preset with 21:9 Display Aspect Ratio

    INTRODUCTION

    Question came up as to how video recorded with a 21:9 display aspect ratio could be imported, edited and exported in Premiere Elements 12 without black borders.

    ISSUE

    All the project presets in Premiere Elements are either 4:3 or 16:9. Could a user custom project preset be created for this situation, and what export opportunities for a 21:9 video existed if a user custom project preset could be created for the 21:9 video import into Premiere Elements 12?

    SOLUTION

    A project preset for 1920 x 822 (21:9) @ 29.97 progressive frames per second was obtained by editing the Notepad document of the Premiere Elements 12 "DSLR 1080p30@29.97.sqpreset" file.

    An AVCHD.mp4 1920 x 822 (21:9) @ 29.97 progressive frames per second file was created from the edited Timeline content after customizing the Advanced export settings for Publish+Share/Computer/AVCHD with Presets = MP4 H.264 1920 x 1080p30.


    HOW TO 

    Creation of User Custom Project Preset For 21:9 Video (1920 x 822 @ 29.97 progressive Frames Per Second)

    1. Locate and copy to the computer desktop the DSLR 1080p30 @ 29.97.sqpreset file found in the Windows 7, 8, or 8.1 64 bit path
    Local Disk C
    Program Files
    Adobe Premiere Elements 12
    Settings
    SequencePresets
    NTSC
    DSLR
    1080p
    and in the 1080p Folder is the DSLR 1080p30 @ 29.97.sqpreset file.

    Rename the DSLR 1080p30 @ 29.97.sqpreset file so that the file name is now
    DSLR 822p30 @ 29.97.sqpreset file.

    2. At the computer desktop level, right click the .sqpreset file pasted and renamed there, select Open With, and then select Notepad.

    3. In the Notepad document there are only two places that need to be changed. The first at the top of the Notepad document, change

    From : 
    <PreviewVideoFrameSize>0,0,1920,1080</PreviewVideoFrameSize>
    To:
    <PreviewVideoFrameSize>0,0,1920,822</PreviewVideoFrameSize>

    and at the bottom of the Notepad document, change

    From:

    <VideoFrameSize>0,0,1920,1080</VideoFrameSize>
    To:
    <VideoFrameSize>0,0,1920,822</VideoFrameSize>

    Then save the edited Notepad document, using specifically File Menu/Save.

    4. Go to
    Local Disk C
    Program Files
    Adobe Premiere Elements 12
    Settings
    SequencePresets
    NTSC
    DSLR
    and in the DSLR Folder create a empty 822p Folder.
    In the 822p Folder, place the user customized project preset that was just created for the 21:9 video (1920 x 822 @ 29.97 progressive frames per second.)

    5. Set the Premiere Elements 12 project preset manually to the newly customized project preset, according in the How To near the bottom of the following blog post.
    http://www.atr935.blogspot.com/2013/04/pe11-accuracy-of-automatic-project.html

    Then import your 21:9 1920 x 822 source video into Premiere Elements 12/12.1 with Premiere Elements 12/12.1's Add Media/Files and Folder/Project Assets from where you drag the video to the Expert workspace Timeline.

    6. After edit of the Timeline content, export it using Advanced export settings based on Publish+Share/Computer/AVCHD/ with Presets = MP4 H.264 1920 x 1080p30. Customization of the preset is done under the Advanced Button/Video Tab and export settings are as seen the Figure 1.

    Figure 1. Premiere Elements 12/12.1 Publish+Share/Computer/AVCHD With Presets = MP4 H.264 1920 x 1080p30 Advanced Customized Settings For 1920 x 822 p30 Export As AVCHD.Mp4 File


    COMMENTARY

    Preliminary studies indicate that a 2560 x 1080 (21:9) could also be imported into a Premiere Elements 12/12.1 using the 822p custom project preset created. With Default Scale to Frame Size in effect, the 2560 x 1080 would be scaled automatically to the 1920 x 822 space in the Edit area monitor established by the project preset. And, export of the 2560 x 1080 21:9 Timeline to 1920 x 822 (21:9) does work.

    The above blog post content is the extent of looking into 21:9 project presets for Premiere Elements 12/12.1 or other.

    Work in Progress.

    ___________________________________________________________________________

    ATR