Sunday, November 17, 2013

PE11 and 12: Christmas Disc Main Menu Audio Limit

INTRODUCTION

The story starts with the Adobe disc menu Holiday and Events/Christmas which comes with a main menu falling snow video background and no audio for the main menu and scene menu.

Disc main menu background adjustments include replacement with video background and/or addition or replacement with audio. These adjustments are characterized by a maximum 30 second duration, looping.

Today a Premiere Elements 12 user found that the Holidays and Events/Christmas menu was limiting the audio addition to 13.4 seconds and not the expected 30 seconds. See Figure 1.

Figure 1. Premiere Elements 11 NTSC AVCHD Full HD 1080i30 Project. Theme Holidays and Events/Christmas (HD Version) Appearance In Movie Menu Workspace After Selection Of Menu In Movie Menu Display Area.

Why? A bug in the menu? A bug in Premiere Elements 12 disc menus? Neither.

The matter goes to the fact that the Christmas menu was designed with a video background (falling snow) whose file duration defines what you get in Movie Menu customization area within the opened project. Basically how this works, the main menu .psd file is created with a still in the Background Layer Set. In the same theme folder as the .psd file is included the video background file. In this case .mpg file. In the project, this .mpg video overrides the still in the .psd's Background Layer Set and becomes the main menu video background. This mpg video duration impacts the audio background duration as well as the video background duration.

ISSUE

The issue becomes what to do if you want to get 30 seconds looping audio in the Christmas menu?

SOLUTION

The solutions to the ISSUE stated above can include:

  • Replacing the video background in the Movie Menu section with a still and then doing the audio addition
  • Taking the Christmas theme folder's .mpg video files into Premiere Elements and editing their duration from 13.4 seconds to 30 seconds and then putting them back into the Christmas theme folder
  • Going into the Christmas theme folder, removing the Adobe's .mpg video background files and then replacing them with 30 seconds .mpg files of your own, with strict adherence to the file naming requirements
  • In the Movie Menu workspace, going to the Video or Still Video Background replacement area, and browsing to and applying your own video with duration of 30 seconds. Then the audio addition is done, resulting in the 30 seconds audio duration, looping.

HOW TO*

The focus will be on
Taking the Christmas theme folder's .mpg video background files into Premiere Elements and editing their duration from 13.4 seconds to 30 seconds and then putting them back into the Christmas theme folder
The 3 Adobe files involved are
  • christmas_s_mm_bg.m1v  (main menu, standard project 4:3)
  • christmas_w_mm_bg.mpg (main menu, standard widescreen project 16:9)
  • christmas_hd_mm_bg.mpg (main menu, high definition project 16:9)
The Windows 7, 8, and 8.1 64 bit path to these files can be found in the path:
Local Disc C
Program Files
Adobe
Premiere Elements
12.0
Online
DVD Templates
All_Lang
Holiday and Events
(V) Christmas


 Editing Scheme**

 christmas_s_mm_bg.m1v

STEP 1
Import into Premiere Elements 11 PAL DV Standard Project

STEP 2
Right click video on Timeline, select Time Stretch, and, in Time Stretch dialog, set duration for 00;00;29;29. (29 seconds and 29 frames, essentially 30 seconds)
.
STEP 3
Export Timeline content and save it to Desktop. For export, use Publish+Share/Computer/MPEG/preset = PAL DV Standard

STEP 4
Rename file to give file name = christmas_s_mm_bg.mpg

christmas_w_mm_bg.mpg

STEP1
Import into Premiere Elements 11 PAL DV Widescreen Project

STEP 2
Right click video on Timeline, select Time Stretch, and, in Time Stretch dialog, set duration for 00;00;29;29. (29 seconds and 29 frames, essentially 30 seconds)

STEP 3
Export Timeline content and save it to Desktop. For export, use Publish+Share/Computer/MPEG/preset = PAL DV Widescreen

STEP 4
Rename file to give file name = christmas_w_mm_bg.mpg

christmas_hd_mm_bg.mpg

STEP 1
Import into Premiere Elements 11 PAL DSLR 1080p DSLR 1080p25 project

STEP 2
Right click video on Timeline, select Time Stretch, and, in Time Stretch dialog, set duration for 00;00;29;29. (29 seconds and 29 frames, essentially 30 seconds)

STEP 3
Export Timeline content and save it to Desktop. For export, use Publish_Share/Computer/MPEG/preset = HDTV 1080p25 High Quality

STEP 4
Rename file to give file name = christmas_hd_mm_bg.mpg

Non Destructive Approach***

If you wanted to leave the Adobe Christmas theme as is and use the above variations when necessary, then the following plan might be a consideration, working with copies.

STEP 1
Create a master folder named Special Menus

STEP 2
Create a folder named schristmas and place in it 
  • christmas_s_mm_bg.mpg (video file) with its 30 seconds duration
  • christmas_s_mm.psd (main menu .psd file)
  • christmas_s_sm.psd (scene menu .psd file)
Then place the schristmas folder in the Special Menus Folder

STEP 3
Create a folder named wchristmas and place in it
  • christmas_w_mm_bg.mpg (video file) with its 30 seconds duration
  • christmas_w_mm.psd (main Menu .psd file)
  • christmas_w_sm.psd (scene Menu .psd file)
Then place the wchristmas folder in the Special Menus Folder

STEP 4
Create a folder named hdchristmas and place in it
  • christmas_hd_mm_bg.mpg (video file) with its 30 seconds duration
  • christmas_hd_mm.psd (main menu .psd file)
  • christmas_hd_sm.psd (scene menu.psd file) 
Then place the hdchristmas folder in the Special Menus Folder

STEP 5
Take the Special Menus Folder (now containing the 3 subfolders) and place it in the Common Folder in the Windows 7, 8, 8.1 64 bit path
Local Disk C
Program Files
Adobe
Adobe Premiere Elements 11
DVD Templates
Common

Then when you want to use the Christmas theme menu with this perk to extend its built in video and audio backgrounds, just select the one wanted Tools/Movie Menu/Special Menus Folder within the opened project.

_______________________________________________________________________________

* The look at the Christmas disc menu theme was done with Premiere Elements 11 on Windows 7 Professional SP1 64 bit. Note that Christmas results apply to Premiere Elements 11 and 12 on Windows 7, 8, or 8.1 64 bit. The principles involved would be expected to be applicable to any of the Adobe disc menus that use this video background concept. Access to Holiday and Events/Christmas in Premiere Elements 10 probably no longer exists since it is "plus members only" for the discontinued photoshop.com.

**These export settings are used whether on NTSC or PAL setup.

***I took the "Non Destructive Approach" in the final test runs of the blog content.


September 03, 2014 Add On
Also see blog post
PE: Disc Menu Folders/Files Locations
http://atr935.blogspot.com/2014/09/pe-disc-menu-foldersfiles-locations.html


ATR

Tuesday, November 12, 2013

PE: Menu Marker Limitation/Implementation Update

INTRODUCTION

First, the good news. Premiere Elements 12 now allows for the use of 99 Timeline menu markers in its project in contrast to Premiere Elements 11, 10, and 9.0/9.0.1 which each have a 25 Timeline menu marker limit. This is confirmed at the Timeline level as well as in the play back of disc to which the menu has been applied.


Back in the April 2013 blog post "PE11: Menu Marker Limit Implementation Problem", it was found that Premiere Elements 11 has the same 25 menu marker limit that versions 10 and 9 have, but, unlike 10 and 9, does not give a pop up with regard to that limitation when the user tries to create the 26th menu marker. And, in that study, that pop up did not appear even when the 75th menu marker was placed in Premiere Elements 11. Under those circumstances, no attempt was made to place more than 75.

In preparing an update blog post on the Premiere Elements Menu Marker limitation and implementation using 110 stills as part of the test protocol, it was discovered that the 25 limit pop up does appear in Premiere Elements 11 but when the user attempts to place the 100th menu marker.

ISSUE

Need for verification and clarification is indicated for version to version
  • menu marker limit
  • pop up menu marker limit warning dialog, the timing of its appearance and the accuracy of its message
SOLUTION
An exploration mission of the ISSUE was carried out with Premiere Elements 4, 7, 8.0/8.0.1, 9.0/9.0.1, 10, 11, and 12 on Windows 7 Professional SP1 64 bit. In each case 110 stills were placed on the Timeline and scene markers placed at the beginning of each as far as could be done.

RESULTS

Premiere Elements 12
99 Timeline menu markers usable
Menu Marker Limit Pop Up appeared at attempt to place the 100th marker...could go no further.
However, the warning message was in error, citing a 25, not 99, menu marker limit.

Figure 1. Premiere Elements 12. Menu Marker Pop Up At Attempt To Place 100TH Menu Marker.

The 99 menu marker limit* was confirmed at the Timeline level and at play back of disc to which the menu was applied. It was suspected that someone had forgotten to up date this pop up going from version 11 to 12.

Premiere Elements 11
25 Timeline menu markers usable
Menu Marker Limit Pop Up appeared only at attempt to place the 100th marker...could go no further.
The Menu Marker Limit Pop Up message appeared as represented in Figure 1 for Premiere Elements 12. Earlier studies missed this Premiere Elements 11 Pop Up because attempted placements of menu markers did not exceed 75. Stopping at 75 at that time seemed justified since placement of menu marker 26 through 75 resulted in 25 Timeline menu markers actually useable.

Premiere Elements 10
25 Timeline menu markers usable
Menu Marker Limit Pop Up appeared at attempted placement of the 26th menu marker...could go no further.

Figure 2. Premiere Elements 10. Menu Marker Pop Up At Attempt To Place 26TH Menu Marker.

Premiere Elements 9.0/9.0.1
25 Timeline menu markers usable
Menu Marker Limit Pop Up appeared at attempted placement of the 26th menu marker...could go no further.

The Menu Marker Pop Up message appeared as represented in Figure 2 for Premiere Elements 10.

Premiere Elements 8.0/8.0.1
98 Timeline menu markers usable
No Menu Marker Limit Pop Up, 110 menu markers actually placed

Premiere Elements 7
98 Timeline menu markers usable
No Menu Marker Limit Pop Up, 110 menu markers actually placed

Premiere Elements 4
98 Timeline menu markers usable
No Menu Marker Limit Pop Up, 110 menu markers actually placed


_____________________________________________________________________________
* DVD Template was used with 6 scenes per Scene Selection page.
  • Premiere Elements 12. 16 Scene Selection pages with 6 scenes each page + 1 Scene Selection page with 3 scenes. 99 scenes total.
  • Premiere Elements 11. 4 Scene Selection pages with 6 scenes each page + 1 Scene Selection page with 1 scene. 25 scenes total.
  • Premiere Elements 10. Same as 11.
  • Premiere Elements 9.0/9.0.1. Same as 11.
  • Premiere Elements 8.0/8.0.1, 7, and 4. 16 Scene Selection pages with 6 scenes each page + 1 Scene Selection page with 2 scenes. 98 scenes total.

Wednesday, November 6, 2013

PE12: Preview Window "Play In to Out"

INTRODUCTION

The question was asked "After I trim a video clip in the Preview Window using the Set In and Set Out points there, how can I play back just the trim, not the whole clip, in the Preview Window when I click the Preview Window's Play button?"

This was looked at*
  • Preview Window opened by double clicking the file thumbnail in Project Assets
  • Preview Window opened by double clicking the Timeline file
The answer appeared to be "no can do" for either case above. It should be mentioned that the trim on the Timeline did display just the trim at playback in the Edit Mode monitor.

Then the idea popped up "What about hidden route to attain the goal?" An example of this type of thinking can be found in the September, 2013 blog post on Slip and Slide Edits which have no tools in the Premiere Elements workspace, but can be made to function in the Premiere Elements workspace via keyboard shortcuts.

ISSUE

"After I trim a video clip in the Preview Window using the Set In and Set Out points there, how can I play back just the trim, not the whole clip, in the Preview Window when I click the Preview Window's Play button?"

SOLUTION

The solution to the stated ISSUE came via the Premiere Elements keyboard shortcuts. (See the September 2013 blog post on keyboard shortcuts for fuller details on customization of Premiere Elements keyboard shortcuts.)

There under the Premiere Elements 12 Expert workspace Edit Menu/Keyboard Customization/Application catagory/Help subcatagory was the "Play In to Out" command with no assigned keyboard shortcut.

Figure 1. Premiere Elements 12. Keyboard Customization/Application/Help/"Play In To Out" Command (Circled In Red To Point Out the Location)
.
It was just a matter of

First.....Assigning a keyboard shortcut (in this example W) to the command "Play In to Out"
(Took the  W from the "Go To Out Point" command which was not going to be used)
Second.....Hitting the computer keyboard's W in the Premiere Elements 12 Expert workspace instead of the Preview Window play button in order to get play back of just the trim created in the opened Preview Window with its Set In and Set Out points.

HOW TO

STEP 1
At the onset the "Play In to Out" panel has a gray background and no keyboard shortcut at the far right of the panel. If the left side of the panel is left mouse clicked once, the whole panel turns blue. If the right side of the panel is left mouse clicked once, the left side of the panel is blue, but the right is a gray area where the keyboard shortcut can be typed in using the computer keyboard key(s). So,
  • click the right side of the "Play In to Out" panel to obtain the gray keyboard shortcut field where the keyboard shortcut is to be typed in
  • with the keyboard keys, type, in this case, W. Figure 2 represents what you would expect to see after the W is entered.
Figure 2. Premiere Elements 12. Keyboard Customization Of "Play In To Out". View After W Is Typed For Command of "Play In To Out".

STEP 2
Click on the Save As button in the Keyboard Customization dialog to bring up the "Name Key Set" dialog. In the "Name Key Set" dialog, assign a "Key set name" for the "Play In To Out" command with the keyboard shortcut W. Click Save in the "Name Key Set" dialog when finished. Then click OK to the Keyboard Customization dialog.

Figure 3. Premiere Elements 12. Naming And Saving of Keyboard Shortcut W For Command "Play In To Out".


STEP 3. The Keyboard Shortcut W for Command "Play In To Out" is ready for use in the Premiere Elements 12 Expert workspace. Whenever you trim a clip in the the Premiere Window and want to play back just the trim there, press keyboard key W instead of Preview Window play button.

____________________________________________________________________________
* Work was done with Premiere Elements 12 running on Windows 7 Professional SP1 64 bit. In principle it should be applicable to other versions of Premiere Elements.


ATR


Monday, November 4, 2013

PE10: Changing Project Preset Without Starting A New Project Revisited

INTRODUCTION

A question has been asked by a Premiere Elements 10 Windows user "How can I change the Premiere Elements 10 Windows project preset from NTSC DSLR 480p60 to NTSC DSLR 1080p24 after the DSLR 480p60 project preset has been set?" See project preset descriptions in new project dialog/Change Settings as shown in Figure 1 and Figure 2.

Originally Set

Figure 1. Premiere Elements 10 Windows 7 Professional SP1 64 Bit. New Project Dialog. Selection Of Original Project Preset NTSC/DSLR/480p/DSLR 480p60.

Should Have Set

Figure 2. Premiere Elements 10 Windows 7 Professional SP1 64 Bit. New Project Dialog. The Project Preset Wanted NTSC/DSLR/1080p/DSLR 1080p24.

The May 2013 blog post "PE11: Changing Project Settings Without Starting A New Project" demonstrated the principles for doing this for Premiere Elements 11 PAL AVCHD Full 1080i25 to PAL DV Widescreen. Although the principles for doing this type of change are applicable to other versions, certain details will differ depending on the circumstances.

So the following will detail the specifics for changing the Premiere Elements 10 project settings without starting a new project so that the project settings reflex 1080p24 instead of 480p60.
In many instances, just starting a new project may be the best choice. But the details are presented for the reader to decide whether it is in his/her best interests to start a new project or to edit the Notepad document of the saved/closed 480p60 project.

ISSUE

"How can I change the Premiere Elements 10 Windows project preset from NTSC DSLR 480p60 to NTSC DSLR 1080p24 after the DSLR-480p60 project preset has been set?"

SOLUTION

The answer to the ISSUE question is found in editing the Notepad document of the DSLR 480p60 saved/closed project file (project.prel) so that it reflects key properties of a DSLR 1080p24 project when the project is reopened.

HOW TO

STEP 1
Save/close the DSLR 480p60 project.

STEP2
Go to the save location of the DSLR 480p60 project file (project.prel), right click it, select Open With, followed by Notepad.

STEP 3
In the Notepad document, go to Edit Menu/Find. In the Find dialog's "Find What" field, type in FrameRect. And, using the dialog's "Find Next", go through the entire Notepad document changing all and only

<FrameRect>0,0,640,480</FrameRect>

to

<FrameRect>0,0,1920,1080</FrameRect> 


Save the changes (Notepad File Menu/Save).

IMPORTANT: Do not change any <FrameRect> unless 00,00,640,480 is shown. Ignore any other FrameRec that has other data.

When finished with FrameRect, then in the Find dialog's "Find What" field, type in FrameRate. And, using the dialog's "Find Next", go through the entire Notepad document changing all and only


<FrameRate>4237833600</FrameRate>

to
 
 <FrameRate>10594584000</FrameRate>


Save the changes (File Menu/Save) 

IMPORTANT: Do not change any <FrameRate> unless 4237833600 is shown. Ignore any other FrameRate that has other data.

STEP 4

That is it. The before and after project settings as in Premiere Element 10 Edit Menu/Project Settings/General should reflect the project settings changes from 480p60 to 1080p24 as represented in Figure 3 and 4.

Project Settings - BEFORE - 480p60

Figure 3. Premiere Elements 10. Windows 7 Professional SP1 64 bit. The 480p Project Settings Before Its Notepad Document Editing.

Project Settings - AFTER - 1080p24


Figure 4. Premiere Elements 10. Windows 7 Professional SP1 64 Bit. The 1080p24 Project Settings After Notepad Document Editing Of The 480p60 Project.Prel.

_______________________________________________________________________________

ATR

Friday, November 1, 2013

PE12: Disc Image/Phantom Burner & PE

INTRODUCTION

Premiere Elements* offers a burn to folder option as well as burn to disc for DVD and AVCHD, but offers only burn to disc for Blu-ray. So, there are those of us who have sought a substitute for the non existent burn to folder for Premiere Elements Blu-ray as well as a way to create a disc image for DVD, AVCHD, and Blu-ray. For many, the answer to this situation has come from the use of the virtual DVD/BD burner (Phantom Burner) with a virtual disc (DVD+RW or BD-RE) in conjunction with Premiere Elements "burn to" to create the disc image in .VDD or .ISO format.

After installing the Phantom Burner software, it becomes available as a separate computer drive which is recognized by Premiere Elements burn dialog in the burner location field. Typically the resulting disc image (.VDD or .ISO) is taken to disc with 3rd party software such as ImgBurn to give the DVD-VIDEO on DVD disc, AVCHD on DVD disc, or the Blu-ray disc format on Blu-ray disc. In addition, it was discovered that certain possibilities exist for importing the disc image into a Premiere Elements project by mounting it in the Phantom Burner drive and then importing it into Premiere Elements 12 using the Premiere Elements Add Media/"DVD camera or computer drive"/Video Importer (Source field set to Phantom Burner drive). This path results in VOB (in case of DVD disc image .VDD or .ISO) or .m2ts (in case of AVCHD or Blu-ray disc image .VDD) in Project Assets as well as on the Timeline.

Interestingly, some Premiere Elements 11 Editor (Mac Only) product information seems to show that there is a burn to "ISO Image" choice in the Publish+Share/Disc/DVD choices in that particular version of Premiere Elements. That is another story for another time. Focus in this blog post will be on the Premiere Elements Windows side of the matter. The concepts will be demonstrated using Premiere Elements 12 on Windows 7 Professional SP1 64 bit, but, in principle, are applicable to earlier versions of Premiere Elements.

ISSUE

How to create DVD-VIDEO/DVD, AVCHD/DVD, and Blu-ray/Blu-ray disc images using Premiere Elements and the virtual Phantom Burner with a virtual DVD+RW or BD-RE disc? And, what can you do with it once you have it?

SOLUTION

Although the Phantom Burner Premiere Elements How To is fairly straight forward for the .VDD or .ISO image creation and its use when dealing with DVD-VIDEO, tips are needed to get Blu-ray BD-RE opportunities to work.

Keys to overcoming the AVCHD and Blu-ray glitches typically include:
  • for Blu-ray BD-RE, ignoring "device error" message which appears instead of "Burn Complete!" message at the end of the Premiere Elements burn to using the Phantom Burner with its virtual disc BD-RE.
  • for AVCHD DVD or Blu-ray BD-RE, using the .VDD format instead of the .ISO format of the disc image if trying to import the Phantom Burner Premiere Elements created disc image as media into another Premiere Elements project to obtain the m2ts in Expert workspace Project Assets/Timeline
  • for Blu-ray BD-RE, not deleting the .VDD.001 file that is the companion for the .VDD file, if the specific goal is to import the Phantom Burner Premiere Elements created disc image .VDD as media into another Premiere Elements project to obtain the .m2ts in Expert workspace Project Assets/Timeline 
  • for AVCHD DVD or Blu-ray BD-RE disc image .VDD format, selecting "All Files" instead of "Supported Files" when browsing for the .VDD disc image in the 3rd party software to get the disc image to disc.
The How To that follows describes what worked for me. And, it is hoped that the SOLUTION will be enhanced by the details presented.

HOW TO

DVD

STEP 1 is to download and install the Phantom Burner.**
This should get you through most of the evaluation of the technique. You will get a message in a subsequent step, giving you size limits for use before you need to BUY.
50 MB CD-R
1.4 GB DVD & BD Media
Phantom Burner 2.0 was used in these studies on Windows 7 Professional SP1 64 bit.

STEP 2. After Phantom Burner installation, go to Computer where you will now find a drive icon and letter for your Phantom Burner. Think of this Phantom Burner software installation as equivalent to installing physically an internal or external CD/DVD or Blu-ray burner to your computer.

STEP 3. Now for getting a "disc" in this virtual burner.....when you get to the burn dialog in Premiere Elements, the program is going to be looking for a disc in the Phantom Burner before it shows Status = Ready in the Publish+Share/Disc/DVD disc burn dialog. The Phantom Burner's answer for getting a virtual disc into its burner is to right click the Phantom Burner drive icon shown with the other drives under Computer in order to obtain the drop down list where Create Image is included (Refer to Figure 1a.)

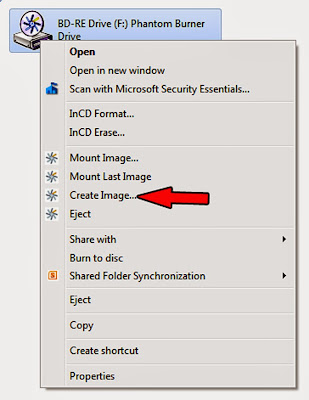
Figure 1a. Windows 7 64 bit Computer. Phantom Burner Drive F. Create Image.
After right clicking Create Image, a dialog will appear to which you click No if you want to continue using the Phantom Burner on a tryout basis. Refer to Figure 1b. Read this dialog carefully for tryout limits.


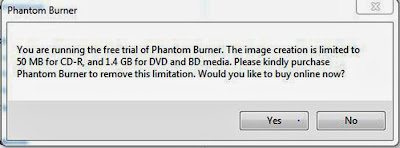
Figure 1b. Windows 7 64 bit Computer. Phantom Burner Drive. Tryout Limitations. Decision To Buy Or Continue On Tryout Basis.


After clicking "No" so that you can continue the tryout, the following Save As dialog appears. See Figure 1c. Here the file name automatically appears as in the naming format of "Disc 10-31-2013_151603.VDD". The 10-31-2013 will vary with the date. The 151603.VDD part is program decided, and it presents in the Save As dialog as .VDD even though the "Convert data disc to ISO format" option is selected.


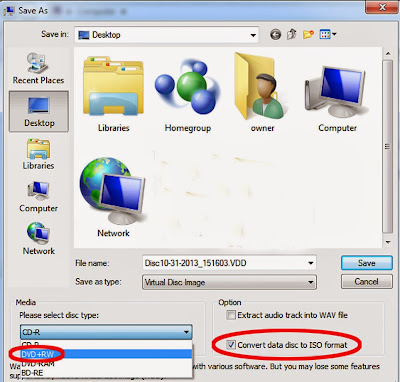
Figure 1c. Phantom Burner. Windows 7 64 bit Computer. Save As Dialog In Virtual Disc Setup For DVD-VIDEO ISO Disc Image.

In this example at this stage with the destination DVD-VIDEO disc image .ISO format...
File name = Disc 10-31-2013_151603.VDD
Save as type = Virtual Disc Image
Media = DVD+RW
Option selected = Convert data disc to ISO format.

At the bottom of the Save As dialog is a Warning that reads:
Warning: ISO format provides maximum compatibility with various software. But you may lose some features supported by native virtual disc images (.VDD).

When "Save" of the Save As dialog is hit, one empty Disc 10-31-2013_151603.VDD file appears on the Desktop which was designated in the Save In: field of this Save As dialog.

STEP 4. Open Premiere Elements 12 Expert workspace and set project preset manually to NTSC DV Standard. Import your project media, create your DVD-VIDEO standard project with menus. When you get to Publish+Share/Disc/DVD disc, in the burn dialog assure that your burner location = Phantom Burner Drive (F in this demo) and that the burn to preset = NTSC_Standard Dolby DVD. The Status should = Ready since you have already placed your virtual DVD+RW in the virtual Phantom Burner "tray". Hit Burn with the burn dialog as represented in Figure 1d.

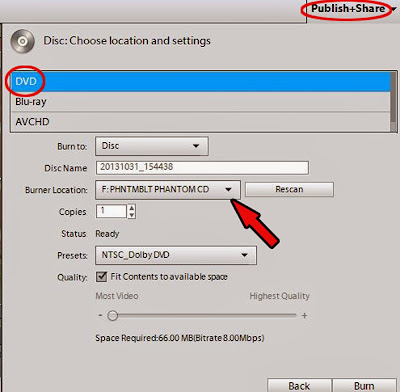
Figure 1d. Premiere Elements 12. Publish+Share/Disc/DVD Disc. Burner Location = Phantom Drive F. Status Ready With Virtual DVD+RW Disc In This Virtual Burner.
After the message "Burn Complete!" is seen in Premiere Elements 12 burn dialog, the file named Disc 10-31-2013_151603.VDD which was placed automatically on the Desktop in STEP 3 undergoes an automatic file extension change from .VDD to .ISO as the virtual DVD+RW disc is automatically ejected from the Phantom Burner drive.

The .VDD disc image can be obtained in a similar manner by leaving unchecked the option for "Convert data disc to ISO format". Refer to Figure 1c.

STEP 5. Now what to do with that Disc 10-31-2013_151693.ISO file saved to computer desktop in order to get it on a real DVD disc as DVD-VIDEO?

Take this ISO disc image to DVD disc with ImgBurn (used version 2.5.7.0)
Here the settings are "Write image file to disc", followed by ImgBurn's File Menu/Browse for Source. In the case of the .ISO format, files of type = All Supported Files. Whereas, in the case of the .VDD format, files of type = All Files.

or

Take this ISO image to DVD disc with Nero (we have worked with only older versions such as 6 and 9). 
The settings for 9 were Back Up, followed by Copy Disk, followed by automatic opening of Nero Express Essentials and selection of "Disk Image or Saved Project". These settings (under Supported Files) worked for the .ISO disc image. But they would not work for the .VDD disc image, even when setting for All Files. Error message was "Unexpected File Format".

Back in the days of Premiere Elements 7 and Phantom Burner, I wrote
5. This is what worked for me with the Nero StartSmart (version 6) whether the file was set up for ISO or VDD format:
(a) Right clicked the file and selected “Mount in Phantom Burner”. That put our DVD-VIDEO virtual DVD+RW disc into the Phantom Burner. Now it was just a matter of copying that to a real DVD+RW or DVD-R disc which would play back on the computer as well as the TV via its TV DVD Player. The Nero settings that worked were:
Copy and Backup/Copy DVD
or
Copy and Backup/Burn Image to Disc/”Image, Project, Copy”/ “Copy Entire Disk”.

Any other Nero routes were problematic and resulted in failures. Needs more work.

6. This is what worked for me with Sonic Record Now (version 7) the settings were:
Drag and drop of the saved .iso or .VDD file was to Backup Projects/Burn Image.
Both the .iso and .VDD could be burned to a DVD+RW or DVD-R disc successfully. But it was only the one derived from the .iso file that the DVD player would accept and play back as DVD-VIDEO; whereas the Copy approach that made Nero doable did not work for Record Now.

7. ImgBurn (version 2.5.0.0) worked to produced DVD-VIDEO from both the .iso and .VDD formats. Here the settings were “Write image file to disc”, followed by File Menu/Browse for Source. In the case of the .iso format, files of type = All Supported Files did the job. Whereas, in the case of the .VDD format, files of type had to be set = All Files.
or

Right click the .VDD disc image and select "Mount in Phantom Burner" to mount it in the now empty Phantom Burner. Then import the VOBs into another Premiere Elements project via Premiere Elements Add Media/"DVD camera or computer drive"/Video Importer with Source field = Phantom Burner drive F in this case. This worked for the .VDD or .ISO disc image.

AVCHD

The principles and steps applied for the .VDD and .ISO formats for the DVD-VIDEO disc image are applicable to AVCHD on the virtual DVD+RW disc. This Phantom Burner Premiere Elements 12 setup included project preset = NTSC AVCHD Full HD1080i30 and Publish+Share/Disc/AVCHD disc with Presets = H.264 1920 x 1080i NTSC Dolby.

The results are the same as with DVD in that
  • only one .VDD or .ISO file is generated in the Create Image stage
  • All Phantom Burner Premiere Elements 12 burn to go to a "Burn Complete!" notification.
  •  After the "Burn Complete!" notification, the virtual DVD+RW is automatically ejected from the Phantom Burner
  • ImgBurn can be used to take the .VDD or .ISO disc image to DVD disc, using ImgBurn's Open dialog's Supported Files for .ISO disc image import and All Files for .VDD disc image import. Like DVD, Nero 9 could be used to take the AVCHD disc image ISO to DVD disc, but could not do that with the AVCHD disc image .VDD ("Unexpected File Format" Error)
  • Whereas DVD-VIDEO disc image .VDD or .ISO seem to work for getting getting VOBs into a Premiere Elements 12 project for use as source media, the AVCHD DVD disc image .VDD worked to import .m2ts file, but .ISO did not ("Error Copying Files").

Blu-ray

The principles and step applied for the .VDD and .ISO format for the DVD-VIDEO and AVCHD disc image are applicable to Blu-ray on the virtual Blu-ray disc. This Phantom Burner Premiere Elements 12 setup included project preset = NTSC AVCHD Full HD1080i30 and Publish+Share/Disc/Blu-ray disc with Presets = H.264 x 1080i NTSC Dolby.

The end results were the similar, but differed in several respects from those from the DVD and AVCHD work.
  • Most significant is the Phantom Burner Premiere Elements 12 burn to resulting in a "device error" at the end of the burn to. However, if "Cancel", followed by "acknowledgement of Cancel", are clicked in the burn area, the Blu-ray disc image is found intact and ready for use in the hard drive save location established back in the Create Image stage.
  • The virtual BD-RE does not automatically eject as it does in the cases of  the virtual DVD disc for DVD-VIDEO and AVCHD.
  • If Save As (Figure 1c) is set for BD-RE and "Convert data disc to ISO format" is left unchecked so that the .VDD format is produced, then two files present as saved on the Desktop, one named Disc 10-31-2013_151603.VDD and the other Disc 10-31-2013_151603.VDD.001. (When all is said and done, the .VDD one has a file size of 1.3 GB; whereas the .VDD.001 one has a file size of 0 bytes.) By contrast, when set for BD-RE and "Convert data disc to ISO format" is selected to obtain the .ISO disc image, two files present as saved on the Desktop, one named Disc 10-31-2013_151603.VDD and the other still Disc 10-31-2013_15603.VDD.001. It is only after the virtual BD-RE disc is manually ejected from the Phantom Burner that the .VDD file extension is automatically changed to .ISO for the Disc 10-31-2013_151603.VDD file, while the .VDD.001 file remains as is.
  • Preliminary indications are that the presence of the .VDD.001 is needed to import the .VDD as  source media into Premiere Elements to get the .m2ts, but only the VDD is needed if ImgBurn or the like is to take the .VDD or .ISO disc image to disc.
  • Like DVD and AVCHD, ImgBurn can be used to take the .VDD or .ISO disc image to BD-RE disc using ImgBurn's Open dialog's Supported Files for .ISO disc image import and All Files for .VDD disc image import. Like DVD, Nero 9 could be used to take the Blu-ray disc image ISO to BD disc, but could not do that with the Blu-ray disc image .VDD ("Unexpected File Format" Error)
  • Whereas DVD-VIDEO disc image .VDD or .ISO seem to work for getting getting VOBs into a Premiere Elements 12 project for use as source media, the Blu-ray disc image .VDD worked to import .m2ts file, but .ISO did not ("Error Copying Files"). The latter behavior was similar to that seen for the AVCHD DVD disc image in this regard.

COMMENTARY

Lots of variables, but interesting end results whose applicability needs to be explored in different Premiere Elements Phantom Burner computer environments. To date, the Phantom Burner Premiere Elements 12 setup on Windows 8 or 8.1 64 bit cannot be used for AVCHD or Blu-ray disc image since Premiere Elements 12 burn dialog's Status = Media Not Present. In this instance it is not recognizing the virtual DVD+RW for AVCHD nor the virtual BD-RE for Blu-ray while it does recognize the virtual DVD+RW for DVD. More work to do.

The work presented here has been road tested many times, looking for inconsistencies in the results. Since the results posted in this blog post have been consistent over many runs in my computer environment, I am publishing these results for consideration.
_______________________________________________________________________________

*Premiere Elements is being used as a generalization in this sentence. Premiere Elements 4 through 12 have burn to disc or folder for DVD and only burn to disc for Blu-ray. AVCHD burn to DVD disc or folder opportunity was introduced in version 10 and therefore exists or folder exists for only for versions 10, 11, and 12.

**UPDATE January 8, 2015. The original link to the Phantom Burner 2.0 used when this blog was written is no longer working to obtain the Phantom Burner 2.0 and has been replaced this day with a link that is working to obtain the Phantom Burner 2.0 tryout download (phantomburner_setup.exe). This new link seems to be working to obtain the "Phantom Burner 2.0", but the Learn More and Purchase buttons for this choice do not work. Interestingly, the old and new links are from the same web site, just different pages of the web site. At this time, it is not known if this reflects problem with the PHANTOMbility.com web site or something else.***

***IMPORTANT UPDATE March 1, 2016. Please refer to the following
http://atr935.blogspot.com/2016/03/pe-iso-images-burn-to-opening-virtual.html 
regarding the Phantom Drive as a possible replacement for the Phantom Burner.

ATR