The July 2013 blog post describes how to apply Titler animation to one or more lines of text in the same title created in the Titler. And, some interesting examples are given.
ISSUE
Recently the question was asked about applying Titler's animation "Fade In By Character" to 4 lines of text, so that the characters of the 4 lines would fade in sequentially from the first character of the first line to the last character of the fourth line. At this time, the task was found doable, but not with all 4 lines within the same title file. No easy crop or garbage matte approach was found to create this text effect all in one title*.
SOLUTION**
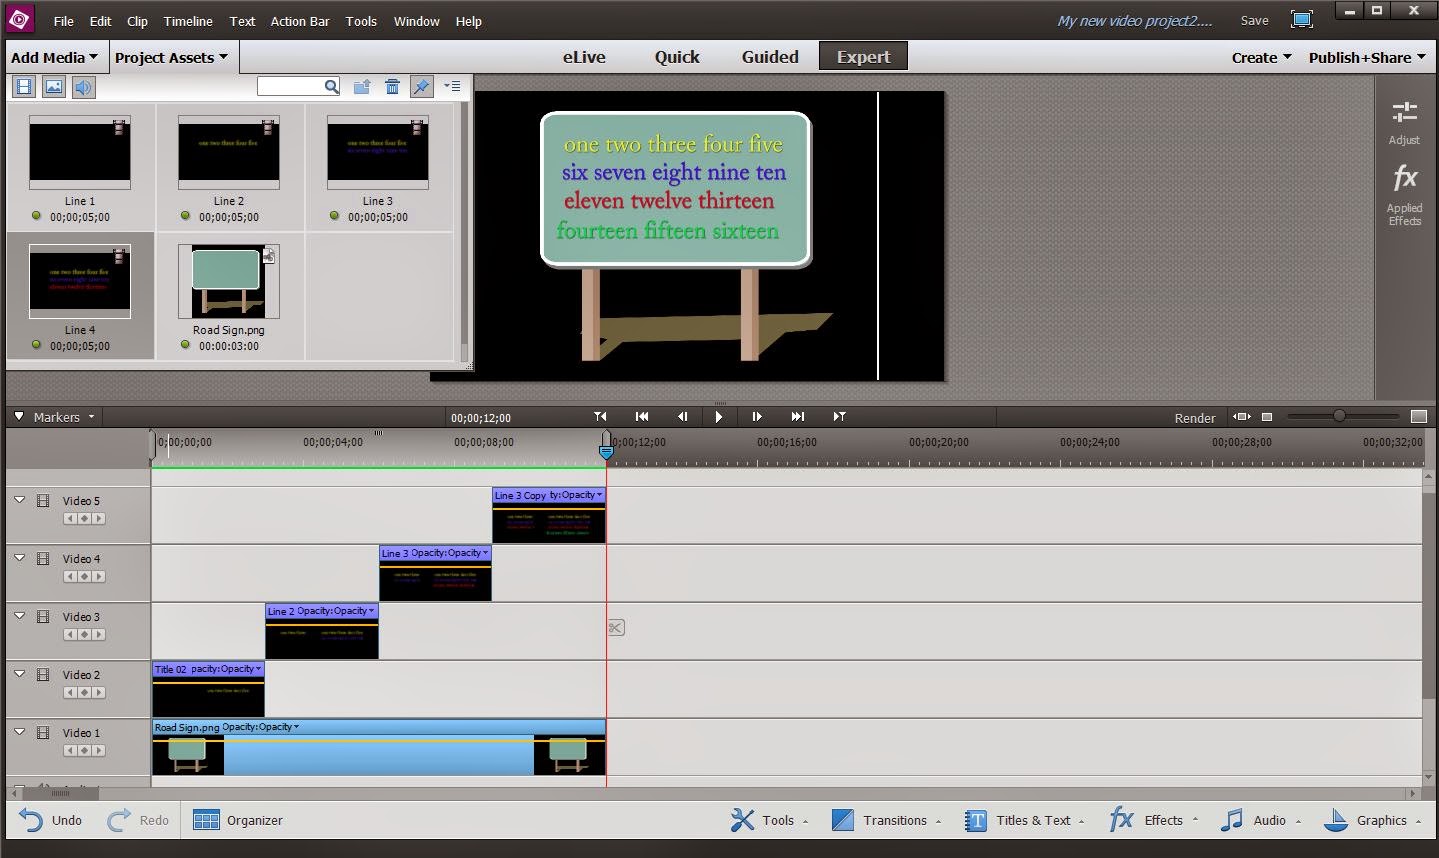
To achieve the Titler's animation "Fade In By Character" effect sought and which is described in ISSUE, a title file was created for each line of text, and each title file was placed on progressively higher track in a train like fashion. The Expert workspace for the finished creation is represented in Figure 1.
 |
| Figure 1. Premiere Elements 13/13.1 Expert Workspace Finished "Fade In By Character" For 4 Lines Of Text. |
The how to for this effect follows.
HOW TO
STEP 1
Create Line 1 Title In The Titler
Text Menu/New Text/Default Text
Duration: 5 seconds
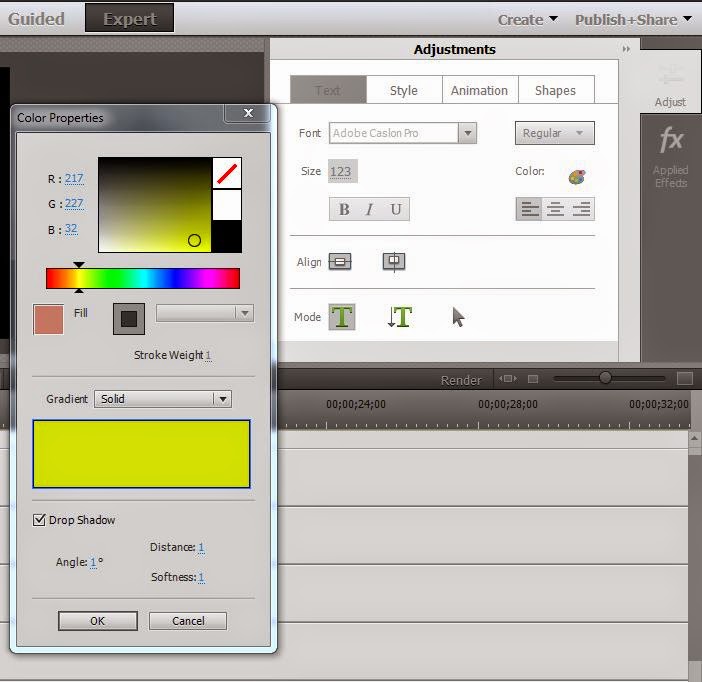
Font: Adobe Caslon Pro
Size 123
Color Palette Icon: Yellow, R 217, G 227, B 32; Drop Shadow with check mark, and then close Color.
 |
| Figure 2. Text Section Of The Titler And Some STEP 1 Details. |
In the Text section of the Titler, type Line 1 text using the Horizontal Type Tool, and then use the Selection Tool there to select the Line 1 text and position it. Leave the Line 1 text selected.
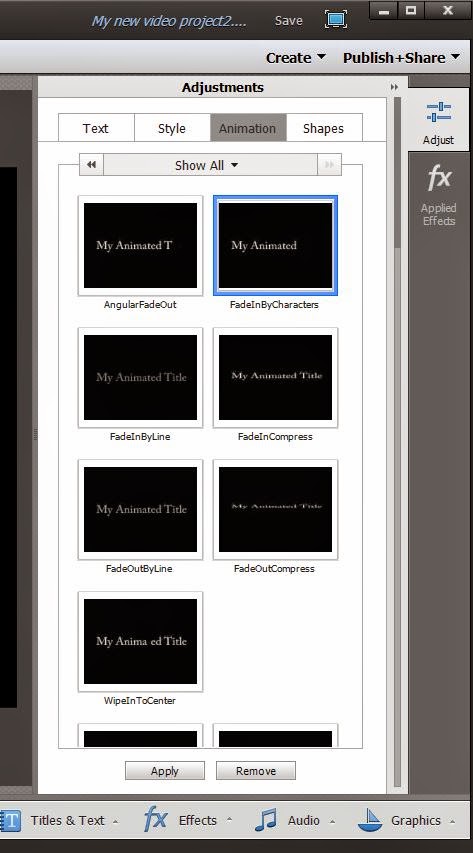
Go to the Titler's Animation section, select/highlight the animation "FadeInByCharacter" and hit Apply at the bottom of the Animation listings.
 |
| Figure 3. Animation Section Of The Titler And Some STEP 2 Details. |
STEP 2.
Create Line 2 Text In The Titler
Go to Project Assets, opened it, find the thumbnail for line 1 text file. Right click it, and change the thumbnail name from Title 01 to Line 1. Then right click Line 1 thumbnail, and click on Duplicate from the drop down menu. Right click the Duplicate created, and rename this Duplicate to Line 2. Drag Line 2 thumbnail to the Timeline Video Track 3 at the 5 second mark. Double click Line 2 Timeline title to open the Titler to create the Line 2 title. Do the following
- With the Text section Selection Tool, select the Line 1 text on screen if it is not already selected.
- Go to the Animation section, with FadeInByCharacters selected, hit Remove at the bottom of the Animation Section listings.
- Go to the Titler's Animation section, select/highlight the animation "FadeInByCharacter" and hit Apply at the bottom of the Animation listings.
STEP 3
Create Line 3 Text In The Titler
Go to Project Assets, open it, find the thumbnail for Line 2 text file. Duplicate the Line 2 text thumbnail, and rename that thumbnail to read Line 3. Drag Line 3 thumbnail to Timeline Video Track 4 at the 10 second mark. Double click Line 3 Timeline title to open the Titler to create Line 3 title. Do the following
- With the Text section Selection Tool, select Line 2 text if it is not already selected.
- Go to the Animation section, with FadeInByCharacters selected, hit Remove at the bottom of the Animation Section listings.
- Go to the Titler's Animation section, select/highlight the animation "FadeInByCharacter" and hit Apply at the bottom of the Animation listings.
STEP 4
Create Line 4 Text In The Titler
Go to Project Assets, open it, find the thumbnail for Line 3 text file. Duplicate the Line 3 text thumbnail, and rename that thumbnail to read Line 4. Drag Line 4 thumbnail to Timeline Video Track 5 at the 15 second mark. Double click Line 4 Timeline title to open the Titler to create Line 4 title. Do the following
- With the Text section Selection Tool, select Line 3 text if it is not already selected.
- Go to the Animation section, with FadeInByCharacters selected, hit Remove at the bottom of the Animation Section listings.
Go back to the Text section and, using the Horizontal Text Tool, type in Line 4 text. This time the text color is going to be green . See Color Palette Icon and set R 11, B 219, and G 80, and do not forget the check mark for Drop Shadow in the Color Properties. Position Line 4 text with the Text section's Selection Tool. With Line 4 text selected, end with
- Go to the Titler's Animation section, select/highlight the animation "FadeInByCharacter" and hit Apply at the bottom of the Animation listings.
STEP 5
Miscellaneous
In the example workflow, one of the program's Graphics named Road Sign was placed on Video Track 1 as a background for the 4 lines of text. See Figure 1.
In the example workflow, the duration of each text title was changed from the original 5 seconds to 3 second using Time Stretch.
_____________________________________________________________________________
* The sequential appearance "by line" of 4 lines of text within 1 title can easily be obtained by keyframing Crop or a garbage matte effect. See fx Effects/Transform/Crop or fx Effects/Keying/and Four-Point Garbage Matte, Eight-Point Garbage Matte, or Sixteen-Point Garbage Matte.
** Workflow using Premiere Elements 13/13.1 NTSC AVCHD Full HD1080i30 project (Windows 7 Professional SP1 64 bit). Workflow also applies to Premiere Elements 11, 12/12.1, and 13/13.1 and in principle to earlier versions of the program.
ATR