In a Premiere Elements forum in 2015 I gave the following description of Volume Bypass to a Premiere Elements user who was then using version 10. The following is an excerpt of what I wrote at that time:
When your audio comes into the project, it is assigned a 0 dB value. That value represents the volume of the file as recorded by the recording device.
You can lower or increase the volume at the Timeline level by moving the audio file's orange "Volume Clip Volume" rubberband up or down. All the way to the top represents +6 dB, and all the way to the bottom represents infinity. The "Volume Bypass" option is going to work for you as long as the Volume reading is no longer 0 dB.
The "Volume Bypass" orange line rubberband is a different line than that for the "Volume Clip Volume". "Volume Clip Volume" deals with setting the Volume whereas "Volume Bypass" allows you to decide what segments of the Volume change that you want be to heard without going back to Volume Clip Volume to make Volume adjustments.
Also refer to the following related follow ups to the topicWhen you set the audio clip for Volume Bypass, it is normal for the Volume Bypass orange line to be all the way to the bottom (Off) because that represents the Volume Bypass letting you hear the Volume change that you made. It is allowing you to hear however you adjusted the Volume away from 0 dB. With Volume Bypass, you decide what segments of that Volume change across the clip you want heard and do not want to be heard without having to go back to the Volume Clip Volume's orange rubberband. In the Volume Clip Volume phase, if you have set audio fade in and fade out, then you make sure that Volume Bypass is Off at those times. Also, consider, do you really need or want Volume Bypass in your workflow? What benefit is it to your audio for the effect that you are trying to achieve?
PE12: Audio Features
May 2, 2014
http://atr935.blogspot.com/2014/05/pe12-audio-features.html
PE: Rubberband Options Detailed
March 20, 2014
http://atr935.blogspot.com/2014/03/pe-rubberband-options-detailed.html
PE 11: Video and Audio Track Content Rubberband
June 9, 2013
http://atr935.blogspot.com/2013/06/pe11-video-and-audio-track-rubberband.html
ISSUE
Since not yet reported here for current version Premiere Elements 15 and since there was some interest in the topic, the ON/OFF for Premiere Elements 15's Audio Bypass options were revisited at the levels of the Timeline rubberband, Audio Adjustments, audio effects found under Applied Effects.
OBSERVATIONS
Audio Bypass Options
Applied Effects/Audio Effects
After application of any of the audio effects found under fx Effects/Audio/Audio Effects, the related Applied Effects Palette then contains the audio effect's viewing/editing panel which includes a Bypass option*. That Bypass option
- is keyframeable with views for setting/editing/and viewing the set keyframes when "Show/hide keyframe controls" is activated in the Applied Effects Palette.
- has an On Off feature with On = check mark in its box, and Off = removal of any check mark in its box (single click on box toggles this On Off).
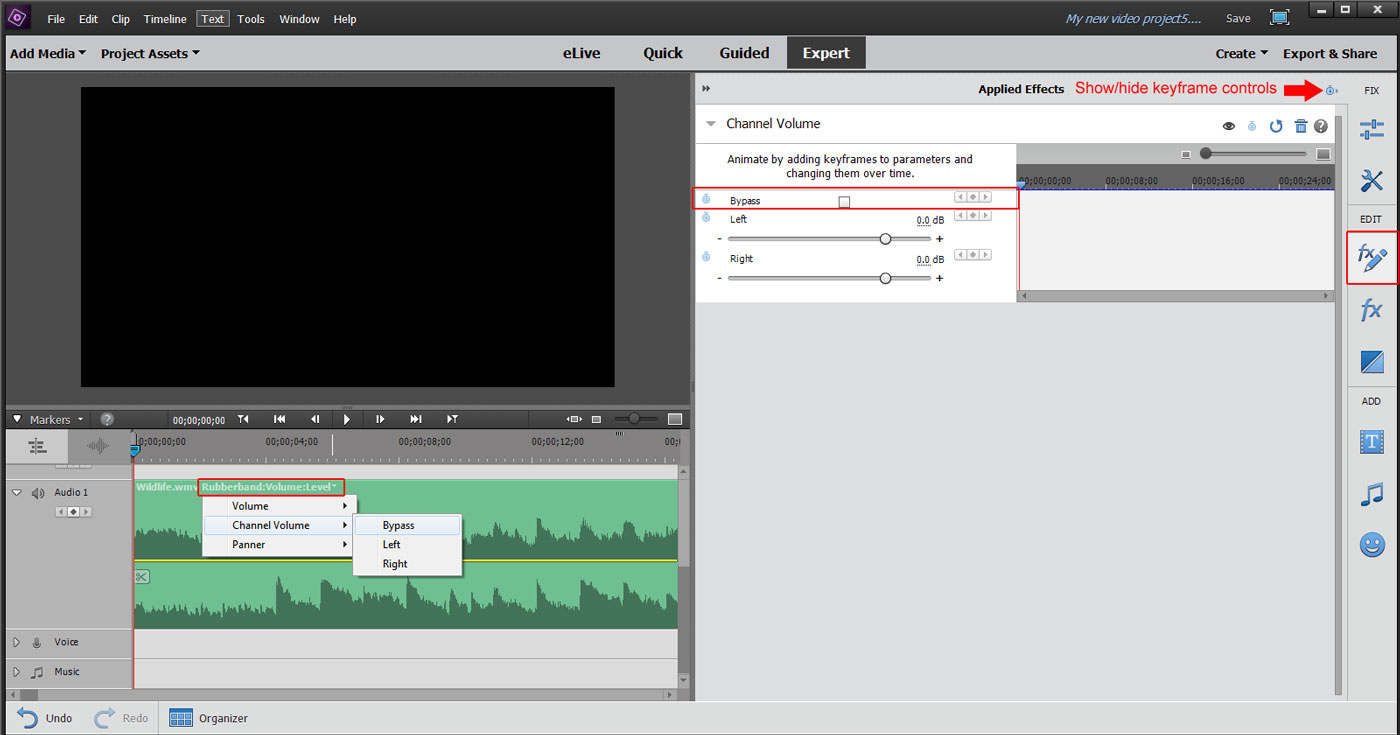 |
| Figure 1. Premiere Elements 15. Audio Effects Bypass Option in Applied Effects Palette. Channel Volume Audio Effect Is Used For Demonstration Purposes. Show/Hide Keyframe Controls View. |
- The audio clip's default rubberband is for Volume Level and needs to be changed to "Rubberband: Channel Volume:Bypass" in the clip's title (in Figure 1 Timeline, see Channel Volume/Bypass after click on the tiny triangle at the end of the clip's title).
- Must do step - right click Timeline audio clip, select "Show Clip Keyframes"/Channel Volume/Bypass. The Bypass keyframes are editable at the rubberband level.
- At the Timeline rubberband level, the audio Bypass is Off when the rubberband is at the bottom of the clip and On when the rubberband is at the top of the clip.
Audio clips placed on the Timeline present with adjustment options for Volume, Balance, Treble, Bass, and Audio Gain. None of the panels in the Adjustment Palette were found to offer a Bypass option. With the exception of Audio Gain, the other adjustments were each found to be keyframeable when done with "Show/hide keyframe controls" activated view of its opened panel. It appeared that any Bypass option for these adjustments are in conjunction with the Timeline rubberband activity.
 |
| Figure 2. Premiere Elements 15. Audio Adjustments In Conjunction With Timeline Rubberband Access To An Audio Bypass Option. Bass Adjustment Is Used For Demonstration Purposes. Adjustment Palette's Show/Hide Keyframe Controls View. |
- Select the Audio Clip in the Timeline. Bass adjustment is used for demonstration purposes.
- The audio clip's title is changed to "Rubberband:Bass:Bypass". In order to have the Bass option appear in the Rubberband options (as in Figure 2) the Bass value needs to be changed to other than 0.0 dB.
- Must do step - right click audio clip, select "Show Clip Keyframes" and the wanted option in order to see the wanted type of keyframes (in this demonstration, that is, "Show Clip Keyframes"/Bass/Bypass).
Please refer to references cited in the INTRODUCTION. For all intents and purposes, the Volume Level and its Bypass Option at the Timeline Rubberband Level appear to be the same from at least Premiere Elements 10 through 15.
______________________________________________________________________________
*Also see Adobe document titled "Adding and Removing Effects/Apply An Audio Effect" found
https://helpx.adobe.com/premiere-elements/using/applying-removing-effects.html
ATR