Premiere Elements 11 and earlier versions have controls at the Timeline track level for several properties, such as, Opacity and Motion for video track and Clip Volume and Balance for audio track. The controls utilize an orange line called rubberband that stretches horizontally across the track content. Clicking and dragging up or down on the track content's rubberband can adjust the value of the property selected at the video or audio track level.
 |
| Figure 1. Video Track and Audio Track Rubberband Details. |
Keyframes are used to change properties of video or audio effects over time. Typically this is seen done in the Applied Effects Palette (for video track content) and Adjust Tab/Adjustments Palette (for audio track content). However, quick and easy adjustable keyframes for the properties mentioned can be set by holding down the Ctrl key of the computer main keyboard and clicking on the rubberband. The keyframes set for video track content Opacity or Motion properties at the Timeline rubberband level are reflected in Applied Effects; whereas, the keyframes set for audio track content Volume or Balance properties at the Timeline rubberband level are reflected in Adjust Tab/Adjustments Palette. See Figure 2 and 3.
 |
| Figure 2. Video Track Rubberband Opacity Keyframes. Rubberband and Applied Effects Locations. |
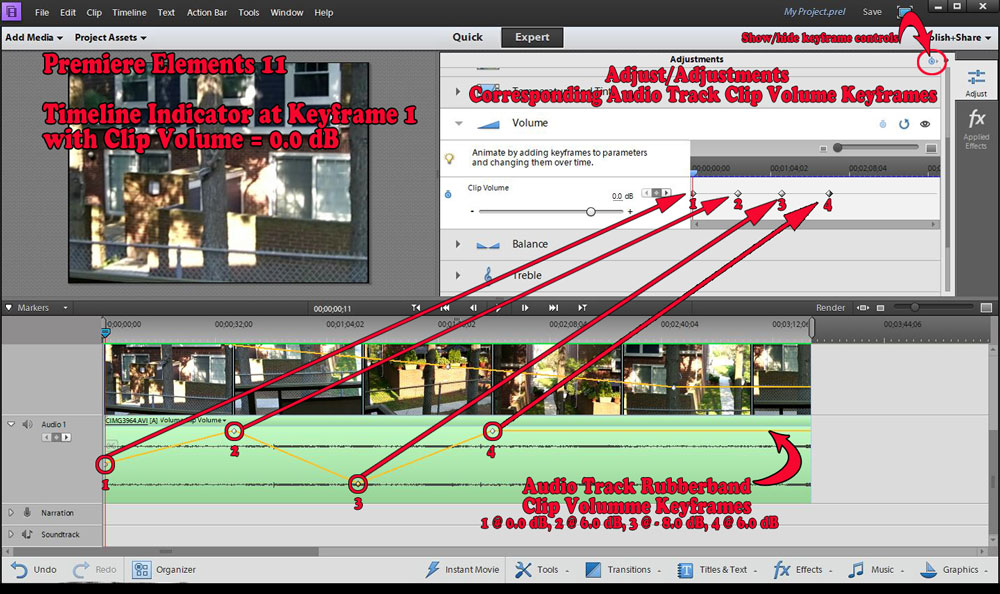 |
| Figure 3. Audio Track Rubberband Clip Volume. Rubberband and Adjust Tab/Adjustments Locations. |
By default the rubberband of the video track represents Opacity property. But, that can be changed to a Motion property option by clicking on the tiny arrow at the end of the video track's clip title, selecting Motion followed by one of the Motion properties in the drop down list that appears. See Figure 1.The Motion Property options are Position, Scale, Constrain Proportions, Rotation, Anchor Point, or Anti-Flicker filter. The Opacity choice is just Opacity.
By default the rubberband of the audio track represents Clip Volume property. But that can be changed to Volume:Bypass, Balance:Bypass, or Balance:Balance by clicking on the tiny arrow at the end of an audio track's clip title and making the choice between Volume and Balance options. See Figure 1.
ISSUE
Time Remapping for creating slow and fast motion effects is a new feature in Premiere Elements 11. In Premiere Pro CS3 and higher, the video track content rubberband choices appear to be Motion, Opacity, and Time Remapping. So when this new Time Remapping feature appeared in Premiere Elements 11, it was asked "Is Premiere Elements 11's Time Remapping included with Opacity and Motion as a choice in the drop down list for controls at the video track content rubberband level?" The answer was found to be no.
SOLUTION
There is no solution to "no Time Remapping option" in the video track's clip rubberband drop down list of choices. According to the expression, "it is what it is".The Premiere Pro CS3 Time Remapping over time involves setting Speed Keyframes at the video track rubberband level. By contrast, Premiere Elements 11 Time Remapping is not done at the video track rubberband level but instead has it own workspace, and, even though Speed and Duration are part of its Time Remapping feature, there are no keyframes for the process to be seen by the user in the Applied Effects or Adjust/Adjustments area as well as the video track rubberband of the Premiere Elements Edit workspace or its special Time Remapping workspace.
A later blog post will to go into how Premiere Elements 11's Time Stretch and Time Remapping are presenting and working in Premiere Elements 11, including what is happening at the video frame level in creating slow or fast motion effects with these tools.
ATR