Question always comes up as to how to gather, assemble, organize, and manage video grabs from a large collection of video files going into one Premiere Elements 11 project.
As for gathering and assembling the grabs, trimming a video clip using the Preview Window's Set In and Set Out points is common procedure in which the isolated segment is dragged from the Preview Window monitor to a position on the Timeline for use there and/or dragged from the Preview Window monitor into the Project Assets area to become part of the project's media (copy there often referred to as "subclip").
All details presented here are for Premiere Elements 11 Windows Expert view. Although the Preview Window is offered in both Expert and Quick view, the Project Assets Palette is only available in the Expert view.
ISSUE
All those video files and segments scattered about Timeline and/or Project Assets areas often create logistically workflow problems.
SOLUTION
An effective plan to gather, assemble, organize, and manage video grabs from a large collection of video files going into one Premiere Elements 11 project was found by
- using Add Media to import the first video file of the collection into Project Assets
- double clicking the video file in Project Assets to open the Preview Window to generate "subclips" which represented the whole file, a scene grab from the file, and a highlight grab from the Scene.
- then creating and appropriately naming a folder in Project Assets in which to place these 3 assets before repeating the process for the next video file in the collection
- when all the video files of the collection were processed as for the first, opening a folder and dragging the assets inside the folder as needed to the Timeline tracks for creation of the movie.
HOW TO
1, After opening Premiere Elements 11 Windows project with the correct project preset, go to Add Media, browse to and import the first video file of the video collection into Project Assets (List View). Double click the file in Project Assets to open the Preview Window with its Set In and Set Out points. See Figure 1.
 |
| Figure 1. Project Assets and Preview Window. Step 1. |
2. In the Preview Window, go through the video to identify your SCENE to be isolated as per 2 (a) and 2 (b).
(a) Place the Preview Window's Indicator (blue head with red stem) at beginning of identified SCENE, click Set In
(b) Move the Preview Window's Indicator to the end of identified SCENE, click Set Out
3. Put the isolated SCENE into Project Assets as per 3 (a)
(a) With the mouse cursor, click/drag from Preview Window screen to a free space in the Project Assets. That will create a subclip in Project Assets which represents the SCENE 1 from VIDEO 1. At this point the subclip will have the same name as the parent file, so rename this subclip from "VIDEO 1" to "VIDEO 1 SCENE 1". See Figure 2.
Tips:
To rename a file in Project Assets, right click the file name, select Rename, and type in new file name.
If you were doing 3 (a) in Project Assets (Grid View), then the click/drag would be replaced by holding down the Ctrl key of the computer main keyboard as you click/drag.
 |
| Figure 2. Scene Grab Details. Steps 2 and 3. |
4. Put an isolated HIGHLIGHT for the isolated "VIDEO 1 SCENE 1" into Project Assets as per 4 (a) and 4 (b)
(a) Go back to the Preview Window and move the Indicator for the Set In and Set Out of the HIGHLIGHT.
(b) Click/drag from Preview Window screen to free space in the Project Assets. That will create a subclip in Project Assets which represent the HIGHLIGHT 1. At this point this latest subclip will have the same name as the parent file,so rename this subclip from "VIDEO 1" to "VIDEO 1 SCENE 1 HIGHLIGHT 1".
5. You are left with three files in Project Assets: one named "VIDEO 1", one named "VIDEO 1 SCENE 1", and a third one named "VIDEO 1 SCENE 1 HIGHLIGHT 1". But now "VIDEO 1" appears to the same as "VIDEO 1 SCENE 1 HIGHLIGHT 1" We will take care of that next. None of the 3 files now in Projects Assets is selected.
6. Regain a copy of the original VIDEO 1 as per 6 (a)
(a) Go back to the Preview Window and move the Preview Window Indicator to the beginning of the Timeline there. Click Set In. Then move the Indicator to the end of the Timeline there. Click Set Out. You will now see 3 files in Project Assets, one representing the whole starting VIDEO 1, one representing the isolated SCENE, and one representing the HIGHLIGHT.
(b) Close the Preview Window.
7. Create a Folder in Project Assets, naming it "VIDEO 1 ASSETS" Then drag your 3 files into this folder. Then repeat steps 1 through 9 for the remaining files, using appropriate identification for the folders and files. Drag the appropriate files from the opened Project Assets Folder to their Timeline position as needed.
Tips
- A folder can be created by going to Project Assets' Panel Options and selecting New Folder or by right clicking a blank area in Project Assets and selecting New Folder.
- If you point the triangle to the left of the folder icon downward to reveal the folder's files, the folder and its files are displayed as shown in Figure 3. But, if you double click the folder to open it to reveal its files, only the files inside are displayed in Project Assets. To regain the folder representation click the icon to the immediate left of the Trash icon. See Figure 3.
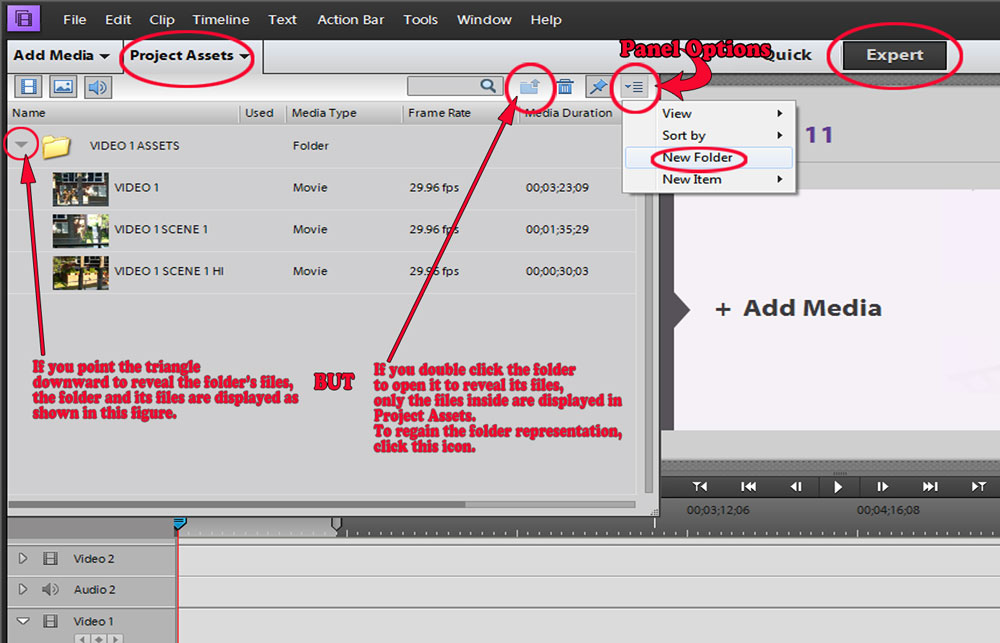 | |||
| Figure 3. Project Assets Folder Tips. |
ATR