Wednesday, December 30, 2015

PE: Default Video Background For Movie Menu Main Menu

INTRODUCTION

Adobe designed a default video background into the main menu page of several of its movie menu themes. Examples* of the Premiere Elements 14/14.1 movie menu main themes that use these Adobe default video backgrounds include:

ENTERTAINMENT - (AV) Broadway.
HOLIDAYS AND EVENTS - (AV) Scary Halloween; (V) Blinking Lights; (V) Christmas.
KID'S CORNER - (AV) Kid's Channel
MOVIE GENRE - (AV) Secret Agent
SLIDESHOWS - (AV) Wedding Doves
SPORTS - (AV) Extreme
TRAVEL - (AV) Cruiseliner; (AV) Outdoor Adventure; (AV) Space Travel
WEDDING - (V) Elegant

ISSUE

How to
  • Create a movie menu main menu with your own default video background for use from project to project
as well as
  • Replace the Adobe default video background within the opened project's movie menu customization area for use for just within that project

SOLUTION

Create a movie menu main menu with your own default video background for use from project to project 

The major ingredients of the Adobe way to create a default video background for the main menu include
  • The video file with specific naming format in the same folder with the theme's .psd file on the computer hard drive.
  • A freeze frame of first frame of the video as background layer in the Layers Palette of the main menu's .psd file on the computer hard drive.
The video file and the main menu .psd file are both in the theme folder in the Windows 7, 8, 8.1, or 10 64 bit path
Local Disk C\Program Data\Adobe\Premiere Elements\11.0, 12.0, 13.0, or 14.0\Online\DVD Templates\All_Lang\Category Folder\Theme Folder

 The video file naming format* is
name of theme_pal_s, w, or hd_mm_bg.file extension 

The file extension of this video file could be at least .mpg and .swf.
And, slight variations in the naming of the video file by Adobe can be found.

A freeze frame of the first frame of the video can be .bmp or other.

Replace the Adobe default video background within the opened project's movie menu customization area for use for just within that project

These Adobe default video backgrounds can be replaced by the user's own video in the opened project in the movie menu customization area's Adjustments/Menu Background/Video or Still. In this instance, the video background is replaced for just this one project. It does not become the Adobe default video background which appears when the theme is selected in a new project and used.

Whether Adobe default video background or user's replacement video background, the video background in the main menu presents at playback of the disc as looping 30 seconds (max). And, there is an option in Adjustments/Menu Background/Video or Still for "Apply Default Transition before looping".

COMMENTARY

Work in progress.


___________________________________________________________________________
* Below are some examples of the what Adobe has used for its video file names and formats for the default video backgrounds which it has designed into some of its movie menu main menus. The theme folder will contain 3 versions of the video file. Which one is used in the project will depend on the project preset (s = standard; w = widescreen, and hd = high definition). The file properties of these examples were obtained from the MediaInfo video and audio properties readout program.

ENTERTAINMENT
(AV) Broadway.

broadway_pal_s_mm_bg.mpg
Video part of file
MPEG1.mpg
720 x 576 @ 25 progressive frames per second
Display Aspect = 4:3
VBR 2852 Kbps
Duration = 13.8 seconds
File Size =  4.90 MB
Audio part of file
None

broadway_pal_w_mm_bg.mpg
Video part of file
MPEG1.mpg
720 x 576 @ 25 progressive frames per second
Display Aspect Ratio = 16:9
VBR 2580 Kbps
Duration = 13.8 seconds
File Size =  4.43 MB
Audio part of file
None

broadway_pal_hd_mm_ bg.mpg
Video part of file
MPEG2.mpg
1920 x 1080 @ 25 progressive frames per second
Display Aspect Ratio = 16:9
VBR 37.7 Mbps (Max 57.6 Mbps)
Duration = 13.8 seconds
File Size =  64.6 MB
Audio part of file
None

HOLIDAYS AND EVENTS
(AV) Scary Halloween

halloween_pal_s_mm_bg.mpg
Video part of file
MPEG1.mpg
720 x 576 @ 25 progressive frames per second
Display Aspect Ratio = 4:3
VBR = 3124 Kbps
Duration = 12.4 seconds
File Size = 4.95 MB

Audio part of file
MP2
CBR = 224 Kbps
Duration = 12.120 seconds
Channels = 2
Sampling Rate = 48.0 KHz
(not sure what the purpose is for this audio data)

halloween_pal_w_mm_bg.m1v
Video part of file
MPEG1.mpg
720 x 576 @ 25 progressive frames per second
Display Aspect Ratio = 16:9
VBR = 4093 Kbps
Duration = 12.120 seconds
File Size =  6.17 MB
Audio part of file
None

halloween_pal_hd_mm_bg.m2v
Video part of file
MPEG2.mpg
1440 x 1080 @ 29.97 interlaced frames per second (Scan Order = Upper Field First)
Display Aspect Ratio = 16:9
VBR = 24.4 Mbps (Max 30 Mbps)
Duration = 12.33 seconds
File Size = 36.5 MB
Audio part of file
None

HOLIDAYS AND EVENTS
(V) Blinking Lights

blinking_lights_pal_s_mm_bg.swf
Video part of file
Shockwave.swf
720 x 576 @ 12.000 frames per second
Display Aspect Ratio = 5:4
VBR = 1105 Kbps
Duration = 4.83 seconds
File Size = 577 KB
Audio part of file
None


blinking_lights_pal_w_mm_bg.swf
Video part of file
Shockwave.swf
720 x 576 @ 12.000 frames per second
Display Aspect Ratio = 5:4
VBR - 1105 Kbps
Duration = 4.83 seconds
File Size = 577 KB
Audio part of file
None

There no hd video file for this set for Adobe default video file for main menu. Blinking Lights does have an Adobe default video file for scene menu as well as main menu.
blinking_lights_pal_s_sm_bg.swf
and
blinking_lights_pal_w_sm_bg.swf

WEDDING
(V) Elegant
elegant_pal_s_mm_bg.swf
Video part of file
Shockwave.swf
720 x 576 @ 24.000 frames per second
Display Aspect Ratio = 5.4
VBR = 310 Kbps
Duration = 10.58 seconds
File Size = 427 KB
Audio part of file
None

elegan_pal_w_mm_bg.swf
Video part of file
Shockwave.swf
720 x 576 @ 24.000 frames per second
Display Aspect Ratio = 5.4
VBR = 310 Kbps
Duration = 10.58 seconds
File Size = 427 KB
Audio part of file
None

A hd movie menu theme does not exist for Wedding/Elegant. When a "w" or "hd" project preset is set for the project, the project appears to be using the Wedding/Elegant "w" files. When a "s" project preset is set for the project, the project appears to be using the Wedding/Elegant "s" files.

______________________________________________________________________________

ATR


Monday, December 14, 2015

PE 14: Premiere Elements 14.1 Update Released

INTRODUCTION

Adobe released Premiere Elements 14 and Photoshop Elements 14 on September 24, 2015, replacing Premiere Elements 13/13.1 and Photoshop Elements 13/13.1 as the current version. Please refer to
http://atr935.blogspot.com/2015/09/premiere-elements-14-first-look-details.html
and
http://atr935.blogspot.com/2015/09/premiere-elements-14-daily-discoveries_21.html

Today December 14, 2015 we find that Adobe has released a free 14.1 update for 14*. It is available only as a download and install from within the programs under Help Menu/Updates of Premiere Elements 14 Editor, Photoshop Elements 14 Editor, or Elements Organizer 14.

Figure 1. Update Dialog For Premiere Elements 14.1 Update.
More news to follow with more Adobe definition on "bug fixes and performance improvements". The same description in the Updates dialog is given to Photoshop Elements 14.1 and Premiere Elements 14.1.

The free update to .......includes bug fixes and performance improvements.


IMPORTANT FOLLOW UP
Today (December 18, 2015), in the Adobe Premiere Elements Forum, Aurobinda (Adobe Staff) has posted a link giving the details of the Premiere Elements 14.1 Update. Please see
https://blogs.adobe.com/contentcorner/2015/12/18/adobe-premiere-elements-14-1-update/
Thanks, Aurobinda.


_______________________________________________________________________________
*We also have started a Adobe Premiere Elements Forum thread on the 14.1 Update. https://forums.adobe.com/thread/2041984


ATR

Tuesday, December 8, 2015

PE: 12/12.1 480 x 480p30 Project Preset

INTRODUCTION

Question came up as to how video recorded as 480 x 480 @ 30 progressive frames per second could be imported, edited and exported in Premiere Elements 12/12.1 without black borders.

ISSUE

All the project presets in Premiere Elements are either 4:3 or 16:9. Could a user custom project preset be created for this situation, and what export opportunities exist for a 480 x 480 30p video if a user custom project preset could be created for the video's import into Premiere Elements 12/12.1?

SOLUTION

A project preset for 480 x 480 30p was obtained by editing the Notepad document of the Premiere Elements 12/12.1 "Flip Mino and Ultra 30p.sqpreset" file.

An AVCHD.mp4 480 x 480 30p file was created from the edited Timeline 480 x 480 30p content after customizing the advanced export settings for Publish+Share/Computer/AVCHD with Presets = MP4 H.264 1920 x 1080p30.

HOW TO 

Creation of User Custom Project Preset 480 x 480 @ 30 progressive Frames Per Second)


1. Locate and copy to the computer desktop the Flip Mino and Ultra 30p.sqpreset file found in the Windows 7, 8, 8.1, or 10 64 bit path
Local Disk C
Program Files
Adobe Premiere Elements 12
Settings
SequencePresets
NTSC
FLIP
and in the FLIP Folder is the Flip Mino and Ultra 30p.sqpreset file.

Rename the Flip Mino and Ultra 30p.sqpreset copy so that the file name is now
480 480 Flip Mino and Ultra 30p.sqpreset

2. At the computer desktop level, right click the .sqpreset file pasted and renamed there, select Open With, and then select Notepad.

3. In the Notepad document there are only two places that need to be changed. All the changes involve 640 x 480 to 480 x 480.....

PLACE ONE
FROM

<Descriptions Version="1">
<DescriptionItem Version="1" Index="0">
                <Second>For editing Flip Mino and Flip Ultra 640 x 480 camcorder videos.&#13;48kHz audio.</Second>
                <First>en_US</First>

TO

<Descriptions Version="1">
<DescriptionItem Version="1" Index="0">
                <Second>For editing Flip Mino and Flip Ultra 480 x 480 camcorder videos.&#13;48kHz audio.</Second>
                <First>en_US</First>

PLACE TWO
FROM
/<VideoFrameSize>0,0,640,480</VideoFrameSize>

TO

/<VideoFrameSize>0,0,480,480</VideoFrameSize>


Then save the edited Notepad document, using specifically File Menu/Save.

4. Go to
Local Disk C
Program Files
Adobe Premiere Elements 12
Settings
SequencePresets
NTSC
FLIP
and, in the FLIP Folder, place the file that you created and named 480 480 Flip Mino and Ultra 30p.sqpreset  

5. Set the Premiere Elements 12/12.1 project preset, by either
a. letting the project set it automatically based on its analysis of the properties of the 480 x 480 30p as the first file dragged to its Timeline
or
b. if problems (which there should not be), then set the project preset manually according to the following scheme
  • Open the project to the Expert workspace, and go to File Menu/New Project and Change Settings.
  • In Change Settings, set the project preset to the new project preset under NTSC/FLIP. OK out of there.
  • In the New Project dialog that opens, rename the project and make sure to have a check mark next to "Force Selected Project Setting on This Project". OK out of there.
  • Then import your 480 x 480 30p source video into Premiere Elements 12/12.1 with Premiere Elements 12/12.1's Add Media/Files and Folder/Project Assets from where you drag the video to the Expert workspace Timeline.

6. After edit of the Timeline content, export it using advanced export settings based on Publish+Share/Computer/AVCHD/ with Presets = MP4 H.264 1920 x 1080p30. Customization of the preset is done under the Advanced Button/Video Tab and export settings are set as seen the Figure 1.

Figure 1. Advanced Export Settings For 480 x 480 30p Premiere Elements 12/12.1 Project To Give AVCHD.Mp4 File 480 x 480 30p.

COMMENTARY

This work has been road tested and found to work as described on Premiere Elements 12/12.1 on Windows 7 Professional SP1 64 bit. Although experimental, all indications so far are that this works and should be applicable in principle to at least Premiere Elements 11 through 14.

In the export choice used as an example here, the bitrates might be lowered without affecting quality, but that point has not been explored yet.

The Premiere Elements 12/12.1 PAL project presets do not contain the FLIP category as does the NTSC project presets. The suggested PAL counterpart to obtain a 480 x 480 25p project preset would be
  • Modify the DSLR 640 x 480p50.sqpreset file found Local Disk C\Program Files\Adobe\Adobe Premiere Elements 12\Settings\SequencePresets\PAL\DSLR\480p\
  • Modifications would include changes in 640 x 480 to 480 x 480 (3 places) and, at the bottom of the document, changing the frame rate code from 5080320000 (for 50) to 10160640000 (for 25).
______________________________________________________________________________
Proofread several times without finding changes needed. Will continue to proofread for accuracy.

ATR


Wednesday, November 25, 2015

PE: Typewriter Animation Effect For Titler Text

INTRODUCTION

Question was asked  "How to create a Typewriter Effect for text created in Premiere Elements 11 Titler?"

ISSUE

Although the Premiere Elements 11 Titler has an Animation section, its FadeInByCharacter is not very realistic for this Typewriter Effect, even if the effect is embellished with clicking sound for each letter being typed in. None of the Premiere Elements versions from 4 to 14 was found to have a Typewriter Effect for the text created in Titler.

SOLUTION

A Typewriter Effect was created using the Timeline text file created with the Premiere Elements project's Titler, Crop keyframing of the letters of the text, and adding a clicking sound when each letter appeared. The work is an adaptation of the creation of the Typewriter Effect for Premiere Pro found HERE.

The key to making this Typewriter Effect look realistic is the application of Hold to each of the Crop keyframes. Adding sound when each letter appears embellishes the concept of the Typewriter Effect.

Although Premiere Elements 11 Windows 7 Professional SP1 64 bit was used for developing the HOW TO to follow, the details are applicable to at least Premiere Elements 12/12.1, 13/13.1, and current version 14.

HOW TO EXAMPLE

STEP 1
Text File Duration
Calculate the Text File duration needed for the number of letters in the text and the time interval between Crop keyframes. For this HOW TO, the text is "Typewriter Effect". The interval between each the Crop Keyframes is set at 0.5 second (15 frames in a 30 frames per second set up). For 16 letters and the 0.5 second interval, the clip duration was set at at least 8.5 seconds.

STEP 2
Creating The Text File With "Typewriter Effect" As The Text
Go to Expert workspace Text Menu/New Text/Default Text to open the Titler. A Text File will be placed automatically on the Timeline at the position of the Timeline Indicator. The duration of the Text File will be what is set in preferences (150 frames/5 seconds default for 30 frames per seconds setup).

To obtain the 8.5 seconds Timeline text file for this example, close the Titler. Right click the Timeline Text File that was placed there automatically, select Time Stretch, and set the Time Stretch dialog's duration to 00;00;08;15 (hours;minutes;seconds;frames). Double click the Timeline 8.5 seconds Text File to open the Titler again. Then
  • Set Font = Times New Roman; Size 191; Regular; Color = White
  • Type text = Typewriter Effect
  • Center the text horizontally and vertically
  • Close Titler ....it remains closed for the remainder of the HOW TO

STEP 3
Creating the Typewriter Effect

At the Timeline level
  • 1. Go to fx Effects/Transform/Crop, and drag the Crop effect into the Timeline text file.
  • 2. Go to the Timeline Text File and change the file's title from Opacity:Opacity to Crop:Right. This enables the Crop keyframes to be seen as white dots on the clip's Rubberband* when each of the Crop keyframes is created.
See Figure 1 for view of Workflow STEP 3.

Figure 1. Typewriter Effect Workflow STEP 3.


STEP 4
Creating the Typewriter Text Animation
The Tools for creating this effect are the Timecode above the Timeline and the Crop Panel Right slider in Applied Effects/Applied Effects Palette/Crop Panel expanded. See Figure 1, feature labelled 3.

Type the Timecode = 00;00;00;00 and move Crop Right slider to 100%.
Hit the Toggle Animation Icon in the Crop Panel.

Timecode = 00;00;00;00 and Crop Right slider at 100%, and the text Typewriter Effect is not seen.

Type the Timecode to equal 00;00;00;15, and move the Crop Right slider to left just to the point to reveal the first letter T in Typewriter Effect text.

Type the Timecode to equal 00;00;01;00, and move the Crop Right slider to left just to the point to reveal the y as well as previous T.

Type the Timecode to equal 00;00;01:15, and move the Crop Right slider to left just to the point to reveal the p as well as the previous T and y.

Type the Timecode to equal 00;00;02:00, and move the Crop Right slider to left just to the point to reveal the e as well as the previous T, y, and p.

Type the Timecode to equal 00;00;02:15, and move the Crop Right slider to left just to the point to reveal the w as well as the previous T, y, p, and e. 

Continue in this routine to the last letter of the text Typewriter Text. Then right click each of the keyframes, and apply the Hold option to each. Hold can be applied to the Crop keyframes either at the Timeline level (Rubberband) or in the Show Keyframe Controls area in the Crop Panel (Applied Effects Tab route).

Figure 2. Applying Hold To Crop Keyframes.

At each of the Timecode times (except 00;00;00;00) place** a 0.5 second clicking sound file. Free online sound file (.wav) was used.

See Figure 3 for STEP 4 Details as well as Expert workspace structure at the end of the procedure and before its export to file.

Figure 3. Finished Typewriter Effect Content Workspace Before Export.

The export of the finished Timeline content to Window Media 1920 x 1080p29.97 file can be seen below.

COMMENTARY

The above are the basics of how the Typewriter Effect animation was created for Premiere Elements. Work is still in process to attempt to streamline the details. Certain edits of the finished project at the project file level are expected to force a redo. Those certain edits need to be defined.


_______________________________________________________________________
*Rubberband. The orange line that runs horizontally across the duration of the Timeline clip. For the video portion of a clip, the rubberband represents by default Opacity. For the audio portion of a clip, the rubberband represents by default Volume. See HERE and HERE for more information on "Rubberband".
**Convenient way to place each of the 0.5 sound files was found to be using the Show Keyframe Controls area Crop Right keyframes previous and next to move from keyframe to keyframe. This moved the Timeline Indicator to the corresponding keyframe on the Timeline. With the Timeline Snap on, it was just a matter of dragging the 0.5 second sound file to snap to the position of the Timeline Indicator on the Timeline.


ATR

Friday, November 20, 2015

PE 12/12.1, 13/13.1: Adobe Revel Discontinued

INTRODUCTION

Adobe Revel's presence in Premiere Elements 12/12.1 and 13/13.1 is found in the Elements Organizer as well as in the Editor Publish+Share/Private Web Album. Before Premiere Elements 14 was released in September, 2015, it was announced that Adobe Revel features were not to be included in 14, but Adobe Revel would still be available in Premiere Elements 12/12.1 and 13/13.1 as usual.

Today November 20, 2015, we have received the following email from the Adobe Revel Team, announcing that Adobe Revel will no longer be available after February 23, 2016.

Pending further information, we are left to assume that, when you open Premiere Elements 12/12.1 or 13/13.1 after February 23, 2016, Adobe Revel features will be unusable at the Elements Organizer or Publish+Share levels.


We're writing you with some important news about Adobe Revel. Revel will no longer be available after February 23, 2016.

Members tell us that the Creative Cloud Photography plan — which includes access to Adobe Photoshop CC and Lightroom CC — is the best solution for organizing, editing and sharing their images. Lightroom works on your iOS and Android mobile devices, so you can access all your images anywhere you are — just as you could with Revel.

To get started with the Creative Cloud Photography plan, download your Revel photos and videos and import them into Adobe Photoshop Lightroom.

If you used Revel exclusively on your mobile device and still have copies of your files in your camera roll or gallery, download Lightroom for mobile to get started.

If you no longer have copies of your Revel files on your device, use our Download tool to download them to your computer.

Download your files now


To learn more about transitioning from Adobe Revel to the Creative Cloud Photography plan, accessing the -day trial, and moving your files to Lightroom, visit our blog post.

Sincerely,

The Adobe Revel team


Adobe
  

COMMENTARY

We are seeking more news on this specific to Premiere Elements 12/12.1 and 13/13.1 and the Adobe Revel features that came with the purchase of those products. Further news will be reported here as it develops.

UPDATE

A thread was posted in the Adobe Revel Forum, requesting clarification on Adobe Revel discontinuance and Premiere Elements 12/12.1 and 13/13.1, and a prompt response was obtained from GlenyseH (Adobe Staff). See thread found at  https://forums.adobe.com/message/8198667#8198667

For convenience, the following is a copy/paste of the GlenyseH response.
Photoshop Elements 11, 12, and 13 all had integration with Revel. With Revel shutting down, your Elements app itself will still work but there will no longer be integration with Revel. That feature will be gone.

Here is a link to a YouTube video that may be of help to you:
How to transition off the Revel service for Elements customers - YouTube

Also, here is an FAQ regarding the transition. About half-way down is a section on Elements and Revel
Adobe Revel

ATR

Wednesday, November 18, 2015

PE 14: 5.1 Channel Audio Export Opportunities.

INTRODUCTION

Premiere Elements 14, like prior versions*
  • does not offer Dolby Digital 5.1 channel audio for its export to file or burn to products
  • does offer some limited opportunities to export a file with 5.1 channel with an audio codec other than Dolby Digital, but requires that a project preset with 5.1 channel in its description be used for the project
ISSUE

Where in Premiere Elements 14 are these opportunities for exporting a file with 5.1 channel audio?

SOLUTION

In Premiere Elements 14, opportunities for exporting a file with 5.1 channel audio can be found 
Export & Share/Devices/Custom and under its Advanced Settings and its Export Settings.

Figure 1. Premiere Elements 14 Windows 10 64 bit Export & Share/Devices/Custom And Its Advanced Settings/Export Settings/Formats
FORMATS
Those choices in the Format field of Export Settings that offered 5.1 channel audio opportunity included

AAC Audio
(audio only - with audio codecs AAC; AAC+ Version 1; AAC+ Version 2)
Note: This file has an .aac file extension.

AIFF
(audio only - with audio codec Uncompressed)
Note: This file has an .aiff file extension.

AVI
(video audio - with audio codec Uncompressed - video codecs DV NTSC, DV PAL, Intel IYUV codec, Intel IYUV codec, Microsoft RLE, Microsoft Video 1, Uncompressed UYVY 422 8bit, and None)
Note: This file has an .avi file extension.

AVI (Uncompressed)
(video audio - with audio codec Uncompressed - video codecs Video Codec V210 and UYVY)
Note: This file has an .avi file extension.

H.264
(video audio - with audio format AAC, audio codec AAC, AAC+ Version 1, or AAC+ Version 2 - video codec H.264)
Note: This file has a .mp4 file extension. Resolution can include 4K 3840 x 2160 and 1920 x 1080. MediaInfo names these exports as Format AVC Codec ID avc1 which it typically uses to describe AVCHD (MPEG4 AVC/H.264.

MPEG4
(video audio - with audio format AAC, audio codec AAC, AAC+ Version 1, or AAC+ Version 2 - video codec described by Media Info as "Format H.263 and Codec ID s263")
Note: This file has a .mp4 file extension. 

QuickTime
(video audio - with audio codec Uncompressed - video codecs Animation, BMP, Cinepak, Component Video, DV/NTSC 24p, DV 25 NTSC, DV 25 PAL, DV 50 NTSC, DV 50 PAL, DVCPRO HD 1080i50, DVCPRO HD 1080i60, DVCPRO HD 1080p25, DVCPRO HD 1080p30, DVDPRO HD 720p50, DVDPRO HD 720p60, GoPro CineForm, Graphics, H.261, H.263, H.264, MPEG-4 Video, Motion JPEG A, Motion JPEG B, None (Uncompressed RGB 8 bit), PNG, Photo-JPEG, Planar RGB, Sorenson Video, Sorenson Video 3, TGA, TIFF, Uncompressed YUV 10 bit 4:2:2, Uncompressed YUV 8 bit 4:2:2, and Video)
Note: These files have a .mov file extension. Compare MPEG4 Format above (MPEG4.mp4) with this QuickTime Format's MPEG- 4 Video.mov with Uncompressed audio 5.1 channels. MediaInfo describes the MPEG-4 Video codec here as Format MPEG-4 Visual Codec ID 20.

Waveform Audio
(audio only - with audio codec Uncompressed)
Note: This file has a .wav file extension.

WebM**
(video audio - with audio codec Vorbis and Opus - video codec VP8 and VP9)
Note: This file has a .webm file extension.

Windows Media
(video audio - with audio codecs Windows Media Audio 9.2 Lossless or Windows Media Audio 10 Professional - video codecs Windows Media Video 9 Screen, Windows Media Video V8, Windows Media Video 9,  and Windows Media Video 9 Advanced Profile)
Note: This file has a .wmv file extension.

COMMENTARY

In order to take advantage of opportunities to export the above to a file containing 5.1 channel audio, the project preset must be set for a project preset whose description includes 5.1 channel audio. If the project preset is not set for a project preset whose description includes 5.1 channel audio, when the Save button is hit to begin the export, an Export Error message will appear with the message "Incompatible Audio Channel type in Preset".

If the needed project preset with 5.1 channel audio does not exist, it can be produced by the user from existing project preset sqpreset files on the hard drive. See Local Disk C\Program Files\Adobe\Adobe Premiere Elements 14\Settings\SequencePresets. How to details can be found

http://atr935.blogspot.com/2013/04/pe11-exporting-1080p50-or-1080p60-file.html

http://atr935.blogspot.com/2013/07/pe11-exporting-1080p25-or-1080p30-file.html 

http://atr935.blogspot.com/2013/10/pe12-exporting-720p50-or-720p60-file.html


___________________________________________________________________________
 * Premiere Elements 13/13.1 counterparts for the 14 information above.

AAC Audio
Same 13/13.1 and 14 except 13/13.1 counterpart found under 13/13.1's Publish+Share/Computer/Audio with Presets = AAC - Highest Quality or AAC - Medium Quality, and Advanced Button/Audio Tab

AIFF Audio
Same 13/13.1 and 14 except 13/13.1 counterpart found under 13/13.1's Publish+Share/Computer/Audio with Presets = AIFF - 48 KHz, and Advanced Button/Audio Tab

AVI
Same 13/13.1 and 14 except 13/13.1 counterpart found under 13/13.1's Publish+Share/Computer/AVI with Presets = DV NTSC Standard, DV NTSC Widescreen, DV PAL Standard, and DV PAL Widescreen, and Advanced Button/Video Tab Audio Tab settings.


H.264
In the 14's list of formats above, the H.264 AVCHD, H.264 Blu-ray, MPEG2 Blu-ray, and MPEG2 - DVD Formats do not appear to have opportunities for export to a file with 5.1 channel audio. But, this 14's "H.264" Format does allow for sizing which includes 4K 3840 x 2160 and 1920 x 1080, and MediaInfo appears to be identify the export as Format AVC Codec ID avc1 which MediaInfo  typically uses to describe AVCHD (MPEG4 AVC/H.264). As counterpart for what 14 is using, in 13/13.1 see Publish+Share/Computer/AVCHD and Publish+Share/Computer/XAVC-S and their MP4 presets.

MPEG4
Best 13/13.1 match for 14's MPEG4 Format above is probably Publish+Share/Computer/QuickTime and Advanced Button/Video Tab Audio Tab choices.

QuickTime
See Publish+Share/Computer/QuickTime and its Advanced Button/Video Tab, Audio Tab and explore the 5.1 channel export opportunities.

Waveform Audio
See Publish+Share/Computer/Audio with Presets = Windows Waveform and its Advanced Button/Audio Tab.

WebM
With special WebM plugin (see Footnote **), could import Webm file into Premiere Elements 12/12 and 14, but not 13/13.1. Could export from14, but could not find way to export the WebM as WebM from 12/12.1.

Windows Media
See Publish+Share/Computer/Windows Media and Advanced Button/Video Tab, Audio Tab for preset used.

Please refer to other links in this blog post for more details on Premiere Elements and 5.1 Audio before Premiere Elements 14. Premiere Elements 14 work for blog was done using Windows 10 Home 64 bit.

**After download and install of WebM plugin from http://www.fnordware.com/WebM/
WebM plugin allows for import and export of WebM, but still under investigation for use in Premiere Elements 14 and other. Please refer to post 6 HERE.


Information has been proofread many times to confirm details. In spite of that, still work in progress to continue to insure accuracy.

ATR

Thursday, November 12, 2015

PE 14: Changes In Project's Automatic Project Preset Setting

INTRODUCTION

For Premiere Elements 11, 12/12.1, and 13/13.1, the program is designed for the project to set the project preset automatically based on its analysis of the properties for the first file dragged to its Timeline.This analysis is reported to be based on the file's clip dimensions, frames per seconds, PAR (pixel aspect ratio), and field order. Mention of this can be found HERE.

And, if the project can not automatically analyze the file because there is no matching project preset or for any other reason, the project assigns its default project preset, either NTSC AVCHD Full HD 1080i30 or PAL AVCHD Full HD 1080i25, depending on whether Premiere Elements was installed for NTSC or PAL.

ISSUE

Premiere Elements 14 appears to have been given different instructions on how to response if it cannot find a match between one of the Adobe project presets and the properties of the source media.
That direction seems to be for it to attempt to give a "closest match" project preset rather than its default project preset of NTSC AVCHD Full HD 1080i30 or PAL AVCHD Full HD 1080i25.

OBSERVATIONS*

Premiere Elements 14

640 x 360 16:9 @ 29.97 progressive frames per second
Project Preset Expected: NTSC AVCHD Full 1080i30 default since no 640 x 360 project preset
Result: NTSC FLIP Flip Mino and Ultra 29_97p which is 640 x 480 4:3

Premiere Elements 13/13.1

640 x 360 16:9 @ 29.97 progressive frames per second
Project Preset Expected: NTSC AVCHD Full 1080i30 default since no 640 x 360 project preset
Result: NTSC AVCHD Full 1080i30 default since no 640 x 360 project preset

Example 2

Premiere Elements 14

1400 x 900 @ 29.97 progressive frames per second
Project Preset Expected: NTSC AVCHD Full 1080i30 default since no 1400 x 900 project preset
Result: NTSC AVCHD AVCHD LITE 720p30 which is 1280 x 720 16:9

Premiere Elements 13/13.1

1400 x 900 @ 29.97 progressive frames per second
Project Preset Expected: NTSC AVCHD Full 1080i30 default since no 1400 x 900 project preset
Result: NTSC AVCHD Full 1080i30 default since no 1400 x 900 project preset

Example 3

Premiere Elements 14

1440 x 1080 HD anamorphic 16:9 @ 29.97 progressive frames per second
Project Preset Expected: NTSC AVCHD Full 1080i30 default since no 1440 x 1080 HD anamorphic 16:9 with the progressive frame rate
Result: NTSC AVCHD HD 1080i30 which is 1440 x 1080 16:9 with the interlaced frame rate

Premiere Elements 13/13.1

1440 x 1080 HD anamorphic 16:9 @ 29.97 progressive frames per second
Project Preset Expected: NTSC AVCHD Full 1080i30 default since no 1440 x 1080 HD anamorphic 16:9 with the progressive frame rate
Result: NTSC AVCHD Full 1080i30 default since no 1440 x 1080 HD anamorphic 16:9 with the progressive frame rate

SOLUTION

When possible set the project preset manually according to the scheme described HERE.
or
Create new project preset as was done HERE for special occasion
or
Plan strategy as indicated

The major consideration is knowing and confirming the Premiere Elements 14 project preset since many of the activities in the new Export & Share area take their guide from the project preset. See Edit Menu/Project Settings/General to verify settings established by the user manually or the project automatically.**

More on this later. Work in progress. Please consider.
_____________________________________________________________________________
* Work done with Premiere Elements 13/13.1 and 14 on Windows 10 Home 64 bit. Both MPEG.mpg and AVCHD.mp4 files were used in the studies.
**Although significant project settings cannot be changed in Edit Menu/Projects Settings/General, it is a good place to verify project settings established by user manually or the project automatically.

ATR

Saturday, November 7, 2015

PE 14: Premiere Elements 14 Mac Only Adobe Solutions For Three Known Issues

INTRODUCTION

During October/November 2015, three important Premiere Elements 14 Mac issues reported in the Adobe Premiere Elements Forum targeted
  • Program crash when clicking on Continue after selecting a Movie Menu theme in the Movie Menu display of theme section
  • Royalty Activation error associated with MPEG file import and DVD burn
  • Premiere Elements 14 Mac Graphics Not Appearing
ISSUE

How to correct these three different types of issues seemingly affecting only Premiere Elements 14 Mac at this time.

ADOBE SOLUTIONS

Premiere Elements 14 Mac crash when clicking on "Continue" after selecting a Movie Menu theme in the Movie Menu display of themes section*

To resolve the issue, Adobe points to the deletion color profile files with the file extension .csf. The Adobe description of the problem and the how to for the deletion of these .csf files is found HERE . The following is an excerpt of the Solution that appears in the document.
Solution: Delete the .csf files
Delete the Color Profile file that is causing Premiere Elements to crash.
Navigate to ~/Library/Application Support/Adobe/Color/Settings and delete files with the .csf extension.
If you see a Recommended folder at ~/Library/Application Support/Adobe/Color/Settings, delete all the contents of the Settings folder except for the Recommended folder itself.
The outdated files are no longer required and will have no impact on the functioning of the product.

Premiere Elements 14 Mac Royalty Activation Error**

To resolve this issue, Adobe points to permission settings in the path which includes the ARA Folder.
The early mention of ARA Folder error related to MPEG file imports and DVD burn is found HERE where the Adobe solution for the error was
Solution: Delete the ARA folder
To resolve the permission issues, delete the ARA folder that has the bad permissions. Once deleted, on next launch, PRE creates the folder with the right permissions.
You can find the ARA folder at the following locations:
Windows
%programdata%\Adobe\Common\Adobe\ARA\

Mac
/Library/Application Support/Adobe/Common/Adobe/ARA
In this earlier mention of ARA Folder permissions, the product affected was Premiere Element 10, presumably on Windows and Mac.

In the case of the November 2015 Royalty Activation error report, Adobe's Sandeep Singh addressed the permissions at the level of the Common Folder/Adobe Folder/ in which the ARA Folder exists and gave the following instructions for resolving the Royalty Activation error.
Steps to check permissions:
- Right click on the Common folder
- Go to information in Sharing & Permissions isn’t visible, click the disclosure triangle.
- If necessary, click the lock icon  to unlock it, then enter an administrator name and password.
- Click a user or group in the Name column, then choose a privilege setting from the pop-up menu.
-  Give Read & Write: Allows a user to open the item and change it.
- If your username is not displaying Please  click Add + to add the your name owner.
- close the get info box
Please do these steps for Adobe folder also.

for more information about giving permission on mac you can check this document : https://support.apple.com/kb/PH18894?locale=en_US&viewlocale=en_U
The user's follow up included
"I have changed read and write permission for Administrative and all user in Get Info of Common and Adobe folder as suggested by Sandeep, and it work. Now Premiere Elements 14 open without error."

In that same thread, Mac user with the Royalty Activation error reported not having the Common Folder, manually creating the Common Folder, restarting the computer to find the complete path to the ARA Folder generated. Problem was resolved.

Another Mac user in this same thread could not get any of the above to work and obtained the assistance of Jay at Adobe Support. This user shared the following for how Adobe's Jay resolved his Royalty Activation issue.
best to start off if you are going to try and correct this is to uninstall premiere elements first. Then grant privileges as described and then install. Once it launches the error should go away.

There are two folders that need permission granted to the Admin users, everyone users, your id if it is an admin to Adobe PCD and Common which are located as follows:
From Finder:
Macintosh HD/Library/Application support/Adobe/Adobe PCD  grant Read&Write permission to everyone and admins
Macintosh HD/Library/Application Support/Adobe/Common  grant Read&write permission to everyone & admins

If you use finder and perform go to /library/application support/adobe you will not find adobe pcd nor the adobe/ara folders, for what ever reason it can be located via that method. The only thing that seem to work to get where you need to be is going using finder under devices: so for me the path was as follows
userid macintosh hd/library/application support/adobe you will find the adobe pcd folder and the common folder where adobe/ara should be written to once you have granted permissions to Admins, Yourself which should be admin and apparently everyone as well.
Once you have granted permission you should install the software and it theory it should work.

Premiere Elements 14 Mac Graphics Not Appearing*** 
To resolve this issue, Adobe pointed to relocating the Clip Arts Folder from the Common Folder to the Adobe Premiere Elements.app Folder.

A Premiere Elements 14 Mac  (OSX 10.11 El Capitan) user has reported the project's Graphics not appearing in the opened project under its Graphics Tab. See Adobe Premiere Elements Forum thread HERE for full details of problem, replies from assumed Adobe sources, and Adobe fix until a 14.1 Update is release somewhere in the future.

The information from posts in the thread cited include:

  • Problem affects Premiere Elements 14 Mac (all versions), and Premiere Elements 14 Windows is not affected by this issue.
  • The Clip Arts/Graphics issue presented by the Premiere Elements 14 Mac user was resolved by the following steps (copy/paste from thread cited)
1. Go to /Applications/Adobe Premiere Elements 14/Support Files/Adobe Premiere Elements.app/Contents/Clip Arts/
2. You need to copy the Clip Art folder and paste it out of contents.
New path for Clip art folder should be:
/Applications/Adobe Premiere Elements 14/Support Files/Adobe Premiere Elements.app/Clip Arts/
When asked about the fate of the Contents Folder in this fix, Adobe representative has replied
"..... the 'Content' folder will remain as it is (No need to delete 'Content' folder). We just need to take 'Clip Art' folder out of 'Content' folder."

COMMENTARY

Special thank you to the Premiere Elements 14 Mac users who asked these important questions and received solutions from Adobe with excellent customer service in this sharing and learning process. Please see Footnotes below for the Adobe Premiere Elements Forum threads that called attention to the issues reported in this blog post.

__________________________________________________________________________
*Adobe Premiere Elements Forum thread - https://forums.adobe.com/thread/1990180?start=40&tstart=0
**Adobe Premiere Elements Forum thread - https://forums.adobe.com/thread/1963175
***Adobe Premiere Elements Forum thread - https://forums.adobe.com/thread/1978448

Sunday, November 1, 2015

PE: Videomerge Produced Transparency Lost In 4K (3840 x 2160) Sized Export

INTRODUCTION

Premiere Elements 12/12.1, 13/13.1, and 14 have QFHD project presets and XAVC-S export presets for 4K (3840 x 2160) video. And, each version includes the Videomerge effect under its Expert workspace fx Effects/Keying. Videomerge has been described as an automatic version of the keying effect named ChromaKey. The keying effects have been used in green screen projects to convert a color in the image to transparency. 

ISSUE

When Videomerge is used to convert a color to transparency in an image to allow for replacement background in that image, the preview in the Edit area looks fine. However, when that Timeline content is exported to file AVCHD.mp4 or XAVC-S.mp4 with 4K 3840 x 2160 export settings, the transparency in that image is lost, and the export file displays the image with its original colored background. 

The study results point to this issue being exclusive to Videomerge and the 4K 3840 x 2160 export in Premiere Elements 12/12.1, 13/13.1, and 14. It is independent of codec (AVCHD vs XAVC-S), project preset (1920 x 1080p30 vs 3840 x 2160p30), and resolution of the import* (1920 x 1080 vs 3840 x 2160). The problem does not exist if ChromaKey or Difference Matte replaces Videomerge in these studies.

STUDIES, DETAILS & RESULTS

The following is a list of the studies done to arrive at the above ISSUE details...
Premiere Elements 13/13.1**
Windows 7 Professional SP1 64 bit
With imported images 1920 x 1080 or 3840 x 2160
Pumpkin on green background on Video 2 and Videomerge applied
Leaves background on Video 1
Player for export: either VLC Player of QuickTime Player 7.7.8.

XAVC-S.MP4 Series Export

TEST 1

Project Preset = NTSC/AVCHD/QFHD 16x9 29.97
Publish+Share = Computer/XAVC-S with Presets = MP4 H.264 3840 x 2160 29.97 30 Mbps

Preview = Image with replacement background displaying
Export = Image with original green colored background displaying
Result = Failure

TEST 2
Project Preset = NTSC/AVCHD/QFHD 16x9 29.97
Publish+Share = Computer/XAVC-S with Presets = MP4 H.264 3840 x 2160 29.97 30 Mbps, but changed 3840 x 2160 to 1920 x 1080 in Advanced Button/Video Tab of preset

Preview = Image with replacement background displaying
Export = Image with replacement background displaying
Result = Success

AVCHD.MP4 Series Export

TEST 3
Project Preset = NTSC/AVCHD/QF 16x9 29.97
Publish+Share = Computer/AVCHD with Presets = MP4 H.264 1920 x 1080p30, but changed 1920 x 1080 to 3840 x 2160 in Advanced Button/Video Tab of preset
Preview = Image with replacement background displaying
Export = Image with original green colored background displaying
Result = Failure

TEST 4
Project Preset = NTSC/AVCHD/QF 16x9 29.97
Publish+Share = Computer/AVCHD with Presets = MP4 H.264 1920 x 1080p30 and left as is.
Preview = Image with replacement background displaying
Export = Image with replacement background displaying
Result = Success


Other Defining Tests

TEST 5, 6, 7, and 8
Repeat of  TESTs 1, 2, 3, and 4, except ChromaKey replaced Videomerge.
Results = All Success

TEST 9, 10, 11, and 12
Repeat of TESTs 1, 2, 3, and 4, except Difference Matte replaced Videomerge
Results = All Success

ADDITIONAL TESTS
Repeat of TESTs 1 through 12, same except Project Preset = NTSC/DSLR/1080p/DSLR 1080p30@ 29.97 instead of NTSC/AVCHD/QFHD 16x9 29.97
Repeat of TESTs 1 through 12, same except resolution of Timeline image was 1920 x 1080 instead of 3840 x 2160
Results = Same As Results From TESTs 1 through 12.

SOLUTION

Based on the above considerations and results, the conclusion is to use ChromaKey or Difference Matte and not Videomerge to create transparency in Timeline images destined for export with the 4K sizing of 3840 x 2160 in Premiere Elements 12/12.1, 13/13.1, and 14.

No advanced export settings were found to resolve the Videomerge 4K 3840 x 2160 export issue.

__________________________________________________________________________________
*Results were independent of whether Videomerge, ChromaKey, or Difference Matte was applied to Timeline video or still.
**The results were randomly confirmed in Premiere Elements 14 on Windows 10 64 bit using Export & Share/Devices/Computer 4K Ultra HD 3840 x 2160 or HD 1080 1920 x 1080 choices as well as Export & Share/Devices/Custom choices. The results were also randomly confirmed in Premiere Elements 12/12.1 on Windows 7 64 bit using  Publish+Share choices similar to those used in the studies reported above for Premiere Elements 13/13.1 on Windows 7 64 bit.


ATR

Tuesday, October 27, 2015

PE 14: Elements Organizer 14 Slideshow In Premiere Elements 14 Editor


INTRODUCTION

The Elements Organizer 13/13.1 and 14 slideshow feature is essentially the same but markedly different than that in versions of the program earlier than 13/13.1. In the pre-13/13.1 versions, the Elements Organizer Slideshow Editor offers Output options for Edit in Premiere Elements Editor (in non wmv format), save as wmv slideshow version, or create a wmv video file that is sent to Premiere Elements Editor burn to section. In Premiere Elements 13/13.1 and 14, the slideshow's route to the Premiere Elements Editor is a bit detoured since the Output options of the pre 13/13.1 versions are gone and replaced with the only choices being to export the slideshow to 720p or 1080p AVCHD.mp4 file saved to the computer hard drive or to save to Facebook.

But, these new slideshows come with bell and whistles including choice of 5 different themes: Classic Dark, Array, Memories, Album, Party Poppers, and Holiday Season. Audio can come from user music (.mp3 or wav) on hard drive or from Adobe choices within the feature which include for Elements Editor 14 Slideshow Builder:
No Audio
BedtimeStory.mp3
ClassReunion.mp3
Spin_Show.mp3
RainyDaydream.mp3
IsItLove_Slow.mp3
CityLights_Slow.mp3
AfternoonSun_Slow.mp3 
14 has 2 more audio choices than does 13/13.1. They are BedtimeStory.mp3 and ClassReunion.mp3.

The Elements Organizer 14 Slideshow Builder tabs at the bottom of the Slideshow Builder workspace include (from left to right) Undo, Redo, Theme, Audio, Captions (On/Off), and Add Text Slide. The previewing area of the feature includes a bar with choices of Edit, Save, Export, and Exit. Customization of these slideshow is markedly limited compared to the pre-13/13.1 times.

ISSUE 

How can the user get this Elements Organizer 14 Slideshow export (720p or 1080p AVCHD.mp4) into Premiere Elements Editor for editing and subsequent export to file or burn to disc?

SOLUTION 

The following gives steps for getting the Elements Organizer 14 slideshow 720p and 1080p export into Premiere Elements Editor either from the 720p and 1080p video file saved to the Elements Organizer 14 browser or from the video file saved to the computer hard drive.

STEP 1
Using Elements Organizer 14's Create/Slideshow, create and export the slideshow from the Elements Organizer Slideshow Builder as 720p or 1080p to the designated computer hard drive save location.
Note: The 720p and 1080p file will be AVCHD.mp4 file with 30 progressive frames per second frame rate and AAC Stereo audio, 48.0 kHz. The video portion of the file uses a variable bitrate max 25.0 Mbps. The audio portion of the file uses a variable bitrate max 9000 kbps.

STEP 2
At the end of the Elements Organizer export to 720p or 1080p, a pop up will appear with the message
"Would you like to import the exported video to Elements Organizer?" with a Yes or No choice.
Select Yes.
Note: The Yes will put a thumbnail for the video file into the Elements Organizer Browser. That thumbnail for the 720p or 1080p video can be right clicked and "Edit in Premiere Elements Editor" selected from the drop down menu in order to get the video into the Premiere Elements Editor project (automatically placed in its Project Assets and on the Timeline). If all has gone correctly, the project preset should be set automatically to NTSC/DSLR/1080p/DSLR 1080p30 for 1080p and NTSC/FLIP/Flip Mino HD and Ultra HD30p for 720p.

STEP 3
With the exported slideshow saved to the Elements Organizer browser and while still in a phase of the slideshow operation, click on the Save button in the workspace in order to save the slideshow as a "Slideshow Project" in the Elements Organizer browser.
Note: That Save will give the slideshow in a form that can be edited at a later date by double clicking the Elements Organizer browser thumbnail for the "Slideshow Project" to open the Elements Organizer Slideshow Builder for further edits.

STEP 4
Next click Done at the bottom right of the Slideshow Builder to exit the Slideshow Builder and get back to the Elements Organizer browser.
Note: The key buttons here are Save, Exit, and Done, and their appearance and location can depend  on whether the slideshow is being created for the first time or from a previously created Slideshow Project that was saved to the Elements Organizer browser. Remember Save = saving slideshow as editable "Slideshow Project" in the Elements Organizer browser, Exit goes to Slideshow Builder, and Done goes to Elements Organizer browser. Rough generalizations.

STEP 5 
Besides the above Elements Organizer route for getting the 720p and 1080p Elements Organizer 14 AVCHD.mp4 slideshows into the Premiere Elements 14 Editor, the 720p and 1080p slideshows can be imported from their hard drive save location into the Premiere Elements 14 project Expert workspace, using the Premiere Elements 14's Add Media/Files and Folders/Project Assets.


EXAMPLES FOR THE SAME 2 PHOTOS (JPEG 3274 x 2448 Pixels 4:3

Dark Classic
1080p30, 21.0 MB, 10 seconds

Array
1080p30, 8.38 MB, 6 seconds


The Minimalist
1080p30, 17.7 MB, 8 seconds


Memories
1080p30, 21.4 MB, 9 seconds


Album
1080p30, 23.3 MB, 10 seconds


Party Poppers
1080p30, 30.8 MB, 11 seconds


Holiday Season
1080p30, 19.4 MB, 8 seconds


_______________________________________________________________________________

ATR

Friday, October 23, 2015

PE 14: Edit Monitor Visibility Issues: Image Bounding Box and Garbage Matte Points

INTRODUCTION

Several editing features can be controlled with the mouse cursor in the Edit area monitor. Two of these features will be pointed to as they relate to the newly released Premiere Elements 14.
  • Image Scaling. Clicking on the image in the Edit area monitor to bring up the image's bounding box, and clicking and dragging on one of its handles to scale the image.
  • Garbage Matte to Create Transparency in Image. Applying a garbage matte to an image to create transparency in the image anywhere outside the area defined by the garbage matte points (Four, Eight, or Sixteen points).

ISSUE*

Image Scaling

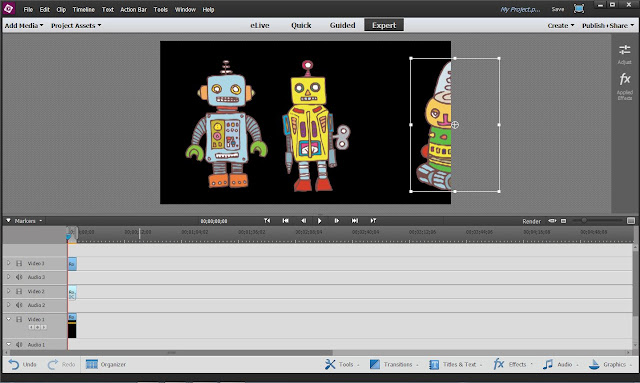
With Premiere Elements 14 on Windows 7 64 bit used, the image bounding box outline in Edit area monitor was a dark color which was barely visible when it was presenting within the monitor space. This was not the case in 13/13.1 on the same computer where the image bounding box outline is white. And, unlike 13/13.1, in Premiere Elements 14, the image bounding box outline was not displaying at all outside the monitor space.

Premiere Elements 14 - poor bounding box outline visibility - attention selected Robot 3 (far right) in Figure 1

Figure 1. Robot 3 (Far Right) Was Selected But The Robot 3's Bounding Box Outline Was Barely Visible.

Premiere Elements 13/13.1 - good bounding box outline visibility - attention selected Robot 3 (far right) in Figure 2

Figure 2. Robot 3 (Far Right) Was Selected And Robot 3's Bounding box Had Good Visibility.

Premiere Elements 14 - image bounding box was not displaying at all outside of Edit area space - attention selected Robot 3 (far right) in Figure 3

Figure 3. Robot 3 (Far Right) Was Selected And Moved Partially Off Screen. The Right Side Of The Bounding Box Outline Was Not Seen Outside The Monitor Space, Only The Left Side.


Premiere Elements 13/13.1 - image bounding box was displaying inside and outside the Edit area space - attention selected Robot 3 (far right) in Figure 4

Figure 4. Robot 3 (Far Right) Was Selected And Moved Partially Off Screen. The Bounding Box Outline Was Seen Complete Inside And Outside The Monitor Space.

Garbage Matte to Create Transparency in Image (Points Visibility)

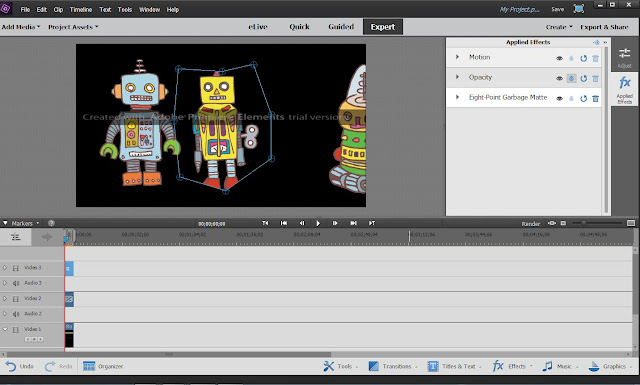
Premiere Elements 13/13.1 and 14 each comes with the keying effects of Four-point, Eight-point, and Sixteen- point Garbage Mattes under the Expert workspace fx Effects of these versions. In Premiere Elements 14 Windows 7 64 bit, the garbage matte points visibility was poor when the garbage mattes points were edited in the Edit area monitor. This was not the case in Premiere Elements 13/13.1.

Premiere Elements 14 - poor garbage matte points visibility - attention middle Robot Figure 5.

Figure 5. Premiere Elements 14. The Eight-Point Garbage Matte Was Applied To The Middle Robot And The Points Barely Visible.


Premiere Elements 13/13.1 - good garbage matte points visibility - attention middle Robot Figure 6

Figure 6. Premiere Elements 13/13.1. Eight-Point Garbage Matte Applied To The Middle Robot And Points Had Good Visibility.


SOLUTION

For Premiere Elements 14 

For Image Scaling 
The degree of visibility of the Premiere Elements 14 bounding box outline varied from Windows 7 Professional SP1 64 bit* poor (as demonstrated in this blog post) to Windows 10 Home 64 bit* characterized as not as bad and acceptable. In both Windows 7 64 bit and Windows 10 64 bit, the version 14 image bounding box outline would not display beyond the Edit area monitor space. This matter did not present in Premiere Elements 13/13.1.

For  Garbage Matte to Create Transparency in Image (Points Visibility)
A temporary solution in the Premiere Elements 14 Windows 7 64 bit workflow was to place the video on the upper track above a color matte from Project Assets/Panel Options/New Item/Color Matte. See Figure 7 example.

Figure 7. Premiere Elements 14 Gray (B7B6B6) Color Matte Used Below The Middle Robot Image File To Which Had Been Applied The Eight-Point Garbage Matte
Here again, the visibility of the garbage matte points varied from poor in the Windows 7 64 bit computer environment to not as bad to acceptable in the Windows 10 64 bit computer environment.


 COMMENTARY

More information is being sort to define all the factors that entered into these observations. More information as it becomes available. At this point, work in progress.


________________________________________________________________________________
* Work was done on Windows 7 Professional SP1 64 bit and compared on Windows 10 Home 64 bit with Premiere Elements 13/13.1 and Premiere Elements 14 tryout on each computer.
Both computers used an Intel HD Graphics video card/graphics card. Windows 7 64 bit computer used a 19 inch monitor with a native resolution of  1440 x 900. The Windows 10 64 bit computer used a 15 inch monitor with a native resolution of 1366 x 768.  


Sunday, October 18, 2015

PE 14: Expert and Quick Workspace Menus


INTRODUCTION

Premiere Elements 14, like 13/13.1, has 4 major workspaces. They are eLive (available in some parts of the world), Quick, Guided, and Expert. See Figures 1 and 2. Guided can exist as Quick Guided or Expert Guided. File, Edit, Clip, Timeline, Text, Tools, Window, and Help are menus of Premiere Elements 14 Quick and Expert workspaces. The Action Bar Menu of 13/13.1 is gone from that group of menus in 14. Many of the entries under these menus include keyboard shortcuts.

Figure 1. Premiere Elements 14 Windows Expert Workspace.

Figure 2. Premiere Elements 14 Windows Quick Workspace.
INTENT

This blog post will focus on the entries under these Expert and Quick workspaces menus and show the Adobe keyboard shortcuts for them. Also see HERE for Premiere Elements 14 keyboard customization/keyboard shortcuts/functions & commands.

EXPERT WORKSPACE MENUS


QUICK WORKSPACE MENUS


File Menu 

Expert entries not in Quick, Interpret Footage.


Edit Menu
Expert entries not in Quick, Paste Insert, Delete and Close Gap, Duplicate, Locate Media, and Edit Original.


Clip Menu

All Expert entries are gone in Quick, except Remove Effects.


Timeline

All Expert entries are gone in Quick, except Render Work Area, Delete Rendered Files, Delete Rendered Files for All Projects, Split Clip, Zoom In, Zoom Out, and Apply Default Transition.


Text

Expert workspace entries appear to be the same in Quick workspaces. 


Tools
Expert entries not in Quick, Audio Mixer, Beat Detect, and Time Stretch.


Window

Expert entries not in Quick, Dual Monitor Workspace and Project Assets.


Help
Expert workspace entries appear to be the same in Quick workspace.

______________________________________________________________________________
The details above have been proof read several times and appear to be complete. We will continue to check them for typing and factual accuracy.

Work in Progress