Frequently explanations are requested for the pop up menu options resulting from right clicking a Expert workspace* Timeline clip. Often the option's name is self explanatory. Sometimes not. And, there will be minor differences in the pop up list resulting from the right click of the Timeline clip dependent on whether or not the clip has audio linked to it. See Figure 1.
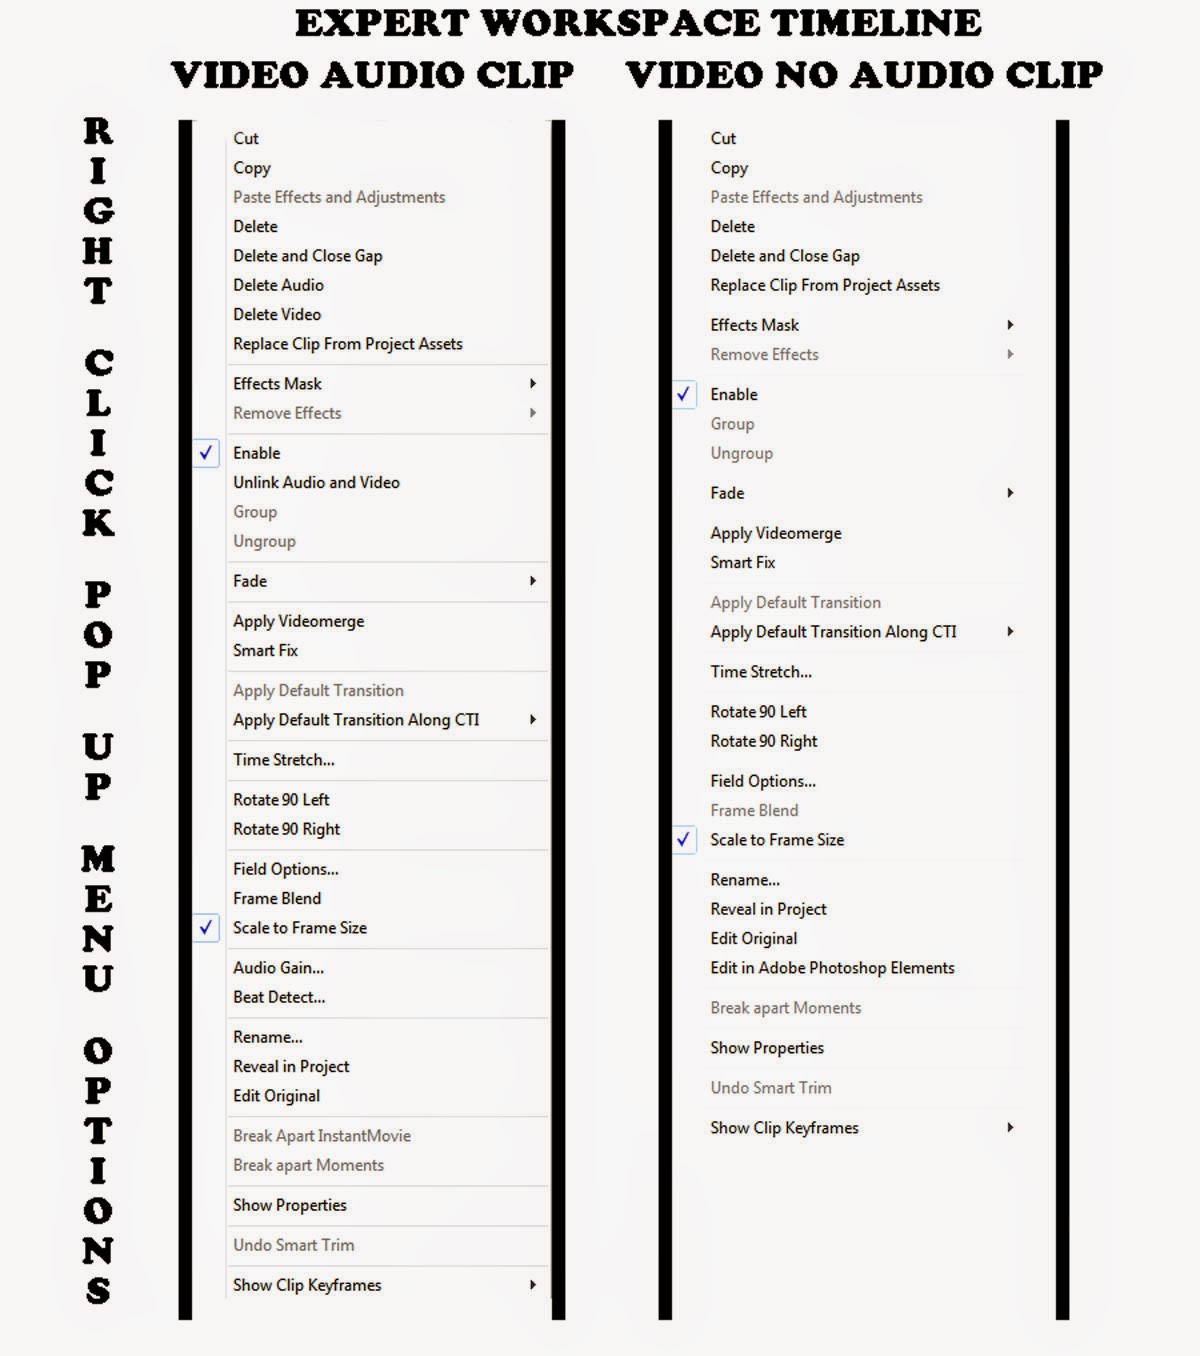 |
| Figure 1. Premiere Elements 13/13.1 Expert Workspace Pop Up Menu Options When Video Audio Clip Or Video No Audio Clip Is Right Clicked On The Timeline |
POP UP MENU OPTIONS
CUT
Removes the clip from the Timeline and holds it in memory until you paste it to where the Timeline Indicator is positioned on the Timeline. (The clip pastes with its end on the left side of the Timeline Indicator.)
COPY
Copies the Timeline clip (does not remove it) and holds it in memory ntil you paste it where the Timeline Indicator is positioned on the Timeline. (The clip pastes with its end on the left side of the Timeline Indictor.)
You can cut, copy, paste within a Premiere Elements project, but you cannot do that from project file to project file with just Premiere Elements along. For copying/pasting between projects (Windows Only) see ClipMate in conjunction with Premiere Elements or export Timeline from project 1 to file saved to the computer hard drive. Then import that export into project 2 which is setup with project settings consistent with project 1 setup.
PASTE EFFECTS AND ADJUSTMENTS
Used after a right click of Timeline clip, COPY, in order to paste copied file's effects and adjustments to selected Timeline clip(s).
The effects and adjustments of that copied clip can be applied to a selection of one or more other Timeline clips by right clicking anywhere in the selection and choosing PASTE EFFECTS AND ADJUSTMENTS.
This is not a selective process, so, any prior effects and adjustments in the copied clip will be pasted into the selection of clips designated for PASTE EFFECTS AND ADJUSTMENTS.
DELETE
Deletes selected clip, leaving gap or vacated space.
DELETE AND CLOSE GAP
Deletes selected clip and should close any Timeline gap related to this deletion.
There can be times when Delete and Close Gap will not work due to components on tracks above or below the track where the DELETE AND CLOSE GAP is taking place. For one example,
See http://atr935.blogspot.com/2014/02/pe-delete-and-close-gap-failures.html
DELETE AUDIO
Deletes audio from selected Timeline clip which has audio linked or grouped to video on Timeline.
Does not work for selected Timeline clip with just video or just audio.
DELETE VIDEO
Deletes video from selected Timeline clip which has video linked or grouped to audio on Timeline.
Does not work for selected Timeline clip with just video or just audio.
REPLACE CLIP FROM PROJECT ASSETS
Replaces the Timeline clip with clip whose thumbnail had been selected beforehand in Project Assets.
Replacements are not always successful due to inappropriate choices for the replacement. One example can be seen in this error message
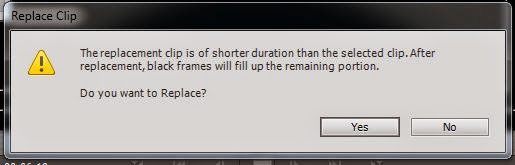 |
| Figure 2. REPLACE CLIP FROM PROJECT ASSETS Warning. |
EFFECTS MASK
See http://www.atr935.blogspot.com/2013/07/pe-about-effects-mask.html
REMOVE EFFECTS
Removes effects applied to Timeline video and audio files.
This option gives 3 choices: audio effects, video effects, all effects. The choices appear to apply to fx Effects and Adjust Tab choices and not Motion effects. Example...if you apply Channel Mixer, Crop, Lighting to a scaled clip, the "all effects" choice will remove the Channel Mixer and Crop effects and Lighting adjust, but will not affect the scale change that was applied.
ENABLE
Removal of the default check mark next to Enable in the pop up list results in a gray cast over that Timeline clip which remains in the Timeline but is not seen in the Edit area monitor nor in any export of that Timeline content.
See https://helpx.adobe.com/premiere-elements/using/grouping-linking-disabling-clips.html
UNLINK AUDIO AND VIDEO
Unlinks audio and video components of a file that imported by default into the project linked. This option is seen only when dealing with a file with linked audio and video.
The counterpart LINK AUDIO AND VIDEO requires that the audio and video components each be selected at the same time in order to use this option.
See https://helpx.adobe.com/premiere-elements/using/grouping-linking-disabling-clips.html
GROUP
See https://helpx.adobe.com/premiere-elements/using/grouping-linking-disabling-clips.html
UNGROUP
See https://helpx.adobe.com/premiere-elements/using/grouping-linking-disabling-clips.html
FADE
Offers shortcut (presets) for creating a Fade In or Out for video and Fade In or Out for audio. The default fades appear to be 0 to 100% Opacity from start to 1 second into clip and from 100% to 0% Opacity from 1 second from end of the clip to the end of the clip. The Opacity keyframes for these presets are adjustable at the Timeline rubberband level.
See http://atr935.blogspot.com/2013/06/pe11-timeline-fade-out-shortcuts-and.html
APPLY VIDEOMERGE
Creates transparency in solid colored area of the clip.
See https://helpx.adobe.com/premiere-elements/using/effects-reference.html#videomerge
Personal opinion...say no to Videomerge. Think ChromaKey instead if needed to create transparency in solid colored area of clip (fx Effects/Keying/ChromaKey).
SMART FIX
Automatic fix of video quality issues after AutoAnalyzer run through and application of Smart Tags.
APPLY DEFAULT TRANSITION
Applies the same default transition to all the selected Timeline clips.
Pairing between video and still clips can be different than expected.
APPLY DEFAULT TRANSITION ALONG THE CTI
Applies the same default transition between clips by using APPLY DEFAULT TRANSITION ALONG THE CTI (Ctrl+D) at each stop of the Timeline Indicator which is being moved left to right from clip to clip with each tap of the Page Down key.
There is no selection of clips beforehand with APPLY DEFAULT TRANSITION ALONG THE CTI as there is with APPLY DEFAULT TRANSITION.
TIME STRETCH
See https://helpx.adobe.com/premiere-elements/using/changing-clip-speed-duration.html
Back in 2009, I wrote about recommendations that I found for smoother motion effects.....
"Advised Slow Motion Speed" sets are given as:
50%, 33.33%, 25%, 20%, 16.67%
"Advised Fast Motion Speed" set are given as:
100%, 200%, 300%, 400%, 500%
What is looked at is the even manner in which the frames are added or removed. And, the decision is based on the speed change percentage. In the case of the 50% speed set, the ratio would be 1:2, reflecting that every one frame ends up as two; 33.33% speed set, the ratio would be 1:3, reflecting that every one frame ends up as three, etc. In the case of 200%, the ratio would be 2:1, reflecting that every 2 frames become 1, etc.
ROTATE 90 LEFT
Self Explanatory.
For more rotation options, see Applied Effects Tab/Applied Effects Palette/Motion Panel expanded, and the rotation feature in Motion Panel expanded.
ROTATE 90 RIGHT
Self Explanatory.
For more rotation options, see Applied Effects Tab/Applied Effects Palette/Motion Panel expanded, and the rotation feature in Motion Panel expanded.
FIELD OPTIONS
See https://helpx.adobe.com/premiere-elements/using/aspect-ratios-field-options.html
FRAME BLEND
Typically the Frame Blend option is a consideration for smoothing out motion effects related to speed of clip (slow motion) and changing frame rate. The basis of Frame Blend "On" seems to be averaging the frames versus Frame Blend "Off" the duplication of frames to achieve, if possible, the smoother look. In versions 12/12.1 and 11, Frame blend from the right click of the video clip is grayed out. Only way to get to Frame blending is through Time Remapping. The Frame Blend situation in 13/13.1 is still being explored.
Ghosting seems to be a consideration here.
SCALE TO FRAME SIZE
Scales imported video to frame size of the project preset.
This SCALE TO FRAME SIZE can be done on an automatic basis or "on demand" basis. The automatic way is controlled by the preference in Edit Menu/Preferences/General and is effective when it is done before source media import. The "on demand" one is done with the right click of the Timeline video and enabling SCALE TO FRAME SIZE by placing a check mark next to that option in the pop up menu.
AUDIO GAIN
See https://helpx.adobe.com/premiere-elements/using/mixing-audio-adjusting-volume.html
BEAT DETECT
Used to synchronize music edits with music beats.
See Beat Detect Settings dialog that opens by BEAT DETECT is selected.
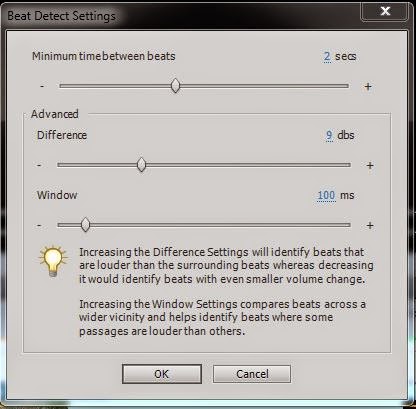 |
| Figure 3. Premiere Elements 13/13.1 Beat Detect Setting Dialog. |
Renames the clip's name in its title bar appearing in the Timeline track.
However, it does not change the name of the copy of the same file in Project Assets. Interestingly, if you right click the renamed Timeline clip and select Reveal in Project, it will pick out the right thumbnail for its file.
REVEAL IN PROJECT
Self Explanatory. REVEAL IN PROJECT choice should open the Expert workspace Project Assets with the Timeline file's thumbnail selected/highlighted there.
EDIT ORIGINAL
For edits in other than in Premiere Elements. Self explanatory after you set up Control Panel default program for opening file type.
BREAK APART INSTANT MOVIE
Self Explanatory. Used to customize Instant Movie once it is generated.
BREAK APART MOMENTS
Self Explanatory. Can be used at the Timeline level to break apart joined video trims produced in the Favorite Moments workspace from the same video clip.
See https://helpx.adobe.com/premiere-elements/using/favorite-moments.html
SHOW PROPERIES
Opens up the file's Properties dialog (same one that is accessed by right clicking the Project Asset thumbnail for the file and selecting Properties).
UNDO SMART TRIM
Self Explanatory. See Tools Menu/Smart Trim and Smart Trim workspace.
SHOW CLIP KEYFRAMES
Allows for display of keyframes on the rubberband of the Timeline clip which has a property keyframed across its duration.
Work In Progress...will add to
____________________________________________________________________________
* Pop up menus from right click of Quick workspace Filmstrip scene spaces have not been
addressed in the above.
ATR