Thursday, April 30, 2015

PE: Editable Subtitle For The Disc Menu's Main Menu Page

INTRODUCTION

The main menu page and scene selection page of the Adobe Movie Menu theme each comes with an editable page title. A few offer an editable subtitle* to accompany the main menu editable page title.
Examples of the title plus subtitle design are
  • Slideshows/Pan and Zoom (See Figure 1)
  • Slideshows/Wedding Doves
  • Kids Corner/Toy Train
  • Movie Genre/Musical
  • Travel/Beach Resort
  • Wedding/Outdoor Wedding 

Figure 1. Subtitle Editable Text Found In Movie Menu Customization Area For Slideshows/Pan and Zoom Main Menu.

ISSUE

What to do if the Movie Menu theme that you prefer to use does not come with an editable subtitle in that theme's main menu page?

SOLUTION

To add an editable subtitle in the theme's main menu page, the .psd file for the theme is edited in Photoshop CS or higher.

  • The target for the edit is the Title major layer group in the Layers Palette of the main menu's .psd file.
  • A text layer is created with text being the word Subtitle, and the layer is given the coding appropriate for the program's language setting. For English, the code would be (en_US), and the name of the layer would be (en_US) Subtitle.
  • Then a new layer group is created above the new text layer and named (^^). The new text layer is dragged into the folder icon on the panel of that new (^^) layer group in order to place the new text layer within the new (^^) layer group.
  • The new (^^) layer group is next dragged into the folder icon on the panel for the existing Title major layer group above it in order to place the new (^^) layer group in the existing Title major layer group.

HOW TO

The example shows how to add a subtitle to the General/Aquarium Movie Menu main menu page. The Movie Menu theme's file that is edited in Photoshop CS5.1 extended to add the subtitle to the main menu is the one named Aquarium_pal_w_mm.psd. And, it is found in the Windows 7 Professional SP1 64 bit path
Local Disk C\Program Data\Adobe\Premiere Elements\13.0\Online\DVD Templates\All_Lang\General\Aquarium.

 STEP 1

Open the Aquarium main menu .psd file in Photoshop CS5.1 extended. And, see the Title major layer group at the top of the other major layer groups in the Layer Palette of the .psd file. See Figure 1.

Figure 1. Aquarium Main Menu Page In Photoshop CS5.1 Extended. Title Major Layer Group And The Title That It Provides On Screen.

STEP 2

When the Title major layer group is opened, it is seen that it contains the (^^) layer group which contains text layers, each with the text "Movie Title Here" but each in a different language. The text layer selected in this example is the one for English since Premiere Elements was installed for English as the setup language. See Figure 2.


Figure 2. Photoshop CS5.1 Extended Editing Of Aquarium Main Menu Psd. Title Major Layer Group Opened To Reveal Its (^^) Layer Group Containing The Text Layer Responsible For The Main Menu's "Movie Title Here".

Close the (^^) layer group containing the text layer for "Movie Title Here". Click on the Title major layer group to highlight that panel. Using Photoshop's horizontal type tool, create a new text layer which should appear immediately above the closed (^^) layer group for "Movie Title Here" The text for this new text layer is "Subtitles". The new text layer is named (en_US) Subtitle. Drop Shadow is applied to the Subtitle text using the selected new text layer and Photoshop's Image Menu/Layer Styles/Drop Shadow. See Figure 3.

Figure 3. Photoshop CS5.1 Extended Editing Of Aquarium Main Menu PSD. Creation Of New Text Layer For Subtitle Text In Main Menu Page.


STEP 3 

Click on the new text layer named (en_US) Subtitle to highlight it. Then create a new layer group above that new text layer, using the Layer Palette's "create a new group" icon. Change the name of this new layer group to (^^),

STEP 4

Drag the text layer named (en_US) Subtitle into the folder icon on the panel for the newly created (^^) layer group. See 1 in Figure 4.

STEP 5

Drag that newly created (^^) layer group into the folder icon on the panel for the Title major layer group. See 2 in Figure 4.

Figure 4. Photoshop CS5.1 Extended Editing Of Aquarium Main Menu Psd. Dragging The Newly Created Text Layer for "Subtitles" Into The Newly Created (^^) Layer Group And Then Moving The Newly Created (^^) Layer Group Into The Existing Title Major Layer Group.
At this point, the Title major layer group contains two (^^) layer groups, one for the "Movie Title Here" text and the other for the "Subtitle" text. Mission accomplished.

COMMENTARY

Some preparation is recommended for obtaining the properties needed for the added text subtitle so that it blends in with the existing text title. In this example, information was gathered from the text that existed for the text "Movie Text Here"

"Movie Text Here"
Tekton Pro
Bold
50 pt
Crisp
Color 99eeff
Drop Shadow

And, the following were used
"Subtitle"
Tekton Pro
Bold
48 pt
Crisp
Color 99eeff
Drop Shadow

________________________________________________________________________________
* Difference here between title and subtitle can be a matter of font, font size, or other attributes of the titles. So, besides the title and subtitle aspects of the study, this study could be looked at as just "How to add more than one text title to a Movie Menu main menu page or a scene selection page?"


ATR


Tuesday, April 28, 2015

PE 12/12.1, 13/13.1: About Adjustment Layer


INTRODUCTION 

Adjustment Layer was introduced to Premiere Elements in version 12/12.1. It can be found in versions 13/13.1 (current version) as well as 12/12.1.

Adjustment Layer is essentially a clip with total transparency to which fx Effects effect(s) can be applied so that an effect or group of effects in the Adjustment Layer can be seen in all the clips directly below it. Using an Adjustment Layer in this way bypasses applying effects to individual clips, and the Adjustment Layer concept is said to provide rendering performance advantage (yet to be defined).

In Premiere Elements 12/12.1 and 13/13.1 Adjustment Layer can be introduced in the Expert* workspace's Timeline in four ways. Way one results in Adjustment Layer with an effect in it placed automatically on the Timeline Video Track 4. Way two, three, and four result in a blank Adjustment Layer which is automatically placed in Project Assets and must be dragged from Project Assets to a Timeline video track for the manual application of an effect or effects into it.

Way One

Dragging an fx Effects effect into the Edit area monitor which is displaying the Timeline clip.
This triggers the appearance of a pop up menu wanting a Yes or No answer to whether or not to apply the selected effect to the entire clip (See Figure 1).

Figure 1. Apply Effect Dialog When A Fx Effect Is Dragged Into Timeline Clip's Image In Edit Area Monitor.

After pressing Yes in the Apply Effect dialog, the Adjustment Layer containing the effect that was dragged into the monitor image appears on Video Track 4. And, now a copy of a blank Adjustment Layer is also found in Project Assets. Editing of the effect that was applied to the Adjustment Layer is done in Applied Effects Tab/Applied Effects Palette/and the Panel for the effect. If No is the response to the Apply Effect message, then no Adjustment Layer is generated, and the effect is applied directly to the clip.

Way Two

Timeline Menu/New Adjustment Layer
 Clicking on New Adjustment Layer in this route triggers Project Assets to open with a thumbnail for a blank Adjustment Layer. The Adjustment Layer can be dragged from Project Assets to any track above the Timeline clips involved. Then fx Effects effect(s) can be dragged into the Adjustment Layer. Editing of the effect now applied to the Adjustment Layer can be done using Applied Effects Tab/Applied Effects Palette/and the Panel for the effect.

Way Three

Project Assets Palette/Panel Options/New Item includes Adjustment Layer 
This is an alternative route to a blank Adjustment Layer. See Way Two. When Adjustment Layer is clicked on under New Item, a new blank Adjustment Layer is placed in Project Assets. The Adjustment Layer can be dragged from Project Assets to any track above the Timeline clips involved. Then fx Effects effect(s) can be dragged into the Adjustment Layer. Editing of the effect now applied to the Adjustment Layer can be done using Applied Effects Tab/Applied Effects Palette/and the Panel for the effect.

Way Four

Keyboard shortcut Ctrl+Alt+Y (Windows) or Cmd+Opt+Y (Mac) 
See Edit Menu/Keyboard Customization/Application - Timeline and "New Adjustment Layer" to create the keyboard shortcut for generating a New Adjustment Layer with the command of Ctrl+Alt+Y (Windows) or Cmd+Opt+Y (Mac) or personal choice. See Ways Two and Three.

ISSUE

What is the origin of the Adjustment Layer? And, will the image look the same with its effects applied individually directly from fx Effects effects versus through an Application Layer? How to deal with those blank Adjustment Layers thumbnails in Project Assets

RESULTS

What is the Adjustment Layer?

This blog started out with
Adjustment Layer is essentially a clip with total transparency to which fx Effects can be applied so that an effect or group of effects in the Adjustment Layer can be seen in all the clips directly below it.
Both Black Video (opaque, non transparent) and Adjustment Layer (transparent) are listed under Project Assets/Panel Options/ New Item. If Black Video is imported into the project, its thumbnail named Black Video appears in Project Assets. And, if Adjustment Layer is introduced into the project (way one, two, three, or four), its thumbnail named Adjustment Layer appears in Project Assets. The curious thing is that, both give the same Properties readout in Project Assets. Both are described as Black Video. See Figure 2.

Figure 2. Same Project Assets Properties Readout For Adjustment Layer And Black Video In The 1920 x 1080 Premiere Elements 13/13.1 Project.
Can it be inferred that Adobe creates the Adjustment Layer from a Black Video file, replacing the black color of Black Video with transparency? If that might be the case, could an Adjustment Layer also be created from a blank text title created in the opened Titler? Those ideas were explored and at no time could an Adjustment Layer for Premiere Elements 13/13.1 be created by us from Black Video with color replaced by transparency or from a blank text title from the program's Titler. So, no answer to this one yet.

Some have suggested a rendering performance advantage to using an Adjustment Layer as placeholder for effects that affect the Timeline clips below instead of applying effects directly to the Timeline clips individually. Preliminary look into this type of question showed rendering times were 2 to 4 minutes slower when Application Layer with Three-Way Color Corrector effect was used over Timeline clips instead of Three-Way Color Corrector effect applied to each of the same Timeline clips.
1920 x 1080i30 Project
Effect Three-Way Color Corrector
Timeline Duration 16 minutes 2 seconds 12 frames
4 different clips representing 28842 frames
Timeline Rendering Time
...Adjustment Layer - Three-Way Color Corrector...........17 minutes 44 seconds 2 frames.
...Three-Way Color Corrector direct to Timeline Clips....14 minutes 5 seconds 5 frames
1920 x 1080i30 Project
Effect Three-Way Color Corrector
Timeline Duration 9 minutes 28 seconds 11 frames
1 clip representing 17033 frames
Timeline Rendering Time
...Adjustment Layer-Three-Way Color Corrector.............10 minutes 29 seconds 9 frames
...Three-Way Color Corrector Direct to Timeline Clips.....8 minutes 23 second 6 frames
And, will the image look the same with its effects applied individually directly from fx Effects versus through an Application Layer?

Example One** - fx Effects/Advanced Adjustments/Image Control and fx Effects/Blur & Sharpen/Sharpen

Original


Effects Direct To Clip


 Effects In Adjustment Layer Above Clip


Example Two*** - fx Effects/Color Correction/Three-Way Color Corrector

Original


Effect Direct To Clip


 Effect In Adjustment Layer Above Clip


Working around blank Adjustment Layers piling up in Project Assets


Whether Adjustment Layer is generated by Way 1 or 2, 3, 4,  the copy of the Adjustment Layer stored as project media in Project Assets is blank. This is true even after the corresponding Timeline copy has an effect applied to it. A situation can occur where there are many of these blank Adjustments Layers in Project Assets. Knowing which Project Assets "Adjustment Layer" belongs to which Timeline "Adjustment Layer" can get confusing. The best way around this seems to be right clicking the Timeline "Adjustment Layer" and selecting Reveal in Project. That will open Project Assets with the correct corresponding "Adjustment Layer" selected/highlighted in Project Assets.

The above observation is interesting when making a comparison between text titles and Adjustment Layers. Timeline text title edit in the Titler is reflected in the Project Assets thumbnail.  Effects edits, additions, subtractions to Timeline Adjustment Layers are not. Yet deletion of either from Project Assets removes the text title and Adjustment Layer respectively from the project.

COMMENTARY

Although the mechanics of how the Adjustment Layer in Premiere Elements 12/12.1 and 13/13.1 works, it is not known to us how to make our own Adjustment Layer file as a "placeholder" for effects that will be seen the in the clip(s) below the Adjustment Layer. There is circumstantial evidence but nothing that works to support the speculations about Adjustment Layer origins.

The Project Assets thumbnails for the Adjustment Layers as source media seem confusing. And, the reason for their existence there as blank Adjustment Layers all with the same name is puzzling at this point. Also, often the spontaneous expansion of the Adjustment Layer to span the entire Timeline can be unhelpful rather than helpful.

Comparable results appear to result whether the effect(s) are applied to a clip directly or indirectly through an Adjustment Layer/with effect placed above the clip. However, the examples given in this blog post seem slightly darker when the effects were applied directly to the clip.

Something to think about....would the creation and use of an Effects Preset instead of Adjustment Layer work just a well to apply the same effects to a clip or group of clips? 

Needs more thinking about.

________________________________________________________________________________
*Blog post focused on look at Adjustment Layer in Premiere Elements 13/13.1 Windows, using Windows 7 Professional SP1 64 bit computer. Adjustment Layer can also be done in the Quick workspace according to the steps described in the Adobe document "Adobe Premiere Elements Help / Applying effects using Adjustment layers". 

** Effects Settings in Applied Effects Tab/Applied Effects Palette/Image Control Panel expanded and Applied Effects Tab/Applied Effects Palette/Blur & Sharpen/Sharpen Panel expanded.


*** Effect Settings in Applied Effects Tab/Applied Effects Palette/Three-Way Color Corrector Panel expanded


______________________________________________________________________________

ATR

Wednesday, April 22, 2015

PE 13/13.1: Photoshop Camera Raw 9.0 Update Released

INTRODUCTION

Premiere Elements 13 as well as Photoshop Elements 13 were released in September 2014 with Photoshop Camera Raw 8.6. About November of 2014*, Photoshop Camera Raw 8.6 was updated to 8.7.1 Now in April 2015*, Photoshop Camera Raw 8.7.1 is updated to 9.0*. For the Elements users  Camera Raw updates continue to be only via Help Menu/Updates from within an opened project.

Figure 1. Help Menu/Updates Route To Photoshop Camera Raw 9.0 Update.**

The Adobe DNG Converter 9.0 is also available, but as an download.
For Windows
http://www.adobe.com/support/downloads/detail.jsp?ftpID=5883
For Mac
http://www.adobe.com/support/downloads/detail.jsp?ftpID=5882


SUPPLEMENTAL INFORMATION

"Camera Raw plug-in I Support cameras"
https://helpx.adobe.com/creative-suite/kb/camera-raw-plug-supported-cameras.html 
This Adobe link appears to represent an up to date listing of Camera Raw version and supported cameras.

COMMENTARY

It is too early to assess how many of the Elements users, if any, will have problems downloading and installing the Photoshop Camera Raw 9.0 Update using an opened project's Help Menu/Update. Our download and install of this plug-in using this route went smoothly for Premiere Elements 13/13.1 and Photoshop Elements 13/13.1 on Windows 7 Professional SP1 64 bit and Windows 8.1 64 bit. The Adobe party line is that Help Menu/Update is the only route to this update for the Elements users. Apparently this is not so for Lightroom and Photoshop users. For them, we see the update offered as download for installation.
https://helpx.adobe.com/x-productkb/multi/camera-raw-plug-in-installer.html
Based on our prior work, in necessary, we should be able to use the downloads in this link and do a manual install of Photoshop Camera Raw 9.0 using the maneuvers from a prior blog post HERE. But, we have not tried it yet.

Just a reminder, Photoshop Camera Raw enables the Premiere Elements user to import raw format images and dng files into the project. But, Photoshop Elements is needed to open and edit the Camera Raw image in the Camera Raw editing workspace.

________________________________________________________________________________

* The file for the Photoshop Camera Raw 8.7 Update automatically placed in Program Files has an Date Modified date of 11/29/2014. And, the file for the Photoshop Camera Raw 9.0 Update automatically placed in Program Files has a Date Modified date of 4/14/2015. For Premiere Elements 13/13.1 and Photoshop Elements 13/13.1, the file for the  Photoshop Camera Raw Update is named Camera Raw.8bi and is found
Local Disk C\Program Files\Common Files\Adobe\Plug-Ins\Elements 13\File Formats

** Figure 1 is screenshot from the Photoshop Camera Raw 9.0 Update for Premiere Elements 13/13.1 and Photoshop Elements 13/13.1 in Windows 8.1 64 bit.

ATR

Tuesday, April 21, 2015

PE 13/13.1: Favorite Moments Or Preview Window Trims?

INTRODUCTION

In Premiere Elements versions, it is convenient to split video into clips (trims) by double clicking the video's thumbnail in Expert workspace Project Assets to bring up the Preview Window with its Set In and Set Out points.The trim created can be dragged to the Timeline and/or dragged into Project Assets to become a "subclip", part of the project's media. In the trimming of the clip in the Project Window, the trimmed parts are hidden and not really cut away. This can be evidenced by the fact that the Project Window's trim on the Timeline can be dragged out to recover the whole clip on the Timeline. See
http://www.atr935.blogspot.com/2013/06/pe11-project-assets-organization-for.html 

Favorite Moments is a new video trimming feature debuting in Premiere Elements 13/13.1 where Preview Windows has not been discontinued and remains an alternative choice for video trimming. See
https://helpx.adobe.com/premiere-elements/using/favorite-moments.html 

The Favorite Moments workflow begins by selecting/highlighting a single Timeline video clip and then going to and selecting Tools Menu/Favorite Moments or Tools Tab/Favorite Moments which opens to its own workspace which is set for either
  • Place moments as combined clip on timeline
  • Place as individual clips on timeline
before trimming is begun, completed, and the trims for the video returned to the Timeline as individual trims or the individual trims combined into one. Either way, copies of the Favorite Moments trims automatically end up in the same Project Assets folder named Moment Trimming.

The individual Timeline trims can be drawn out by the mouse cursor to recover the whole clip whereas this is not the case for the the individual trims which are combined into one. But, the latter can be broken apart to yield the individual trims by right clicking the Timeline combined clip and selecting Break Apart Moments.

ISSUE

For trimming video clips in Premiere Elements 13/13.1, what to use -
Preview Window with Set In and Set Out points or the Favorite Moments feature?

COMPARISONS*

Preview Window or Favorite Moments

Either way, the video clip can be effectively trimmed and trims provided for the Timeline content as well as for project media
  • In Preview Window way, trim is dragged from Preview Windows to Project Assets to generate copy of trim (subclip)
  • In Favorite Moments way, all copies of trim(s) created in the project by Favorite Moments automatically go to the same Project Assets folder name Moment Trimming which is automatically created when the Favorite Moments feature is used in a project.
Either way, individual trims on the Timeline can be drawn out there to recover the whole clip from which the trims were derived.

The mode of access to Preview Window and Favorite Moments differs. Preview Window is opened for trims by double clicking the video file's thumbnail in Project Assets; whereas, Favorite Moments starts off with Timeline selected video clip, followed by Tools Menu/Favorite Moments or Tools Tab/Favorite Moments to bring up the Favorite Moments workspace for the trims.
Note: Although double clicking the video file on the Timeline will bring up the Preview Window for Timeline trims, it does not support creating subclips for Project Assets as is possible when the Preview Window is opened by double clicking the video file's thumbnail in Project Assets.

Preview Window does not offer combining individual trims into one and subsequent breaking the combined trims apart as necessary as does Favorite Moments.

Favorite moments offers a Favorite Moments Settings dialog with options not found in Preview Window. This dialog is accessed by clicking on the Settings icon at the bottom left of the Favorite moments workspace. See this dialog when making decisions on whether or not to include transitions with the trims that will be returning to the Expert workspace from the Favorite Moments workspace. See Figure 1.


Figure 1. Favorite Moments Settings In Favorite Moments Workspace.

The Favorite Moments way, either choice of the two "Exit Settings" allows for the automatic application of the default transition between trims when they arrive back on the Timeline from the Favorite Moments workspace. But, that appears to be the default video transition and not the default audio transition as well.
Note: When Favorite Moments is used for the first time, clicking Done in the Favorite Moments workspace triggers an Exit Settings dialog which is just the Exit Settings portion of the Favorite Moments Settings dialog without the option for applying default transition between Favorite Moments.

Favorite Moments removes all earlier applied effects before opening its workspace. These "earlier applied effects" appear to include fx Effects, adjustments. Example, if video has been scaled in Edit area, the scaling needs to be removed by Favorite Moments in order for it to continue.

Figure 2. Favorite Moments' Remove Applied Effects Dialog When Video To Be Trimmed Has Applied Effects.
Consequently, if presented with the Remove Applied Effects dialog, the choice needs to be Yes to continue to the Favorite Moments workspace for video trimming.

Favorite Moments and Preview Window can be used in the Expert and Quick workspaces of Premiere Elements 13/13.1, remembering that Quick does not have Project Assets for trim storage as project media as does Expert. The Project Window that opens in Quick has no visible Set In or Set Out point as does the Expert workspace counterpart. Set In and Set Out are set by right clicking the bar under the Preview Window and selecting Set Clip Marker In Out. The following is an online video tutorial on the use of Favorite Moments in Premiere Elements 13/13.1 Mac. It is demo'd in the Quick workspace.
http://tv.adobe.com/watch/learn-premiere-elements/new-favorite-moments-fast-movies/


COMMENTARY

Favorite Moments (the newcomer) or Premiere Windows for video trimming, which to use in Premiere Elements 13/13.1 was the question. After all is said and done, I would probably give the edge to Favorite Moments for handling of the trim storage as project media, the consistency of the workflow between Expert and Quick workspaces, and its overall perks. But, when it comes to the actual ease in trimming and trim results, I am undecided at this time. Need to think about that some more.


_______________________________________________________________________________
* Study on using Windows 7 Professional SP1 64 bit and confirmed on Windows 8.1 64 bit.


ATR


Saturday, April 18, 2015

PE 13/13.1: Pop Up Menu Options Explanation

INTRODUCTION

Frequently explanations are requested for the pop up menu options resulting from right clicking a Expert workspace* Timeline clip. Often the option's name is self explanatory. Sometimes not. And, there will be minor differences in the pop up list resulting from the right click of the Timeline clip dependent on whether or not the clip has audio linked to it. See Figure 1.
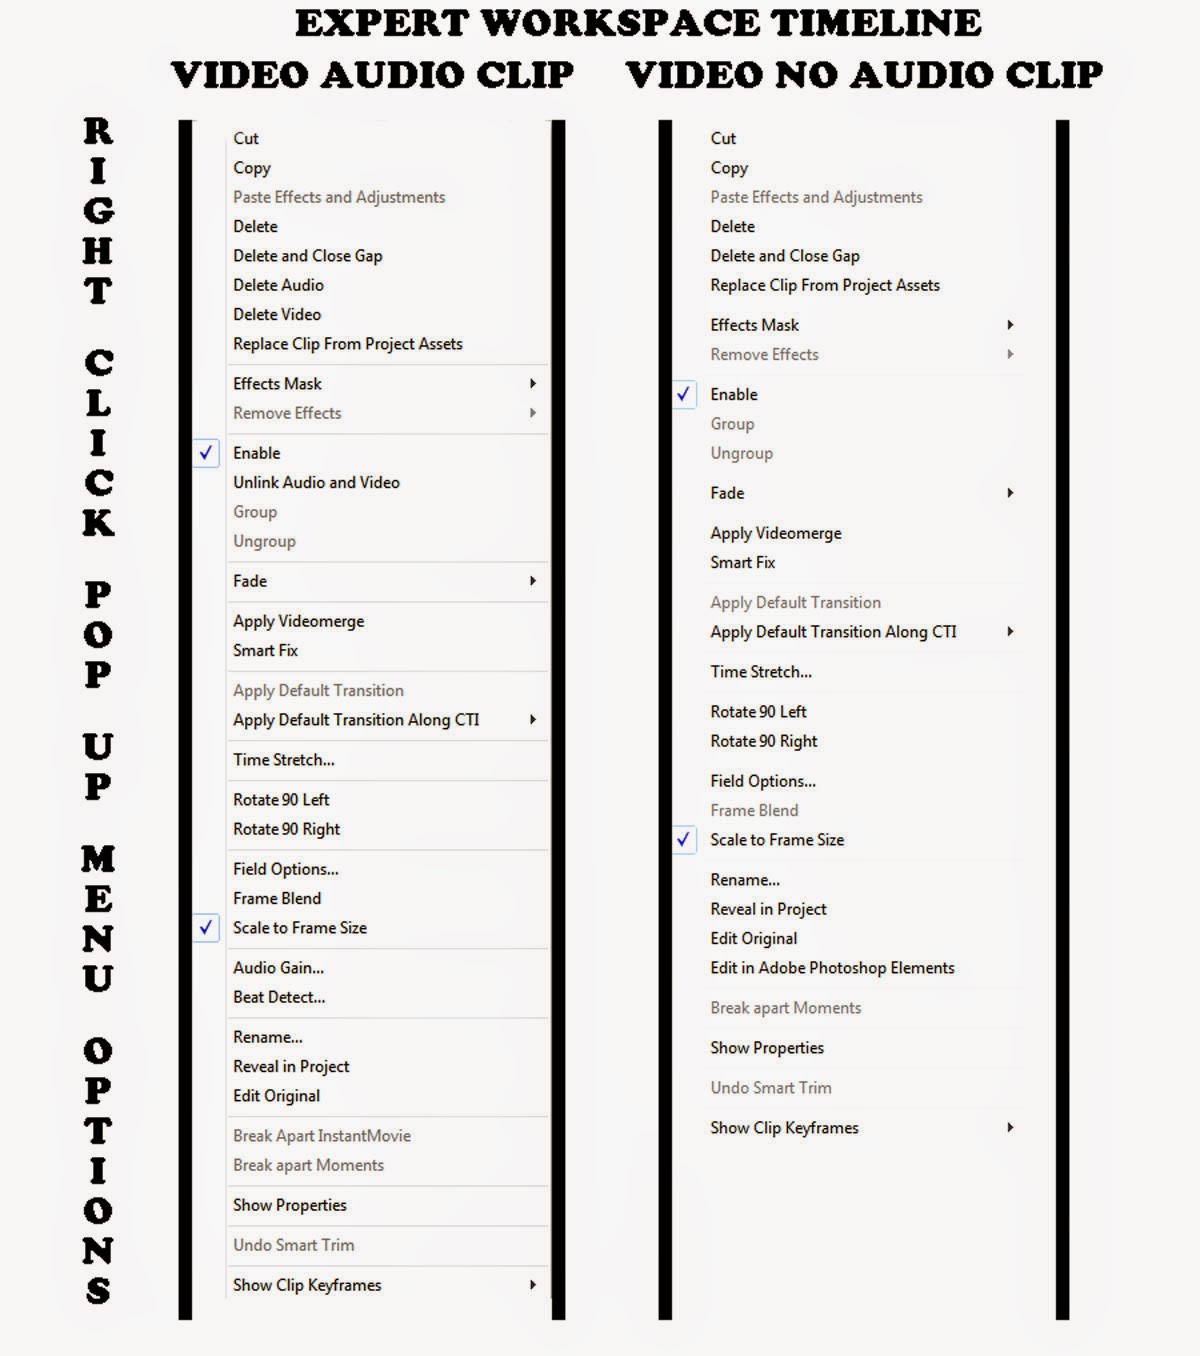
Figure 1. Premiere Elements 13/13.1 Expert Workspace Pop Up Menu Options When Video Audio Clip Or Video No Audio Clip Is Right Clicked On The Timeline
This blog post will focus on some explanations for most of these options.

POP UP MENU OPTIONS

CUT
Removes the clip from the Timeline and holds it in memory until you paste it to where the Timeline Indicator is positioned on the Timeline. (The clip pastes with its end on the left side of the Timeline Indicator.)

COPY
Copies the Timeline clip (does not remove it) and holds it in memory ntil you paste it where the Timeline Indicator is positioned on the Timeline. (The clip pastes with its end on the left side of the Timeline Indictor.)

You can cut, copy, paste within a Premiere Elements project, but you cannot do that from project file to project file with just Premiere Elements along. For copying/pasting between projects (Windows Only) see ClipMate in conjunction with Premiere Elements or export Timeline from project 1 to file saved to the computer hard drive. Then import that export into project 2 which is setup with project settings consistent with project 1 setup.

PASTE EFFECTS AND ADJUSTMENTS
Used after a right click of Timeline clip, COPY, in order to paste copied file's effects and adjustments to selected Timeline clip(s).

The effects and adjustments of that copied clip can be applied to a selection of one or more other Timeline clips by right clicking anywhere in the selection and choosing PASTE EFFECTS AND ADJUSTMENTS.

This is not a selective process, so, any prior effects and adjustments in the copied clip will be pasted into the selection of clips designated for PASTE EFFECTS AND ADJUSTMENTS.

DELETE
Deletes selected clip, leaving gap or vacated space.

DELETE AND CLOSE GAP
Deletes selected clip and should close any Timeline gap related to this deletion.

There can be times when Delete and Close Gap will not work due to components on tracks above or below the track where the DELETE AND CLOSE GAP is taking place. For one example,
See http://atr935.blogspot.com/2014/02/pe-delete-and-close-gap-failures.html

DELETE AUDIO
Deletes audio from selected Timeline clip which has audio linked or grouped to video on Timeline.

Does not work for selected Timeline clip with just video or just audio.

DELETE VIDEO
Deletes video from selected Timeline clip which has video linked or grouped to audio on Timeline.

Does not work for selected Timeline clip with just video or just audio.

REPLACE CLIP FROM PROJECT ASSETS
Replaces the Timeline clip with clip whose thumbnail had been selected beforehand in Project Assets.

Replacements are not always successful due to inappropriate choices for the replacement. One example can be seen in this error message

Figure 2. REPLACE CLIP FROM PROJECT ASSETS Warning.
If interested, for comparison look at the Replace Footage feature accessed by right clicking a clip's thumbnail in Project Assets and selecting Replace Footage.


EFFECTS MASK
See http://www.atr935.blogspot.com/2013/07/pe-about-effects-mask.html

REMOVE EFFECTS
Removes effects applied to Timeline video and audio files.

This option gives 3 choices: audio effects, video effects, all effects. The choices appear to apply to fx Effects and Adjust Tab choices and not Motion effects. Example...if you apply Channel Mixer, Crop, Lighting to a scaled clip, the "all effects" choice will remove the Channel Mixer and Crop effects and Lighting adjust, but will not affect the scale change that was applied.

ENABLE
Removal of the default check mark next to Enable in the pop up list results in a gray cast over that Timeline clip which remains in the Timeline but is not seen in the Edit area monitor nor in any export of that Timeline content.
See https://helpx.adobe.com/premiere-elements/using/grouping-linking-disabling-clips.html

UNLINK AUDIO AND VIDEO
Unlinks audio and video components of a file that imported by default into the project linked. This option is seen only when dealing with a file with linked audio and video.

The counterpart LINK AUDIO AND VIDEO requires that the audio and video components each be selected at the same time in order to use this option.
See https://helpx.adobe.com/premiere-elements/using/grouping-linking-disabling-clips.html

GROUP
See https://helpx.adobe.com/premiere-elements/using/grouping-linking-disabling-clips.html

UNGROUP
See https://helpx.adobe.com/premiere-elements/using/grouping-linking-disabling-clips.html

FADE
Offers shortcut (presets) for creating a Fade In or Out for video and Fade In or Out for audio. The default fades appear to be 0 to 100% Opacity from start to 1 second into clip and from 100% to 0% Opacity from 1 second from end of the clip to the end of the clip. The Opacity keyframes for these presets are adjustable at the Timeline rubberband level.

See http://atr935.blogspot.com/2013/06/pe11-timeline-fade-out-shortcuts-and.html

APPLY VIDEOMERGE
Creates transparency in solid colored area of the clip.

See https://helpx.adobe.com/premiere-elements/using/effects-reference.html#videomerge

Personal opinion...say no to Videomerge. Think ChromaKey instead if needed to create transparency in solid colored area of clip (fx Effects/Keying/ChromaKey).


SMART FIX
Automatic fix of video quality issues after AutoAnalyzer run through and application of Smart Tags.

APPLY DEFAULT TRANSITION
Applies the same default transition to all the selected Timeline clips.

Pairing between video and still clips can be different than expected.

 
APPLY DEFAULT TRANSITION ALONG THE CTI
Applies the same default transition between clips by using APPLY DEFAULT TRANSITION ALONG THE CTI (Ctrl+D) at each stop of the Timeline Indicator which is being moved left to right from clip to clip with each tap of the Page Down key.

There is no selection of clips beforehand with APPLY DEFAULT TRANSITION ALONG THE CTI as there is with APPLY DEFAULT TRANSITION.

TIME STRETCH
See https://helpx.adobe.com/premiere-elements/using/changing-clip-speed-duration.html

Back in 2009, I wrote about recommendations that I found for smoother motion effects.....

"Advised Slow Motion Speed" sets are given as:
50%, 33.33%, 25%, 20%, 16.67%
"Advised Fast Motion Speed" set are given as:
100%, 200%, 300%, 400%, 500%

What is looked at is the even manner in which the frames are added or removed. And, the decision is based on the speed change percentage. In the case of the 50% speed set, the ratio would be 1:2, reflecting that every one frame ends up as two; 33.33% speed set, the ratio would be 1:3, reflecting that every one frame ends up as three, etc. In the case of 200%, the ratio would be 2:1, reflecting that every 2 frames become 1, etc.


ROTATE 90 LEFT
Self Explanatory.

For more rotation options, see Applied Effects Tab/Applied Effects Palette/Motion Panel expanded, and the rotation feature in Motion Panel expanded.

ROTATE 90 RIGHT
Self Explanatory.

For more rotation options, see Applied Effects Tab/Applied Effects Palette/Motion Panel expanded, and the rotation feature in Motion Panel expanded.

FIELD OPTIONS
See https://helpx.adobe.com/premiere-elements/using/aspect-ratios-field-options.html

FRAME BLEND
Typically the Frame Blend option is a consideration for smoothing out motion effects related to speed of clip (slow motion) and changing frame rate. The basis of Frame Blend "On" seems to be averaging the frames versus Frame Blend "Off" the duplication of frames to achieve, if possible, the smoother look. In versions 12/12.1 and 11, Frame blend from the right click of the video clip is grayed out. Only way to get to Frame blending is through Time Remapping. The Frame Blend situation in 13/13.1 is still being explored.


Ghosting seems to be a consideration here.

SCALE TO FRAME SIZE
Scales imported video to frame size of the project preset.

This SCALE TO FRAME SIZE can be done on an automatic basis or "on demand" basis. The automatic way is controlled by the preference in Edit Menu/Preferences/General and is effective when it is done before source media import. The "on demand" one is done with the right click of the Timeline video and enabling SCALE TO FRAME SIZE by placing a check mark next to that option in the pop up menu.

AUDIO GAIN
See https://helpx.adobe.com/premiere-elements/using/mixing-audio-adjusting-volume.html

BEAT DETECT
Used to synchronize music edits with music beats.

 See Beat Detect Settings dialog that opens by BEAT DETECT is selected.
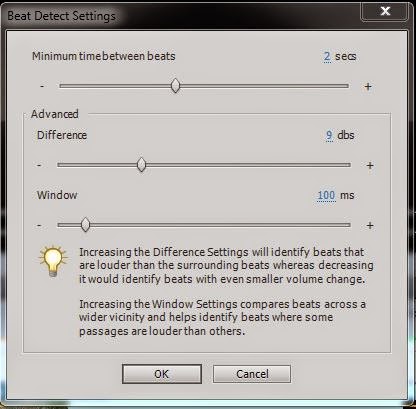

Figure 3. Premiere Elements 13/13.1 Beat Detect Setting Dialog.
RENAME
Renames the clip's name in its title bar appearing in the Timeline track.

However, it does not change the name of the copy of the same file in Project Assets. Interestingly, if you right click the renamed Timeline clip and select Reveal in Project, it will pick out the right thumbnail for its file.

REVEAL IN PROJECT
Self Explanatory. REVEAL IN PROJECT choice should open the Expert workspace Project Assets with the Timeline file's thumbnail selected/highlighted there.

EDIT ORIGINAL
For edits in other than in Premiere Elements. Self explanatory after you set up Control Panel default program for opening file type.

BREAK APART INSTANT MOVIE
Self Explanatory. Used to customize Instant Movie once it is generated.


BREAK APART MOMENTS
Self Explanatory. Can be used at the Timeline level to break apart joined video trims produced in the Favorite Moments workspace from the same video clip.
See https://helpx.adobe.com/premiere-elements/using/favorite-moments.html

SHOW PROPERIES
Opens up the file's Properties dialog (same one that is accessed by right clicking the Project Asset thumbnail for the file and selecting Properties).

UNDO SMART TRIM
Self Explanatory. See Tools Menu/Smart Trim and Smart Trim workspace.


SHOW CLIP KEYFRAMES
Allows for display of keyframes on the rubberband of the Timeline clip which has a property keyframed across its duration.


Work In Progress...will add to

____________________________________________________________________________
* Pop up menus from right click of Quick workspace Filmstrip scene spaces have not been
addressed in the above.


ATR


Friday, April 17, 2015

PE 13/13.1: Split Screen Basics

INTRODUCTION

Split screen effects can be created using Premiere Elements to display two or more images simultaneously on the same screen. Two approaches to achieving a split screen effect
  • Two images cropped and positioned so that one occupies the left 50% of the screen view and the other the right 50% of the screen view.
  • Two videos recorded with the same background, but each video differing in people on the left and right side of the background. It is the top video (left view) that is cropped and positioned to occupy the left 50% of the screen view.
ISSUE

How to?

HOW TO

Two images cropped and positioned so that one occupies the left 50% of the screen view and the other the right 50% of the screen view.

In the classic case, two images are each cropped to occupy 50% of the screen and positioned to represent either the left or right of the screen view. The image to represent the right side of the screen view goes on Video Track 1. The image to represent the left side goes on Video Track 2 directly above the Video Track 1 image for the right side. And, there is the possibility to apply a horizontal flip effect to the  one on the left so that a left and right person face each other. See fx Effects/Transform/Horizontal Flip.

STEP 1
Premiere Elements 13/13.1 NTSC AVCHD Full HD 1080i30 project
Edit Menu/Preferences/General, Default Scale to Frame Size Enabled
Right click Edit Area Monitor To Enable Safety Margins For Use As Guide to 50% Mark On Screen

Figure 1. Safety Margins As 50% Guide.

Video Track 1. 007.avi from Adobe Samples
Video Track 2. 002.avi. from Adobe Samples, selected and cropped to 50% using fx Effects/Transform/Crop. Crop edited using Applied Effects Tab/Applied Effects Palette/Crop Panel extended. See Figure 2.

In this example, rather than apply 50% crop to Video Track 1 007.avi, the file was clicked and dragged on screen to the right to fill the empty 50% space on the right.

STEP 2
Viewing Results

Workspace Overview

Figure 2. Premiere Elements 13/13.1 Split Screen Workspace For Two Images Cropped/Positioned To 50% Simultaneous Screen View.
Note: Because of the view wanted for the left video on Video Track 2, in the Crop Panel expanded, Top and Bottom are each set to 0.0%, and Right and Left are set so that total is close to 50.0%.

Video Sample For Figure 2


Two videos recorded with the same background, but each video differing in people on the left and right of the background. It is the top video that is cropped and positioned to occupy the left 50% of the screen view.

Another interesting approach is to use two videos each recorded with a different person on the same background but, in one video, one person is on the right, and, in the other video, the person is on the left. The video to represent the right side of the screen view goes on Video Track 1. The video to represent the left side goes on Video Track 2 directly above the Video Track 1 video. Then the Video 2 video is cropped to represent the 50% view for the left side of the screen.

STEP 1.
Premiere Elements 13/13.1 NTSC AVCHD Full HD 1080i30 project
Edit Menu/Preferences/General, Default Scale to Frame Size Enabled
Right click Edit Area Monitor To Enable Safety Margin For Use As Guide to 50% Mark On Screen. See Figure 1.

Video Track 1. Homemade .wmv video for right side of screen
Video Track 2. Homemade .wmv video for left side of screen, selected and cropped to 50 % using fx Effects/Transform/Crop Crop was edited using Applied Effects Tab/Applied Effects Palette/Crop Panel extended. See Figure 3.

Workspace Overview

Figure 3. Premiere Elements 13/13.1 Split Screen Workspace For Two Videos Recorded With The Same Background But Each Video With Different Objects For Right And Left Halves.

Sample Video For Figure 3


COMMENTARY

The split screen effect is easy enough to carry out in Premiere Elements. The key to success is in the preparation of the images and videos that go into creating the effect. Interesting effects can also be created using more than 2 two screen view simultaneously.

Miscellaneous tips include:
  • Make sure the correct clip is selected for a given edit, right click Edit area monitor, select Select, and the name of the clip that you want to edit.
  • Use the Applied Effects Tab/Applied Effects Palette/Motion Panel expanded Position properties for fine tuning of the position of the two sides of the screen view.
  • Crop settings can be for Left or Right = 50% or the total of Left and Right = 50.0% when doing the split screen for viewing two images simultaneously.  Work in progress on Crop settings.

______________________________________________________________________________


ATR


Saturday, April 11, 2015

PE 12: Movie Menu Pan and Zoom Background Replacement Issues

INTRODUCTION*

In Premiere Elements 12/12.1, the background replacement for the main or scene menu for the Slideshow/Pan and Zoom theme has been found to be flawed by horizontal stretching in Preview and black borders in Movie Menu customization area Window and Preview. Also noted, there may be no  display of theme graphics in the Movie Menu customization area Window or Preview. Compare what is seen in 12/12.1 versus in current version 13/13.1 The project preset NTSC AVCHD AVCHD 1080p60 appears to be implicated in this issue.

ISSUE

Comparison Of "No Problem" Premiere Elements 13/13.1 and "Problem" Premiere Elements 12/12.1

Premiere Elements 13/13.1
NTSC AVCHD AVCHD 1080p60 project
Timeline source media with scene markers = AVCHD.mp4 @ 59.940 progressive frames per second.
Tools Menu/Movie Menu/Slideshow category with Pan and Zoom HD theme
Background Replacement for Main Menu with 1920 x 1080 images
  • 1920 x 1080 jpeg, red circle on white background
  • 1920 x 1080 jpeg, scene image

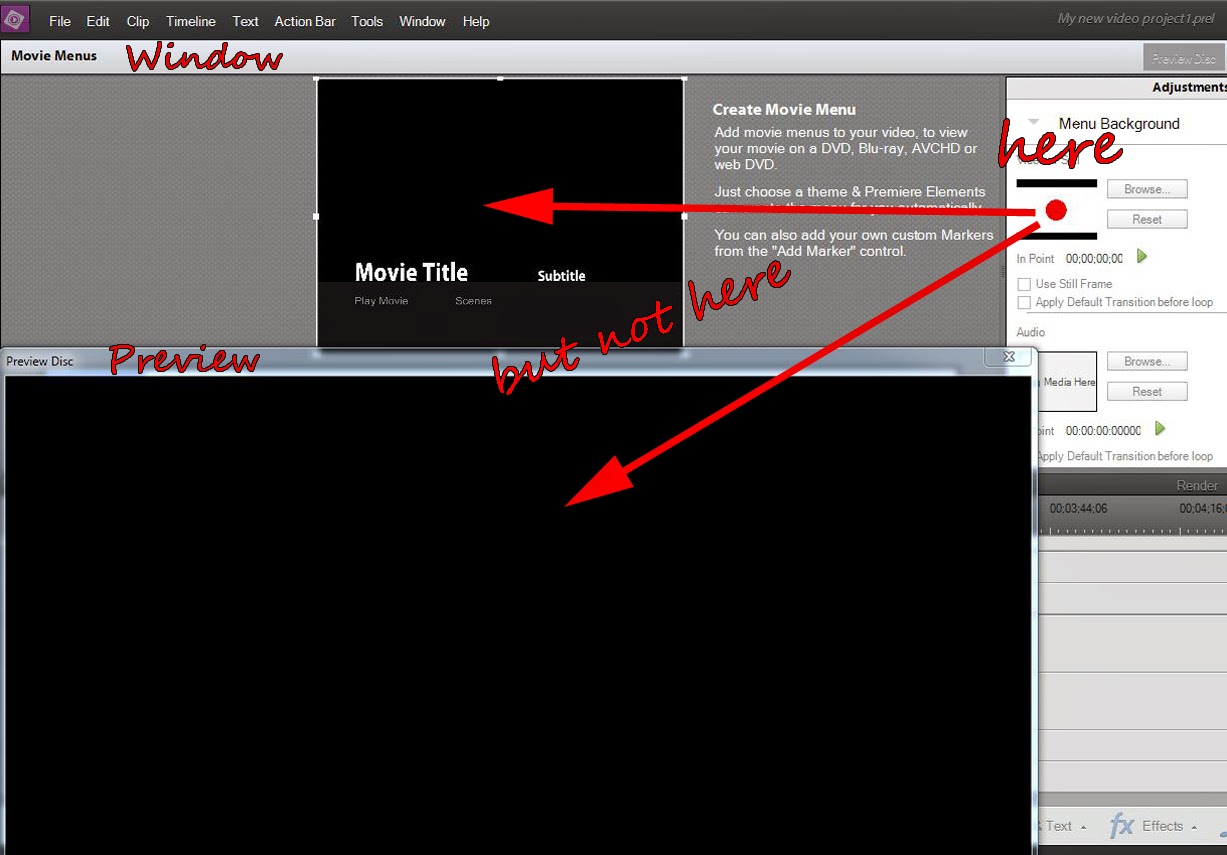
Figure 1. Red Circle.Jpeg Image (1920 x 1080) As Pan And Zoom Main Menu Background Replacement As Seen In 13/13.1 Movie Menu Customization Window And Preview
 
Figure 2. Scene.Jpeg Image (1920 x 1080) As Pan And Zoom Main Menu Background Replacements As Seen In 13/13.1 Movie Menu Customization Window And Preview.


Premiere Elements 12/12.1
Protocol exactly the same as described above for 13/13.1.....

No display of replacement background existed in Movie Menu customization Window or Preview, but thumbnail for background replacement was seen in Adjustments area when background replacement was .jpeg and not a video. See Figure 3.

Figure 3. Red Circle Jpeg Image (1920 x 1080) As Pan And Zoom Main Menu Background Replacement As Seen In 12/12.1 Movie Menu Customization Window And Preview.
But, if the project preset was manually forced set to 1080p30 instead of 1080p60 and that same 1080p60 source video or a jpeg was imported to the Timeline, then the Movie Menu customization area Window and Preview displayed the background replacement images, but the Preview was characterized by horizontal stretching, and both Window and Preview views had large top and bottom black borders. See Figure 4 and Figure 5.

Figure 4. Red Circle Jpeg Image (1920 x 1080) As Pan And Zoom Main Menu Background Replacement As Seen In 12/12.1 Movie Menu Customization Window And Preview Only After Project Preset Was 1080p30 Instead Of 1080p60.

Figure 5. Scene Jpeg Image (1920 x 1080) As Pan And Zoom Main Menu Background Replacement As See In 12/12.1 Movie Menu Customization Window And Preview.

The results shown in Figures 1, 2, 3, 4, and 5 were the same for Premiere Elements 12/12.1 and 13/13.1 whether the programs were installed Windows 7 64 bit or Windows 8.1 64 bit computer. Although not all the Movie Menu themes were tested for this issue, all the ones tested showed the same problem profile.

The background replacement display in the playback of the disc product from this project reflected what was seen in the Movie Menu customization area Preview, that is, black border at top and bottom of image and horizontally stretched background replacement (whether DVD-VIDEO Widescreen on DVD disc with preset = NTSC_Widescreen_Dolby DVD or AVCHD on DVD disc with preset = 1920 x 1080p NTSC Dolby).

SOLUTION

One way to overcome the black borders and image stretching described above for Premiere Elements 12/12.1 Movie Menu Pan and Zoom background replacement was found.

Step 1**

For Pan and Zoom theme main menu and scene menu .psd files to be edited, see
Local Disk C\Program Files\Adobe\Adobe Premiere Elements 12\DVD Templates\Common\Slideshows\Pan and Zoom and, in the Pan and Zoom Folder, copy and work from copy.....
pan and zoom_hd_mm.psd
and
pan and zoom_hd_sm.psd
For this study, results are detailed for Pan and Zoom (HD) theme main menu only. 

Background replacement was done in the main menu .psd file on the hard drive rather than in the Menu Background/Video or Still and Browse area within the Movie Maker customization area of the project. The background replacement is 1920 x 1080 pixels and is placed in it own Layer Set in the Layers Palette. Refer to Figure 6 and Figure 7.

Figure 6. Pan And Zoom (HD) Theme Editing At Psd Level With Photoshop CS5.1 Extended

Figure 7. Pan And Zoom (HD) Theme Editing At Psd Level With Photoshop CS5.1 Extended. Saved Version.
Suggestion:
  •  rename the edited .psd file SATpan and zoom_hd_mm.psd and SATpan and zoom_hd_sm.psd
  • place them in a new folder named SATpan and zoom.
  • place that  SATpan and zoom folder in the Slideshows Folder in the path already cited
  • leave the original  Pan and Zoom Folder in the Slideshows Folder as is

Step 2

Some dos and don'ts....
In the Movie Menu customization area, do not do a replacement background for your special Pan and Zoom appearing in the Movie Menu customization area of the project. If you do, you will end up with black borders and image distortion for the replacement. If you try this, Reset will get you back to your special Pan and Zoom with the no black borders in Window or Preview and no distortion in Preview.

You should be able to save close reopen this project and find your special Pan and Zoom theme displaying and functioning as created.

COMMENTARY

Lots of variables yet to be explored. Of recent memory, Premiere Elements 9.0/9.0.1 disc menus had serious background replacement issues which involved the loss of the background replacement after burn to disc. The fix for that was adding music (muted or not muted) to the menu.

Premiere Elements 12/12.1 Movie Menu background replacement issues appear to be presenting with distortions that do not disappear in the burn to disc.

It is interesting to note that what is working starts with the applied menu appearing in the Window of the Movie Menu customization area a bit on the shrunken  side and then ends up in the end product menu looking "normal".

Another part of the equation is that moving the Premiere Elements 13/13.1 Pan and Zoom (HD) files (no problems in 13/13/1)  to Premiere Elements 12/12.1 (where there were these problems) did not impact the Premiere Elements 12/12.1 Movie Menu background replacement issue.

While writing up this COMMENTARY, a 2012 thread was found on background replacement issue in Premiere Elements 11 Mac Movie Menu Pan and Zoom theme. But, the discussion apparently went without resolution and got lost in looking for the theme's files on the computer.
https://forums.adobe.com/message/7063610

We have not yet looked into the Movie Menu background replacement issue in version 11 and will do so.
______________________________________________________________________________
*Also see other recent Premiere Elements Movie Menu issues.
PE 13/13.1: News Reel Movie Menu Theme Unusable
PE 13: Glass Flowers Disc Menu Highlights Missing in Playback of DVD-VIDEO on DVD Disc

**Study done on Windows 7 Professional SP1 64 bit and double checked with Windows 8.1 64 bit computer.


 .