Tuesday, October 27, 2015

PE 14: Elements Organizer 14 Slideshow In Premiere Elements 14 Editor


INTRODUCTION

The Elements Organizer 13/13.1 and 14 slideshow feature is essentially the same but markedly different than that in versions of the program earlier than 13/13.1. In the pre-13/13.1 versions, the Elements Organizer Slideshow Editor offers Output options for Edit in Premiere Elements Editor (in non wmv format), save as wmv slideshow version, or create a wmv video file that is sent to Premiere Elements Editor burn to section. In Premiere Elements 13/13.1 and 14, the slideshow's route to the Premiere Elements Editor is a bit detoured since the Output options of the pre 13/13.1 versions are gone and replaced with the only choices being to export the slideshow to 720p or 1080p AVCHD.mp4 file saved to the computer hard drive or to save to Facebook.

But, these new slideshows come with bell and whistles including choice of 5 different themes: Classic Dark, Array, Memories, Album, Party Poppers, and Holiday Season. Audio can come from user music (.mp3 or wav) on hard drive or from Adobe choices within the feature which include for Elements Editor 14 Slideshow Builder:
No Audio
BedtimeStory.mp3
ClassReunion.mp3
Spin_Show.mp3
RainyDaydream.mp3
IsItLove_Slow.mp3
CityLights_Slow.mp3
AfternoonSun_Slow.mp3 
14 has 2 more audio choices than does 13/13.1. They are BedtimeStory.mp3 and ClassReunion.mp3.

The Elements Organizer 14 Slideshow Builder tabs at the bottom of the Slideshow Builder workspace include (from left to right) Undo, Redo, Theme, Audio, Captions (On/Off), and Add Text Slide. The previewing area of the feature includes a bar with choices of Edit, Save, Export, and Exit. Customization of these slideshow is markedly limited compared to the pre-13/13.1 times.

ISSUE 

How can the user get this Elements Organizer 14 Slideshow export (720p or 1080p AVCHD.mp4) into Premiere Elements Editor for editing and subsequent export to file or burn to disc?

SOLUTION 

The following gives steps for getting the Elements Organizer 14 slideshow 720p and 1080p export into Premiere Elements Editor either from the 720p and 1080p video file saved to the Elements Organizer 14 browser or from the video file saved to the computer hard drive.

STEP 1
Using Elements Organizer 14's Create/Slideshow, create and export the slideshow from the Elements Organizer Slideshow Builder as 720p or 1080p to the designated computer hard drive save location.
Note: The 720p and 1080p file will be AVCHD.mp4 file with 30 progressive frames per second frame rate and AAC Stereo audio, 48.0 kHz. The video portion of the file uses a variable bitrate max 25.0 Mbps. The audio portion of the file uses a variable bitrate max 9000 kbps.

STEP 2
At the end of the Elements Organizer export to 720p or 1080p, a pop up will appear with the message
"Would you like to import the exported video to Elements Organizer?" with a Yes or No choice.
Select Yes.
Note: The Yes will put a thumbnail for the video file into the Elements Organizer Browser. That thumbnail for the 720p or 1080p video can be right clicked and "Edit in Premiere Elements Editor" selected from the drop down menu in order to get the video into the Premiere Elements Editor project (automatically placed in its Project Assets and on the Timeline). If all has gone correctly, the project preset should be set automatically to NTSC/DSLR/1080p/DSLR 1080p30 for 1080p and NTSC/FLIP/Flip Mino HD and Ultra HD30p for 720p.

STEP 3
With the exported slideshow saved to the Elements Organizer browser and while still in a phase of the slideshow operation, click on the Save button in the workspace in order to save the slideshow as a "Slideshow Project" in the Elements Organizer browser.
Note: That Save will give the slideshow in a form that can be edited at a later date by double clicking the Elements Organizer browser thumbnail for the "Slideshow Project" to open the Elements Organizer Slideshow Builder for further edits.

STEP 4
Next click Done at the bottom right of the Slideshow Builder to exit the Slideshow Builder and get back to the Elements Organizer browser.
Note: The key buttons here are Save, Exit, and Done, and their appearance and location can depend  on whether the slideshow is being created for the first time or from a previously created Slideshow Project that was saved to the Elements Organizer browser. Remember Save = saving slideshow as editable "Slideshow Project" in the Elements Organizer browser, Exit goes to Slideshow Builder, and Done goes to Elements Organizer browser. Rough generalizations.

STEP 5 
Besides the above Elements Organizer route for getting the 720p and 1080p Elements Organizer 14 AVCHD.mp4 slideshows into the Premiere Elements 14 Editor, the 720p and 1080p slideshows can be imported from their hard drive save location into the Premiere Elements 14 project Expert workspace, using the Premiere Elements 14's Add Media/Files and Folders/Project Assets.


EXAMPLES FOR THE SAME 2 PHOTOS (JPEG 3274 x 2448 Pixels 4:3

Dark Classic
1080p30, 21.0 MB, 10 seconds

Array
1080p30, 8.38 MB, 6 seconds


The Minimalist
1080p30, 17.7 MB, 8 seconds


Memories
1080p30, 21.4 MB, 9 seconds


Album
1080p30, 23.3 MB, 10 seconds


Party Poppers
1080p30, 30.8 MB, 11 seconds


Holiday Season
1080p30, 19.4 MB, 8 seconds


_______________________________________________________________________________

ATR

Friday, October 23, 2015

PE 14: Edit Monitor Visibility Issues: Image Bounding Box and Garbage Matte Points

INTRODUCTION

Several editing features can be controlled with the mouse cursor in the Edit area monitor. Two of these features will be pointed to as they relate to the newly released Premiere Elements 14.
  • Image Scaling. Clicking on the image in the Edit area monitor to bring up the image's bounding box, and clicking and dragging on one of its handles to scale the image.
  • Garbage Matte to Create Transparency in Image. Applying a garbage matte to an image to create transparency in the image anywhere outside the area defined by the garbage matte points (Four, Eight, or Sixteen points).

ISSUE*

Image Scaling

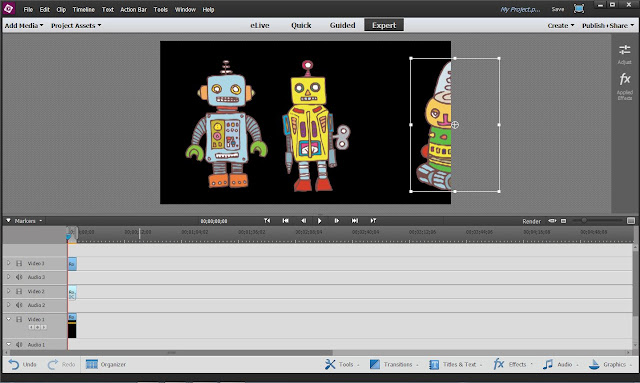
With Premiere Elements 14 on Windows 7 64 bit used, the image bounding box outline in Edit area monitor was a dark color which was barely visible when it was presenting within the monitor space. This was not the case in 13/13.1 on the same computer where the image bounding box outline is white. And, unlike 13/13.1, in Premiere Elements 14, the image bounding box outline was not displaying at all outside the monitor space.

Premiere Elements 14 - poor bounding box outline visibility - attention selected Robot 3 (far right) in Figure 1

Figure 1. Robot 3 (Far Right) Was Selected But The Robot 3's Bounding Box Outline Was Barely Visible.

Premiere Elements 13/13.1 - good bounding box outline visibility - attention selected Robot 3 (far right) in Figure 2

Figure 2. Robot 3 (Far Right) Was Selected And Robot 3's Bounding box Had Good Visibility.

Premiere Elements 14 - image bounding box was not displaying at all outside of Edit area space - attention selected Robot 3 (far right) in Figure 3

Figure 3. Robot 3 (Far Right) Was Selected And Moved Partially Off Screen. The Right Side Of The Bounding Box Outline Was Not Seen Outside The Monitor Space, Only The Left Side.


Premiere Elements 13/13.1 - image bounding box was displaying inside and outside the Edit area space - attention selected Robot 3 (far right) in Figure 4

Figure 4. Robot 3 (Far Right) Was Selected And Moved Partially Off Screen. The Bounding Box Outline Was Seen Complete Inside And Outside The Monitor Space.

Garbage Matte to Create Transparency in Image (Points Visibility)

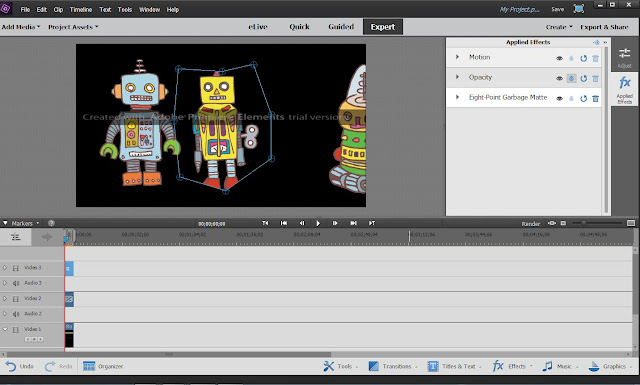
Premiere Elements 13/13.1 and 14 each comes with the keying effects of Four-point, Eight-point, and Sixteen- point Garbage Mattes under the Expert workspace fx Effects of these versions. In Premiere Elements 14 Windows 7 64 bit, the garbage matte points visibility was poor when the garbage mattes points were edited in the Edit area monitor. This was not the case in Premiere Elements 13/13.1.

Premiere Elements 14 - poor garbage matte points visibility - attention middle Robot Figure 5.

Figure 5. Premiere Elements 14. The Eight-Point Garbage Matte Was Applied To The Middle Robot And The Points Barely Visible.


Premiere Elements 13/13.1 - good garbage matte points visibility - attention middle Robot Figure 6

Figure 6. Premiere Elements 13/13.1. Eight-Point Garbage Matte Applied To The Middle Robot And Points Had Good Visibility.


SOLUTION

For Premiere Elements 14 

For Image Scaling 
The degree of visibility of the Premiere Elements 14 bounding box outline varied from Windows 7 Professional SP1 64 bit* poor (as demonstrated in this blog post) to Windows 10 Home 64 bit* characterized as not as bad and acceptable. In both Windows 7 64 bit and Windows 10 64 bit, the version 14 image bounding box outline would not display beyond the Edit area monitor space. This matter did not present in Premiere Elements 13/13.1.

For  Garbage Matte to Create Transparency in Image (Points Visibility)
A temporary solution in the Premiere Elements 14 Windows 7 64 bit workflow was to place the video on the upper track above a color matte from Project Assets/Panel Options/New Item/Color Matte. See Figure 7 example.

Figure 7. Premiere Elements 14 Gray (B7B6B6) Color Matte Used Below The Middle Robot Image File To Which Had Been Applied The Eight-Point Garbage Matte
Here again, the visibility of the garbage matte points varied from poor in the Windows 7 64 bit computer environment to not as bad to acceptable in the Windows 10 64 bit computer environment.


 COMMENTARY

More information is being sort to define all the factors that entered into these observations. More information as it becomes available. At this point, work in progress.


________________________________________________________________________________
* Work was done on Windows 7 Professional SP1 64 bit and compared on Windows 10 Home 64 bit with Premiere Elements 13/13.1 and Premiere Elements 14 tryout on each computer.
Both computers used an Intel HD Graphics video card/graphics card. Windows 7 64 bit computer used a 19 inch monitor with a native resolution of  1440 x 900. The Windows 10 64 bit computer used a 15 inch monitor with a native resolution of 1366 x 768.  


Sunday, October 18, 2015

PE 14: Expert and Quick Workspace Menus


INTRODUCTION

Premiere Elements 14, like 13/13.1, has 4 major workspaces. They are eLive (available in some parts of the world), Quick, Guided, and Expert. See Figures 1 and 2. Guided can exist as Quick Guided or Expert Guided. File, Edit, Clip, Timeline, Text, Tools, Window, and Help are menus of Premiere Elements 14 Quick and Expert workspaces. The Action Bar Menu of 13/13.1 is gone from that group of menus in 14. Many of the entries under these menus include keyboard shortcuts.

Figure 1. Premiere Elements 14 Windows Expert Workspace.

Figure 2. Premiere Elements 14 Windows Quick Workspace.
INTENT

This blog post will focus on the entries under these Expert and Quick workspaces menus and show the Adobe keyboard shortcuts for them. Also see HERE for Premiere Elements 14 keyboard customization/keyboard shortcuts/functions & commands.

EXPERT WORKSPACE MENUS


QUICK WORKSPACE MENUS


File Menu 

Expert entries not in Quick, Interpret Footage.


Edit Menu
Expert entries not in Quick, Paste Insert, Delete and Close Gap, Duplicate, Locate Media, and Edit Original.


Clip Menu

All Expert entries are gone in Quick, except Remove Effects.


Timeline

All Expert entries are gone in Quick, except Render Work Area, Delete Rendered Files, Delete Rendered Files for All Projects, Split Clip, Zoom In, Zoom Out, and Apply Default Transition.


Text

Expert workspace entries appear to be the same in Quick workspaces. 


Tools
Expert entries not in Quick, Audio Mixer, Beat Detect, and Time Stretch.


Window

Expert entries not in Quick, Dual Monitor Workspace and Project Assets.


Help
Expert workspace entries appear to be the same in Quick workspace.

______________________________________________________________________________
The details above have been proof read several times and appear to be complete. We will continue to check them for typing and factual accuracy.

Work in Progress

Thursday, October 15, 2015

PE 14: Keyboard Shortcuts


INTRODUCTION

Premiere Elements 4 through 14 offer "Keyboard Customization" with Application and Windows categories, each filled with program functions with and without Adobe assigned keyboard shortcuts. Keyboard customization applies to user assigning commands only for those functions that Adobe has put in the Keyboard customization feature.

The distinction between the Application and Windows categories is that Application is categorized according to the menus of the Premiere Elements workspace (for version 14, File, Edit, Clip, Timeline, Text, Tools, Window, and Help); whereas Windows is categorized according to the Windows of Premiere Elements (for version 14, Narration, Organizer, Disc Layout Window, Properties Window, History Window, Trimming Window, Monitor Window, Media Window, Sceneline Window, and Timeline Window.

For all intents and purposes the "Keyboard Customization" area of 14 is same as for 13**.
PE 13: Keyboard Shorts are found HERE.

The Keyboard Customization (default) listings found in Premiere Elements 14* Edit Menu/Keyboard Customization are:


PART 1

APPLICATION


more Clip


 more Text


more Help


PART 2

WINDOWS


more Monitor Window


________________________________________________________________________________
*Information listed is for Premiere Elements 14 on Windows 7, 8, 8.1, or 10 64 bit.
**Some specific differences noted between Premiere Elements 14 and 13/13.1 Keyboard Customization feature
APPLICATION
File..the function listing for Export Title is gone, and now Export and Share function in the Adobe list of functions.
Clip.. For Clear Clip Marker/Current Marker, now Adobe assigned as Ctrl + Shift + 1...it was Ctrl + Shift + 0 in 13/13.1. For Clear Clip Marker/All Markers, now Adobe assigned as Alt + Shift + 1, was Alt + Shift + 0. 
Timeline...For Clear Timeline Marker/Current Time Indicator, now Adobe assigned as Ctrl + 1...it was Ctrl + 0 in 13/13.1. For Clear Timeline Marker/All Markers, now Adobe assigned as Alt + 1...it was Alt + 0. Also, Apply Default Transition Along CTI function is now assigned a command by Adobe for Audio and Video, with Audio's command Ctrl + Shift + D and Video's commnad Ctrl + D...was left blank in 13/13.1.
Help....Now has function for Show Audio View assigned by Adobe as Shift + A. And the function Show Classic View is assigned by Adobe as Shift + C.
WINDOWS
Narration Windows....the function delete present narration is gone.


Work in progress, continuously checking for any typing errors.

ATR