As we explore and experiment with Premiere Elements 13 on Windows 7 64 bit, Daily Discoveries will be frequently posted.
DAILY DISCOVERY
0001. Premiere Elements 13 and Dolby Digital 5.1 Channel Sound
As in Premiere Elements 12, version 13 does not offer Dolby Digital 5.1 channel sound for its burn to exports. It does continue to offer limited opportunities for the export of a file with AAC or Window Media Audio 10 Professional 5.1 channel, but the process errors out if the project preset does not include 5.1 channel in its description. In the case of Premiere Elements 13, the error message is presenting as "Error compiling movie. Unknown error".
 | ||||
| Figure 1. Premiere Elements 13. Error Message When Timeline Content Is Exported To File With 5.1 Channel Sound And The Project Does Not Use A Project Preset With 5.1 Channel In Its Description. |
http://www.atr935.blogspot.com/2013/04/pe11-exporting-1080p50-or-1080p60-file.html
http://www.atr935.blogspot.com/2013/07/pe11-exporting-1080p25-or-1080p30-file.html
http://www.atr935.blogspot.com/2013/10/pe12-exporting-720p50-or-720p60-file.html
In Premiere Elements 13, check out the following areas for the limited opportunities to export a file with 5.1 channel sound saved to the computer hard drive
- Publish+Share/Computer/Windows Media and Advanced Button/Audio Tab with Windows Media Audio 10 Professional 5.1 channel sound for the Windows Media Video 9.wmv file export.
- Publish+Share/Computer/AVCHD or XAVC S and Advanced Button/Audio Tab for AAC 5.1 channel opportunities for the .mp4 file export.
- Publish+Share/Mobile Phones and Players/ and preset's Advanced Button/Audio Tab for AAC 5.1 channel opportunities for the H.264.mp4 file export.
0002. Premiere Elements 13 And Its New Shake Stabilizer's Benefits And Liabilities
The fx Effects/Video Stabilizer/Stabilizer effect found in Premiere Elements 12 is gone and now in Premiere Elements 13 there is a Shake Stabilizer in the Expert and Quick workspaces under Adjust Tab/Adjustments Palette. This Shake Stabilizer is described by Adobe as "Shake Stabilizer will smooth out camera shakes in your clips". In the Expert workspace, the feature offers an Advanced set of options which is not present when the feature is used in the Quick workspace.
Although Shake Stabilizer is accessed under the Adjust Tab/Adjustments Palette, once the user clicks on Quick or Detailed within the feature there, the Shake Stabilizer is transferred to Applied Effects/Applied Effects Palette/and presenting as a Shake Stabilizer panel there. See Figure 1 in this 0002 topic.
 |
| Figure 1. Premiere Elements 13 Expert Workspace Shake Stabilizer "Advanced" Working Under Applied Effects Tab/Applied Effects Palette/Shake Stabilizer Panel Expanded. |
The details of the Shake Stabilizer can be found in the Adobe document "Adobe Premiere Elements Help/Stabilize Video Footage with Shake Stabilizer"
http://helpx.adobe.com/premiere-elements/using/shake-stabilizer.html
The effectiveness of the Shake Stabilizer is yet to be determined. At this introductory phase of the evaluation, two aspects of the feature draw attention.
1. "Stabilizer requires clip dimensions to match project settings. Create a new project".
The feature will not stabilizer a clip whose properties do not match that of the project preset even if the clip image is scaled in the Edit area monitor to fit that monitor's space established by the project preset set. Interestingly, if a clip is imported with its properties matching that of the project preset and subsequently zoomed in in the Edit area monitor, the Shake Stabilizer will stabilize that zoomed in image.
2. "Shake Stabilizer is a memory-intensive and time-consuming operation"/
See Adobe document cited above for more details under its "Recommendations for Using Shake Stabilizer section.
0003. Premiere Elements 13 Version’s fx Effects/Hollywood Looks Are Premiere
Elements 12 Version's fx Effects/Film Looks.
The 16 “Hollywood Looks” of the new version’s fx Effects are the same as the 16 “Film Looks”
of prior version’s fx Effects . Nothing
new, except the name of the category. “Hollywood Looks” remains a group of presets, each with its own unique
set of effects and settings to achieve a given “Look” for the image to which it
is applied.
Still existing are the consequences of the No or Yes in the Apply Effect dialog and whether or not the effect is dragged into the image in the screen or into the image's Timeline clip. The Application Layer automatic placement of Video Track 4 with the Yes selection in the Apply Effect dialog exists in 13 as it did in 12. See full details in Item 0002. Premiere Elements 12 fx Effects/Film Looks: Designed In Or Unintended Glitches? in the Premiere Elements Daily Discoveries blog post.
In a recent Adobe Premiere Elements Forum post PRE_help gave the following Adobe insights into Hollywood Looks.
"......Since these are effect presets (multiple effects in combination) that result in a specific "look", they are best applied in isolation. If any previous effect is applied and we still allow a Hollywood effect to be applied, we will not be able to see what the effect does clearly. For e.g. if you already have a Gaussian Blur effect applied to your clip, and then we allow you to apply the "Red Noir" Hollywood effect, the fact that the "Reds" in the scenes will be highlighted and the others converted to B/W will not be clearly seen since the content is already blurred out. So any previously applied effects was designed to be removed. This holds good even if you apply a Hollywood look "on top of" another one. The previous one will be replaced. Having said that, you can customize the look further by either tweaking an already applied filter or by a adding a newer effect on top. That is the reason you can apply an effect on top of the Hollywood Effects and not vice versa."Further exploration and experimentation with PRE_help's comments need to be done. As a reference point, the following is our summary of the 16 Hollywood Looks, the combination of components in each, and where to look for the components of the Look after application of the Look to the image. With regard to where to look, note
AE after the name of the effect = Applied Effects Tab/Applied Effect Palette/Panel for fx Effect applied.
A after the name of a component of the Look = Adjust Tab/Adjustment Palette/Name of Adjust Panel Used.
Comic
.....NewBlue Cartoonr Plus, AE
.....Auto Tone, Lighting Panel A
Cross Process
.....Split Tone, AE
.....Auto Tone, Lighting Panel A
.....Color Balance (HLS), Color Panel A
Crushed Color
.....Temperature Tint, Temperature and Tint Panel A
.....Vibrance, Color Panel A
.....Color Balance (HLS), Color Panel A
.....Auto Tone, Lighting Panel A
Deep Copper
.....Temperature Tint, Temperature and Tint Panel A
.....Color Balance (HLS), Color Panel A
.....Split Tone, AE
.....Auto Tone, Lighting Panel A
Dreamy
.....Temperature Tine, Temperature and Tint Panel A
.....Gaussian Blur, AE
.....Auto Tone, Lighting Panel A
.....Vibrance, Color Panel A
.....Blend with Original, AE
Hollywood Movie
.....Three-Way Color Corrector, AE
.....AutoTone, Lighting Panel A
Horror
.....Three-Way Color Corrector, AE
.....Color Balance (HLS), Color Panel A
.....Split Tone, AE
News Reel
.....Old Film, AE
Old Film
.....Old Film, AE
Pandora
.....Invert, AE
.....Vibrance, Color Panel A
Red Noir
.....HSL Tuner, AE
.....Auto Tone, Lighting Panel A
.....Color Balance (HLS), Color Panel A
.....Vibrance, Color Panel A
.....Blend with Original, AE
Sparta
.....Three-Way Color Corrector, AE
.....Vibrance, Color Panel A
.....Color Balance (HLS), Color Panel A
.....Auto Tone, Lighting Panel A
.....HSL Tuner, AE
.....Split Tone, AE
Summer Day
.....Split Tone, AE
.....Color Balance (HLS), Color Panel A
.....Auto Tone, Lighting Panel A
.....Temperature Tine, Temperature and Tint Panel A
Trinity
.....Three-Way Color Corrector, AE
.....Split Tone, AE
.....Auto Tone, Lighting Panel A
.....Vibrance, Color Panel A
Vintage
.....Shadow/Highlight, AE
.....HSL Tuner, AE
.....Split Tone, AE
Yesteryear
.....Split Tone, AE
0004. VBR, 2 Pass Option Missing In Premiere Elements 13 Advanced Export Settings for Publish+Share/Computer/AVCHD and XAVC-S
A Premiere Elements 13 user has just commented on the finding that the VBR, 2 Pass is missing in Premiere Elements 13 Advanced Export Settings for Publish+Share/Computer/AVCHD. Under Advanced Button/Video Tab and its Bitrate Settings, only CBR and VBR, 1 pass are offered. Interestingly, the description associated with the VBR, 1 pass there reads
The encoding mode to use. Choose Constant Bit Rate (CBR) or Variable Bit Rate (VBR) and the number of encoding passes.Either the message is a mistake or the Video Tab options design is flawed.
When looking further into this report, it was found that VBR, 2 pass can be seen for many of the presets under Premiere Elements 13 Advanced Export Settings for Publish+Share/Computer/MPEG, but not Publish+Share/Computer/AVCHD or XAVC-S.
More news on this with further developments.
October 15, 2014 Update....PRE_help has posted today in the Adobe Premiere Elements Forum
We acknowledge the missing 2-Pass encoding option as a bug and will look at it the next version.
Since the days of Premiere Elements 9.0/9.0.1, deletion of the BadDrivers.txt file has come to the rescue of those who are getting display card error messages in spite of having their video card/graphics card driver version being up to date. For version 9.0/9.0.1, 10, and 11 (on Windows 7, 8, or 8.1 64 bit), the BadDrivers.txt file can be found in the path
Local Disk C
Program Data
Adobe
Premiere Elements
9.0 or 10.0 or 11.0
and in the 9.0 Folder, 10.0 Folder, or 11.0 Folder is the BadDrivers.txt file that is to be deleted.
Folder Option Show Hidden Files, Folders, and Drives needs to be enabled so that the path cited can be seen. The rationale behind deletion of the BadDrivers.txt file can be found in post 10 HERE.
For Premiere Elements 12, that BadDrivers.txt file is now found in the Premiere Elements Folder in the above path rather than in one of the folders in the Premiere Elements Folder.
But, now in Premiere Elements 13, there is no file named BadDrivers.txt file to be found. In the new version, inside the Premiere Elements Folder is seen "Current Display Driver.txt" file. Its significance and relation to the BadDrivers.txt file is unknown at this time. See UPDATE October 17, 2014 at bottom of this item 0005.
On the same Windows 7 64 bit computer, the following is what is seen when the Notepad document of these files are opened with the respective program opened or closed.
Premiere Elements 9.0/9.0.1, 10, and 11
##FALSE#0#0#0
Premiere Elements 12
##FALSE###FALSE#0
Premiere Elements 13
Seen is the Intel Build number/Driver Version for the Intel HD Graphics video card/graphics card that this particular Windows 7 64 bit computer uses.
Good news, if all this means no more display card errors in Premiere Elements 13. Bad news if the Premiere Elements 13 user has lost a value means to troubleshoot display card error issues.
Update October 17, 2014. According to PRE_help, the BadDrivers.txt file "will be at the root of Premiere Elements Folder." and further states, if Premiere Elements 12 and 13 are on the same computer, "PRE12 and 13 will share the entry. So if the entry in this file matches the currently installed driver, both of them will error out during launch." Please refer to fuller details in post 9 here.
0006. Premiere Elements 13 Workarounds For Removed Features
Today in the Adobe Premiere Elements Forum PRE_help posted a link to an Adobe document detailing workarounds for features that Adobe removed from version 13. The document is titled "Adobe Premiere Elements Help/Removed Features And Unsupported File Formats/Adobe Premiere Elements 13". Topics in the document include
- Alternative Way to Capture DV
- Alternative Way to Capture HDV
- MacOS HDV/DV/Webcam Capture
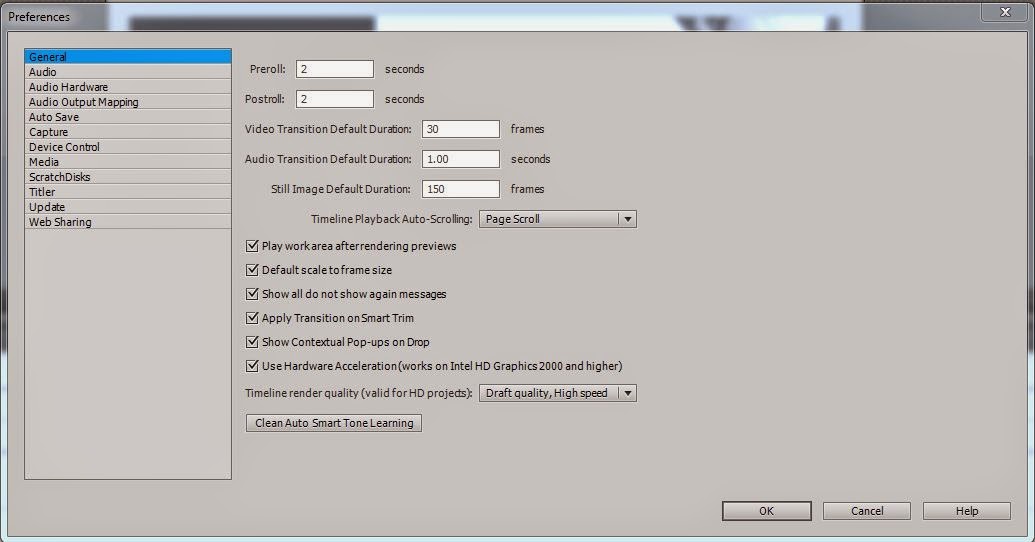 |
| Figure 1. Premiere Elements 13. Edit Menu/Preference/General And Option "Use Hardware Acceleration (Works On Intel HD Graphics 2000 And Higher". |
More information is definitely needed on this and will be posted as it becomes available.
Update October 15, 2014. Please see comments of PRE_help in today's Adobe Premiere Elements Forum thread.
0008. Premiere Elements 13 Tryout Unexpected Work Area Bar Behavior
In Premiere Elements 12 and other prior versions of the program, if I had a clip of 149 frames (from video or still) and played them back in the Edit area
- the gray tabs of the Work Area Bar typically automatically spanned the duration of the clip
- at the end of Timeline playback, the Timeline Indicator would stop "in the black" in what could be designed the 150th frame (the first frame of the next clip if there were a side by side clip).
 |
| Figure 1. Premiere Elements 12. The 150th Frame. |
 |
| Figure 2. Premiere Elements 13. The 150th Frame. |
- If I use the left arrow key to go back to the 149th frame and then use Alt/right bracket key ] to reset the right gray tab of the Work Area Bar, it takes about a "4 frames in" set of the Work Area Bar right gray tab before I get the playback ending without the 10% black.
- Alternatively, if I use the right arrow key to advance the Timeline Indicator by 1 frame to get a "black frame" ending, reset the right gray tab using Alt/right bracket key ] , then the playback of the clip ends in black on the 152nd frame, not the 151st.
- Deletion of the Adobe Premiere Elements Prefs file or the whole 13.0 Folder in which it exists did not resolve the issue.
More news on this as we seek to discover if this is a tryout only issue and if this issue has been seen by others in Premiere Elements 13 purchased version as well as tryout version.
Update. October 20, 2014
Today in the Adobe Premiere Elements Forum PRE_help is confirming that this Premiere Elements 13 Work Area Bar Behavior is not a bug, but rather
This is only a visual indicator that you have reached the last frame. As correctly noted, this is only during preview and is not there is in the exported output.
The Timeline Shuttle would appear to be discontinued in the Premiere Elements 13 workspace, but it is still there under the Play Button in the Full Screen view. However, it has been noted that, under Edit Menu/Keyboard Customization/Application/Help, there are 5 Shuttle keyboard shortcuts that can be used in non Full Screen for the Shuttle function. They are
- Shuttle Left...................J
- Shuttle Right................L
- Shuttle Slow Left.........Shift+J
- Shuttle Slow Right......Shift+L
0010. Importing/Viewing MPEG2 Files In Elements Organizer 13 Tryout
Premiere Elements 13 comes with Elements Organizer 13. A MPEG2 export from Premiere Elements 13 tryout will not load into the Elements Organizer 13, giving a message relating to codec. At the Adobe Premiere Elements Forum level, the answer seems to be that this problem will not exist in the purchased version of 13. We have not yet verified this first hand. The following "Elements Organizer Help document/View video and full-screen images", Section on View video files, does not point out this said to be tryout versus purchased version difference.
http://helpx.adobe.com/elements-organizer/using/view-video-full-screen-images.html
The history on this is interesting. On the same Windows 7 64 bit computer and same MPEG2.mpg file....
Elements Organizer 12 - the MPEG2.mpg crashes the Elements Organizer 12
Elements Organizer 11 - no problem
Elements Organizer 10 - no problem
Elements Organizer 9.0/9.0.1 - no problem
Export settings to generate the MPEG2.mpg used in the above comparison
Publish+Share/Computer/MPEG with Presets = HDTV 1080p 29.97 High Quality
More information as it becomes available.
0011. "New Trimmed Project" Is Working In Premiere Elements 13 Project Archiver/Archive Project/.
Project Archiver/Archive Project/ results in a Trimmed Folder which is supposed to contain a "New Trimmed Project". The "New Trimmed Project" feature has not worked as advertised since Premiere Elements 8.0/8.0.1. Create a "New Trimmed Project" is now working in Premiere Elements 13. Please see the recent blog post for details of the "New Trimmed Project" failures of versions 9.0/9.0.1, 10, 11, and 12 and a general discussion of the matter.
http://atr935.blogspot.com/2014/09/pe-creating-new-trimmed-project.html
0012. Premiere Elements 13 Alert When Install Of Pen And Tablet
Forum threads have talked about what can and cannot be done with mouse versus pen and tablet in the Premiere Elements 13 workflow. However, two of the most recent threads have pointed to more extreme issues with Premiere Elements 13 in a computer environment with a pen and tablet installed.
The latest of these two recent threads involved Premiere Elements 13 iMac OSX 10.95 and workspace stuck in Quick. The problems resolved with removal or disabling of the pen and tablet. Details for this one can be found
https://forums.adobe.com/message/6993322#6993322
More information is being gathered and organized on this matter.
0013. Premiere Elements 13 .MOD Widescreen 16:9 Interpret Footage And Properties Readings Issues.
It is an old story that mod widescreen 16:9 files typically import into Premiere Elements as 4:3. The fix has been to change the Interpret Footage Pixel Aspect Ratio/Conform To: to D1/DV Widescreen 16:9.
The reliability of that fix for .mod widescreen imported into Premiere Elements 13 is questioned since the Interpret Footage and Properties readings for this type of format in Premiere Elements 13 are different than other Premiere Elements versions using the same file and the same Windows 7 64 bit computer.
Details of the situation can be found in the blog post
http://atr935.blogspot.com/2014/12/pe-13-serious-problem-with-mod.html
Studies were done with .mod widescreen as well as with the .mod widescreen whose file extension had been renamed from .mod to .mpeg.
Update...a possible workaround seems to be
a. Set the project preset manually to NTSC DV Widescreen or PAL DV Widescreen
b. Go to Expert workspace Edit Menu/Preferences/General and remove the check mark next to the preference "Default Scale to Frame Size".
c. Import the .mod widescreen into the project with the project's Add Media/Files and Folders/Project Assets, and drag the .mod widescreen from Project Assets to the Timeline Video Track 1/Audio Track 1.
d. Click on the Edit area monitor to bring up the image's bounding box with handles. Click and drag on one of the image's bounding box handles to scale the image to the point where it just fits the space provided in the Edit area monitor by the project preset choice.
0014. Premiere Elements 13 And "No Disc" Error
More and more reports are surfacing about "No Disc" error popping up in Premiere Elements 13. On each of Windows 7 64 bit and Windows 8.1 64 bit, I have installed first the tryout (download) and later the purchased product (disc) and have not encountered this issue.
Most of those with the problem have resolved the problem by deleting or disabling the OldFilm.AEX file as suggested by PRE_help in the Adobe Premiere Elements Forum thread
https://forums.adobe.com/thread/1657807
In that thread, see post 9 which reads
Could you try removing the Old Film effect from the installed location of Premiere Elements 13 and then try to launch the app? The exact file to be removed is (assuming you have installed it in the default location)
Program Files\Adobe\Adobe Premiere Elements 13\Plug-Ins\Common\NewBlue\OldFilm.AEX
While we are not 100% certain this is to blame, we have seen internally that this has fixed the problem in some cases. Let us know if this helps.
Regards,
Premiere Elements Team
Currently under investigation is ruling in or out other factors that may be triggering this Premiere Elements 13 "No Disc" message. At this time, the No Disc OldFilmAEX solution for Premiere Elements 13 is dominating the reports.
0015. ClipMate With Premiere Elements 13 For Copy/Paste Insert Between Projects
Premiere Elements 13 was put through the same Premiere Elements ClipMate testing protocol as described for version 7, 8.0/8.0.1, 9.0/9.0.1, 10 and 11 in the May blog post "PE: ClipMate Copy/Paste Between Projects". Please refer to that blog post for further details.
As done for 12, in 13, an extra test was included, that is,
determining if the Fade In and Out Video and Audio applied to clips
would copy/paste insert successfully from Premiere Elements project to
another Premiere Elements project.. They did.
_____________________________________________________________________________
* Work, to the extent of the Premiere Elements Clip Mate testing protocol as defined in the
May 2013 blog post "PE: ClipMate Copy/Paste Between Projects".
0016. Premiere Elements 13 Titler And Auto Color Adjusted Video/Still Glitch
In Premiere Elements 13, after Auto Color specifically is applied to a still or video clip before the Titler is opened, the clip image cannot be seen when the Titler is opened to create a text title above the clip. This is not the case in Premiere Elements 11 and 12.
Please see blog post
http://www.atr935.blogspot.com/2015/01/pe-13-titler-and-auto-color-adjusted.html
for full details.
0017. Premiere Elements 13 ISO Image File Size Issue
The issue is the lack of player recognition for AVCHD on DVD disc or Blu-ray disc format on Blu-ray disc when the disc is created in ImgBurn using a Premiere Elements 13 ISO Image with a file size greater than about 1 GB.
Please see blog post
http://atr935.blogspot.com/2015/01/pe-13-iso-image-file-size-issue.html
for more details.
0018. Premiere Elements 13 Expert Workspace Timeline Area Mouse Wheel Scrolling Issue: Bernard Solution
In prior versions of Premiere Elements, mouse scroll wheel has been used to scroll the Timeline, moving the Timeline Indicator from left to right or right to left - frame by frame. This is not the case in Premiere Elements 13 Expert workspace.Timeline. Instead, there the mouse scroll wheel scrolling results in the movement of the Timeline tracks up or down or up and down in the Timeline panel.
Bernard has posted the discovery that mouse scroll wheel scrolling in Premiere Elements 13 Expert workspace Timeline can result in the left to right or right to left movement and gave the how to details. Incredible findings by Bernard.
The essentials of what Bernard did and observed include
- With zoom in max set in the -+ slider above the Timeline, position the mouse with the scroll wheel at a blank space to the right or left of the Edit area monitor, and scroll. An 11 frames movement (left to right or right to left) results from each nudge of the mouse scroll wheel.
- If the Premiere Elements 13 icon in the Taskbar is clicked twice before doing the scroll as described above, the result is a 1 frame movement (left to right or right to left) with each nudge of the mouse scroll wheel.
0019. Premiere Elements 13 Movie Menu Title Issue: More Than One Line of Text
A Premiere Elements 13/13.1 user reports that, if he creates a 3 lines of text title for Faux Widescreen theme's main menu in the Movie Maker customization area of the project, those 3 lines of text end up "scrambled" in the reopened project after it had been saved closed.
We have confirmed this report and extended it to include that this issue appears for 13's Movie Menus other than Faux Widescreen. This issue is not seen in Premiere Elements 12/12.1 and earlier versions.
BEFORE THE SAVE CLOSE REOPEN
 |
| Figure 1. Spring Flower Main Menu Originally With 3 Lines Of Text As Seen Before The Save Close Reopen |
AFTER THE SAVE CLOSE REOPEN
 |
| Figure 2. Spring Flower Main Menu Title Originally With 3 Lines Of Text As Seen After The Save Close Reopen |
The only way found so far to get the end product to have the 3 lines of text title for the menus in the end product is to customize the Movie Menu theme in the Movie Menu customization area of the project, do not save close the project at that point, and then do the burn to.
Many variables have been looked at to explain this behavior. So far no answer for why.
0020. Premiere Elements 13 Movie Menu Text Issue: Use Of & In Text Results In &
The forum user gregg reported today (June 27, 2015) that scene button text written as
Joe & Chadney's Wedding
displayed
Joe & Chadney'
and
Bride & Father Dance
displayed
Bride & Father Dance
after the project was saved, closed, and reopened.
In use was Premiere Elements 13 on Windows 8.1 64 bit with Movie Menu Wedding/Elegant.
When the above was repeated with our Premiere Elements 13/13.1 on Windows 7 64 bit, the issue for the most part was confirmed. Our results were
Joe & Chadney' Wedding
displayed
Joe & Chadney's Wedding
and
Bride & Father Dance
displayed
Bride & Father Dance
Our results could be repeated if we used Slideshows/Pan and Zoom theme instead of the Wedding/Elegant theme. And, the issue existed in menu titles as well as in text under scene buttons. This issue was found not to exist in the previous version, Premiere Elements 12/12.1.
If the project was taken to disc without the project save, close, reopen, burn to disc, then the & in text appeared as & and not & at playback of the disc with menus. Consequently, we write
The only way found so far to get the end product to include & and not & is to customize the Movie Menu theme in the Movie Menu customization area of the project, do not save close the project at that point, and then do the burn to.
Alternative for & (like w/) seems less appealing.
0021. Premiere Elements 13/13.1 "Where Is The File Business Title_7.TGA?" and "Where Is The File Tropical_7.TGA?" Messages Popping Up When Reopening A Saved Closed Project Containing Title Templates RedBulb_Title and Beachresort_Title Respectively
For full details including suggested solution, please see blog post.
http://www.atr935.blogspot.com/2015/07/pe-13131-where-is-file-business.html
0022. HD Project's Preview File Format Has Changed From MPEG2.MPEG to AVC/H.264.MPEG According To MediaInfo Readout And Other Property Readout Program
For full details including suggested solution, please see blog post
http://atr935.blogspot.com/2015/07/pe-13131-hd-timeline-rendered-files.html
0023. Premiere Elements 13/13.1 Supports Import Of 16-Bit Tiff Images
The most recent Adobe document found for "Adobe Premiere Elements Help / Guidelines for adding files" states that Premiere Elements does not support 16-bit TIFF Images created in Photoshop and other applications. See
https://helpx.adobe.com/premiere-elements/using/guidelines-adding-files.html
Although this seems to be true for Premiere Elements 10, 11, and 12/12.1, it was found that Premiere Elements 13/13.1 does support the import of a 16-bit TIFF created in Photoshop or other applications.
0024. Premiere Elements 13/13.1 Audio Mixer Mute Button To Mute Selectively Audio Track In The Export
In an earlier blog
http://www.atr935.blogspot.com/2015/05/pe-about-disabling-sound-for-whole.html
we wrote in depth about the Audio Mixer Mute button being functional only within the opened Audio Mixer for adjusting Edit area Timeline audio tracks volume. The message from that work is that you cannot disable sound for a whole audio track, but you can disable sound from each of the files on the audio track.
Recently, in the Adobe Premiere Elements Forum, a Premiere Elements 11 Windows 8.1 64 bit user posted an interesting variation on this matter. The user had audio on different tracks and wanted only one of the audio tracks to be heard in the export. So, the user opened the Audio Mixer in the Edit area, selected Mute button for all the audio tracks except the one wanted, left the Audio Mixer opened, and did the export of the Timeline content. It worked for this user.
We had not seen this approach reported before. We have used the usual ways to mute selectively Timeline content in the export. But, we are confirming that the ID's approach works for MP3 Timeline audio files using Premiere Element 11 or 13/13.1 Windows 7 64 bit with Publish+Share/Computer/Audio with Presets = AAC High Quality or MP3 High Quality.
Thanks Claude for sharing this Premiere Elements Audio Mixer information relating to selective audio export.
ATR