I have created two Premiere Elements perspective effect animations that have gained high praise from Premiere Elements users. They are being offered here for your consideration. No challenge, no critiquing, no contests, just maybe some fun in trying to work through the following and then, if found interesting, to apply the principles to a theme other than the one I used.
First, I chose to try to create an animation which "realistically" showed a bird flying from inside a house and through an open window to join some birds already outside circling around. The second of the two animations involved the idea of creating the illusion of viewing a picture in a picture frame and suddenly have the bird in the picture take life (scale up) and move out of the picture and then retreat back into the stillness and sizing of the picture in the picture frame.
Each can be done with just about any version of Premiere Elements. In the case of the "Bird Flying Inside Outside Window", I had Premiere Elements 8.0/8.0.1 opened at the time, so I used it. In the case of "Bird Flying Out In Picture Frame", I had Premiere Elements 10 opened at the time and used it.
Typical results*
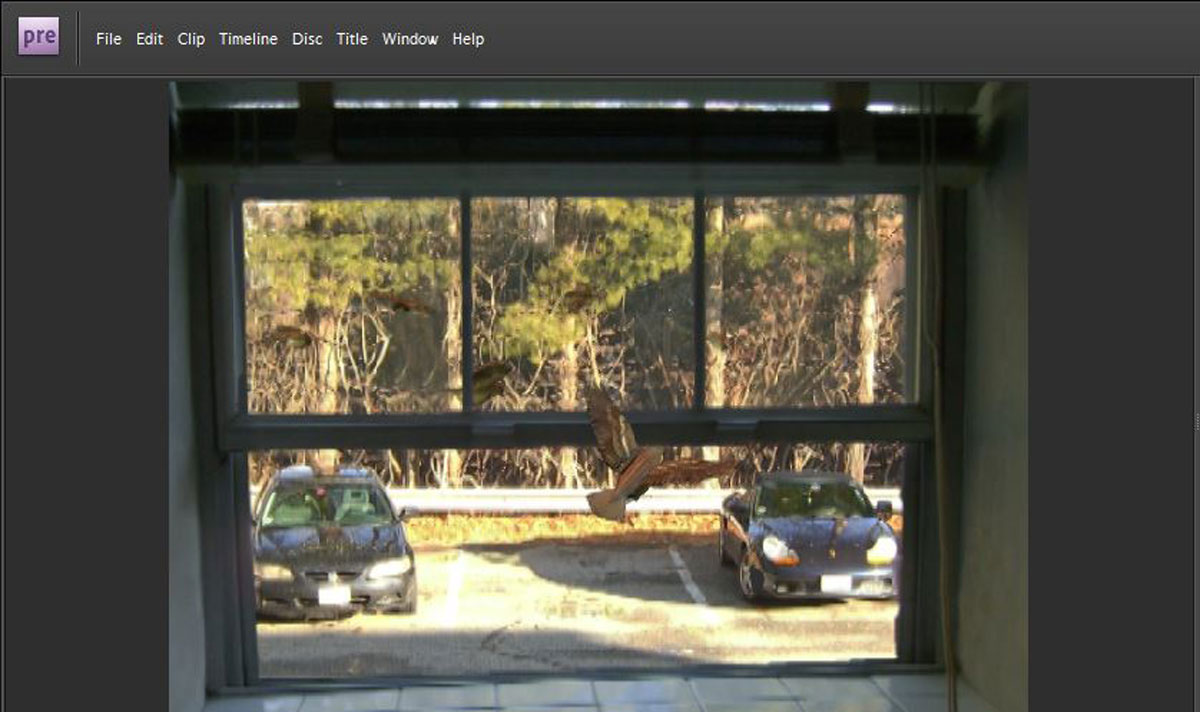
Bird Flying Inside Outside Window
Bird Flying Out In Picture Frame
PART 1
HOW BIRD FLYING INSIDE OUTSIDE WINDOW WAS CREATED
A bird flying from inside a house and through an open window to join some birds already outside circling around
Source Media Were
- My own photo of a window. I created transparent areas in the window panes where the view outside the window had existed. The photo editing was done in Photoshop Elements, and the edited photo saved as a .png.
- A background jpg for the view outside the window. Here I used the background view as seen in the original photo. I took the original into Photoshop Elements, cloned out the window pane elements, and cloned in what was needed to give a seamless background view. And, then I saved my window-less background as jpg.
- Two Clip Art clips from Premiere Elements. These were used for the birds. Premiere Elements 8.0/8.0.1 Edit Header/Clip Art/Animated Objects/Bird-2 and Bird Circling.
- Whatever is on the upper track will show unless there are transparent areas in it for what is below to show through. Here, in the case of the birds, we are dealing with Clip Art, with object on transparent background.
- In the case of the Clip Art (birds), the Clip Art on a track BELOW the photo of window with transparency will appear to be outside the window. The Clip Art on a track ABOVE the photo of window with transparency will appear to be on the inside of the window.
- To achieve the inside to outside look, two identical (Position and Scale keyframed) Bird-2 files are used, one is placed ABOVE the window (for inside look) and one BELOW the window (for outside look), and a garbage matte is applied to the ABOVE one to eliminate it from view at the times when any part of the bird is viewed outside the window.
Workflow
Overview
 |
| Figure 1. "Bird Flying Inside Outside Window" Premiere Elements Workspace Track Set Up. |
Details
STEP 1
In this example where Bird-2 will be flying inside to outside, I took the original Bird-2 Clip Art file (on Video 3) and keyframed its Position property, moving Bird-2 from not seen at bottom left to its exit at top right. Next, I keyframed Bird-2 Clip Art's Scale property from larger inside and to gradually smaller as the bird flew further away outside. If we stopped here, all we would have is the look of the bird moving across the screen and the look of the Bird-2 outside the window, not going inside to outside.
STEP 2
To achieve the inside to outside look, two identical (Position and Scale keyframed) Bird-2 files were used, one was placed ABOVE the window image (for inside look) and one BELOW the window image (for outside look), and a garbage matte was applied to the ABOVE to eliminate it from view at the times when the bird was to be viewed outside the window.
Tip: 4-Point Garbage Matte. Everything within the points of its bounding box is what is seen while all else is excluded, becoming transparent. So, in carrying out this important step in the workflow, best focus on watching the monitor and, during the garbage matte keyframing, moving the points of the bounding box so that the video 5 Bird-2 is only seen at those times when the Bird-2 is inside the window.
Compare, Bird-2 transition from inside to outside, with and without 4-Point Garbage Matte in use at the moment. Refer to Figure 2 (for with 4-Point Garbage Matte) and Figure 3 (for without 4-Point Garbage Matte).
With...
 |
| Figure 2. 4-Point Garbage Matte Applied to Video 5 Bird-2 (Inside). At The Moment Shown, Areas Of "Inside" Beyond The Garbage Matte Bounding Box Are Excluded So The Video 3 Bird-2 (Outside) Dominates In Those Areas. |
 |
| Figure 3. Video 5 Bird-2 (Inside)'s 4-Point Garbage Matte Disabled. Bird-2 Wing Showing "Inside" When It Should Be "Outside" At That Moment. |
STEP 3
As for the Clip Art with the Bird Circling outside, nothing much is to be done there, except
placing the Clip Art in a track below the one with the photo with the window with transparency and some minor positioning and resizing without any keyframing.
Tip: Good idea to keep the sizing of the Bird Circling consistent with the size of Bird-2 once Bird-2 gets outside.
PART 2
Illusion of viewing a photo in a picture frame and suddenly have the bird in the picture take life (scale up) and move out of the picture and then retreat back into the stillness and sizing of the picture in the picture frame
Source Media Were
- My own photo of a picture frame with its own living room background. I used Photoshop Elements to create the transparent area in space provided for the photo in the picture frame. This file was saved as .png file for use as the "frame source" in Premiere Elements project.
- A background jpg to be used for the view inside the frame. Here I used a jpg photo of a Hostas plant flower for use in Premiere Elements 10 project.
- One Clip Art clip from Premiere Elements. Premiere Elements 10 Edit Header/Clip Art/Animated Objects/Bird-1.
- Because I could not immediately find the right photo for my original intent here (copyright considerations), I decided to use what I had to demonstrate the idea. The intent of this particular task was to start with a close up photo of a flower and bird in a picture frame on a living room end table. It is the bird who will leave the picture to travel from inside the frame to outside the frame into the living room and then fly back into its original location in the photo in the picture frame.
- Since the photo is a close up, this will necessitate scaling the bird-outside down to "room size" once it is outside of the picture frame. In the prior animation described, we used the Four-Point Garbage Matte to control the what and when for viewing of the animated objects. In this example, keyframing the Opacity was used instead when that necessity arose.
- Here we will introduce Time Stretch/Reverse Speed and the Horizontal Flip Effect to create the illusion of the bird's return to its original place within the photo in the photo frame.
Workflow
Overview
The 5 track setup was as represented in Figure 4.
 |
| Figure 4. "Bird Flying Out In Picture Frame" Premiere Elements Workspace Track Set Up |
Track Content Set Up (Refer to Figure 4)
Video 5 from left to right
3 sec gap
Bird-1 Outside (5 sec) = Bird-1 on transparent background (keyframed Opacity = 0 % for 1 sec at beginning; keyframed Motion/Scale and Position for bird flight from inside frame to outside frame).
3 sec gap
Copy of Bird-1 Outside (5 sec) with its Motion/Scale and Position as well as Opacity keyframed. Then Time Stretch/Reverse Speed with check mark
Video 4 from left to right
3 sec gap
Frame .png (5 sec) (with transparency where picture is displayed)
3 sec gap
Copy of Frame .png (5 sec) (with transparency were picture is displayed)
Video 3 from left to right
3 sec gap
Copy of Bird-1 Outside (5 sec) with its Motion Scale and Position keyframing; no Opacity keyframing.
3 sec gap
Copy of Bird-1 Outside (5 sec) with its Motion Scale and Position keyframing, no Opacity keyframing. Then Time Stretch/Reverse Speed with check mark, applying effect to whole clip; the Split Clip Tool cut at 4 seconds of that 5 second clip, followed by Horizontal Flip Effect applied to just those 4 sec.
Video 2 from left to right
3 sec gap
Background Photo (Hostas Flower) for inside frame .png (5 sec)
3 sec gap
Background Photo (Hostas Flower) for inside frame .png (5 sec)
Video 1 from left to right
3 sec freeze frame (bmp) from first frame of zero time composite of the Video 5, 4, 3, and 2 clips.
5 sec gap
3 sec freeze frame (bmp) from last frame of "inside to outside" block of Video 5, 4, 3, and 2 clips.
5 sec gap
3 sec freeze frame (bmp) from last frame of "outside to inside" block of Video 5, 4, 3, and 2 clips.
_____________________________________________________________________________
*I have proof read the content for typos several times and all appears to be in order, inside and outside and vice versa. A recent run through of the "how created" details confirmed
the above.
ATR