Premiere Elements* Effects Mask offers the opportunity to apply an effect to a certain area of a clip rather than to the whole clip. The first look impression of what is happening when the Effects Mask is applied to a clip on video track 1 includes:
- at Timeline level, what appears to be the original clip content on video track 1 with a duplicate of it on video track 2 directly above...the duplicate has been automatically grouped to the video track 1 content in the process.
- at Edit Mode Monitor level, display of the original content with a small bounding box (Effects Mask) within it and this bounding box ready to accept application of video effect to it. Any required resizing and repositioning of the bounding box follows.
 |
| Figure 1. PE11 Expert View Timeline Set Up Before Application Of Effects Mask. |
 |
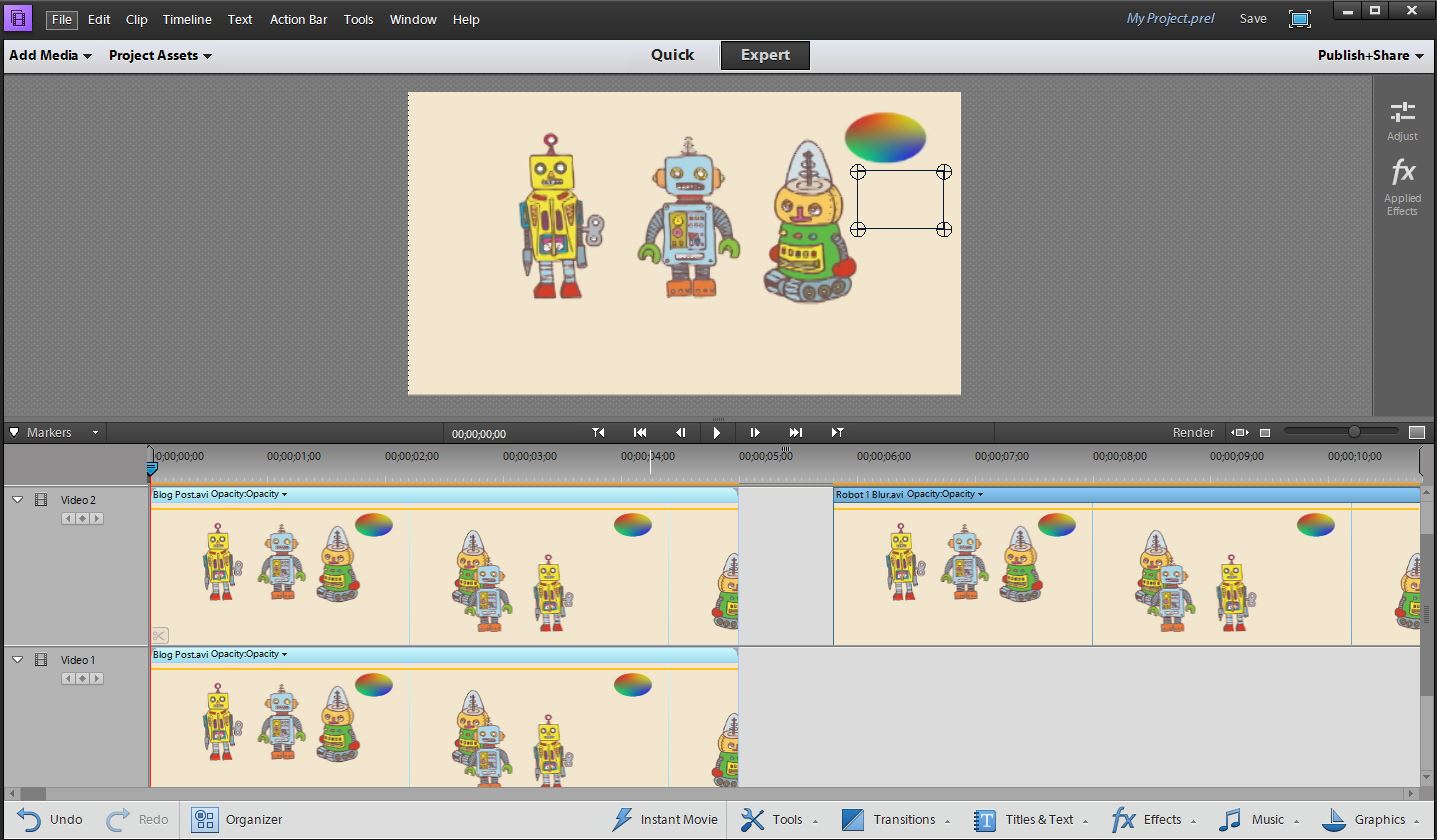
| Figure 2. PE11 Expert View Timeline After Application Of Effects Mask. No Effect Applied To Effects Mask Yet. |
Since original and duplicate are grouped, clicking on one highlights both. When both are highlighted, there is one Applied Effect/Applied Palette/ for the two. It contains the panels for Motion, Opacity, and "Mask". See Figure 2.
 |
| Figure 3. Ungrouped Bottom Track Content (Video 1) Perspective. PE11 Expert View Timeline After Application Of Effects Mask And Ungrouping Of Bottom And Top Track Content. No Effect Applied To Effects Mask Yet. |
 |
| Figure 4. Ungrouped Top Track Content (Video 2) Perspective. PE11 Expert View Timeline After Application Of Effect Mask And Ungrouping Of Bottom And Top Track Content. No Effect Applied To Effects Mask Yet. |
One of the frequent uses of the Effects Mask is the selective blurring of an object in clip. Often Gaussian Blur or FastBlur effect is applied to the Effects Mask for this purpose. Typical issues that have been reported by users of the Effects Mask will be explored below in context with the observations of the feature pointed out above.
ISSUES
The following types of questions that led to exploring this feature further include:
- How do I add more than one Effects Mask to an image?
- If I start with a clip to which cropping has been applied, why does the cropping effect disappear when I apply an Effects Mask to a selected area of the clip?
Keys to resolving the issues cited include ungrouping of the grouped contents that result from Effects Mask application as well as the careful ordering of the steps required to achieve the effect. Answers to the issues and better understanding of Effects Mask are sought in the How Tos to follow.
HOW TO
How do I add more than one Effects Mask to an image?
Tip 1: The key here is the ungrouping of the top and bottom video track contents associated with the Effects Mask feature.
Tip 2: Thrown into the mix here for a particular circumstance is using the "patch" aspects of Effects Mask to get rid of an object whose colors defy blurring by the "book".
STEP 1
Place original clip on video track 1.
(The clip in this example shows 3 robots with a colorful ellipse above them. This is a homemade DV AVI widescreen little video clip in which the face of the middle robot (blue head) will be blurred and the colorful ellipse removed (covered up). See Figure 5 for the starting view.
 |
| Figure 5. Original Clip First Frame. |
STEP 2
Click on Clip Menu/Effects Mask/Apply and move the Effects Mask bounding box on screen to the face of the middle robot. Go to fx Effects, select Blur Sharpen/Gaussian Blur, and drag it into the Effects Mask on screen. Go to Applied Effects/Applied Effect Palette/Gaussian Blur Panel expanded, and adjust the amount of blur.
STEP 3
When the Effects Mask is applied, the duplicate and original track contents are grouped. So, now ungroup the video track 1 and video track 2 contents by right clicking anywhere in the highlight for the pair, and selecting ungroup from the pop up menu. Then, with the mouse cursor, move the video track 2 content with the Effects Mask for the middle robot to the far right out of the way. Rename the video track 2 content file "Robot 1 Blur".
STEP 4
With the ungrouped video track 1 still in its original location, Steps 2 and Step 3 could be repeated to blur the faces of the other robots. But, for the purpose of this How To, a variant on this will be used to cover up the colorful ellipse shown in Figure 5.
Highlight the video track 1 content which now does not have a grouped component, and then click on Clip Menu/Effects Mask/Apply. Move the resulting Effects Mask bounding box, not to encompass the colorful ellipse, but rather to an area with solid background color (beige in this case). Refer to Figure 6.
 |
| Figure 6. Gathering "Patch" To Cover Up Ellipse. |
STEP 5
Ungroup the current video track 1 and video track 2 contents by right clicking anywhere in the highlight for the pair and selecting ungroup from the pop up menu. Next rename this video track 2 file "Ellipse". Right click the Edit Mode Monitor and select Select followed by the "Ellipse" to select that video track 2 content. Then with the mouse curser move the "beige" patch to cover the ellipse. The blend should be good. If not, a Fast Blur can be applied to that "patch" aka Effects Mask to help the blend with the surroundings. In this case, it was not needed.
STEP 6
Stack video track 1 content with the other two track contents, one above the other. Figure 7 represents what the end result should look like for the first frame of the video.
 |
| Figure 7. Robot 1 Face Blur Plus Ellipse Cover Up Results. |
Keyframing of the mask (on the file named Robot 1 Blur) could be done to blur the middle robot's face as it moves in the video. See sample video.
If I start with a clip to which cropping has been applied, why does the cropping effect disappear when I apply an Effects Mask to a selected area of the clip?
Tip 1: The whys reside in the duplicate generated in the Effect Mask feature. A key is to watch what is being displayed in the Edit Mode Monitor versus what is represented within the track contents.
Tip 2: The key to a workaround is the order in which steps are done in the process of applying Effects Mask with Effect to an image for which cropping or other effects are wanted.
STEP 1.
Place the following jpg photo as source image on video track 1. See Figure 8.
 |
| Figure 8. Jpg Photo Source For Test |
The goals are to
- crop off the bottom and top red horizontal bars of the jpg photo
- apply an Effects Mask/NewBlue Cartoonr Plus effect to the Hostas plant
IF
STEP 2
Apply fx Effects/Transform/Crop to remove the top and bottom horizontal red bars of the jpg photo. Do not not use the Zoom option in Crop, and do not scale the cropped image in the Edit Mode Monitor after the cropping. It is important to note that the cropping done is reflected in the Edit Mode Monitor view as top and bottom horizontal black bars (transparency); whereas, what is displayed within the Timeline video track 1 itself is the red bars BEFORE cropping representation.
IF
STEP 3
Click on Clip Menu/Effects Mask/Apply.
When that is done, what is seen in the Edit Mode Monitor is the image with all the cropping gone and with the Effects Mask there awaiting application of an effect to it. This has all the appearances of the Effects Mask duplicate being derived from the BEFORE cropping and dominating the view.
STOP
START AGAIN
STEP 4
Start again. This time, first apply the Effects MaskNewBlue Cartoonr Plus effect, and ungroup the duplicate video 2 content from the uncropped ungrouped original video 1 content. Then crop the ungrouped video 1 content. And, next position the ungrouped duplicate video 2 content which includes the Effects Mask/NewBlue Cartoonr Plus effect so that it is directly above the ungrouped video 1 content as represented in Figure 9.The result is seen in the Edit Mode Monitor of Figure 9.
 |
| Figure 9. Result Of First Applying Effects Mask/NewBlue Cartoonr Plus Effect And Then Doing The Cropping Of The Ungrouped Video 1 Content |
But when all is said and done, what if the end result wanted is without the top and bottom black borders representing transparency? Those borders can be "scaled out". If so,
- ungrouped Video track 1 content. Applied Effects/Applied Effects Palette/Motion Panel Expanded/Scale property, check mark for Constrain Proportions, adjustment of Scale slider so that image just fills Edit Mode Monitor space. In this case, the Scale % was 120.1.
- ungrouped Video track 2 content selected. Applied Effects/Applied Effects Palette/Motion Panel Expanded/Scale property, check mark for Contrain Proportions, set Scale % to 120.1.
 |
| Figure 10. Result Of Scaling Out Black Borders From Previous Step. |
If I start with a clip to which cropping has been applied, why does the cropping effect disappear when I apply an Effects Mask to a selected area of the clip?the question glares out "Could this issue have been addressed in a quicker and easier way than what was just gone through step by step? Consider as the alternative solution to achieve the goal
STEP 1
At the onset scale video track 1 content to eliminate the bottom and top red bars, Then Applied Effects/Applied Effects Palette/Motion Panel expanded/Scale property set to 120.1% with a check mark next to Constrain Proportions
STEP 2
Click on Clip Menu/Effects Mask/Apply and apply the NewBlue Cartoonr Plus effect to the Effects Mask.
See Figure 11.
 | ||
| Figure 11. Alternative Approach. Scaling Instead Of Cropping, Then Clip Menu/Effects Masks/Apply and NewBlue Cartoonr Plus Effect Aplied to Effects Mask |
There does not seem to be a generalized do this or that, but rather various factors that interact in the logistics of using Effects Mask. Thoughts on what the duplicate represents in Effects Mask feature needs more thought in view of the results as represented in Figure 10 (cropping involved) and in Figure 11 (scaling involved).***
_________________________________________________________________________________
*Study was done with Premiere Elements 11 Windows 7 Professional SP1 64 bit. But principles are applicable to earlier versions of Premiere Elements with the Effects Mask feature.
**Ungroup and grouping can be done by right clicking the Expert view Timeline file and, from the pop up menu, selecting Ungroup or Group as required for the task or by highlighting the Timeline file and going to Clip Menu/Ungroup or Group.
***Still thinking about this.
ATR