Monday, October 27, 2014

PE 11: SmartSound Error Windows 8.1 64 bit

INTRODUCTION
 
The following SmartSound error has been encountered by Premiere Elements 11 Windows 8.1 64 bit users when trying to access the "Use SmartSound" feature under the Music Tab of the Expert and Quick workspaces.
Error: Unable to acquire serial number for Express Track. Please make sure you are connected to the internet and click OK to try again.
I have confirmed this finding and contacted SmartSound Customer Service about the matter. SmartSound representative Frank* responded promptly with the resolution for now.

ISSUES

Some of the issues involved in gaining use of the free SmartSound soundtracks of Premiere Elements 11 SmartSound feature on Windows 8.1 64 bit include
  • Premiere Elements integration with SonicFire Pro will only work with Sonicfire Pro version 5.7.3-5.7.5.
  • Online serial number retrieval process no longer available. New serial numbers for versions of SonicFire Pro less than 5.8 are no longer available
  • SonicFire Pro 5.8 is available only purchase or tryout; nonetheless will not integrate with Premiere Elements.

SOLUTION

STEP 1
Get A New Free Serial Number

According to Frank from SmartSound Customer Service
For now, any Elements users who need a free serial number can email us at support@smartsound.com, preferably after creating an online SmartSound account, and we can provide them with a serial number that way.
STEP 2
Entering The New Free Serial Number Into SonicfirePro5.Exe

With Premiere Elements 11 closed.....
Local Disc C
Program Files (x86)
SmartSound Software
Sonicfire Pro 5
and, in the Sonicfire Pro 5 Folder, is the SonicfirePro5.exe which is opened by double clicking it.
Enter the new serial number to unlock Sonicfire Pro and apply all the updates.

STEP 3
Next, Applying Update Patch To Work With Sonicfire Pro 5.7.5

If Sonicfire Pro less than 5.7.5, SmartSound is recommending application of the update patch so that 5.7.5 is in use. See http://www.smartsound.com/support/updates/?product=sfp5

STEP 4
Open Premiere Elements 11 To Find a Working Music Tab/"Use SmartSound" feature.
______________________________________________________________________________

*Many thanks to Frank at SmartSound Customer Service who represented SmartSound and himself well in this matter - a model of excellent customer service and responsibility to customers.

Work In Progress.
Any further developments will be posted as they become available.


 ATR


Friday, October 24, 2014

PE 13: Blu-ray ISO Image and AACS Folder

INTRODUCTION

Premiere Elements earlier than version 13 does not offer a Blu-ray burn to folder option as there is for DVD and AVCHD. The classical workaround for a Blu-ray burn to folder has been to try to use Phantom Burner in conjunction with Premiere Elements to produce a Blu-ray VDD or ISO image that could be taken to Blu-ray disc with 3rd party software such as ImgBurn and Nero.

Now in Premiere Elements 13, Blu-ray as well as DVD and AVCHD burn to have built in the choice of ISO Image which can be taken to the appropriate disc using, for examples, ImgBurn, Nero, or CyberLink PowerProducer.

ISSUE

If Premiere Elements 13 Blu-ray disc format on Blu-ray disc is produced using the program's burn to disc, only a BDMV Folder and a CERTIFICATE Folder are present on the end product Blu-ray disc. However, with the ISO Image choice for Premiere Elements 13 burn to Blu-ray, the end product Blu-ray disc now has 3 folders: AACS Folder, BDMV Folder, and the CERTIFICATE Folder whether ImgBurn, Nero, or CyberLink PowerProducer is used to produce the Blu-ray disc end product.

What is this AACS Folder? From all that we can determine, the presence of this AACS Folder on the disc means "Movie is encrypted". At this point, the questions are "Why an encrypted movie for a home made movie?" and "What are the implications of this at playback time of this Premiere Elements 13 encrypted Blu-ray disc format on Blu-ray disc?"

SOLUTION

We do not have the answers for the ISSUE questions. This Premiere Elements 13 "encrypted Blu-ray disc format on Blu-ray disc" does play back on our computer CyberLink software without issue. We do not have Blu-ray playback equipment at this time to pursue this.

What this blog will present is the "what is" for Premiere Elements 13 burn to DVD, AVCHD, and Blu-ray with regard to
  • what gets saved to the designated hard drive save location when burn to folder or burn to ISO Image is selected rather than burn to disc
  • the end product disc's file system and folder(s) found on the disc
  • how to for taking the Premiere Elements 13 burn to folder and ISO Image to disc using ImgBurn, Nero, and CyberLink PowerProducer versions that we have and which we are mentioning here for informational and non promotional purposes.

    RESULTS*

    What Gets Saved To The Designated Hard Drive Save Location When Burn To Folder Or Burn To ISO Image Is Selected Rather Than Burn To Disc (See Table 1).

    Table 1. Saves From Burn To Folder And Burn To ISO Image For DVD, AVCHD, And Blu-ray Choices.

    The End Product Disc's File System And Folder(s) Found On The Disc

    Table 2 summarizes and compares the results when Premiere Elements 13 does the burn to disc versus when Premiere Elements 13 produces a Folder or ISO Image which is taken to disc by a 3rd party program. Table 2 results are from a study that used ImgBurn as the 3rd party program.

    Table 2. Premiere Elements 13. Disc End Product File System And Folders On Disc Associated With Burn To Choice Of Disc, Folder, And ISO Image.
    With the ISO Image choice for Premiere Elements 13 Blu-ray, the end product Blu-ray disc now has 3 folders: AACS Folder, BDMV Folder, and the CERTIFICATE Folder whether ImgBurn, Nero, or CyberLink PowerProducer is used as the 3rd party program to produce the Blu-ray disc end product.

    HOW TO

    Burn to Folder for DVD or AVCHD DVD
    ImgBurn

    STEP 1
    Click on "Write to files/folders to disc" choice.
    Because it was available, ImgBurn v 2.5.7.0 was used in these studies. 

    STEP 2
    In interface that opens, go to File Menu/"Browse for a source folder", and navigate to and select the whole VIDEO_TS Folder (from the DVD burn to folder) or the whole BDMV Folder (from the AVCHD DVD burn to folder).

    STEP 3
    Make sure that the name of your burner with DVD disc is set in Destination field. Place a check mark next to Verify. Assure that ImgBurn Options show disc file system ISO9660 UDF 1.02 for DVD folder and disc file system UDF 2.05 for AVCHD DVD. Have a check mark next to Verify. Hit the Build button at the bottom of the setup area.

    Note: ImgBurn automatically adds a CERTIFICATE Folder to accompany a BDMV Folder on the AVCHD DVD disc that it produces using the Premiere Elements BDMV Folder.

    Burn to ISO Image for DVD, AVCHD DVD, or Blu-ray
    ImgBurn

    STEP 1
    Click on "Write image file to disc" choice.
    Because it was available, ImgBurn v 2.5.7.0 was used in these studies.

    STEP 2
    In the interface that opens, go to File Menu/"Browse for source file", and navigate to and select the .iso file for DVD, AVCHD DVD, or Blu-ray ISO Image.

    STEP 3
    Make sure that the name of your burner with DVD or Blu-ray disc is set in the Destination field. Place a check mark next to Verify. Assure that ImgBurn shows disc file system ISO9660 UDF 1.02 for DVD ISO Image, disc file system UDF 2.05 for AVCHD DVD ISO Image, and disc file system  UDF 2.05 for Blu-ray ISO Image. Have a check mark next to Verify. Hit the Build button at the bottom of the setup area.

    Note: ImgBurn automatically adds a AACS Folder to accompany a BDMV Folder and a CERTIFICATE Folder on the end product Blu-ray disc. If Nero or CyberLink PowerProducer replaced ImgBurn in this Blu-ray ISO Image to Blu-ray disc task, an AACS Folder was also added to the Blu-ray disc to accompany the BDMV Folder and CERTIFICATE Folder.

    For CyberLink PowerProducer v5
    Blu-ray Disc Suite
    Utilities
    Burn to a disc image

    For Nero Essentials 9
    Back Up
    Copy Disc
    Nero Express Essentials workspace
    Disc Image or Saved Project


    ________________________________________________________________________________
    *Studies were performed using Premiere Elements 13 tryout on Windows 7 Professional SP1 64 bit.


    Work in Progress

    ATR

    Tuesday, October 21, 2014

    PE 13: Keyboard Shortcuts

    INTRODUCTION

    Premiere Elements 4 through 13 offer Keyboard Customization with Application and Windows categories, each filled with program functions with and without Adobe assigned keyboard shortcusts. All can be customized.

    The distinction between the Application and Windows categories is that Application is categorized according to the menus of the Premiere Elements workspace (for version 13, File, Edit, Clip, Timeline, Text, Action Bar, Tools, Window, and Help); whereas Windows is categorized according to the Windows of Premiere Elements (for version 13, Narration, Organizer, Disc Layout Window, Properties Window, History Window, Trimming Window, Monitor Window, Media Window, Sceneline Window, and Timeline Window.

    Much is the same going from 12 to 13 in this area, but there have been changes with the loss of some function choices and the addition of a few other. Note the Windows/Trimming Window addition. Prior blog posts with Premiere Elements keyboard customization details can be found here for 11 and here (item 0016) for 12.

    The Keyboard Customization (default) listings found in Premiere Elements 13* Edit Menu/Keyboard Customization are:


    PART 1

    APPLICATION


    more Clip


    more Text


    more Help

    PART 2

    WINDOWS 


    more Monitor Window


    _______________________________________________________________________________
    * Information is from Premiere Elements 13 tryout from Adobe, on Windows 7 Professional SP1 64 bit.


    ATR

    Wednesday, October 1, 2014

    PE 12: Portrait Oriented Video Source

    INTRODUCTION

    Premiere Elements (any version) has project presets for only SD and HD video 4:3 and 16:9 in the landscape orientation. The question was raised at the forum level whether or not it is possible to import, edit, and export portrait oriented video and maintain the portrait orientation without black borders throughout workflow.

    ISSUE

    Since there is no project preset for portrait oriented video source, what to do? And, if such a project preset were to be created at the user level, would it work to create the portrait oriented space in the Edit area monitor from which to edit the portrait oriented video import without black borders? And, could the edited Timeline portrait oriented content be exported to a portrait oriented video file saved to the computer hard drive?

    SOLUTION

    Using Premiere Elements 12/12.1 for this feasibility study, a portrait oriented 1080 x 1920 9:16 project preset was created by editing the Notepad document of the existing 16:9 Adobe DSLR 1080p30@29.97.sqpreset file.

    When this newly created project preset was used, portrait oriented video could be imported, edited, and exported using a Premiere Elements 12/12.1 project. And, the portrait orientation was maintained throughout the workflow. Previewing of the edited Timeline portrait oriented content in the Edit area monitor is an unresolved issue. If the Timeline content is rendered to get the best possible preview at the Edit level, the video displayed in the Edit Area monitor squeezes in resulting in black borders to the left and right of the video image on screen.


    HOW TO

    Creation of the 9:16 Project Preset

    1. Find the DSLR 1080p30@29.97.sqpreset file.
    Local Disk C\Program Files\Adobe\Adobe Premiere Elements 12\Settings\
    SequencePresets\NTSC\DSLR\1080p\
    and in that 1080p Folder is the DSLR 1080p30@29.97.sqpreset file that is to be copied.

    2. Copy the DSLR 1080p30@29.97.sqpreset file and paste it into a newly created desktop folder named 1920p. Change the name of the DSLR 1080p30@29.97.sqpreset file inside the folder to DSLR 1920p30@29.97.sqpreset.

    3. Open the 1920p Folder and edit the .sqpreset file in Notepad.
    To do that, right click the .sqpreset file, and, from the drop down menu, select Open With and then Notepad.

    4. In the Notepad document, there are two essential places that need editing to bring about the landscape to portrait orientation change in the workspace. One is at the top of the Notepad document, and the other is at the bottom of the document.

    At the top
    From
    <PreviewVideoFrameSize>0,0,1920,1080</PreviewVideoFrameSize>
    To
    <PreviewVideoFrameSize>0,0,1080,1920</PreviewVideoFrameSize>

    At the bottom
    From
    <VideoFrameSize>0,0,1920,1080</VideoFrameSize>
    To
    <VideoFrameSize>0,0,1080,1920</VideoFrameSize>

    See Figures 1 and 2
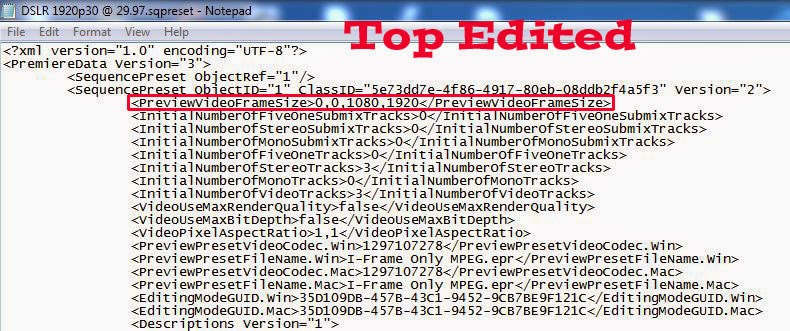
    Figure 1. Sqpreset Notepad Document Essential Edit At Top Of Document


    Figure 2. Sqpreset Notepad Document. Essential Edit At Bottom Of Document.

    In order to get the description of the new project preset to present correctly within the opened Premiere Elements project, then edits of the Description line can be made for the specific language assigned to the computer. See  <Descriptions version = "1"> line at the bottom of Figure 1, and change the details to read for your language. Here the example is for English. The places of change are in bold text with orange background color.

    <Descriptions Version="1">
                    <DescriptionItem Version="1" Index="0">
                                    <Second>For editing most DSLR Formats (like the Canon EOS Movie Full
                                    HD series) recorded in 1080x1920 square pixels (non-   
                                    anamorphic).&#13;&#10;9:16 Progressive HD video at 29.97 frames per  
                                    second.&#13;&#10;48 kHz audio.</Second>
                                   <First>en_US</First>

    Then go to specifically File Menu/Save of the Notepad document and hit Save. Then File Menu/Exit.

    5. At this point, you have the edited sqpreset file in the 1920p Folder on the computer desktop.
    (Change the name of the edited sqpreset file so that it = DSLR 1920p30@ 29.97)
    Move the 1920p Folder from the desktop to the DSLR Folder in the Program Files path cited above and shown in Figure 3. Close out of there.
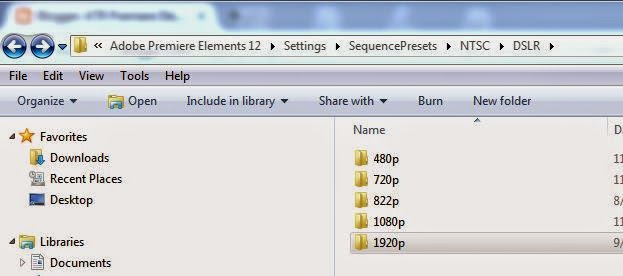
    Figure 3. Placement Of The 1920p Folder Containing The New 9:16 Project Preset In DSLR Folder In Path Local Disk C\Program Files\Adobe\Adobe Premiere Elements 12\Settings\SequencePresets\NTSC\DSLR.


    The Premiere Elements 12/12.1 Project Using The Newly Created 9:16 Project Preset

    6. Back in the Premiere Elements 12/12.1, manually set the project preset to the new project preset.
    See Figure 4 for Change Settings which now includes the new 9:16 project preset under the NTSC/DSLR/1920p/ accessed File Menu/New/Project.
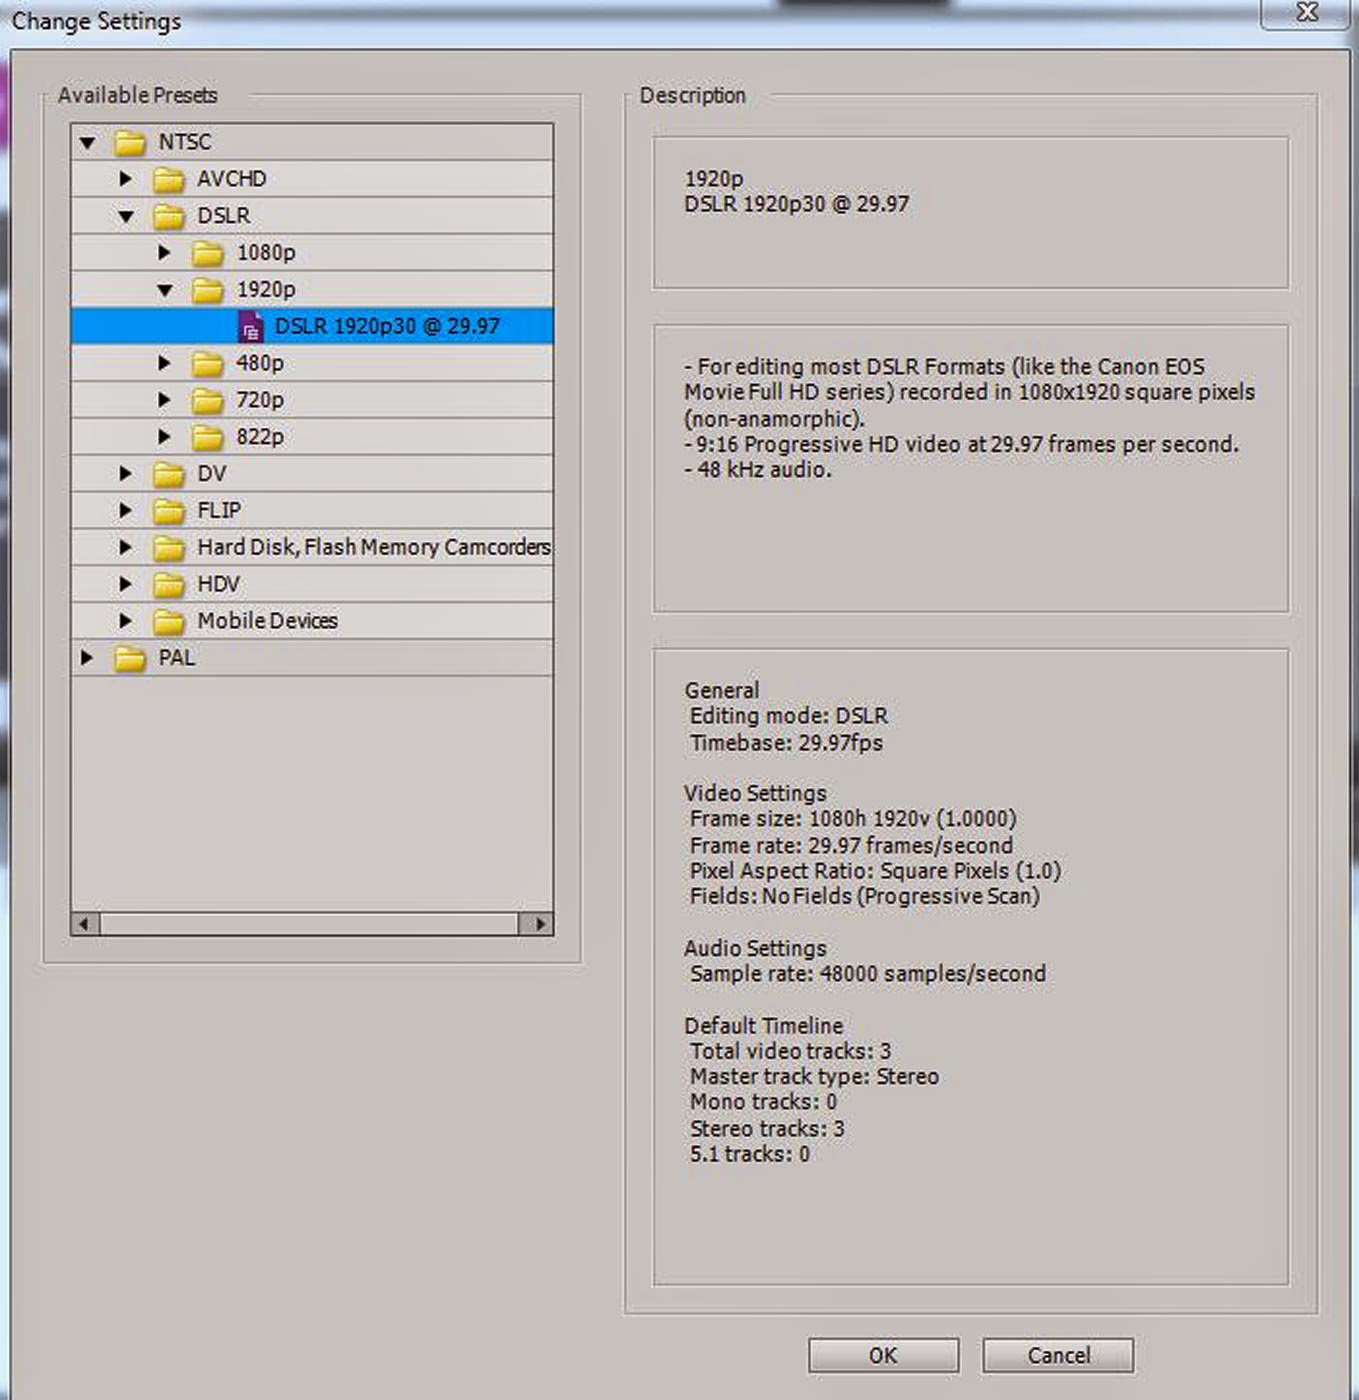
    Figure 4. New DSLR 1920p30@29.97 Project Preset Available In Change Settings. Note Description Of New Project Preset In The Right Column Of Change Settings.

    The selection of the new DSLR 1920p30@29.97 progressive frames per second project preset should have the corresponding details in Edit Menu/Project Settings/General. See Figure 5.
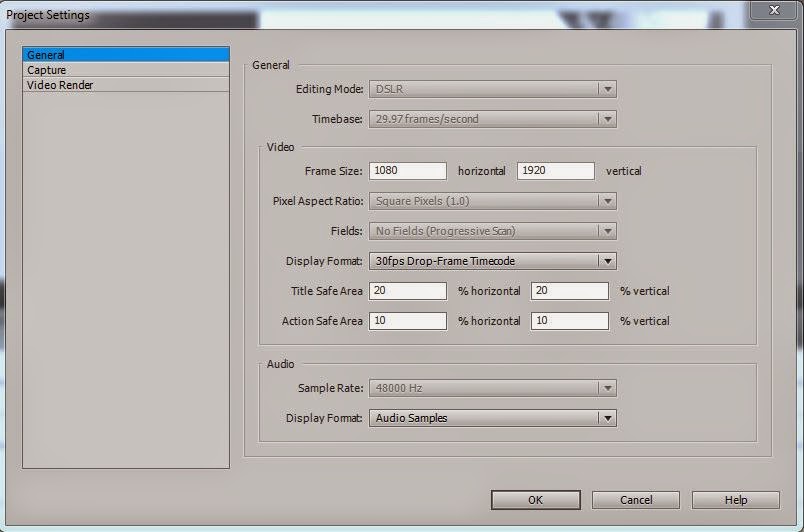
    Figure 5. Project Settings Dialog After Setting Project Preset To New DSLR 1920p30@29.97.

    When you import your 1080 x 1920 9:16 video file into the project set to that new project preset and drag it to the Timeline, you should see what is displayed in Figure 6 screenshot.
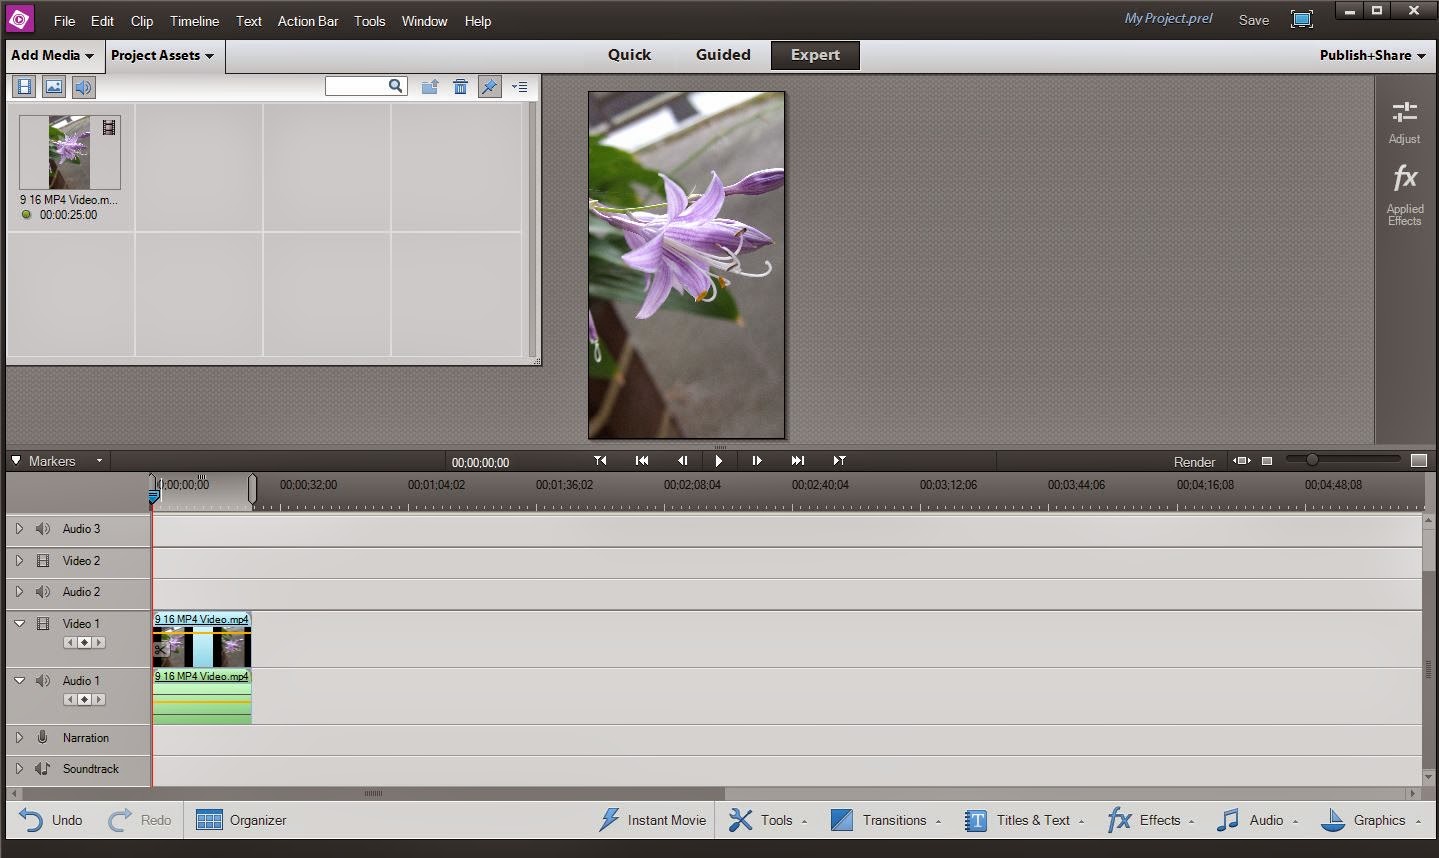
    Figure 6. AVCHD.Mp4 1080 x 1920 @ 29.97 Progressive Frames Per Second File Imported Into Premiere Elements 12/12.1 Project With Project Preset = NTSC/DSLR/1920p/DSLR 1920p30@29.97.

    Note that the video imports with no colored line over its content. Once edits are applied to that Timeline video, an orange line will appear over that Timeline content. DO NOT RENDER. See detail on that in SOLUTION introduction.

    The edited Timeline content was successfully exported to AVCHD.mp4 1080 x 1920 @ 29.97 progressive frames per second, using Publish+Share/Computer/AVCHD with Presets = MP4 H264 1920 x 1080p30 and the export setting customized to 1080 x 1920 under the Advanced Button/Video Tab of the preset. See Figure 7.
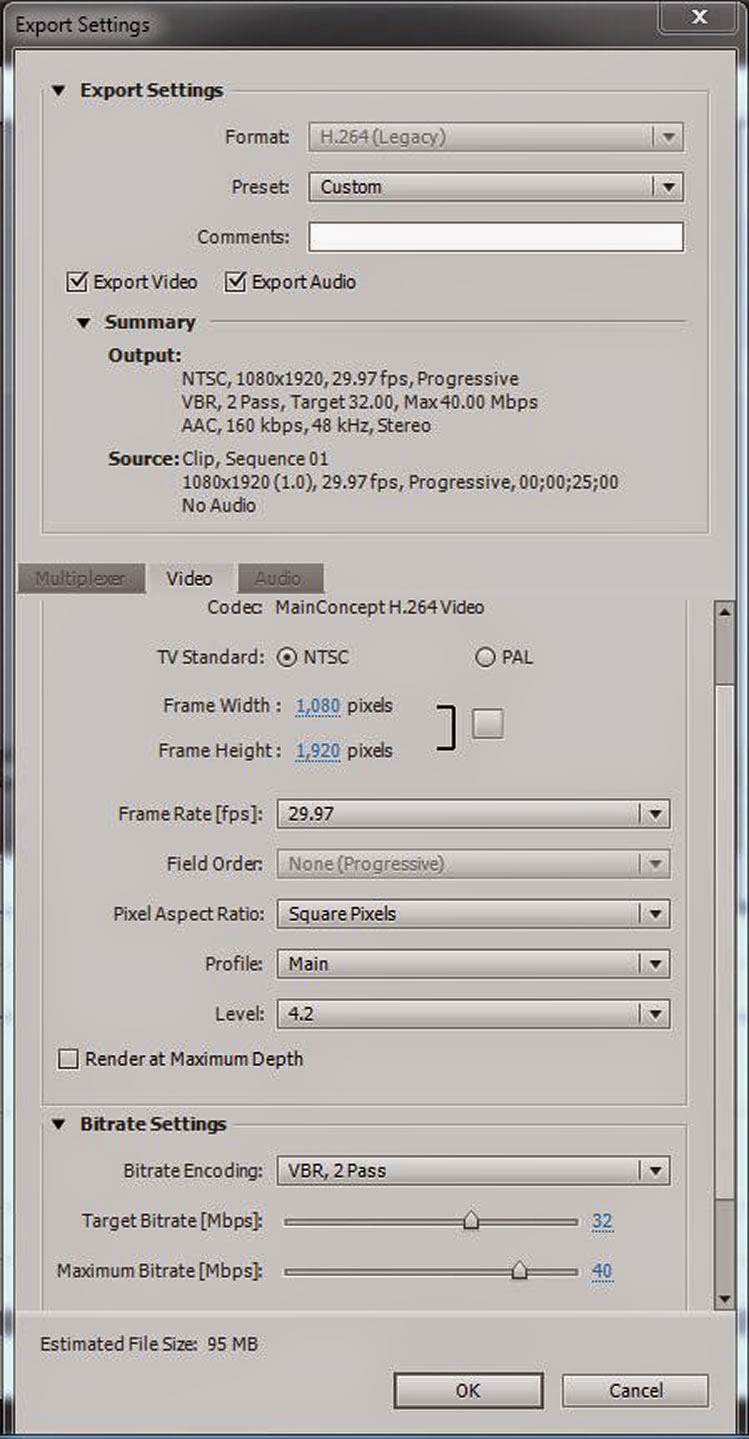
    Figure 7. Export Settings For 1080 x 1920 File From Premiere Elements 12/12.1 1080 x 1920 Project.


    Playback of the 9:16 Export of the 9:16 Timeline Content

    7. The video looked great in QuickTime in a portrait orientation (no black borders) and has been uploaded to this blog post to determine how it would display here.

    Demo 1. 1080 x 1920 @ 29.97 AVCHD.MP4 Video Uploaded To This Blog Post And Played Back Using the Blogger Player.

    The Blogger Player played back the 1080 x 1920 @29.97 progressive frames per second as a portrait oriented video with large black borders to the right and left of the image. The same was seen when the video was played back on the computer's VLC Player and Windows Media Player. To the contrary the QuickTime Player displayed this video in portrait orientation without black borders when using variety of its viewing options.

    When this 1080 x 1920 @29.97 progressive frames per second movie was imported into iTunes Library, its thumbnail was portrait oriented. See Figure 8. But, when this movie was played back there in the iTunes player, the display was like that of VLC Player and Windows Media Player, that is, portrait oriented with black borders to the right and left of the image.
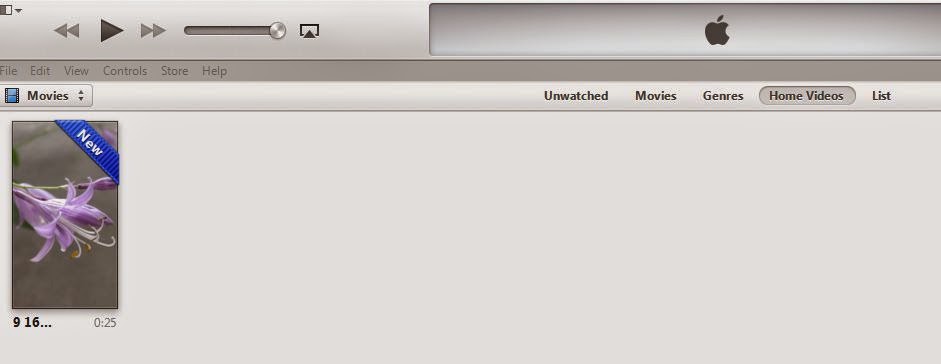
    Figure 8. The 1080 x 1920 @ 29.97 Progressive Frames Per Second Movie Imported Into iTunes Library/Movies/Home Videos.
    Only the iPod Touch 4th generation was available for this study. It supports sync from iTunes of H.264.mov or .mp4 video up to 1280 x 720p30. This iPod refused to accept the 9:16 movie whereas it did accept the movie as 1280 x 720 16:9 movie. Owners of iPod Touch (later than 4th generation), iPhone, and iPad will need to determine if these devices will support the 9:16 movie sync from iTunes.

    COMMENTARY

    This feasibility study answered some major questions

    Yes for "Can a project preset be created at the user level which would work to create the portrait oriented space in the Edit area monitor from which to edit the portrait oriented video import without black borders?"

    Yes for "Could the edited Timeline portrait oriented content be exported to a portrait oriented video file saved to the computer hard drive?"

    And, the QuickTime Player appears to be a good choice for play back of the 9:16 export from the 9:16 project preset. But, much needs to be done regarding a device's sync to 9:16 movies that were imported into the iTunes Library.

    Problems related to rendering the Timeline 9:16 content in the Edit area remain unresolved, but, in these studies, this did not have any impact on the 9:16 end product from the 9:16 project. If you render the 9:16 Timeline content in Edit area, the results are meaningless, and, if you do not render the 9:16 Timeline content in Edit area, it makes no difference to the 9:16 end product.

    ________________________________________________________________________________

    ATR

    Continuing Investigation