My earlier blog post HERE wrote about and demonstrated basic keyframing principles involved in the use of the Premiere Elements motion PiPs. And, in that work a scheme was introduced to reduce the task of an animated photos effect to a "by the numbers" workflow. That work used 28 photos spun progressively into the video frame ultimately to form a rectangular shape.
ISSUE
What is another example for the use of PiPs to create another type of animated photo effect?
SOLUTION
This new blog post targets the keyframe principles involved in using a 40% PiP to assist in the creation of a photo effect where a photo slides into view from off screen left, goes to a center point where it is zoomed in to full frame, returns to 40% scale, and is scaled down as it rotates out of sight. The animated photo effect created is displayed in the mini video found in the How To Step 3 Results section of this blog post.
Once the keyframing by the numbers is done:
- The photo effect produced for one photo can be applied to another photo by keyframe copy/paste in the Show Keyframe Controls area for each of the photos.
- The photo effect can be made to display in reverse by entering the keyframes at each designated time in reverse.
HOW TO
STEP 1.
Start
Premiere Elements 14/14.1 on Windows 7 64 bit
Project Settings NTSC/DSLR/1080p/DSLR 1080p30@29.97
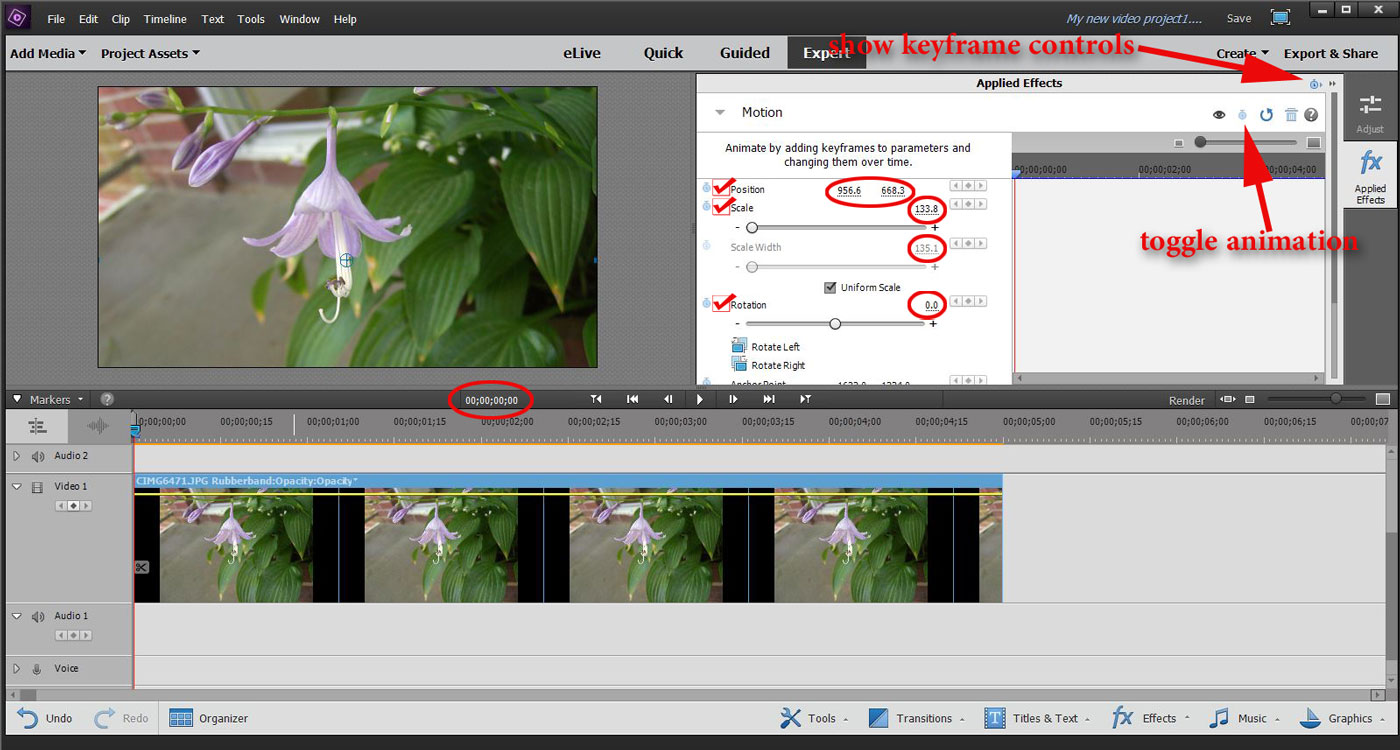
JPEG Photo 3264 x 2448 (5 seconds duration), scaled to fit the Edit area monitor 1920 x 1080 space provided by the project preset. The photo is selected on the Timeline, and keyframing area accessed via Applied Effects/Applied Effects Palette/Motion Panel Expanded. The two partitioned keyframing area is opened by clicking on the Show Keyframe Controls icon.
The setup up at the Start is represented in Figure 1.
 | ||
| Figure 1. Premiere Elements 14/14.1 Expert Workspace At Start. This Setup Can Be Applied To Any Photo Imported And Scaled To Fit the 1920 x 1080 Edit Area Monitor Space. |
Keyframing By The Numbers.
Drag the PiP 40% UR Spin Out effect into the Timeline photo. See fx Effects/Video/Presets/PiPs/40% UR/PiP 40% UR Spin Out. With the Timeline Indicator at 00;00;00;00, hit the Toggle Animation. Then type in the 00;00;00;00 values for Position (-277.0 and 576.5). The keyframe values for Scale (40.0), and Rotation (0.0) will already be there. Next move the Timeline Indicator to the times indicated in the Table below and enter the unique keyframe values for Position, Scale, and Rotation for each time. Changes time using the timecode under the Edit area monitor and tapping on the right arrow key.
Entering of the keyframe value of the property Position, Scale, or Rotation is done in either of two ways...
typing in the value
or
hitting the diamond icon between the previous and next which are to the right of the keyframe value field(s).
In the Table "Motion Panel Expanded Settings"
Type in keyframe values are indicated by Red T after value.
Diamond icon set values are indicated by Red diamond shape after value.
No mark next to keyframe value indicated no action needed.

1. Keyframes for having 40% scaled picture off screen left, no rotation.
2. Keyframes for moving 40% scaled picture from off screen left to the right in order to get to the center position.
3. Keyframes for keeping 40% scaled picture at center position for 0.5 seconds.
4. Keyframes for maintaining center position but with picture scaled to full frame view.
5. Keyframes for maintaining center position - full frame view for 1 second.
6. Keyframes for taking the full frame view back to 40% view in the center position.
7. Keyframes for maintaining the 40% view at center position for 0.5 seconds.
8. Keyframes for scaling the 40% view to 0% as the picture rotates out.
Expert workspace with keyframes all entered. Figure 2 demo's view of keyframe 5, the keyframing at 00;00;03;00 Monitor timecode.
 |
| Figure 2. Expert Workspace Keyframing Details When Keyframing Completed...Focus On Monitor Timecode For Demonstration Purposes. |
STEP 3.
Sample of Photo Effect*
The video shows 4 sample photos put through the above process
Photos 1, 2, and 4 all have the photo effect with keyframes in 1 to 6 direction. Photo 3 has the photo effect in reverse order than the 1, 2, or 4. A 0.5 second Black Video file was placed in front of the first photo file; another 0.5 second Black Video file was placed between photos 3 and 4. Ways were considered as to how to smooth the movement of the animated photos effect, such as by using interpolation method applied to keyframe. This will not be elaborated on in this blog post. The slide ins seemed the hardest to get the smoothest slide in effect.
COMMENTARY
The above is meant as an introductory exercise for the user wanting to start working with keyframing of a property, Position, Scale, Rotation, and other. It is hoped that the assisted support from presets such as PiPs and suggestions "by the numbers" can help the Premiere Elements user build a better understanding of keyframing in preparation to moving forward to independent and creative keyframing.
The work has been proof read several times and appears to be OK. However, any work published here is continually checked for accuracy.
______________________________________________________________________________
*Plug-in problem was found trying use Firefox to play back the "Sample of Photo Effect" video from the blogger.com web site. No problems were found on the same computer when Internet Explorer, Google Chrome, or Microsoft Edge was used instead as the computer default browser.
ATR