Wednesday, July 31, 2013

PE: About Effects Mask

INTRODUCTION

Premiere Elements* Effects Mask offers the opportunity to apply an effect to a certain area of a clip rather than to the whole clip. The first look impression of what is happening when the Effects Mask is applied to a clip on video track 1 includes:
  • at Timeline level, what appears to be the original clip content on video track 1 with a duplicate of it on video track 2 directly above...the duplicate has been automatically grouped to the video track 1 content in the process.
  • at Edit Mode Monitor level, display of the original content with a small bounding box (Effects Mask) within it and this bounding box ready to accept application of video effect to it. Any required resizing and repositioning of the bounding box follows.
 See Figure 1 and Figure 2.

Figure 1. PE11 Expert View Timeline Set Up Before Application Of Effects Mask.

Figure 2. PE11 Expert View Timeline After Application Of Effects Mask. No Effect Applied To Effects Mask Yet.

Since original and duplicate are grouped, clicking on one highlights both. When both are highlighted, there is one Applied Effect/Applied Palette/ for the two. It contains the panels for Motion, Opacity, and "Mask". See Figure 2.
If the two contents are ungrouped** and each viewed separately in the Edit Mode Monitor, the bottom of two appears to be the "original" and the top presents as a "patch" surrounded by black representing transparency. This "patch" Effects Mask content represents a snapshot of the original restricted to the original's area which was selected by the Effects Mask. Now with the two contents ungrouped, each has its own Applied Effect/Applied Palette. But, the bottom's Applied Palette has only Motion and Opacity; whereas the top's has Motion, Opacity, and "Mask". On the other hand, viewed at the Timeline level, the ungrouped bottom and top present with the same display of the original. Refer to Figures 3 and 4.

Figure 3. Ungrouped Bottom Track Content (Video 1) Perspective. PE11 Expert View Timeline After Application Of Effects Mask And Ungrouping Of Bottom And Top Track Content. No Effect Applied To Effects Mask Yet.

Figure 4. Ungrouped Top Track Content (Video 2) Perspective. PE11 Expert View Timeline After Application Of Effect Mask And Ungrouping Of Bottom And Top Track Content. No Effect Applied To Effects Mask Yet.

One of the frequent uses of the Effects Mask is the selective blurring of an object in clip. Often Gaussian Blur or FastBlur effect is applied to the Effects Mask for this purpose. Typical issues that have been reported by users of the Effects Mask will be explored below in context with the observations of the feature pointed out above.


ISSUES

The following types of questions that led to exploring this feature further include:
  • How do I add more than one Effects Mask to an image?
  • If I start with a clip to which cropping has been applied, why does the cropping effect disappear when I apply an Effects Mask to a selected area of the clip?
SOLUTION

Keys to resolving the issues cited include ungrouping of the grouped contents that result from Effects Mask application as well as the careful ordering of the steps required to achieve the effect. Answers to the issues and better understanding of Effects Mask are sought in the How Tos to follow.

HOW TO

How do I add more than one Effects Mask to an image?

Tip 1: The key here is the ungrouping of the top and bottom video track contents associated with the Effects Mask feature.

Tip 2: Thrown into the mix here for a particular circumstance is using the "patch" aspects of Effects Mask to get rid of an object whose colors defy blurring by the "book".

STEP 1
Place original clip on video track 1. 
(The clip in this example shows 3 robots with a colorful ellipse above them. This is a homemade DV AVI widescreen little video clip in which the face of the middle robot (blue head) will be blurred and the colorful ellipse removed (covered up). See Figure 5 for the starting view.

Figure 5. Original Clip First Frame.

STEP 2
Click on Clip Menu/Effects Mask/Apply and move the Effects Mask bounding box on screen to the face of the middle robot. Go to fx Effects, select Blur Sharpen/Gaussian Blur, and drag it into the Effects Mask on screen. Go to Applied Effects/Applied Effect Palette/Gaussian Blur Panel expanded, and adjust the amount of blur.

STEP 3
When the Effects Mask is applied, the duplicate and original track contents are grouped. So, now ungroup the video track 1 and video track 2 contents by right clicking anywhere in the highlight for the pair, and selecting ungroup from the pop up menu. Then, with the mouse cursor, move the video track 2 content with the Effects Mask for the middle robot to the far right out of the way. Rename the video track 2 content file "Robot 1 Blur".

STEP 4
With the ungrouped video track 1 still in its original location, Steps 2 and Step 3 could be repeated to blur the faces of the other robots.  But, for the purpose of this How To, a variant on this will be used to cover up the colorful ellipse shown in Figure 5.

Highlight the video track 1 content which now does not have a grouped component, and then click on Clip Menu/Effects Mask/Apply. Move the resulting Effects Mask bounding box, not to encompass the colorful ellipse, but rather to an area with solid background color (beige in this case). Refer to Figure 6.

Figure 6. Gathering "Patch" To Cover Up Ellipse.

STEP 5
Ungroup the current video track 1 and video track 2 contents by right clicking anywhere in the highlight for the pair and selecting ungroup from the pop up menu. Next rename this video track 2 file "Ellipse".  Right click the Edit Mode Monitor and select Select followed by the "Ellipse" to select that video track 2 content. Then with the mouse curser move the "beige" patch to cover the ellipse. The blend should be good. If not, a Fast Blur can be applied to that "patch" aka Effects Mask to help the blend with the surroundings. In this case, it was not needed.

STEP 6
Stack video track 1 content with the other two track contents, one above the other. Figure 7 represents what the end result should look like for the first frame of the video.

Figure 7. Robot 1 Face Blur Plus Ellipse Cover Up Results.

Keyframing of the mask (on the file named Robot 1 Blur) could be done to blur the middle robot's face as it moves in the video. See sample video.


HOW TO

If I start with a clip to which cropping has been applied, why does the cropping effect disappear when I apply an Effects Mask to a selected area of the clip?

Tip 1: The whys reside in the duplicate generated in the Effect Mask feature. A key is to watch what is being displayed in the Edit Mode Monitor versus what is represented within the track contents.

Tip 2: The key to a workaround is the order in which steps are done in the process of applying Effects Mask with Effect to an image for which cropping or other effects are wanted.

 STEP 1.
Place the following jpg photo as source image on video track 1. See Figure 8.

Figure 8. Jpg Photo Source For Test

The goals are to
  • crop off the bottom and top red horizontal bars of the jpg photo
  • apply an Effects Mask/NewBlue Cartoonr Plus effect to the Hostas plant

IF 
STEP 2
Apply fx Effects/Transform/Crop to remove the top and bottom horizontal red bars of the jpg photo.  Do not not use the Zoom option in Crop, and do not scale the cropped image in the Edit Mode Monitor after the cropping. It is important to note that the cropping done is reflected in the Edit Mode Monitor view as top and bottom horizontal black bars (transparency); whereas, what is displayed within the Timeline video track 1 itself is the red bars BEFORE cropping representation.

IF
STEP 3
Click on Clip Menu/Effects Mask/Apply.

When that is done, what is seen in the Edit Mode Monitor is the image with all the cropping gone and with the Effects Mask there awaiting application of an effect to it. This has all the appearances of the Effects Mask duplicate being derived from the BEFORE cropping and dominating the view.
                                                             STOP

START AGAIN
STEP 4
Start again. This time, first apply the Effects MaskNewBlue Cartoonr Plus effect, and ungroup the duplicate video 2 content from the uncropped ungrouped original video 1 content. Then crop the ungrouped video 1 content. And, next position the ungrouped duplicate video 2 content which includes the Effects Mask/NewBlue Cartoonr Plus effect so that it is directly above the ungrouped video 1 content as represented in Figure 9.The result is seen in the Edit Mode Monitor of Figure 9.
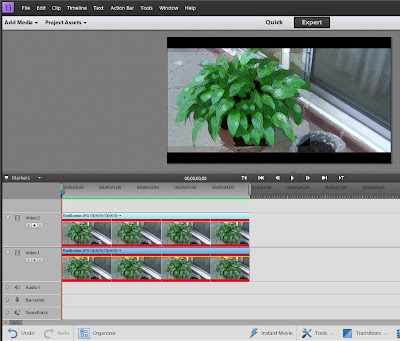
Figure 9. Result Of First Applying Effects Mask/NewBlue Cartoonr Plus Effect And Then Doing The Cropping Of The Ungrouped Video 1 Content
STEP 5
But when all is said and done, what if the end result wanted is without the top and bottom black borders representing transparency? Those borders can be "scaled out". If so,
  • ungrouped Video track 1 content. Applied Effects/Applied Effects Palette/Motion Panel Expanded/Scale property, check mark for Constrain Proportions, adjustment of Scale slider so that image just fills Edit Mode Monitor space. In this case, the Scale % was 120.1.
  • ungrouped Video track 2 content selected. Applied Effects/Applied Effects Palette/Motion Panel Expanded/Scale property, check mark for Contrain Proportions, set Scale % to 120.1.
The stacked ungrouped video track 1 content and ungrouped video track 2 content would present as displayed in Figure 10's Edit Mode Monitor.

Figure 10. Result Of Scaling Out Black Borders From Previous Step.
But reflecting back to the original user problem
If I start with a clip to which cropping has been applied, why does the cropping effect disappear when I apply an Effects Mask to a selected area of the clip?
the question glares out "Could this issue have been addressed in a quicker and easier way than what was just gone through step by step? Consider as the alternative solution to achieve the goal

STEP 1
At the onset scale video track 1 content to eliminate the bottom and top red bars, Then Applied Effects/Applied Effects Palette/Motion Panel expanded/Scale property set to 120.1% with a check mark next to Constrain Proportions

STEP 2
Click on Clip Menu/Effects Mask/Apply and apply the NewBlue Cartoonr Plus effect to the Effects Mask.

See Figure 11.

Figure 11. Alternative Approach. Scaling Instead Of Cropping, Then Clip Menu/Effects Masks/Apply and NewBlue Cartoonr Plus Effect Aplied to Effects Mask


There does not seem to be a generalized do this or that, but rather various factors that interact in the logistics of using Effects Mask. Thoughts on what the duplicate represents in Effects Mask feature needs more thought in view of the results as represented in Figure 10 (cropping involved) and in Figure 11 (scaling involved).***

_________________________________________________________________________________
*Study was done with Premiere Elements 11 Windows 7 Professional SP1 64 bit. But principles are applicable to earlier versions of Premiere Elements with the Effects Mask feature.
**Ungroup and grouping can be done by right clicking the Expert view Timeline file and, from the pop up menu, selecting Ungroup or Group as required for the task or by highlighting the Timeline file and going to Clip Menu/Ungroup or Group.
***Still thinking about this.


ATR


Sunday, July 21, 2013

PE: Narration Recording Stops After 30 Seconds

INTRODUCTION

"Narration Recording Stops After 30 Seconds" calls for help have been received periodically from Premiere Elements 11* users as well as from users with versions earlier than 11.

One user wrote
"As I record the narrative, the recorder stops at 30 seconds...long before I'm done. Starting at the 30 second point, I record again and the recorder stops again in 30 seconds. There are no narrative recordings ahead in the timeline. The help section in Adobe says that the recorder will stop in 30 seconds if you do not press stop after recording, but I'm recording when the recorder stops."

The Adobe document titled "Premiere Elements/Create Narration" gives details on creating narration* for the project as well as tips on producing the narration.

          Note: If your speakers are turned on, move as close to the microphone as possible, and
          keep the microphone as far away from the speakers as possible to prevent feedback.
Note: If you do not click the Stop button, recording automatically stops at the beginning of the next file in the Narration track, or 30 seconds past the end of the last clip in the Quick view timeline or the Expert view timeline.
ISSUE

The Adobe document does not address the why for this "Narration Recording Stops After 30 Seconds" situation.

SOLUTION

First hand analysis of the situation revealed  that content is required on either a video track, an audio track, or the Soundtrack to avoid the"Narration Recording Stops After 30 Seconds" situation. The examples to follow demonstrate how what is on a video track, an audio track, or Soundtrack can influence the duration of the narration clip generated.

Depending on the circumstances, use of the free audio editor Audacity might be looked at to produce the narrations which can then be imported into Premiere Elements 11 with its Add Media/Files and Folders to Project Assets and from there dragged to the Timeline.

TYPICAL NARRATION RECORDING SCENARIOS

EXAMPLE 1

No content on video tracks, audio tracks, nor Soundtrack when narration recording started. At narration start, the Timeline Indicator is at the beginning of the Timeline. After narration is started, no narration recording stop button nor Narration Tool Done button hit.

Result: Stops at 30 seconds Narration Clip
Narration recording and the Timeline Indicator stopped at 30 seconds mark on Timeline, leaving a 30 second narration clip on the Narration Track.  Refer to Figure 1. The Timeline timecode went from 00;00;00;00 to 00;00;29;28. The results were unaffected by the location of the Timeline Indicator at the start of a narration recording.

Figure 1. Narration Recording With No Content On Video Tracks, Audio Tracks, Nor Soundtrack. Narration Recording And Timeline Indicator Stopped At Timeline 30 Seconds Timeline Mark (29 Seconds28Frames). No Narration Recording Stop Button Nor Narration Done Button Hit After The Start Of The Narration.

 Also, if another narration recording was started at the end of this first 30 narration clip, it would stop 30 seconds later with no narration recording Stop button nor narration Done button hit.

EXAMPLE 2

No content on Video tracks and Audio tracks, but mp3 soundtrack (200.87 seconds) on Soundtrack when narration recording was begun with the Timeline Indicator at the start of the Timeline. No narration recording Stop button nor Narration Tool Done button was hit after starting the narration recording.

Result: Stops at 230.83 seconds Narration Clip
Narration recording and the Timeline Indicator stopped at 230.83 seconds mark on Timeline, leaving a 230.83 second narration clip on the Narration Track.  Refer to Figure 2. The resulting 230.83 seconds narration clip in this instance appeared to relate to the 200.87 seconds of the mp3 soundtrack file on the Soundtrack plus the 30 seconds as indicated in the Adobe document when it wrote
If you do not click the Stop button, recording automatically stops at the beginning of the next file in the Narration track, or 30 seconds past the end of the last clip in the Quick view timeline or the Expert view timeline.
Figure 2. Narration Recording With No Content On Video Tracks, Audio Tracks, But With Mp3 Soundtrack On Soundtrack. Narration Recording And Timeline Indicator Stopped At Timeline 230.83 Seconds Mark (3 minutes50Seconds25Frames). No Narration Recording Stop Button Nor Narration Done Button Hit After Start Of Narration.

The same 230.83 seconds Narration clip could be obtained as seen in Figure 2, if the mp3 soundtrack on Soundtrack was removed and a 230.83 second video placed on Video Track 1 or a 230.83 second audio clip was placed on Audio Track 1 prior to the start of the narration recording.

EXAMPLE 3

No contents on Video tracks and Audio tracks, but two mp3 soundtracks on Soundtrack, one extending from 0 time to 200.87 seconds followed by a space of 105.30 seconds, followed by a second mp3 soundtrack with duration of 200.87 seconds. (Total coverage of Soundtrack with 2 mp3 soundtracks and gap between = 507.04 seconds.) No narration recording Stop button nor Narration Tool Done button was hit after starting the Narration Recording.

Result: Stops at 536.97 seconds Narration Clip
Narration recording and the Timeline Indicator stopped at 536.97 seconds mark on Timeline, leaving a 536.97 second narration clip on the Narration Track.  Refer to Figure 3. The resulting 536.97 seconds narration clip in this instance appeared to relate to the 200.87 seconds of the first mp3 soundtrack file plus 105.30 gap plus second mp3 soundtrack on the Soundtrack plus the 30 seconds as indicated in the Adobe document when it wrote
If you do not click the Stop button, recording automatically stops at the beginning of the next file in the Narration track, or 30 seconds past the end of the last clip in the Quick view timeline or the Expert view timeline.
Figure 3. Narration Recording With No Content On Video Tracks, Audio Tracks, But With 2 Mp3 Soundtracks On Soundtrack Separated By A Gap Between The Two.Narration Recordings And Timeline Indicator Stopped At Timeline 536.07 Seconds Mark (8 minutes56Seconds29Frames). No Narration Recording Stop Button Nor Narration Done Button Hit After Start Of Narration.


_______________________________________________________________________________
*Narration recorded with the Narration Tool has the .wav file extension. The typical properties of the file are seen in the MediaInfo properties readout in Figure 4. Properties common to all narrations produced with the Narration Tool appear to be:
  • Format
  • Format Profile
  • Format Settings
  • CodecID
  • CodecID/Hint
  • Bitrate Mode
  • Bitrate
  • Channel(s)
  • Sampling Rate
  • Bit Depth

Figure 4. Premiere Elements 11 Typical Narration Clip Properties. Narration Clip Used For This Figure Is From Example 3.
 **Principles involved in this blog post are applicable to earlier versions of Premiere Elements as well as to Premiere Elements 11. Study was conducted on Windows 7 Professional SP2 64 bit computer. Premiere Elements 11 project preset was manually set for NTSC DV Standard although results appeared independent of project preset setting.


ATR


Friday, July 19, 2013

PE: Quick and Helpful Links

INTRODUCTION

"Quick" and "helpful" are being used here interchangeably to describe links to information that the Premiere Elements user might seek for reference on a variety of aspects of the program. This blog post will be continuously monitored and updated to keep current.

TYPE OF INFORMATION

Help PDF

Premiere Elements 12
http://helpx.adobe.com/pdf/premiere-elements_reference.pdf


Premiere Elements 11

Premiere Elements 10, 9, 8, and 7
Links available here include Premiere Elements 10 as html file and Premiere Elements 9, 8, and 7 as pdf files. If Premiere Elements 10 as PDF is wanted, click on the Premiere Elements 10 html link to open it, and then, in that opened html file, click on the "View Help PDF".

Elements Organizer 12
http://helpx.adobe.com/pdf/elements-organizer_reference.pdf

Elements Organizer 11

Elements Organizer 10, 9, and 8

Contact Adobe

Contact Customer Care

Activation Issues (worldwide)
This looks like a very interesting worldwide link. Not sure how up to date it is, but worth a look at if Activation information is needed.
http://www.adobe.com/eeurope/products/activation/tour.html  

Contact Customer Care - Downloading, Installing, and Setting Up Activating my Product
https://helpx.adobe.com/contact.html?step=PRE_downloading-installing-setting-up_downloading-installing_stillNeedHelp
Link is set for Downloading, Installing, and Setting up topic. It may or may not hold that set. If not, navigate to Premiere Elements and page that looks like, and click on the Chat option.


Customer Care -Adobe ID and Signing In (Activation)
https://helpx.adobe.com/contact.html?step=PRE_adobe-id-signing-in_stillNeedHelp
Link is set for Adobe ID and Signing In topic. It may or may not hold that set. If not, navigate to Premiere Elements and page that looks like, and click on the Chat option.


Redemption Code
http://helpx.adobe.com/x-productkb/global/redemption-code-help.html

Return/Refund
https://helpx.adobe.com/contact.html?step=PRE_membership-account-payment_payments-invoices-orders_stillNeedHelp
also see

Adobe Technical

Adobe Premiere Elements Help/ Supported devices l Adobe Premiere Elements

Adobe Premiere Elements 11/Tech specs - System Resources

Photoshop Elements Help/Supported Formats l Premiere Elements, Photoshop Elements

Adobe Premiere Elements/Help/Missing presets
(downloads for missing 1080p60.sqpreset and 1080p50.sqpreset files necessary for the 1080p60 and 1080p50 project presets)
http://helpx.adobe.com/premiere-elements/kb/missing-presets-pre-11.html


Tutorials

Learn Premiere Elements 11

Learn Premiere Elements 10

Other

Adobe Community>Premiere Elements Forum
http://forums.adobe.com/community/premiere_elements


____________________________________________________________________________
Customer Contact/Adobe Chat links upated July 18, 2014.

Thursday, July 18, 2013

PE: Titler - Part 2 Styles

INTRODUCTION

Much to tell about Premiere Elements and "About Styles". Entrance into the topic will be by way of Premiere Elements 11* Titler and its Text, Styles, and Shapes sections. The fourth of its sections, Animation, has already been detailed in a recent blog post.

The focus here will include
  • Applying Adobe's default Style to text and shapes, and using other built in Styles choices in the Style section on a non-default basis
  • Setting alternative default Style from Adobe's built in Styles in the Style section
  • Creating and saving User Created Style, and Setting it as Default Style
Lots of whys remain on the logistics of Premiere Elements Titler Text and Styles.

SOLUTION

In doing it is hoped that answers would be generated as to what about "About Styles".

OBSERVATIONS

Applying Adobe's default Style to text and shapes, and using other Adobe built in Styles in the Style section on a non-default basis

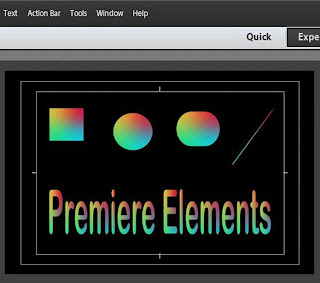
The Titler opens with the Text section revealed, and the Titler monitor showing "Add Text" already typed using the Adobe set default Style which is named "Default Caslon Pro 68", one of 115 different Styles that are found in the Styles section of the Titler. Each Style there includes predetermined font, font size, stroke, color, or drop shadow. These Styles can be applied to shapes drawn in the Titler as well as text typed there. In the case of the Styles applied to Shapes, the font and font size do not apply. The Shapes types include rectangle, ellipse, rounded rectangle, and line.

Compare
  • text and shapes created in one title file with the Adobe set default Style of "Default Caslon Pro 68"
  • the "Default Caslon Pro 68" text and shapes selected and a new non default style applied to them
After the new non default Style was applied, the Text section of the Titler showed the font name and colors of the non default Style applied, but not the font size of the non default Style applied. The font size in the Text section of the Titler remained at 68, the font size of the Adobe default set Style, not the font size of the replacement Style which was not designed as the default Style.

Figure 1. Text & Shapes. Style "Default Caslon Pro 68".

Figure 2. Text & Shapes. Style "Lithos Gold Strokes 52"

Figure 3. Text & Shapes. Style "Tekton Pro Yellow 93"

In addition, the "Lithos Gold Strokes 52" with the 52 font size, appears to have a larger font size than the Default Caslon Pro 68. The "Tekton Pro Yellow 93" with the 93 font size appears to have a smaller font size than the Default Caslon Pro 68. So, for the examples in Figures 2 and 3, it became necessary to
  • Go back to the Text section, select the Selection Tool
  • Use the Selection Tool to select the text, use the bounding box of the text to resize and reposition it (the font size adjustment was not reflected in the Text section, font size remained in the Text section with the readout of 68).
After the Style replacement was done in Figures 2 or 3, any new text or shape created in that same title would have the Adobe set  Default Carlson Pro 68.

Setting alternative default Style from Adobe's built in Styles in the Style section

The Adobe set default Style of "Default Caslon Pro 68" can be changed so that every time text is typed or shape is created in the Titler it will have this newly set default Style including font, font size for text, and stroke, color, drop shadow for text and shape. What may seem a bit confusing is that "Default Caslon Pro 68" retains its name even when a new default Style is set, and this new default Style does not include "default" anywhere in its name. To create a new default style
  • Open the Titler
  • Go to the Styles section, left click the new choice to select it, putting a blue border around it, then right click the new choice, and the select "Set Style As Default". 
  • Close the Titler. (See Close arrows in Figure 4.) Then open the Titler. Go to the Text section to verify that the font name and font size of the new default is shown when ready to type new text.
When a new default is set, the thumbnail for the choice seems to be moved to the top left in the line up of Styles thumbnails in the Styles section of the Titler. See Figure 4.


Figure 4. Setting "Caslon Red 84" As New Default

When the Titler is reopened after this change in Style default and a new title created with "Caslon Red 84" Style as default, the expected results are as displayed in Figure 5.


Figure 5. Results Using "Caslon Red 84" As New Style Default

The new Style Default appears to remain in effect thereafter either within the project
  • when creating a new title in a project
  • when editing a title that was created before the change of default Style
or from project to project.

Creating and saving user created Style and Setting it as Default Style

A Style can be created by the user in the Titler, using its Text section for the creation and its Style section for the Save Style as well as Set Style As Default. Here is one example of how it might be done:

STEP 1
Open the Titler to the Text section, select and set Font, Size, and add Color to the text.

Figure 6. User Created Style In Titler Text Section In Progress

In the example shown in Figure 6, Font = Arial Rounded MT Bold, Size = 392. Color Properties dialog was used to add a 4 Color Gradient to the Text which was Premiere Elements. In this instance, the Fill and Stroke where not available in Color Properties. Please refer to the Adobe document "Premiere Elements/Adding Color and Shadows to Titles" for a full discussion of Set the Fill and Set the Stroke in Color Properties.

STEP 2
When the user Style is completed in the Text section and the text is selected with the Text section's Selection Tool, click on the Style Tab to open that section. In that section, right click anyone of the Styles thumbnails there and select "Save Style" from the pop up menu.
IMPORTANT. At no time, left click the Style thumbnail so that there is a blue border around it. See Figure 7.

Figure 7. User Created Style. Save Style.

STEP 3
Click OK to the Save Style dialog for the new "Arial Rounded MP Bold Red 304" Style. A thumbnail for the new Style will appear in the display of Adobe built in Styles thumbnails (typically to the bottom of the other thumbnails). The User Created Style thumbnail can be distinguished from the Adobe built in ones by the presence of a white border above and below the displayed Aa representation of the Style.

Tip. That Aa representation in the Style thumbnail can be changed to another 2 characters in Edit Menu/Preferences/Titler if wanted. But, at this time, no advantage is seen in that.

Figure 8. User Newly Created Style Displayed In Styles Section

If the User Created Style is wanted as the default Style, then left click its thumbnail to select it (place a blue border around it), and then right click the thumbnail and select "Set Style As Default". The new default should go into effect after the Titler is closed with the arrow pair at the top right of the Titler. So close the Titler, reopen it, and create a new title. Refer to above section named "Setting alternative default Style from Adobe's built in Styles in the Style section" for applicable further details.

STEP 4
When the "Atrial Rounded MT Bold 304"is set as default, the expected results are as displayed in Figure 9.

Figure 9. User Created Style "Atrial Rounded MT Bold 304"
_________________________________________________________________________________

 *Premiere Elements 11 on Windows 7 Professional SP1 64 bit was used in this study. Premiere  Elements 11 project preset was set manually for NTSC DV Standard. Premiere Elements 10 under the same conditions gave comparable choices and results, but in the older style workspace representative of Premiere Elements versions earlier than 11. See Figure 10.

Premiere Element 10. Titler. "Default Caslon Pro 68" Style


Monday, July 15, 2013

PE: Titler - Part 1 Text Animations

INTRODUCTION

There have been several questions/problems concerning Premiere Elements Text Animation. The following is presented in the hope that the information provided will prove helpful to the understanding of the basics of the feature and to working through them to successful text animations.

Premiere Elements (4 through 11) offer Text Animation which is an interesting way to enhance the project's Titles. The first time that this feature is tried by the user, a frequent report is that it is  "not working". Possible reasons for "not working" include:
  • Use of Roll or Crawl options instead of Still Title option
  • Trying to apply Text Animation feature to more than one line of text 
          Special steps are needed to work with the Titler's Text Animation feature when 
          the text animation of more than one line of text is involved in one Title 
          (as originally suggested online by ID JohnnyO).
  
SOLUTION

Understanding of basics of Premiere Elements Text Animation is gained by going step by step through the How To details. Premiere Elements 11 (current version) underwent major changes in its interface as compared to earlier versions. So, for the convenience of those with versions of Premiere Elements earlier than 11, details are presented for Premiere Elements versions earlier than 11 (using version 10 as demo model) as well as for Premiere Elements 11.

HOW TO

PREMIERE ELEMENTS 10*

Applying Text Animation to a single line of text in a Title

STEP 1
Open Premiere Elements 10 Titler by clicking on the T (Add Default Text icon) at the lower right corner of the Edit Mode Monitor or by clicking on the Title Menu**/New Title/Default Still. The Titler monitor presents with the default text of "Add Text" backed by gray inside a rectangular border. 

STEP 2
With the Titler opened and the Horizontal Type Tool selected, if described as above, type a single line of text (no clicking of the text in the Titler monitor, just typing from the computer keyboard). In this example the words Premiere Elements were typed as the first line of text.

STEP 3
Next switch to the Selection Tool and click on the "Premiere Elements" text in the Titler monitor. The rectangular border around the text will now appear as a bounding box with handles. The gray backing for the text is gone in the rectangle. At this point, if wanted, change the font, select a Style, and reposition the text bounding box. See Figure 1.

Figure 1. Premiere Elements 10 Titler

STEP 4
In the Text Animation section of the Titler, there are several categories and options from which to choose. For this example, select the Twist and Turn category and the Spin Out By Line option. With the text still selected from STEP 3, click Apply or drag the Text Animation into the text's bounding box. In this example, select Apply.

STEP 5
In Premiere Elements 10, there is no Preview Button/Preview Window to view the text animation results before clicking the Done button. When finished, click Done button to close the Titler. Render the Timeline title to get the best possible preview of it when viewed in the Edit Mode Monitor. If not OK, double click the title file on the Timeline to re-open the Titler. With the Titler Selection Tool, select the text in the Titler monitor, go to Text Animation, and there click Remove, then select another Text Animation option, click Apply, click the Done button which closes the Titler.

Note: Premiere Elements 9.0/9.0.1 Text Animation, like Premiere Elements 10's, has no Preview Button/Preview Window for viewing results before hitting Done; whereas, versions 4, 7, and 8.0/8.0.1 have.

STEP 6.
At this point, there is one Title file with a copy in the Media area and a copy in the Timeline where it was automatically placed at the position of the Timeline Indicator (CTI) by Premiere Elements. After the Titler is closed, re-edit of the title is possible by double clicking it in the Timeline to bring up the Titler again.

But, what if 2 or more lines of text per Title instead of 1 are wanted with Text Animation for each of the lines? Here is the rest of the story.

Applying Text Animation to 2 or more lines of text per Title (in this example 3 lines of text)

STEP 1a
Create the first line of text as described above in STEP 1, STEP 2, and STEP 3, that is
Open Premiere Elements 10 Titler by clicking on the T (Add Default Text icon) at the lower right corner of the Edit Mode Monitor or by clicking on the Title Menu**/New Title/Default Still. The Titler monitor presents with the default text of "Add Text" backed by gray inside a rectangular border.  

With the Titler opened and the Horizontal Type Tool selected, if described as above, type a single line of text (no clicking of the text in the Titler monitor, just typing from the computer keyboard). In this example the words Premiere Elements were typed as the first line of text.
Switch to the Selection Tool and click on the text in the Titler monitor. The rectangular border around the text will now appear as a bounding box with handles. The gray backing for the text is gone in the rectangle. At this point, if wanted, change the font, select a Style, and reposition the text bounding box. 
BUT, when finished typing the first line of text, DO NOT press the Enter key of the computer main keyboard to type the second text line.

No applying of text animation to the first line of text yet.


STEP 2b
Instead, click the T (Add Default Text icon) again. In the Titler monitor, a new "Add Text" backed by gray inside a rectangular border will present for the second line of text. Type the second line of text (in this case the second line of text consists of the words Check It Out). Switch to the Selection Tool and click on the text in the Titler monitor in order to generate the bounding box with handles for use in dealing with the second line of text.

Again, no applying of text animation to the second line of text yet.

STEP 3c
Now, instead of pressing the Enter key to type the third text line, click the T again to generate another "Add Text" backed by gray inside a rectangular border. Type the third line of text (in this case the third line of text consists of the words Text Animation). Switch to the Selection Tool and click on the text in the Titler monitor in order to generate the bounding box with handles for use in dealing with the third line of text. After the typing of the third line of text is completed, stay with the Selection Tool selected and DO NOT click Done.

STEP 4d
With the Selection Tool, do the following one line at a time.  Click on the text line to show its bounding box, select the Text Animation, and click Apply. After this is done for each of the 3 lines of text, click Done to close the Titler. Note that each line of text can have a different Text Animation type.

STEP 5e
Notice that this process generated one Title file containing 3 lines of animated text, not 3 Titles files, each containing one of the 3 animated lines. If necessary, re-edit this Title by double clicking its Timeline copy to bring up the Titler again.

Presented as a quick demo is the following DV AVI standard video displaying the results of the 3 lines of animated text, with "Premiere Elements" text using Twist and Turn/Spin Out By Line, "Check It Out" text using Move In and Out/Fly Out To Bottom, and "Text Animations" text using Twist and Turn/Spin In By Line. Butterfly is from Premiere Elements 10's animated Clip Arts/Animated Objects.


HOW TO

PREMIERE ELEMENTS 11*

Applying Text Animation to a single line of text in a Title

STEP 1
Open Premiere Elements 11 directly to the Titler via Text** Menu/New Text/Default Text. Or click on Titles & Text Tab at bottom of interface/General/Default Text, and then drag the Default Text thumbnail to the Timeline or into the Edit Mode Monitor. The Titler then opens.

There are four sections to the Titler. They are Text, Styles, Animation, and Shapes. The Titler opens with the Text section options revealed. The default text of "Add Text" presents in the Titler monitor as that "Add Text" surrounded by a rectangular border and a blinking vertical line at the left edge of the rectangle. With the mouse cursor, click/drag across the text horizontally from left to right vertical edge of the rectangular border which surrounds the Add Text, creating a gray text backed in gray in the rectangle.

STEP 2
Now with the Titler opened to the Text section and the Horitzontal Type Tool selected, if described as above, type a single line of text. In this example the words Premiere Elements were typed as the first line of text.

STEP 3
Switch to the Selection Tool in the Text section of the Titler, and click on the text in the Titler monitor. At this point, if wanted, change the font, select a Style, and reposition the text bounding box. See Figure 2.


Figure 2. Premiere Elements 11 Titler.

STEP 4
Make sure the text in selected in the Text section, and then click on the Animation Tab to open that section of the Titler. There are several categories and options from which to choose. For this example, select the Twist and Turn/Spin Out By Line. Click Apply at the bottom of the Animation section. An alternative to clicking Apply there is dragging the animation choice to the Titler monitor and dropping it on top of the title text. In this example, select Apply.  See Figure 3 to view the Animation section opened.

Figure 3. Premiere Elements 11 Titler Animation Section Opened

STEP 5
Although no Preview option is seen, the option to Remove the Animation choice is found at the bottom of the Animation Section to the right of the Apply option. At the top right of the Titler, to the right of the header named Adjustments, are two small triangles facing right. Click on them to close the Titler. They appear to represent the Premiere Elements 11 Titler's Done button. See Figure 1 and Figure 2.

STEP 6
At this point, there is one Title file with a copy in Project Assets and a copy in the Timeline where it was automatically placed at the position of the Timeline Indicator (CTI) by Premiere Elements. After the Titler is closed, re-edit of the title is possible by double clicking it in the Timeline to bring up the Titler again.

But, what if 2 or more lines of text per Title instead of 1 are wanted with Text Animation for each of the lines? This is a can do operation for Premiere Elements 11 when using special steps similar to those just described for versions of Premiere Elements earlier than 11.

Applying Text Animation to 2 or more lines of text per Title (in this example 3 lines)

STEP 1a
Create the first line of text as in Premiere Elements 11's STEP 1, STEP 2, and STEP 3 above, that is
Open Premiere Elements 11 directly to the Titler via Text** Menu/New Text/Default Text. Or click on Titles & Text Tab at bottom of interface/General/Default Text, and then drag the Default Text thumbnail to the Timeline or into the Edit Mode Monitor. The Titler then opens.
There are four sections to the Titler. They are Text, Styles, Animation, and Shapes. The Titler opens with the Text section options revealed. The default text of "Add Text" presents in the Titler monitor as that "Add Text" surrounded by a rectangular border and a blinking vertical line at the left edge of the rectangle. With the mouse cursor, click/drag across the text horizontally from left to right vertical edge of the rectangular border which surrounds the Add Text, creating a gray text backed in gray in the rectangle
Now with the Titler opened to the Text section and the Horizontal Type Tool selected, if described as above, type a single line of text. In this example the words Premiere Elements were typed as the first line of text.
Switch to the Selection Tool and click on the text in the Edit Titler monitor. At this point, if wanted, change the font, select a Style, and reposition the text bounding box. See Figure 2.
BUT, when finished with the first line of text, DO NOT press the Enter key of the computer main keyboard to type the second text line.

No applying of text animation to the first line of text yet.


STEP 2b
Instead, again click the T icon (Horizontal Type Tool) at the bottom of the Text section and then click in the Titler monitor and just type the second line of text. There is no "Add Media" default text to get rid of first. DO NOT press the Enter Key of the computer main keyboard to type the third text line. Use the Selection Tool to select this second line of text and reposition it etc, as necessary.

STEP 3c
To create the third line of text, once more click on the T icon (Horizontal Type Tool) and then click in the Titler monitor and just type the third line of text. Again, there is no "Add Media" default text to get rid of first. After the typing of the third line of text is completed, switch back to the Selection Tool to select this third line of text and reposition it etc, as necessary.

STEP 4d
The rest will be a go between the Text section Selection Tool and the Animation section Animation choice. Do the following one line at a time.. In the Text section select the Selection Tool, and click on the text line to show its bounding box, open Animation section, select the Animation there, and click Apply. After all that is done for each of the 3 lines of text, close the Titler, render the Timeline, and play back the animated text lines in the Edit Mode Monitor.

STEP 5e
Again notice that this process generated one Title file containing the 3 lines of animated text, not 3 Title files, each containing one of the 3 animated lines. If necessary, re-edit this Title by double clicking its Timeline copy to bring up the Titler again.

_______________________________________________________________________________
*Premiere Elements 10, NTSC DV Standard project on Windows 7 Professional SP1 64 bit.
Premiere Elements 11, NTSC DV Standard project on Windows 7 Professional SP1 64 bit.
**Premiere Elements 10. Title Menu also contains options for Default Roll and Default Crawl titles besides the Default Still title. Default Roll and Default Crawl titles cannot be used with Text Animations.
Premiere Elements 11. Text Menu also contains options for Default Roll and Default Crawl titles besides the Default Text title. Under Titles & Text tab at bottom of interface/General/also contains the Default Row and Default Crawl titles besides the Default Still title. Default Roll and Default Crawl titles cannot be used with the Text Animations.


ATR


Monday, July 8, 2013

PE: Time Lapse Video Basics

INTRODUCTION

Premiere Elements is a great tool for producing a high quality Time Lapse video from sequentially taken photos imported in a Folder into the project. Once the photos are on the Timeline in sequence, then Time Stretch can be used to experiment with and set (all at one time) the still image duration for the Timeline photos to achieve the wanted Time Lapse effect. The keys to success include introducing a Folder with the sequentially ordered photos  into the project and then dragging that Folder to the Timeline plus making sure beforehand that the photo pixel dimensions did not exceed 1920 x 1080 pixels (for HD Time Lapse export) or 1000 x 750 pixels (for SD Time Lapse export).

HOW TO

The basic focus areas are
  • Obtaining a series of photos taken over a period of time automatically, using the camera in its time lapse mode set at the time gap wanted.
  • Compiling those photos, maintaining the sequence, into a Folder.
 When Premiere Elements enters the equation
  • Importing that Folder with the sequentially ordered photos into Premiere Elements with its Get Media*/Files and Folders, dragging the Folder to the Timeline.

Detailed Premiere Elements Involvement

1. Select the appropriate project preset in the new project dialog (such as NTSC/AVCHD/Full HD 1080i30 (for HD) or NTSC DV Standard or Widescreen (for SD) or their PAL counterparts.

2.  Leave preferences "Still Image Default Duration" as is.
Unless changed by the user, each photo will have the default duration that the program sets in Edit Menu/Preferences/General "Still Image Default Duration". That option at that location is given only in frame units. So, for NTSC 30 frames/sec project with the Adobe default 150 frames, that would be equivalent to 5 seconds for the Still Image Default Duration.  In that Preferences area, that Still Image Default Duration can be set from 1 frame (equiv. 0.033 sec) to 1000000 frames (equiv. 33.333 sec).

The goal is to shorten the Still Image Duration to the same value for all those Timeline photos to get the desired effect. If ideal duration for this specific project is known by prior experimentation, then set that Still Image Duration here in Edit Menu/Preferences/General, and THEN import the Folder.

3. Otherwise leave the preferences "Still Image Default Duration" with the program's default, import the Folder, drag it to the Timeline, highlight all the Timeline photos, right click anywhere in the highlight, select Time Stretch from the pop up menu, and experiment with Time Stretch's duration field until the duration is found to give the Time Lapse effect sought. In this process each photo ends up with the same duration and all set at the same time.

In the Time Stretch dialog, the display is 00;00;00;05;00, representing hours; minutes; seconds; and frames. Example, if the photo duration there was decreased from 5 to 2 seconds, the reading would then be 00;00;02;00. If the photo duration there was decreased from 5 seconds to less than 1 second (say to 0.3 seconds), the reading would look like 00;00;00;09. That 9 frames would be equivalent to 0.3 second in my NTSC 30 frames per second project.

4. Bottom line: In this Time Stretch duration experimentation process, decrease the photo duration progressively until the desired results are seen. Besides some beforehand photo sizing considerations, some beforehand math may be needed on how many photos and what duration for each to get the wanted video duration. The user does not want to end up with a 6 hour video for a project where the total length of the movie and the duration of the photos were not taken into consideration beforehand.

Premiere Elements** approach is not that hard but there are those "details"*** to be aware of.

_______________________________________________________________________________
*These details are applicable to Premiere Elements 11 and earlier. Premiere Elements 11's Add Menu/Files and Folders/Project Assets would be on a par with earlier version's Get Media/Files and Folders/a project media area.
**This Premiere Elements Time Lapse Basics blog post will be expanded on in the near future.
***One of the details that has been asked about is the location of Time Stretch.
In Premiere Elements 11 Expert workspace, Time Stretch
a. Click onTools Menu/Time Stretch at top of interface or Tools Tab/Time Stretch at bottom of interface.
or
b. Right click the video on the Timeline and select Time Stretch from the pop up menu
or
c. With the video selected, use the keyboard shortcut Ctrl+R

In Premiere Elements 11 Quick workspace, there is no opportunity to use Time Stretch by any means.

ATR 


Sunday, July 7, 2013

PE11: Exporting a 1080p25 or 1080p30 file with 5.1 Channel Audio

INTRODUCTION

In an earlier blog post the focus was on the export of a 1080p50 or 1080p60 video file with 5.1 channel audio. And, the story was that, although Premiere Elements allows for the import of video with Dolby Digital 5.1 channel audio, the Dolby Digital 5.1 channel audio export choice for that video is not available. However, there are limited opportunities for a 5.1 channel audio choice in export as AAC 5.1 channel audio via Publish+Share/Computer/AVCHD.

But here is the catch. These limited opportunities for AAC 5.1 channel audio choices in export fail unless the project preset used is one that includes 5.1 channel audio. Not all project presets have the alternatives of with and without the 5.1 channel audio.

Premiere Elements 11's new NTSC AVCHD 1080p60 and PAL AVCHD 1080p50 did not come with 5.1 channel counter parts. So, for those wanting a successful export to AVCHD 1080p50 5.1 channel or AVCHD 1080p60 5.1 channel, the copies of the Notepad documents for the existing AVCHD 1080p50 and AVCHD 1080p60 were edited to include 5.1 channel audio, giving the user the choice of with or without 5.1 channel audio for these project presets.

The work reported in the earlier blog post is extended here to include the Premiere Elements 11 project presets for NTSC/DSLR/1080p/DSLR 1080p30 and DSLR 1080p30 @ 29.97 as well as PAL/DSLR/1080p25 and the creation of their counterpart 5.1 channel project presets derived from the Notepad document of the existing project preset that does not include 5.1 channel in its description.

The same How To was used for the creation of the new 5.1 channel version of DSLR 1080p30 @ 29.97, DSLR 1080p30, or DSLR 1080p25 in this blog post as was used for AVCHD 1080p60 and AVCHD 1080p50 in the earlier blog post. The discussion that follows the How To will include:

  • All found Publish+Share/Computer/AVCHD or Windows Media opportunities for taking a Timeline video (with or without 5.1 channel audio) and exporting it to a video file with AAC 5.1 channel audio (AVCHD route) or Windows Media Audio 10 Professional 5.1 channel audio (Windows Media route).
  • Other observations.

HOW TO

Starting Files and Their Locations

PAL/DSLR/1080p/DSLR 1080p25
(Local Disc C\Program Files\Adobe\Adobe Premiere Elements 11\Settings\Sequence Presets\PAL\DSLR\1080p\)

NTSC/DSLR/1080p/DSLR 1080p30
NTSC/DSLR/1080p/DSLR 1080p30 @ 29.97
(Local Disc C\Program Files\Adobe\Adobe Premiere Elements 11\Settings\Sequence Presets\NTSC\DSLR\1080p\)

1. Make a copy of each of the starting files cited above which came with the program and which are found in the above path. Paste to computer Desktop and proceed for each file as follows.

2. First right click the PAL DSLR 1080p25.sqpreset.file copy that was pasted to the computer Desktop, select Open With, and then select Notepad.

3. In the Notepad document of the PAL DSLR 1080p25.sqpreset, where it says

<InitialNumberOfFiveOneTracks>3</InitialNumberOfFiveOneTracks>
<InitialNumberOfStereoTracks>3</InitialNumberOfStereoTracks>
Change to:
<InitialNumberOfFiveOneTracks>3</InitialNumberOfFiveOneTracks>
<InitialNumberOfStereoTracks>0</InitialNumberOfStereoTracks>

And where it says

<AudioChannelType>1</AudioChannelType>
Change to:
<AudioChannelType>2</AudioChannelType>

Before saving and closing out of this Notepad document, Save As, changing the name of the document to DSLR 1080p25 5.1 channel. Place that .sqpreset file in 1080p Folder in the route cited above (Local Disc C\Program Files\Adobe\Adobe Premiere Elements 11\Settings\Sequence Presets\PAL\DSLR\1080p\).

Repeat the How to in order to create the NTSC DSLR 1080p 5.1 channel.sqpreset for placement in the Program Files in the 1080p Folder in the route cited above (Local Disc C\Program Files\Adobe\Adobe Premiere Elements 11\Settings\Sequence Presets\NTSC\DSLR\1080p\)

4. It is highly recommended that you take control over setting up the Premiere Elements 11 project when you are using the sqpresets described. To do this, open to Premiere Elements 11 workspace, go to File Menu/New/Project and, in the New Project Dialog, select your new DSLR 1080p 5.1 channel project preset. Make sure you put a check mark next to "Force selected Project Setting on this project" before you click OK. And, then move forward to Add Media and import of video with its DSLR 1080p properties. In the opened project, you should see a little "5.1" to the right of the name Audio 1 for that track.

DISCUSSION

From the onset it was believed that the prerequisite for all this were source media which included Dolby Digital 5.1 channel audio or 5.1 channel with audio codec other than Dolby Digital. In other words, 5.1 channel in to get 5.1 channel out. So, it was a bit unexpected when it was discovered that a Timeline with video (stereo audio) could be exported as video with AAC 5.1 channel or Windows Media Audio 10 Professional 5.1 channel if the project preset included 5.1 channel in its make up. This finding was a bonus since the mission was to try to export source media with 5.1 channel audio without the export erroring out, and the use of the project preset which included 5.1 channel took care of that.

The earlier work confined itself to an AVCHD.mp4 with AAC 5.1 channel audio export for the Timeline with source media containing 5.1 channel audio. Only one specific route to this end was given, that is, Publish+Share/Computer/AVCHD with Presets = MP4 H.264 1920 x 1080p25, with adjusts under the Advanced Tab/Video Tab and Audio Tab to get the video with 5.1 channel audio end product. But, other opportunities in this regard exist and were found to be:

Publish+Share/Computer/AVCHD with Presets =
MP4 (all)
TiVo series 3 (both)
Vimeo (both)
YouTube (both)
and export settings changed under the Advanced Button/Video Tab and Audio Tab of the preset. Audio codec AAC and Output Channels 5.1 Channels.

Publish+Share/Computer/Windows Media with Presets =
720 x 480 16x9 29.97
720 x 480 4.3 29.97
720 x 576 16x9 25
720 x 576 4.3 25
and export settings changed under the Advanced Button/Video Tab and Audio Tab of the preset. Audio codec must be Windows Media Audio 10 Professional with 5.1 channel included in the choices in the Audio Format pop up.

Whether the user is using a 5.1 channel containing project presets that came with the program or those that were created by the user, in these studies the properties readout programs gspot and MediaInfo both confirm the end product as AVCHD video with AAC 5.1 channel from the Publish+Share/Computer/AVCHD route. However, if that same end product AVCHD video with AAC 5.1 channel is imported into a new Premiere Elements 11 project and the Properties for it read in Project Assets, the readout says the audio is Mono.

On the other hand, when the Windows Media opportunities are used, the end product wmv video with Windows Media Audio 10 Professional 5.1 channel has its audio readout as 5.1 channel whether the program is MediaInfo, gspot, or the Premiere Elements (Project Assets Properties). Often, if not always, the read out for "5.1 channel audio" says 6 channels. "6.0 channels" is 5.1 channels. Please refer to the Sony explanation.
https://us.en.kb.sony.com/app/answers/detail/a_id/39221/~/what-is-the-difference-between-dolby%E2%AE-prologic,-dolby-prologic-ii,-dolby

The principles of this matter are not restricted to Premiere Elements 11 Windows.

ATR


Tuesday, July 2, 2013

PE: First Play Before Disc Menus for DVD-VIDEO Format on DVD Disc

INTRODUCTION

Premiere Elements (any version) does not have an option for an intro page (first play) before the disc menus for burn to DVD-VIDEO format on DVD disc, AVCHD on DVD disc, or Blu-ray disc format on Blu-ray disc.

But the first play before the disc menus for burn to DVD-VIDEO format on DVD disc can be achieved using the Premiere Elements burn to folder feature in conjunction with the 3rd party program named PgcEdit, a DVD IFO and menu editor.

HOW TO

Premiere Elements Required Folders and Files

"Movie Main" Burn to Folder (VIDEO_TS) Creation
Open Premiere Elements and create your project destined for NTSC DVD-VIDEO Standard or NTSC DVD-VIDEO Widescreen or the PAL counterparts, including all content, menu markers, disc menus, etc. When ready for burn to from the burn dialog, set
  • Burn to: Folder (4.7) or Folder (8.5), as appropriate
  • Folder Name: Movie Main
  • Folder Location: C:\Users\Owner\Desktop or preferred save location
  • Presets: NTSC_Dolby DVD or NTSC_Widescreen_Dolby DVD or PAL counterparts as appropriate
Hit the Burn button.

"First Play Burn" to Folder (VIDEO_TS) Creation
Open a new Premiere Elements project with the same settings as for the Movie Main Burn to Folder (VIDEO_TS) Creation. First play type can be title created in the project's Titler or video or photo. The first play content* is placed at the start of the Timeline, and its duration here determines the play time of the first play in the playback of the DVD-VIDEO on DVD disc. Nothing but first play content* goes into this "First Play Burn to Folder (VIDEO_TS) Creation. There are Timeline menu markers nor disc menus in this First Play Burn to Folder (VIDEO_TS) Creation. When ready for burn to from the burn dialog, settings are as for Movie Main Burn to Folder (VIDEO_TS) Creation, except the Folder Name: is First Play.

Hit the Burn button.

At this point, there are two folders on the computer desktop, one named Movie Main and the other named First Play. Each contains an OpenDVD Folder and a VIDEO_TS Folder, and its VIDEO_TS Folder is the focus.

PgcEdit Menu Editing For First Play Addition

STEP 1
Download and Install PgcEdit (current version seems to be 9.3)
http://www.afterdawn.com/software/audio_video/video_tools/pgcedit.cfmhttp://www.afterdawn.com/software/audio_video/video_tools/pgcedit.cfm

STEP 2
Open PgcEdit and go to File Menu/Open DVD, and click on Open DVD button (See Figure 2a) in order to open the "Browse for Folder" dialog in order to browse to and select the VIDEO_TS Folder of the Movie Main (See Figure 2b)

Figure 2a. PgcEdit Open DVD Button

 
Figure 2b. "Browse For Folder". Movie Main VIDEO_TS Folder.

STEP 3
With the Movie Main VIDEO_TS selected, click OK to the "Browse for Folder" dialog to display the PgcEdit workspace as shown in Figure 3a.

Figure 3a. PgcEdit Workspace After Clicking OK To "Browse For Folder" Dialog. Title Menu Options Next.


Click on the Title Menu to reveal its options, and select "Import First Play (startup) Clip".
See Figure 3b.

Figure 3b. Title Menu Options. Selection of  "Import First Play (Startup) Clip" Option.

STEP 4
After clicking on "Import First Play (startup) Clip option" under the Title Menu, the "Import first-play clip" dialog appears. See Figure 4a. Make no changes in the settings presented in this dialog. Click Continue.

Figure 4a. "Import First-Play Clip" Dialog. Continue.

Clicking Continue results in the appearance of the "Select the VTS IFO file with the title(s) to import" dialog. In this dialog, navigate to the First Play Folder and its VIDEO_TS Folder. Click on the VIDEO_TS Folder to reveal its VTS_01_0.IFO file. Select that VTS_01_0.IFO as shown in Figure 4b. Then click Open.

Figure 4b. "Select The VTS IFO File With The Title(s) To Import" Dialog. Selection of First Play VIDEO_TS Folder's VTS_01_0.IFO File, Followed By Clicking Open.

STEP 5
Clicking Open to the "Select the VTS IFO file with the title(s) to import" dialog, results in the
appearance of the "PgcEdit: Import VTST" pop up. Click CopyVOB(s) on this pop up. See Figure 5.

Figure 5. "PgcEdit: Import VTST" Dialog. Copy VOB(s) Option.

STEP 6
Clicking on the Copy VOB(s) give rise to the "PgcEdit: Save DVD" pop up. Click OK to this pop up. See Figure 6a.

Figure 6a. "PgcEdit: Save DVD" Pop Up.

Clicking OK to the "PgcEdit: Save DVD" pop up ends the process with the workspace as displayed in Figure 6b.

Figure 6b. PgcEdit Workspace At End Of Process.


STEP 7
Take the edited VIDEO_TS Folder only in the Movie Main Folder on the desktop and burn it from there to DVD disc with the ImgBurn program.
http://www.afterdawn.com/guides/archive/burn_dvd_folder_imgburn.cfm

The basics steps are
  • Write files/folder to disc choice
  • File Menu/Browse to a source folder (in this case the VIDEO_TS Folder of the edited Movie Main)
  • With DVD disc in DVD burner tray, click on Build icon at bottom of the left sector of the ImgBurn workspace.
Link for download of the free ImgBurn program is included in the above link which includes instructions for getting the VIDEO_TS on DVD disc in DVD-VIDEO format with the correct disc file system.

Although PgcEdit seems to be available as a Mac version, ImgBurn appears to be a Window Only program.

Possible ways for setting a first play before the disc menus for AVCHD on DVD and Blu-ray disc format on Blu-ray disc are being explored.

_______________________________________________________________________________

* First play can be more than a single file of the title, video, or photo type.
In one test run, the first play content consisted of a 12 second .wmv video, 5 second title created in the Titler, and a 11 second Universal Counting Leader, all of which played back before the disc menus after going through the procedure described above.


ATR