Friday, July 31, 2015

PE 13/13.1: Some Still Image Failed Imports

INTRODUCTION

There are instances when JPEG files and some other still formats fail to import into Premiere Elements and the throw off a "The importer reported a generic error" message. Examples of this include
  • JPEG images to which the CMYK color profile has been applied
 Recently a Premiere Elements 13 Windows 8.1 64 bit user reported that he could not import low resolution images JPEGs from a DLink camera. The MediaInfo readout of these JPEGs includes format = JPEG, pixel dimensions = 640 x 480, Bit Depth = 8-bit, and "Chroma subsampling 4:2:2". No color profile was named. The JPEGs that do import do not have "Chroma subsampling" included in their properties.

ISSUE

The issue was how to be able to import these DLink JPEGs into the Premiere Elements 13/13.1 project.


SOLUTION

The DLink JPEGs could be imported into Premiere Elements 13/13.1 project by making one of the following color profile adjustments in Photoshop Elements 13/13.1 before importing them into Premiere Elements 13/13.1.

Photoshop Elements 13/13.1 
Image Menu/Mode: RGB for all
Edit Menu/Color Settings for all = Always Optimize Colors For Computer Screens
 
DLink JPEG modified in Photoshop Elements 13/13.1
Image Menu/Convert Color Profile/Remove Color Profile
Save As JPEG (in Save As dialog, found no check mark next to Color: ICC Profile: sRGB IEC61966-2.1)
And imported into Premiere Elements 13/13.1

DLink JPEG modified in Photoshop Elements 13/13.1
Image Menu/Convert Color Profile/Convert to Adobe RGB Profile
Save As JPEG (in Save As dialog, found check mark next to Color: ICC Profile: Adobe RGB (1998)
And imported into Premiere Elements 13/13.1

or simply

DLink JPEG as is in Photoshop Elements 13/13.1
Save As JPEG (in Save As dialog, found  check mark next to Color: ICC Profile: sRGB IEC61966-2.1
And imported into Premiere Elements....that also worked.

Please refer to the following Adobe Premiere Elements Forum thread for more details on the follow through by this user.
https://forums.adobe.com/message/7794231#7794231

Figure 1 displays a 10, 11, 12/12.1, and 13/13.1 comparison of Premiere Elements, Photoshop Elements, Elements Organizer support for the type of files mentioned above.
Figure 1.

COMMENTARY

Photoshop Elements 13/13.1 Editor Image Menu/Convert Color Profile has 3 choices: Remove Color Profile, Convert to sRGB Profile, and Convert to Adobe RGB Profile. When the Edit Menu/Color Settings is set to Always Optimize Colors For Computer and one of these DLink JPEGs imported into the Photoshop Elements 13/13.1 Editor Expert workspace, Convert Color Profile offers only the Remove Color Profile and Convert to Adobe RGB Profile choices.

The choices made and described in the SOLUTION section produced DLink JPEGs that could be imported into the Premiere Elements 13/13.1 project. It was interesting to note that the original DLink JPEGs could be imported into Photoshop Elements 13/13.1 and Elements Organizer 13/13.1, but not Premiere Elements 13/13.1 Editor. An understanding of Chroma Subsampling and Color Profiles is still a work in progress.


ATR


Friday, July 24, 2015

PE 13/13.1: "Where is the File "Business Title_7.tga?" Solved?

INTRODUCTION

Premiere Elements title templates typically come in 4 varieties for a given theme: credits, frame, lower3rd, and title. For now, this blog is focusing on the title variant of each theme.

If a Premiere Elements 13/13.1 project uses the title template named RedBulbs_title and is saved closed, every time that project is reopened the message "Where is the File Business Title_7.tga?" will appear before the project opens. Clicking "Skip" to the message will open the project with this title template intact and the message gone, so this is more of a nuisance than a fatal error. This problem was not found to exist in Premiere Elements 12/12.1 Windows* for the counterpart title templates. And, transferring "good theme folders" from 12/12. to 13/13.1 does not resolve the matter.

For other _title choices like beachresort_title, the message would be "Where is the File Tropical_7.tga?"

ISSUE

How to get rid of the "Where is the File Business Title_7.tga?" and "Where is the File Tropical_7.tga?" messages is the question.

SOLUTION

The solution is to create the .tga file being looked for and add it to the theme's Folder. Two examples of the "fix" are described below using Premiere Elements 13/13.1 on Windows 7 Professional SP1 64 bit.

"Where is the file 'Business Title_7.tga'?"

In the case of the RedBulb_title accessed under Titles & Text Tab/General go to the
Local Disk C
Program Data
Adobe
Premiere Elements
13.0
Online
Title Templates
All_Lang
General
RedBulbs
and, in the RedBulbs Folder, find the file named RedBulbs_title_prv.png and make a copy of it that you paste into the Red Bulbs Folder. Then rename the copy Business Title_7.tga. The job is done.

"Where is the File 'Tropical_7.tga?'"

In the case of the beachresort_title accessed under Titles & Text/Travel, go to the
Local Disk c
Program Data
Adobe
Premiere Elements
13.0
Online
Title Templates
All_Lang
Travel
Beach Resort
and, in the Beach Resort Folder, find the file named beachresort_title_prv.png and make a copy of it that you paste into the Beach Resort Folder. Then rename the copy Tropical_7.tga. The job is done.

COMMENTARY

The why for this situation is not known to us. The above works unless you just want to click "Skip" to the message. In that scenario, the project will open with the title template intact although you went through the detour of the message.

A listing of title templates affected was put on hold for now.


_____________________________________________________________________________
 * Report for this type of problem in 12/12.1 Mac can be found
https://forums.adobe.com/thread/1372202


Work in progress.


ATR


PE: Adobe Watermark Removal From Tryout

INTRODUCTION

An Adobe watermark is seen in the Premiere Elements tryout's project file and in exports from it. The Adobe watermark cannot be removed from those exports from the tryout even after the purchase of the product. However, after the purchase of the product, the Adobe watermark can be removed from the tryout's project file that generated those exports.

Regarding removing the Adobe watermark in the purchased product...
  • Classically it is written, to remove the Adobe watermark from the project file created in the tryout, import the project file from the tryout into the purchased program, and go to and use Timeline Menu/Delete Rendered Files. If the Adobe watermark is not gone at that point, creating new rendered files in that purchased program and save close reopen of the project sometimes finally results with the Adobe watermarking gone.
  • In contrast, some of us have found that just importing the project file from the tryout into the purchased product automatically gets rid of the Adobe watermarks. 
  • And, the current Adobe download page for the Premiere Elements 13 tryout reads
Due to licenses of various codecs, a watermark is displayed on all videos in the preview window and will be added to all the exported files. If you decide to purchase Premiere Elements 13 after the trial period, the watermarking will be disabled once you enter a valid serial number.

ISSUE

Recently a user reported that she created a project file in the Premiere Elements 13 tryout and included in it circles created in the project's Titler using Default Text/Styles/Shape. After she purchased Premiere Elements 13 and used Timeline Menu/Delete Rendered Files to remove the Adobe watermarks from the tryout's project file, she found that she could remove all the Adobe watermarks except those related to the circles that had been created in the project's Titler.

What are these rendered files? Whenever the Timeline content is rendered for previewing purposes, the project generates preview files that are automatically saved to the computer hard drive. Whether the Timeline content rendered is video or still, the preview file is a video file. For SD project, the file is DV.AVI, for a HD project, the file is MPEG2.MPEG (version 12/12.1 and earlier) and H.264.MPEG (version 13/13.1)  plus a companion .xmp file.

Typically*, when titles are created and even edited repeatedly in the Titler, they present on the Timeline in best possible preview. Timeline rendering which is used to get the best possible preview is not needed  nor available since the best possible preview of these titles are being displayed. If it is accepted that removal of tryout's Adobe watermark and deletion of its rendered files (preview files) in the purchased product go hand in hand, then it would follow that tryout project's images that have the Adobe watermark and no rendered files** are destined to have Adobe watermark forever unless rendered files can be made for them in the tryout. The companion question is how to do this to get rid of the Adobe watermark without causing unwanted consequences to the image itself.

SOLUTION***

The easiest and less invasive way found to create "renderable" files for files such as Titler titles so that they could be Timeline rendered to produced rendered file was
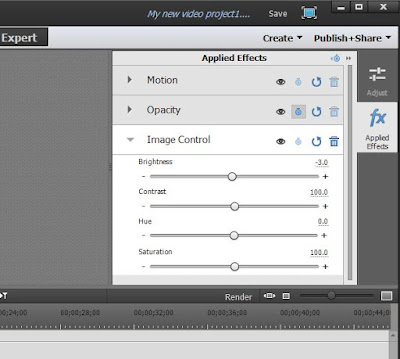
  • to apply to them the fx Effect/Advanced Adjustments/Image Control, 
  • do not edit the Image Control under Applied Effects Tab/Applied Effects Palette/Image Control Panel expanded (See Figure 1).
  • and then Timeline render the Timeline title files to which the Image Control effect was applied.

Figure 1. Premiere Elements 13/13.1 Fx Effects/Advanced Adjustments/Image Control Used To Force Titles Into "Renderable" State So That They Could Be Timeline Rendered To Produce Rendered Files (Preview Files).


COMMENTARY

The initial observation was that a Premiere Elements 13/13.1 user could not remove the Adobe Watermark from circle (title) images in the tryout's project file when that tryout project file was opened in the purchased product and Timeline Menu/Delete Rendered Files was applied. The problem was thought to be related to 

Tryout project's images that have the Adobe watermark and no rendered files are destined to have the Adobe watermark forever unless rendered files can be made for them in the tryout.

When the problem was first presented, a Premiere Elements 13/13.1 tryout was not available to me to validate what was believed to be cause of the problem and how to resolve it. At that time, in the purchased program, the user deleted and redid all the project's titles (circles) which still displayed  the Adobe Watermarks.

When a Premiere Elements 13/13.1 tryout became available to me, the above study was not validated as to cause and effect and casted doubts on classical concept of how to remove the Adobe Watermark from the tryout. Using the Premiere Elements 13/13.1 tryout and purchased versions.....
All the Adobe Watermarks were removed from all the Timeline content**** by just opening the tryout project file in the purchased product. This result was independent of whether or not a file came into the purchased program with a rendered file. Interestingly, inspection of the Adobe Premiere Elements Preview Files Folder found the rendered files that existed there still had their Adobe watermark after the purchased program's apparently automatic removal of the Adobe watermark appearing in the Edit area monitor.

The topic of preview files has many unanswered questions and often conflicting results that beg explanation. 
  • Significance of new format for HD preview files in the Premiere Elements 13/13.1 project
  • Timeline rendering that gives unrendered look in saved closed reopened project yet the rendered files are still alive and well in their hard drive save location
  • Why do some users obtain automatic removal of tryout Adobe watermark by just opening the tryout project file in the purchased program - no Timeline Menu/Delete Rendered Files needed


_______________________________________________________________________________
* Titles created and edited using the Text, Styles, and Shape sections of the Titler arrive on the Timeline with the best possible preview. Timeline rendering is not needed nor available for them. However, when animation is applied to the Titler text using the Titler's Animation section choices, then Timeline rendering is needed and available for the animated text title that arrives on the Timeline in order to get the best possible preview.

**Includes at least Titles & Text Tab title templates as well as titles created in the Titler using its Text, Styles, and Shape sections.

***Work was done with Premiere Elements 13/13.1 Windows 7 Professional SP1 64 bit.


****Files included in tryout project file opened in purchased product
  • circle created in Titler with Text, Styles, and Shape sections, displaying Adobe watermark, no rendered file
  • circle created in Titler with Text, Stylpes, and Shape section and Image Control applied to Timeline file, displaying Adobe watermark, and rendered file
  • jpeg photo 1, displaying Adobe watermark, and rendered file
  • jpeg photo 2, displaying Adobe watermark, and rendered file
  • countryside_title from Titles & Text Tab, displaying Adobe watermark, no rendered file
  • beachresort_title from Titles & Text Tab, displaying Adobe watermark, no rendered file
_______________________________________________________________________________


ATR


Wednesday, July 22, 2015

PE 13/13.1: HD Timeline Rendered Files Format Changes

INTRODUCTION

When the Premiere Elements Timeline content is Timeline rendered to get the best possible preview of it in the Edit area monitor, the project generates preview files which are automatically saved to the computer hard drive. These preview files are all in video format whether the file rendered on the Timeline is a video or still. Typically, the generalization is made that
  • For SD project, the preview file is DV.AVI 4:3 or 16:9
  • For HD project, the preview file is HD MPEG2.MPEG with a companion .XMP file
The Timeline Rendering Quality preference can change the resolution of the HD project's preview file from 960 x 540 to 1920 x 1080, but has no effect on the 720 x 480 resolution of the SD project's preview file. The DV.AVI and MPEG2.MPEG preview files contain no audio component.

 ISSUE

MediaInfo video audio properties readout program was used to examine more deeply the properties of the Premiere Elements 12/12.1 versus 13/13.1 preview files. According to these MediaInfo readouts, Premiere Elements 13/13.1 preview file format from HD projects is significantly different than that used in Premiere Elements 12/12.1. The format of the preview files from SD project appears to remain the same in 12/12.1 and 13/13.1. This blog post will document the format changes found in the Premiere Elements 13/13.1 HD project's preview files.

CHANGES FOUND

For NTSC AVCHD Full HD1080i30 Project HD Preview Files
Timeline Render Quality = High quality, Slow speed....
  • 13/13.1 Format = AVC* whereas 12/12.1 Format = MPEG2 (MPEG-PS)
  • 13/13.1 Bitrate = 60.0 Mbps Constant whereas 12/12.1 Bitrate = 31.1 Mbps max VBR
  • 13/13.1 Scan Type = Progressive whereas 12/12.1 Scan Type = Interlaced with Scan Order = Top Field First
All these 12/12.1 and 13/13.1 preview files have resolution of 1920 x 1080. And, frame rate is 29.97 frames per second. Display Aspect Ratio is 16:9. All have MPEG file extension.


For NTSC AVCHD Full HD1080i30 Project HD Preview Files
Timeline Render Quality = Draft quality, High Speed
  • 13/13.1 Format = AVC* whereas 12/12.1 Format = MPEG2 (MPEG-PS)
  • 13/13.1 Bitrate = 15.5 Mbps Constant whereas 12/12.1 Bitrate = 7768 Kbps max VBR
  • 13/13.1 Scan Type = Progressive whereas 12/12.1 Scan Type = Interlaced with Scan Order = Top Field First
All these 12/12.1 and 13/13.1 preview files have resolution of 960 x 540 and frame rate is 29.97 frames per second. Display Aspect Ratio is 16:9.All have MPEG file extension.


For NTSC DSLR 1080p DSLR 1080p30@29.97 Project HD Preview Files
Timeline Render Quality = High quality, Slow speed....
  • 13/13.1 Format = AVC* whereas 12/12.1 Format = MPEG2 (MPEG-PS)
  • 13/13.1 Bitrate = 60.0 Mbps Constant whereas 12/12.1 Bitrate = 31.1 Mbps max VBR
All these 12/12.1 and 13/13.1 preview files have resolution of 1920 x 1080 and frame rate 29.970 progressive frames per second. Display Aspect Ratio is 16:9. All have MPEG file extension.


For NTSC DSLR 1080p DSLR 1080p30@29.97 Project HD Preview Files
Timeline Render Quality = Draft quality, High speed
  • 13/13.1 Format = AVC* whereas 12/12.1 Format = MPEG2 (MPEG-PS)
  • 13/13.1 Bitrate = 15.5 Mbps Constant whereas 12/12.1 Bitrate = 7768 Kbps max VBR
All these 12/12.1 and 13/13.1 preview files have resolution of 960 x 540 and frame rate 29.970 progressive frames per second. Display Aspect Ratio is 16:9. All have MPEG file extension

COMMENTARY

The most surprising observation is that the Premiere Elements 13/13.1 preview file is the same whether the project settings are for 1080i or 1080p which is not the case in Premiere Elements 12/12.1. See Figure 1 for 13/13.1 comparison of preview file from its NTSC AVCHD Full HD 1080i30 project and from its NTSC DSLR 1080p DSLR 1080p39@29.97 project.

Figure 1. Premiere Elements 13/13.1 Comparison Of Preview File From HD Project With Interlaced Versus Progressive Frame Rate. Timeline Render Quality = High Quality, Slow Speed.


The preview files from Premiere Elements 13/13.1 PAL HD projects also are affected as described for the NTSC counterparts (not all projects tested so far).

The reasons for these changes are not understood at this time. We have not picked up on any visual benefits of these changes related to the actual Edit area previewing.

_______________________________________________________________________________
* The codec utility named GSpot identifies the video compression as "Codec = H.264 with Name = H.264/AVC".


Work in progress.


ATR


Monday, July 20, 2015

PE 13/13.1: 4K XAVC-S p59.94 and p50

INTRODUCTION

Premiere Elements 13/13.1 has project presets and export opportunities for 4K (3180 x 2160) XAVC-S video

The project presets include

NTSC AVCHD AVCHD
  • QFHD 16 x 9 23.976
  • QFHD 16 x 9 29.97
  • QFHD 16 x 9 59.94
and

 PAL AVCHD AVCHD
  • QFHD 16 x 9 25
  • QFHD 16 x 9 50

The export opportunities for 4K (3180 x 2160) include

Publish+Share/Computer/XAVC-S with default export presets
  • MP4 H264 3840 x 2160 23.976p 30 Mbps
  • MP4 H264 3840 x 2160 25p 30 Mbps
  • MP4 H264 3840 x 2160 29.97p 200 Mbps
  • MP4 H264 3840 x 2160 29.97p 30 Mbps 
Each of these presets has an Advanced Button under which the preset can be customized. See Advanced Button/Video Tab, Audio Tab, and Multiplexer Tab.

ISSUE

Premiere Elements 13/13.1 user wanted to create projects for 4K XAVC-S 3180 x 2160 60p or 50p import and export. He could find the appropriate project preset for the project, but could not figure out how to export these files as 4K XAVC-S 3180 x 2160 60p or 50p.

For 60p export version, the obvious answer would be to customize a XAVC-S MP4 H264 3840 x 2160 29.97p export preset for the 60p export version under the Advanced Button/Video Tab of the preset. But, it does not work. See Figure 1.

Figure 1. Trying To Set For XAVC-S 3140 x 2160 60p Export In Premiere Elements 13/13.1 Publish+Share/Computer/XAVC-S/ With Preset = MP4 H264 3140 x 2160 29.97p

The user cannot lower the frame rate since the aim is 60p not less. And, the Profile and Level settings are already at maximum.

For 50p export version, the obvious answer would be to customize the MP4 H264 3840 x 2160 25p export preset for the 50p export version under the Advanced Button/Video Tab of the preset. But, it does not work. Same "Adobe Media Encoder" error message as seen in Figure 1.

SOLUTION 

At the present time there is no solution for those wanting a customized or otherwise 4K XAVC-S 60p or 50p export from Premiere Elements 13/13.1 Publish+Share/Computer/XAVC-S. The same situation exists in Premiere Elements 12/12.1.

COMMENTARY
It is unknown at this time by this writer whether or not Adobe Engineering is aware of this situation and whether the "what is" is by design or oversight.

In summary, the user can import with 3140 x 2160 60p or 50p project preset but cannot export as such.


ATR