Sunday, September 22, 2013

PE11: Title Templates In Adobe Styles UPDATED

INTRODUCTION

Premiere Elements 11 does not support the tga format and in particular the tga graphics found in the title templates of earlier versions of Premiere Elements. In a prior blog post, details were given for how to get the Premiere Elements 8.0/8.0.1 Travel/topo title template with its text (.prtl) and tga (as .png) graphic into Premiere Elements 11 on Windows 7 and 8 64 bit. The workflow for that consisted of folders and files transplanted from one version to another. But, reflecting back, could this have been done by creating a look-alike title template in Premiere Elements 11?

ISSUE

How does one go about creating a "Look-Alike" title template in Premiere Elements 11?

SOLUTION

The prtl title templates file, with embedded graphic, can be created in the Premiere Elements 11 Titler. And, the installation of the "Look-Alike"title template or "My Own" title template is quick and easy. The .prtl produced has the advantages that it can be used for more than one version of Premiere Elements on the same computer and/or used just within the Premiere Elements 11 project. See Important Update Message at the end of this blog post.

The answer to the ISSUE question will be given by example as the Premiere Elements 8.0/8.0.1 Travel/World Travel title template with its text and graphic is reproduced in Premiere Elements 11 Titler.

HOW TO

STEP 1
The goal is to create a Premiere Elements 11 title template that looks something like the Premiere Elements 8.0/8.0.1 Travel/World Travel/world travel_title title template shown in Figure 1. 

 
Figure 1. Premiere Elements 8.0/8.0.1 Travel/World Travel/World Travel_Title.
The .png graphic to be used is 720 x 480 pixels; consequently, in this example, the Premiere Elements 11 project preset is set manually at NTSC DV Standard. To do that, go to File Menu/New/Project, set the project preset at NTSC DV Standard, and, before exiting the new project dialog, be sure to place a check mark next to "Force Selected Project Setting on This Project"

STEP 2
Go to Premiere Elements 11 Text Menu/New Text/Default Text and click on Default text. That will open the Titler. Get rid of the default "Add Text" in the Titler's opened title.

With the Titler opened, go back to the Text Menu, but this time Text Menu/Add Image, and then navigate to and select your world travel graphic. IMPORTANT.  Beforehand this graphic was given the same name as the .prtl file that was to be created and then saved as a .png file in the Logos Folder found in the Windows 7 or 8 64 bit path of Local Disc C\Program Files\Adobe\Adobe Premiere Elements 11\Presets\Logos. In this case, the modified Adobe World Travel Title Bkgd_7.tga file look was decided on as represented in Figure 2a.

Figure 2a. World Travel Graphic (PNG) Added To Title In Titler Via Text Menu/Add Image.


As part of the modification in Photoshop Elements 11, the feathered gray ellipse was added to the original Adobe file, and then the file Saved As .png for use in Premiere Elements 11 Titler. Refer to Figure 2b for what this original Adobe file looked like.

Figure 2b. Premiere Elements 8.0/8.0.1 World Travel Title Bkgd_7 Before Addition Of Feathered Gray Ellipse..
Your own World Travel Title graphic as a .png file could have been used instead, such as the following which I put together in Photoshop Elements 11, using its Content.

Figure 2c. World Travel Type Graphic (Png) Created By Me As Alternative.

STEP 3
For the "WORLD TRAVELS" text in the Titler...
  • In the Text section of the Titler, select the Horizontal Type Tool and type the text WORLD TRAVELS
  • In the Styles section of the Titler, apply the CharlemagneStd. Gradient 67 Style to the selected WORLD TRAVELS text.
  • In the Text section of the Titler, set the Font Size for 68, Bold, and position the WORLD TRAVELS text.
  • In Color Properties of the Text section of the Titler, set the Fill and Stroke for the selected WORLD TRAVELS text.
For the "TRAVEL SUB TITLE" text in the same title of the Titler,,,
Same as for WORLD TRAVELS except Font Size is 26.

For this presentation the Color Properties dialog basic settings details...

WORLD TRAVELS Fill
Click on Fill box. First set for "4 Color Gradient", and then set for R, G, B = 209, 202, 147, Drop Shadow, Angle =1, Distance = 1. Softness = 1.
WORLD TRAVELS Stroke
Click on Stroke box next to the Fill box. First set for "4 Color Gradient", and then set for R, G, B = 227, 254, 152, Stroke = 4, Stroke Weight = 7, Drop Shadow, Angle = 1, Distance = 1, Softness = 1.
Note: CharlemagneStd Gradient 67 Style seems to have been used without major adjustments. So, after applying the CharlemagneStd Gradient 67 Style, you should not have to make any major adjustments to arrive at the above settings. (A bonus of sorts.)

TRAVEL SUB TITLE Fill
Click on Fill box. First set for "Solid", and then set for R, G, B = 206, 190, 147, Drop Shadow, Angle = 1, Distance = 1, Softness = 1.
TRAVEL SUB TITLE Stroke
Click on Stroke box. First set for "Solid", and then set R, G, B = 128, 59, 1, Stroke = 0 or 1, Stroke Weight = 18, Drop Shadow, Angle = 1, Distance = 1, Softness = 1.

These settings are not fixed, and adjustments, especially in the Drop Shadows option in Color Properties, may need some tweaking. Figure 3 shows the typical Color Properties dialog for the WORLD TRAVELS text when the Fill box was selected

Figure 3. Typical WORLD TRAVELS Color Properties Dialog With Fill Box Selected.

STEP 4
When the creating of the title template is completed, close out of the Premiere Elements 11 Titler. Open Project Assets, select the title, go to File Menu/Export/Title and export your title as a .prtl file saved to the computer desktop. Make sure that you give the .prtl file the same name as the graphic used which is saved to Logos. At this point, you can decide to do one of the following or both
  • Title Template .prtl for Use in more than one version of Premiere Elements. Save the .prtl file in a special folder named "Custom Title Templates" and use it in essentially any version of Premiere Elements on that computer via Premiere Elements' Get Media/Add Media/Files and Folders.
  • Title Template .prtl for use just within Premiere Elements 11 from its Text & Titles under the Action Bar Menu or Titles & Text Tab. For this, the placement of the title template .prtl file on the hard drive goes according to the following path:
Local Disc C
Program Files
Adobe
Adobe Premiere Elements 11
Presets
Templates
Common

In the Common Folder, create a new folder named "Customized Title Templates". In the "Customized Title Templates" Folder, create a new folder name "Look-Alike". In the "Look-Alike" Folder, place the newly created .prtl title template named "Look-Alike". In the "Customized Title Templates" Folder, I also created another new folder named "My Own" in which I placed the "My Own" title template .prtl that I created.

In Premiere Elements 11 workspace, these two title templates presented as shown in Figure 4a and Figure 4b.

Figure 4a. Final "Look-Alike" Title Template (.PRTL)

Figure 4b. Final "My Own" Title Template (.PRTL)

_____________________________________________________________________________

09 28 2013

IMPORTANT UPDATE MESSAGE

After this blog post was published, a vulnerability in the Add Image aspects of the details was discovered. The vulnerability is the graphic missing from the title when put to use in a project after the source graphic has been moved from its hard drive save location, the location where it was when it was called into action in the Text/Add Image step.

Even though this type of title was created with an image "embedded", the resulting saved title .prtl appears not to be an all in one file. The .prtl saved via File Menu/Export/Title  is the text file which traces back to the image file at the image's location at the time it was imported into the title in the Titler via Text/Add Image.

We have remedied that matter here by making the Logos Folder the "home" for the graphics in these particular Add Image in the Titler situations.

This situation applies to both suggested uses

Title Template .prtl for Use in more than one version of Premiere Elements

Title Template .prtl for use just within Premiere Elements 11 from its Text & Titles under the Action Bar Menu or Titles & Text Tab

Unique to this situation is the absence of the missing media "Where is file....?" and/or the colorful Media Offline display. The text is there but not the graphic when graphic file movement is involved.

Currently being explored are aspects of all this related to creating the title with added image for use when Premiere Elements on different computers is involved.

More later.

ATR


Thursday, September 19, 2013

PE11: TGA Files/PE8.0/8.0.1 Title Templates

INTRODUCTION

Much of the Premiere Elements Content stays the same from version to version. Yet, it is not uncommon to find a "favorite" from an earlier version discontinued in a later version. Such was the case for several users who had switched from Premiere Elements 8.0/8.0.1 to Premiere Elements 11, found the version 8.0/8.0.1's title template Travel/Topo missing in 11, and tried to transplant the version 8.0/8.0.1 Travel/Topo title template files into 11. The attempts were unsuccessful in their Windows 7 or 8 64 bit computer environments. The transplanted Travel/Topo title template in version 11 contained its text but not its compass graphic. Just colored lines were present where the graphic was supposed to be.

ISSUE

Use of version 8.0/8.0.1's Travel/Topo title template files in Premiere Elements 11 has two major considerations in a Windows 7 or 8 64 bit computer environment.
  • Making sure that all the needed files are found since the title template consists of two components, text and graphic, which are stored in two different locations on the computer hard drive.
  • Title template graphics in version 8.0/8.0.1 have a tga format, and a graphic with a tga format is not supported by Premiere Elements 11; whereas the tga format is supported in Premiere Elements 4 through 10.
  •  
SOLUTION*

In order to get the Premiere Elements 8.0/8.0.1 Travel/Topo title template to work in version 11 on Windows 7 or 8 64 bit, it was necessary to locate and transfer this template's text files (.prtl) plus graphic files (.tga), convert the .tga to .png, and then place the text and graphic files into the correct locations on the computer hard drive for Premiere Elements 11 to use. If this involved a go between 2 computer, a USB 2.0 Flash Drive could be used for the folders/files transfer.


HOW TO

Gathering Premiere Elements 8.0/8.0.1 Travel/Topo Title Template Files

Premiere Elements 8.0/8.0.1
Local Disc C
Program Files (x86)
Adobe
Adobe Premiere Elements 8.0 Folder
Presets Folder
in the Presets Folder are folders named Logos, Styles, Templates, Text Animation, and Textures.

The Templates Folder contains a Common Folder which contains the Travel Folder which contains the Topo Folder. In the Topo Folder are the prtl files (text component of these title templates)
topo_credits.prtl
topo_frame.prtl
topo_list.prtl
topo_lwr3rd.prtl
topo_title.prtl
Everything is very compatible in that Travel/Topo Folder.

The Texture Folder contains a Common Folder which contains numerous .tga images for various title templates. The focus here is only on those related to topo, that is,
topo_bkgd.tga
topo_bkgd2.tga
topo_frame.tga
topo_lwr3rd.tga
All these topo .tga files need to be converted from .tga to .png format. In this example, the conversion was done in Photoshop.

So, before heading to Premiere Elements 11 on either Windows 7 or 8 64 bit computer, this is what to have:

Copy of Travel Folder Saved To Computer Desktop (Refer to Templates Folder description above)
(Details: I copied the entire Premiere Elements 8.0/8.0.1 Travel Folder which contained the Topo Folder which contained the Travel/Topo title template .prtl files. Then everything except the Topo Folder was deleted from the Travel Folder, and this Travel Folder with its text .prtl files was saved to the computer Desktop.)

Copy of Texture Folder Saved to Computer Desktop (Refer to Texture Folder description above)
(Details: I copied the entire Texture Folder from Premiere Elements 8.0/8.0.1, opened that Texture Folder's Common Folder, and deleted all the files except the 4 topo .tga ones from that Common Folder. I then based that Texture folder on the computer Desktop - my base of operations for the .tga to .png conversion with Photoshop. Once the conversions were completed and the .tga files deleted from that Common folder, the Texture Folder with its .png graphics was prepared for the next phase.

Placement of Travel/Topo Title Template Files in Premiere Elements 11**

Local Disc C
Program Files
Adobe
Adobe Premiere Elements 11
Presets Folder
in the Presets Folder place the entire Texture Folder that was prepared (there is no prior Texture Folder under Presets in version 11).
and
in the Common Folder (in the path Presets/Templates/Common) place the Travel Folder.

In the Premiere Elements 11 Expert or Quick workspace of Windows 7 or 8 64 bit, these Travel/Topo title templates could then be found under
Action Bar Menu/Titles & Text at top of Expert or Quick workspace
and
Titles & Test Tab at bottom of Expert or Quick workspace
and present as represented in Figures 1 through 5.

Figure 1. In Premiere Elements 11, topo_frame.
Figure 2. In Premiere Elements 11, Topo_List.
Figure 3. In Premiere Elements 11, Topo_Credits.

Figure 4. In Premiere Elements 11, Topo_Lwr3rd.

Figure 5. In Premiere Elements 11, Topo_Title.
____________________________________________________________________________
*Studies were done with purchased Premiere Elements 8.0/8.0.1 and 11 on Windows 7 and 8 64 bit.
It was not determined if the results reported are applicable Premiere Elements Mac.

If the above is not found to work in a particular case and/or environment, then an alternate approach would be more of a "do it yourself" nature, using text .prtl files created in the Premiere Elements 11 Titler from scratch in the Adobe Style in conjunction with appropriate graphics.

IMPORTANT UPDATE: It would appear that the transparency in the original Premiere Elements 8.0/8.0.1 .tga graphic "topo_frame" is not being maintained in Premiere Elements 11 after the .tga to .png conversion with Photoshop prior to use of the .png in Premiere Elements 11. Pending further investigation on the why not, Premiere Elements ChromaKey effect can correct this situation in the Premiere Elements 11 opened project. In contrast, the topo_lwr3rd.png does present in Premiere Elements 11 with its transparency maintained. Updates to follow. The same situation was also encountered with Premiere Elements 8.0/8.0.1 ,tga graphic "world travel_frame".

**The title templates native to Premiere Elements 11 Windows are of the .prtl/.png type. On Windows 7 and 8 64 bit the "Content downloaded"  Premiere Elements 11 title template files are found
Local Disc C
Program Data
Adobe
Premiere Elements
11.0
Online
Title Templates
All_Lang
and the All_Lang Folder contains a collection title template category folders, each containing theme folders which contain the essential files for the title templates.

Also, see Local Disc C\Program Files\Adobe\Adobe Premiere Elements 11\Presets\ for title templates that came with the original installation rather than from the required "Content downloaded" from Adobe. This is the area where the Premiere Elements 8.0/8.0.1 Travel/Topo title template files were placed in the work presented in this blog post.


ATR

Tuesday, September 17, 2013

PE11: Slide and Slip Edits

INTRODUCTION

A group of "Slip Clip Selection" and "Slide Clip Selection" commands and shortcuts are found in Premiere Elements 4 through 11 (Windows)* under Edit Menu/Keyboard Customization/Windows/Timeline. There is no Slip nor Slide Clip Tool anywhere to be found in the editor workspace of the programs, just these commands and shortcuts tucked away under the Keyboard Customization lists.

ISSUE

First thoughts were "What are Slip Clip Selection and Slide Clip Selection and what are they supposed to be doing when and if put into use? In researching the topic, Premiere Pro was found to have Slip and Slide Edit features which included:
  • Commands and keyboard shortcuts similar to those found in Premiere Elements for "Slip Clip Selection" and "Slide Clip Selection"
  • Slip and Slide tools associated with a monitor display to assist during these edits. (Features not found in Premiere Elements.)

SOLUTION

Based on online research** and some hands on work with Premiere Elements, the following was pieced together
 
Preface 

In Premiere Elements, when a clip is trimmed (a piece split out from the whole) in the Preview Window with its Set In/Set Out points or when the trimming is done at the Timeline level with the use of the Scissors, the piece split from the whole still contains the trimmed out portions of the clip, but they are hidden. This is supported by the fact that, when the trimmed clip is placed on the Timeline, the mouse cursor can be used to drag out the edges of that clip to recover the whole video there. These hidden pieces of the trimmed clip are referred to as clip handles. Depending on the trim, these handles can be on the right and/or left edges of the trimmed clip.

Slide Edits

In the case of the Slide Edit, 3 video clips side by side are involved. In this instance, it is the clip to the left of the middle clip and the clip to the right of the middle clip that must be trimmed (that is, have handles). In this scenario, the middle clip moves to the right or left over, trimming the clip to its left or to its right by the number of frames involved in the middle clip movement. The end result is the whole middle clip moved in time with its duration unchanged, but the adjacent clips are lengthened or shortened depending on the direction of the middle clip movement. But, the total duration of the trio is unchanged. Key points:
  • 3 video clip setup; the clips to the right and left of the middle clip require handles
  • moves middle clip over to right or left, trimming the clip to its left or to its right by the number of frames involved in the middle clip movement
  • changes duration of clip to right and left of middle clip, not the middle clip; total duration of the trio remain the same.

Slip Edits

In the case of the Slip Edit, typically there are 3 video clips side by side on the Timeline, with the middle one trimmed on both edges and selected. For that middle trimmed clip, envision from left to right, x frames hidden (left handle), In point representing the beginning frame of the visible portion of the trimmed clip, the Out point representing the end frame of the visible portion of the trimmed clip, and then x frames (right handle).

With use of the Slip Selection commands and keyboard shortcuts, the frames in the middle clip are shifted 1 or 5 frames to the left or right within its duration, un-hiding prior split out footage in the clip trimming process. This represents a change in the clip's starting frame and end frame without changing its duration or the duration of the clips next to it on its right or left. Key points:
  • 3 video clip setup, must have handles on both sides of the middle clip
  • shifts middle clip's In and Out points by the same number of frames in a single action
  • changes the In and Out points of the middle trimmed clip, but does not affect its duration or position in the group of 3 side by side files; before versus after effect is that after shows a different portion of the middle clip than before. The individual and total duration of the trio remain the same.

HOW TO

Table 1 presents the Premiere Elements 11/Windows* commands and keyboard shortcuts for carrying out the Slide and Slip Edits in its program. These same working commands and keyboard shortcuts can also be found in Premiere Elements 4, 7, 8.0/8.0.1, 9.0/9.0.1, and 10 as well as 11. The Premiere Pro CC/CS6 counterparts are also shown there.

Table 1. Premiere Elements 11. Slide And Slip Edits Commands And Keyboard Shortcuts With Comparison To Those For Premiere Pro.

The Premiere Elements 11 keyboard shortcuts worked as described in SOLUTION. So, we are OK on the Premiere Elements 11 side of things. But, there were questions on the Premiere Pro side with regard to the accuracy of the Premiere Pro keyboard shortcuts cited for these commands. It was interesting to note:
  • The Premiere Elements 11 SLIP and the Premiere Pro SLIP keyboard shortcuts for "Slip Clip Selection Left Five Frames" and "Slip Clip Selection Right Five Frames" are the same and behaved the same in each program.
  • However, the Premiere Pro SLIP shortcuts for "Slip Clip Selection Left One Frame" and "Slip Clip Selection Right One Frame" corresponded to the Premiere Elements 11's SLIDE commands for "Slide Clip Selection Left Five Frames" and "Slide Clip Selection Right Five Frames" respectively.
  • The Premiere Pro SLIP keyboard shortcuts for "Slip Clip Selection Left One Frame" and "Slip Clip Selection Right One Frame" in actual Premiere Pro testing appeared to be "Ctrl+Alt+Left" and "Ctrl+Alt+Right" instead of "Alt+Shift+Left" and "Alt+Shift+Right" respectively.
  • The Premiere Pro SLIDE keyboard shortcuts did not function properly if tried in Premiere Elements 11. They did move the middle clip of a trio but left gaps. These gaps were also seen in Premiere Pro if the published SLIDE keyboard shortcuts were used instead of its built in Slide tool. Since the focus is always Premiere Elements, this Premiere Pro gap behavior was not explored further.

COMMENTARY

This was my first encounter with Slip and Slide Edits. And, these are my initial observations on this topic. Lots more to learn and verify. It was an interesting concept that I would not have run into if I were not exploring the Premiere Elements 11 Edit Menu/Keyboard Customization/Windows list of keyboard shortcuts and wondered "What are these?" when I saw the Slide and Slip commands and keyboard shortcuts.

Most of the background information on these Edits in general came from the Pro Help resources. Yet Premiere Elements 4, 7, 8.0/8.0.1, 9.0/9.0.1, 10, and 11 have these Slip and Slide Edits commands and keyboard shortcuts which seem to me to provide useful "advanced" editing opportunities.

______________________________________________________________________________
*Premiere Elements Mac counterparts for these Premiere Elements Windows commands and keyboard shortcuts were not explored since there was no access to a Mac computer for this study.

**http://helpx.adobe.com/premiere-pro/using/trimming-clips1.html

http://www.adobepress.com/articles/article.asp?p=1660201&seqNum=2

http://documentation.apple.com/en/finalcutpro/usermanual/index.html#chapter=44%26section=2%26tasks=true


ATR

Friday, September 13, 2013

PE: DVD Menu Navigation/Play All Loss

INTRODUCTION

There are numerous instructions for using a main menu Bonus Button in a Premiere Elements DVD menu setup to allow the viewer to skip to special stills and/or videos at the end of the major presentation. Strategically placed main menu marker(s) and stop markers(s) on the Timeline are part of the drill.

Then there are those times when the menu scheme is set up to allow viewer to navigate a multiple movies presentation by selecting a specific movie on the Scene Selection page for viewing, followed by return to Main Menu. Timeline Scene Marker(s) and Stop Markers (s) are typically part of that scenario. But, such a scheme results in the Play All button of the Main Menu losing its play all function, relegating it to play back only the first movie and then return to main menu. The question becomes "Is there a way to do this without Play All button of the Main Menu losing its play all function?"

Back in 2008 I described a way to do this via the "Bonus Button" concept. In this workaround, the Main Menu's Bonus Button becomes the Play All Button, the original Main Menu Play All Button is removed, and a duplicate of the Timeline content placed at the end of the major presentation becomes the "Bonus item".

ISSUE

How to do this menu customization so that
  • Play All Button and Scene Selection Button from main menu
  • Each scene/movie selected on the Scene Selection page will play back just its specific scene/movie and then return only to Main Menu after its playback
  • Major perk is no sacrificing of main menu's Play All option.

SOLUTION

The solution to the issue described in ISSUE is to have the Main Menu's Bonus Button become the Play All Button, get rid of the original main menu Play All Button, and have a duplicate of the Timeline content at the end of the major presentation become the "Bonus item" which is summoned by the Play All Button of the Main Menu.

HOW TO

The example uses 3 video clips, each representing a different movie. For our purposes, the word movie or scene or video clip are the same.

STEP 1
From the Media Panel, drag Video #1 to the beginning of Video Track 1. Place a Scene Marker at the beginning of Video #1 and Stop Marker at the end of Video #1.

STEP 2
Now drag Video #2 to Video Track 1, leaving a few seconds gap between the end of Video #1 and the beginning of Video #2. Place a Scene Marker at the beginning of Video #2 and a Stop Marker at the end of Video #2.

STEP 3
Next drag Video #3 to Video Track 1, leaving a few seconds gap between the end of Video #2 and the beginning of Video #3. Place a Scene Marker at the beginning of Video #3 and a Stop Marker at the end of Video #3.

STEP 4
Then go back to the Media Panel and drag Video #1, Video #2, and Video #3 (trio for the Play All option) from the Media Panel to Video Track 1. These "new" draggings will be placed side by side (no gaps in the trio, no Scene Markers, no Stop Markers) on the Timeline and positioned, leaving a few second space between the end of Video #3 (major presentation)) and the beginning of Video #1 of the trio (Bonus item for Play All option). Now place the Main Menu Marker at the beginning of Video #1 (of the trio for Play All option) and name it Play All.

STEP 5
The typical set up for the existing DVD Main Menu has a Play All button and Scene Selection button. You can add a "Bonus items" button. That is what we just did with our Main Menu Marker, but we called it Play All, not Bonus. So, when you get to your DVD Main Menu of choice, no doubt you will find
  • Play All (part of the original menu)
  • Scene Selection
  • Play All (the "Bonus Item" button that we just created).

The "Play All" (part of the original menu) can be challenging to the modification. Some choices for getting rid of it include:
  • Play All without decorative backing. Select the Main Menu in the disc/movie menus section's bin so that the Main Menu page appears on the disc/movie menus section's screen. Double click the Play All button in the Main Menu to open the "Change text" dialog. In the "Change text" dialog, make sure that Play All text is highlighted, hit Delete and then the spacebar and/or Enter. Click OK to exit the "Change text" dialog. 
  • Play All with decorative backing. Depending on the circumstances where Play All has a decorative background behind the text, try to minimize the bounding box containing the background remaining after the Play All text removal as described above, and move it to a lesser noticed spot on the Main Menu. Alternatively, find the Main Menu's .psd file on the computer hard drive, and open it in Photoshop Elements. In that .psd file, delete the Play All Layer Group. Just turning off the visibility icon for that Layer Group has not always proven effective. At this level, it is advisable to be working from a copy of the original .psd for Menu Menu.
Creation of the Bonus item as a duplicate of the major presentation may not be practical for projects where the major presentation is very large.

Adobe's overview of Premiere Elements disc/movie menus can be found in the following Adobe document
http://help.adobe.com/en_US/premiereelements/using/WS09e4b3c48f3a79fc19b622510385d4355c-7e19.html#WS09e4b3c48f3a79fc19b622510385d4355c-7e12

The navigation of multiple movies in one major presentation in a Premiere Elements burn to Blu-ray when Stop Markers are involved in the workflow is not possible since Stop Markers do not function in the playback of the Premiere Elements Blu-ray disc format on Blu-ray disc.

_______________________________________________________________________________

September 03, 2014 Add On
Also see blog post
PE: Disc Menu Folders/Files Locations
http://atr935.blogspot.com/2014/09/pe-disc-menu-foldersfiles-locations.html


ATR


Thursday, September 12, 2013

PE: DVD-VIDEO/Seamless VOB Ripping

INTRODUCTION

DVD-VIDEO movies are contained in VOB files (Video Objects). Depending on the length of the movie and the fact that each of these VOB file cannot have a file size greater than 0.99 GB, a given DVD-VIDEO may have several of these VOB files, each sequentially and specifically named and numbered. 

Premiere Elements includes a feature for ripping and editing these VOB files from unprotected DVD-VIDEO on DVD disc. Essentially, the DVD disc is placed in the burner tray, and each of the VOBs is imported in the program. For
  • Premiere Elements 11 - Add Media/DVD camera or computer drive/Video Importer
  • Premiere Elements 10 and 9.0/9.0.1 - Get Media/DVD Camcorder or PC DVD Drive, Video Importer
  • Premiere Elements 8.0/8.0.1 and 7 - Get Media/DVD (Camcorder or PC DVD Drive)/Adobe Premiere Elements - Media Downloader
  • Premiere Elements 4 - Get Media/DVD, Digital Camera, Mobile Phone, Hard Drive Camcorder, Card Reader/Adobe Premiere Elements - Media Downloader
Especially in the earlier versions of Premiere Elements, some complained about dropped frames, out of sync audio, and other issues using this approach which imported individual VOB files. One of the suggested alternatives was the use of the computer's Command Prompt to rip the VOB files into one VOB file, named DVD.VOB, and then import DVD.VOB from its save hard drive location into Premiere Elements with Premiere Elements' Add Media or Get Media/Files and Folders.

The Command Prompt approach might be characterized as the "hard way" and "longer" way to accomplish this ripping task, but it will be described for those who might find it of practical or historical value.

ISSUE

How to get the Command Prompt to work to create the DVD.VOB file for import into Premiere Elements on Windows XP 32 bit, Windows 7 64 bit, or Windows 8 64 bit?

SOLUTION

I wrote the how to for the Windows XP 32 bit Command Prompt for this seamless VOB ripping to get the DVD.VOB back in 2009. And, that went without glitches (except for typing errors when entering the data). Recently, when this same Command Prompt approach was used in Windows 7 64 bit or Windows 8 64 bit, it would not work, consistent permission denied and no files copied failures. The answer to that was beforehand setting up Command Prompt with Run As Administrator.

HOW TO

STEP 1
Getting Drive Letter and VOB File Names Information

Place the DVD disc with its DVD-VIDEO content in the computer's DVD burner drive tray. Note the drive letter for this burner.
In this example, the burner had  a drive letter of D when Windows 7 64 bit was used in these tests; drive letter of F when Windows 8 64 bit; drive letter of E when Windows XP 32 bit.
Next explore the disc in the drive, opening the VIDEO_TS and noting the VOB file names involved.
In this example, 
 VTS_01_0.VOB, 
VTS_01_1.VOB, 
VTS_01_2.VOB. 
These represented video files for a DVD-VIDEO formatted video of about 30 minutes duration.This same DVD-VIDEO on DVD disc was used in each of the 3 computer operating systems looked at.
Close out of DVD burner drive.

STEP 2
Finding the Command Prompt Location/Applying Run As Administrator

Windows XP Professional SP3 32 bit and Windows 7 Professional SP1 64 bit
Start/All Programs/Accessories/Command Prompt
For Windows 7, not Windows XP, Command Prompt had to be right clicked and Run As Administrator selected to get beyond access denied and files not copied failures. Run As Administrator was not a permanent set, needed to be set for each Command Prompt VOB ripping  session.

Windows 8 64 bit
Command Prompt on this operating system also needed to be used with Run As Administrator. And, there were several places to make that set.
  • Keyboard shortcut Windows Key + X to bring up the Advanced Settings which included Command Prompt and Command Prompt (Admin) with Command Prompt (Admin) being the required choice for this task each time.
  • Metro Screen/All Apps/Windows System/Command Prompt which required the right click Run As Administration. Also, Metro Screen, just typing in of "Command Prompt". These two were not permanent sets and required a set before each VOB ripping session. 

STEP 3
For Windows 7 64 bit and Administrator: Command Prompt 
Production of DVD.VOB

In the Command Prompt window, you will see a header describing the computer, followed by:
C:\Windows\system32>_
Type exactly as you see in bold (D:) and then press Enter.
That will get you to the next line.

D:\>_
Type exactly as you see in bold (CD VIDEO_TS) and then press Enter.
That will get you to the next line,

D:\VIDEO_TS>_
Type exactly as you see in bold (COPY /b VTS_01_0.VOB + VTS_01_1.VOB + VTS_01_2.VOB C:\DVD.VOB) and then press Enter.

After that you just wait until you see all those VTS files listed along with "1 file(s) copied". The process can be staged where you see one file printing out at a time before you see the "1 file(s) copied" printed. Production of the DVD.VOB can take seconds to minutes to complete. Figure 1 is a screenshot at the end of the process when Windows 7 64 bit was used.

Figure 1/ Administrator: Command Prompt, Windows 7 Professional SP1 64 Bit. VOBs To DVD.VOB.

For Windows 8 64 bit and Administrator: Command Prompt
Production of DVD.VOB

VOB files were ripped from the same DVD-VIDEO on DVD disc as in the Windows 7 64 bit testing. Steps and results were the same, except that the burner drive letter was F and typed in as (F:). Figure 2 is a screenshot at the end of the process.

Figure 2. Administrator: Command Prompt, Windows 8 64 Bit. VOBs To DVD.VOB.

For Windows XP 32 bit and Command Prompt
Production of DVD.VOB

VOB files were ripped from the same DVD-VIDEO on DVD as in the Window 7 64 bit and Windows 8 64 bit testing. Steps and results were the same, except
  • Process succeeded without Run As Administrator applied to Command Prompt.
  • In the Command Prompt window, you will see a header describing your computer, followed byC:\Documents and Setting\Owner>_
  • Burner drive letter was E and typed in as (E:)
Figure 3 is a screenshot at the end of the process.

Figure 3. Command Prompt, Windows XP Professional SP3 32 Bit. VOBs To DVD.VOB.

STEP 4.
Searching for the DVD.VOB in the Local Disc C and Importing DVD-VOB into Premiere Elements

Open Premiere Elements and set the project preset (new project dialog = NTSC DV Standard or Widescreen (or PAL counterpart). Using Premiere Elements/Add or Get Media/Files & Folders. In  the Add or Get Media dialog, set that dialog's "Look in:" to Local Disk C and its "Files of type" to All Files and select and open DVD.VOB which represents your VOBs in one file. After the DVD.VOB is conformed in Premiere Elements (watch for conforming in progress bar at bottom right of interface), drag the DVD.VOB to the Timeline.

Be careful typing in data in the Command Prompt. The absence of a bracket can keep this from working.
_________________________________________________________________________________

ATR


Monday, September 9, 2013

PE: Elements Organizer Slideshow/PE Integration Issue/Solution

INTRODUCTION

"Edit with Premiere Elements Editor"* output of a slideshow from an earlier version Elements Organizer to a later version of Premiere Elements installed on the same computer often results in the baffling message to buy and install Premiere Elements since it is not installed.

The issue goes to the concept of integrated sets of these standalone products**. And, when this integration exists, these programs share a common Elements Organizer/catalog, and there is a major perk in that the slideshow once in Premiere Elements in the .psess video format can be broken apart with the Break Apart Elements Organizer Slideshow command. The use of this command allows for significant additional edits of the slideshow prior to application of menus, followed by burn to. Examples of integrated sets include:
  • Photoshop Elements 6/Premiere Elements 4
  • Photoshop Elements 7/Premiere Elements 7
  • Photoshop Elements 8/Premiere Elements 8.0/8.0.1
  • Photoshop Elements 9/Premiere Elements 9.0/9.0.1
  • Photoshop Elements 10/Premiere Elements 10
  • Photoshop Elements 11/Premiere Elements 11 
ISSUE

What to do if there is a Photoshop Elements 6 Elements Organizer 6 Slideshow Editor slideshow and only Premiere Elements 11 with the Elements Organizer 11 that comes with it? This issue could equally apply to various combinations of earlier version Elements Organizer and later version installed Premiere Elements with the Elements Organizer that comes with it.

SOLUTION

The solution to getting this slideshow which is made in an earlier version Elements Organizer into an later version Premiere Elements is found in the concept of catalog conversion. Using the model of an Elements Organizer 6 slideshow, catalog conversion, and Premiere Elements 11, this slideshow can now be placed on the Premiere Elements Expert workspace Timeline and in addition have the Break Apart Elements Organizer Slideshow Editor command available to it there.

HOW TO

STEP 1
Determine what the name is for the Elements Organizer 6 catalog that contains the Slide Show Project of interest that is saved there. To do this, in the Elements Organizer 6, click on File Menu/Catalog to open to the Catalog Manager. In this example, the name of the catalog is PE4 Catalog and is designated (Current). Close Elements Organizer 6. Figure 1 represents the Elements Organizer 6 displaying the Slide Show Project involved as well as the opened Catalog Manager with its current catalog named PE4 catalog.

Figure 1. Elements Organizer 6. PE4 Catalog (Current) Containing Slide Show Project For Editing In Elements Organizer 11 Slideshow Editor And/Or Premiere Elements 11 Workspace.
STEP 2
Open Premiere Elements 11 Elements Organizer 11 by clicking on the Organizer tab at the bottom left of the Premiere Elements 11 Expert workspace. In the Elements Organizer 11 workspace, go to File Menu/Manage Catalogs. Clicking on Manage Catalog will bring up the Catalog Manager. In this example, the current catalog there is named PE11 Catalog. Click on the Convert button at the top right of the Catalog Manager dialog to bring up the Convert Catalog dialog. In the Convert Catalog dialog, select the PE4 Catalog and click "Convert" button at the bottom of this dialog. Subsequently a message "Catalog converted successfully." will appear. See Figure 2a and Figure 2b.

Figure 2a. Elements Organizer 11. File Menu/Manage Catalogs/Catalog Manager/Convert/Convert Catalog Named PE4 Catalog.


Figure 2b. Elements Organizer 11. Successful Conversion Of PE4 Catalog.
STEP 3
After clicking OK to the Conversion Complete dialog, the PE4 Catalog is now entered along with PE11 Catalog (Current) in the Elements Organizer 11 Catalog Manager dialog. See Figure 3a.  The next step involves switching from the PE11 Catalog (Current) to the PE4 Catalog (Current) so that the slideshow in the PE4 Catalog can be opened in the Elements Organizer 11 and edited in the Elements Organizer 11 Slideshow Editor and/or in Premiere Elements 11 Expert workspace.

Figure 3a. PE4 Catalog Now In Elements Organizer 11 Along With PE11 Catalog (Current).

At this point, highlighting the PE4 Catalog and selecting Open will result in a message from the Elements Organizer, warning "Unable to perform the requested operation" and asking that the Premiere Elements Editor be closed in order to open the PE4 Catalog. See Figure 3b.

Figure 3b. Elements Organizer 11. Request For Closing Premiere Elements 11 Editor So That The PE4 Catalog Open Operation Can Be Performed.
STEP 4
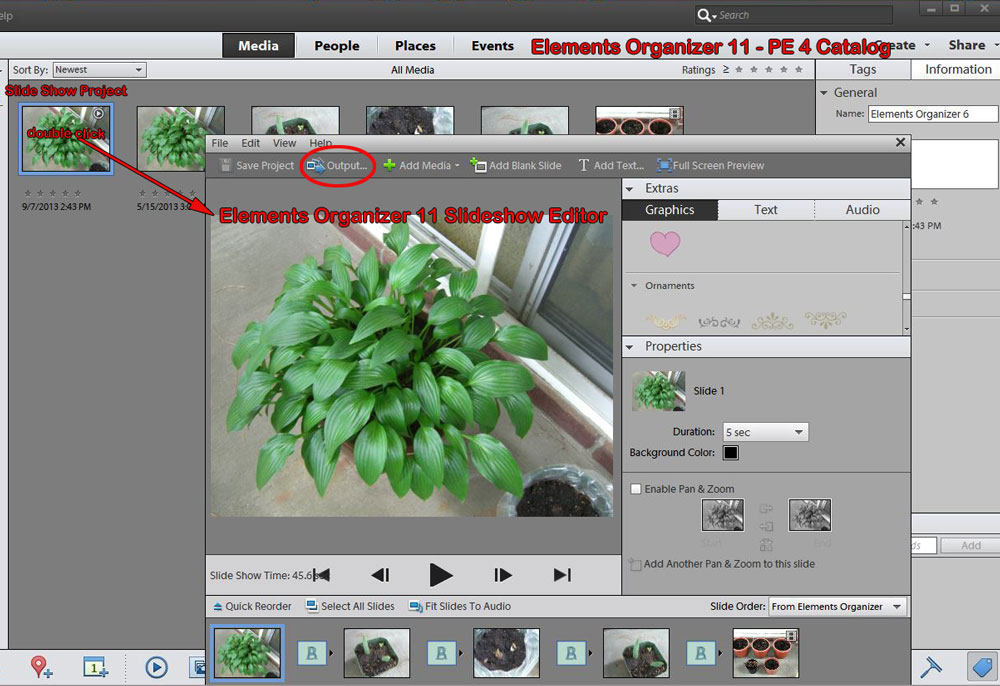
Once Premiere Elements Editor is closed, OK clicked in the "Unable to perform the requested operation" dialog, and Open clicked in the Catalog Manager dialog with PE4 Catalog highlighted, Elements Organizer 11 opens displaying the thumbnails of the PE4 Catalog. And, when the Elements Organizer 11 thumbnail for the Slide Show Project is double clicked, the Elements Organizer 11 Slideshow Editor opens with  slideshow ready for more edits (See Figure 4a) or output to Premiere Elements via the Slideshow Editor's Output option of Edit with Premiere Elements Editor.

Figure 4a. Elements Organizer 11 Using PE4 Catalog (Current). Slide Show Project Being Edited in Elements Organizer 11 Slideshow Editor.
The converted PE4 Catalog will remain the current catalog in Elements Organizer 11 until changed via the Elements Organizer 11 File Menu/Manage Catalogs/Catalog Manager dialog. See Figure 4b.

Figure 4a. PE4 Catalog (Current) In Elements Organizer 11 Catalog Manager.


OBSERVATIONS

  • After catalog conversion, additions or changes in PE4 Catalog back in Elements Organizer 6 are not reflected in PE4 Catalog in Elements Organizer 11 nor are additions or changes in PE4 Catalog in Elements Organizer 11 reflected in PE4 Catalog in Elements Organizer 6.
  • After catalog conversion, using the pairing of Elements Organizer 6 and Elements Organizer 11, the PE4 Catalog (Current) name remained displayed with that name in both Elements Organizer 6 and Elements Organizer 11. However, if this had been done, for example, with Elements Organizer 9 (PE 9 Catalog (Current)) and Elements Organizer 11, then, after conversion, the PE9 Catalog (Current) name would be used in Elements Organizer 11, but the designation for it in Elements Organizer 9 would then become PE9 Catalog 1. See Figure 5.

Figure 5. Elements Organizer 11 Message About PE9 Catalog Renaming After Conversion. PE9 Catalog to PE9 Catalog 1.
  • Catalog conversion can go from earlier Elements Organizer to later version of Elements Organizer, but cannot be done from later version of Elements Organizer to earlier version Elements Organizer.
  • Premiere Elements 11 editor is supposed to be setting automatically the correct project preset for projects based on the first video drag/arrival to the Expert workspace Timeline. If it cannot make the match between one of its project presets and the properties of what it has just received, it defaults to 1080i, not 480i. This presents the issue of a 480i slideshow in a 1080i project. This issue can be  addressed by setting the Premiere Elements 11 project preset manually before using the "Edit with Premiere Elements Editor" Output option of the Elements Organizer 11 Slideshow Editor. For the manual set of the Premiere Elements 11 project preset, use File Menu/New/Project. And, in the new project dialog, select NTSC or PAL DV Standard. Make sure to put a check mark next to "Force Selected Project Setting On This Project" before exiting the new project dialog. Then output the slideshow from the Elements Organizer 11 Slideshow Editor to Premiere Elements 11 workspace.
_______________________________________________________________________________

* This command is a non wmv output for the Elements Organizer Slideshow Editor slideshow. In Elements Organizer 6 and 7 this command is named Send to Premiere Elements; in Elements Organizer 8 and 9, it is named Edit with Premiere Elements; in Elements 10 and 11, it is named Edit with Premiere Elements Editor.
** The Elements Organizer slideshow around which this blog post revolves requires the Elements Organizer Slideshow Editor/Create/Slideshow feature. Elements Organizer 6 and 7 with this feature exist exclusively in Photoshop Elements 6 and 7; whereas, Photoshop Elements and Premiere Elements 8, 9, 10, and 11 each contain the Elements Organizer 8, 9, 10, and 11 which are shared when the integrated set of Photoshop Elements and Premiere Elements are installed on the same computer. Bottom line: for Premiere Elements 8, 9, 10, and 11, you do not need Photoshop Elements for this feature...just click on the Organizer tab in the Premiere Elements workspace to open the Elements Organizer/Create/Slideshow if you prefer to create the slideshow in the Elements Organizer Slideshow Editor instead of the Premiere Elements workspace.

This slideshow is a creation of the Elements Organizer and its catalog and resides there as a "Slide Show Project" saved to the Elements Organizer until it is outputted***. The Elements Organizer Slideshow Editor Output options have include:
  • Save As a File Movie File (.wmv) - wmv or pdf  saved to hard drive - Elements Organizer 4 through 11
  • Burn to Disc - wmv file sent directly to Premiere Elements Disc Menus/Movie Menu section for burn to DVD - Elements Organizer 4 through 11
  • Send to TV - wmv file saved for TV viewing using Windows XP Media Center Edition - Elements Organizer 4, 7, and 8 only.
  • Send to Premiere Elements (also known as Edit with Premiere Elements or Edit with Premiere Elements Editor) - non wmv file sent directly to an integrated Premiere Elements Timeline where the Break Apart Slideshow command is available to it for significant additional slideshow edits.
The following are excerpts of what I have written in the past concerning about Photoshop Elements and Premiere Elements integration without catalog conversion considerations.

September, 2011 Among Premiere Elements 10 Daily Discoveries

With the coming of Photoshop Elements 10 Premiere Elements 10, a major development appears to have occurred with regard to Photoshop Elements and Premiere Elements integration and slideshows.

Early on in the history of these programs, the users had to have integrated sets to have the Output option Send to Premiere Elements (also known as, Edit with Premiere Elements) to get that slideshow to Premiere Elements, have an active Break Apart Slideshow command, and move on to produce the slideshow in DVD-VIDEO format on a DVD disc.

The following would represent "integrated sets" installed on the same computer:
Photoshop Elements 5/Premiere Elements 3
Photoshop Elements 6/Premiere Elements 4
Photoshop Elements 7/Premiere Elements 7
Photoshop Elements 8/Premiere Elements 8.0/8.0.1
Photoshop Elements 9/Premiere Elements 9.0/9.0.1
Photoshop Elements 10/Premiere Elements 10

But with the appearance of versions 8 and 9 on the scene, things changed allowing for some "mixing" of the programs, and I wrote back in September 2010:


Quote:
In spite of the fact (and for whatever reason Adobe persists in saying what it does in its Read Me), you do not have to have Photoshop Elements 9 installed with Premiere Elements 9 in order to use the Photoshop Elements Slide Show Editor Output Option "Edit With Premiere Elements", to get a seamless transfer from Photoshop Elements to Premiere Elements, and to have the Premiere Elements Break Apart command available.

The doable combos for this are:
Photoshop Elements 6.0/Premiere Elements 9.0
Photoshop Elements 7.0/Premiere Elements 9.0
Photoshop Elements 8.0/Premiere Elements 9.0
Photoshop Elements 9.0/Premiere Elements 9.0

as was the case (shown over and over by myself and large number of others)
Photoshop Elements 6.0/Premiere Elements 8.0
Photoshop Elements 7.0/Premiere Elements 8.0
Photoshop Elements 8.0/Premiere Elements 8.0
HOWEVER, in the case of Photoshop Elements 10 and Premiere Elements 10, I have found that Premiere Elements 10 integrates ONLY with Photoshop Elements 10. The following are NOT doable:
Photoshop Elements 6.0/Premiere Elements 10
Photoshop Elements 7.0/Premiere Elements 10
Photoshop Elements 8.0/Premiere Elements 10
Photoshop Elements 9.0/Premiere Elements 10

By "not doable", I mean that, even if you have just Premiere Elements 10 installed with just Photoshop Elements 6.0, 7.0, 8.0, or 9.0, Photoshop Elements Organizer Slideshow Editor does not recognize version 10 already installed and acts as if you had no version of Premiere Elements installed on your computer along with Photoshop Elements 6.0, 7.0, 8.0, or 9.0.

Of course, you can still Output a wmv file from the Photoshop Elements Slideshow Editor and import that into Premiere Elements, using its Get Media/Files & Folders, but you do not have available the break apart slideshow command for further editing purposes....and so on.
September, 2012 Among the Premiere Elements 11 First Looks

7. Regarding Photoshop Elements and Premiere Elements integration for slideshow (Windows), it looks like you will need the specific combo of Photoshop Elements 11 and Premiere Elements 11 for your Photoshop Elements Slideshow Editor Slideshow to Premiere Elements, using the Photoshop Elements Slideshow Editor command of Edit with Premiere Elements Editor.

***A previously unexplored output for the Elements Organizer Slideshow came up in discussion today. It involved selecting the Slide Show Project thumbnail in the Elements Organizer interface, going to the Elements Organizer Share header where Burn Video DVD/Blu-ray option is selected. This gets a psess (non wmv) slideshow into Premiere Elements targeted for Movie Menu and burn to. Contrast....if the slideshow was outputted instead from the Elements Organizer Slideshow Editor, not the Elements Organizer interface, with the Output option of Burn to Disc, the slideshow would also get into Premiere Elements targeted for Movie Menu and burn to, but as a wmv file with limited opportunity for additional significant edits in that form it it were decided more edits were needed at that stage.


Updated September 12, 2013 for Premiere Elements 11 automatic project preset setting issue. See OBSERVATIONS.


Thursday, September 5, 2013

PE11: Keyboard Shortcuts

INTRODUCTION

Premiere Elements 4 through 11* offer Keyboard Customization  with Application and Windows categories, each filled with program functions with and without Adobe assigned keyboard shortcuts. All can be customized. 


The distinction between the Application and Windows categories is that Application is categorized according to the menus of the Premiere Elements workspace ( for version 11, File, Edit, Clip, Timeline, Text, Action Bar, Tools, Window, and Help); whereas Windows is categorized according to the Windows of Premiere Elements (for version 11, Narration, Capture Window, Disc Layout Window, Properties Window, History Window, Monitor Window, Media Window, Sceneline Window, and Timeline window).

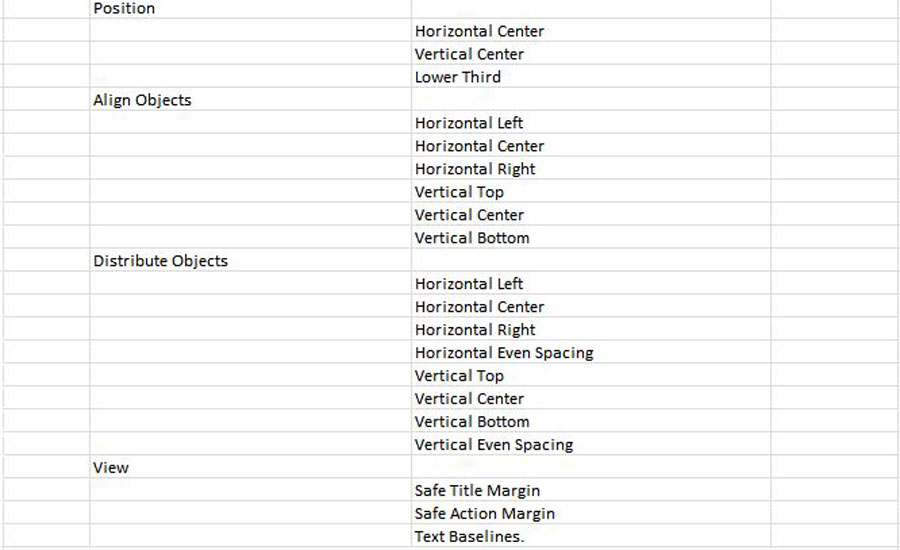
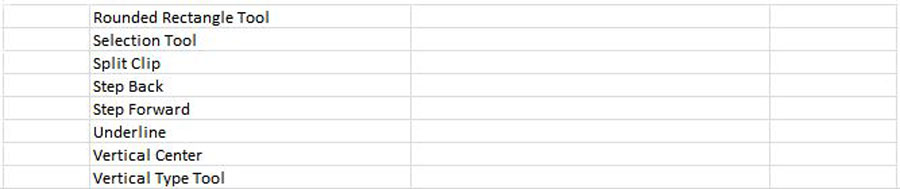
The Keyboard Customization* (default) listings found in Premiere Elements 11 Edit Menu/Keyboard Customization are: 

PART 1

APPLICATION

more Clip

           more Text
more Help

PART 2

WINDOWS


more Monitor Window

_________________________________________________________________________________
*General Notes.

Since Premiere Elements 11 does not have a Freeze Frame (camera looking) icon under the Edit
Mode Monitor as does earlier versions, I have assigned the letter G to Freeze Frame (Applications/
Help) for quick access to the Freeze Frame dialog in Expert workspace. (I borrowed it from another function that I do not use.)

In Applications/Tools, the Time Stretch Command is Ctrl + R; whereas in Windows/Timeline Window/ a Time Stretch Command is listed there as X.  I have gotten the Time Stretch Ctrl + R to work to bring up the Time Stretch dialog, but to date have not been successful using Time Stretch X for this purpose.

The Slide Clip and Slip Clip Functions and Commands in Windows/Timeline Window caught my attention. And, I wondered about their possible relationship to the Premiere Pro Slide and Slip edits
http://helpx.adobe.com/premiere-pro/using/trimming-clips1.html#id_12239
In Premiere Elements there is no Slide Tool or Slip Tool as in Premiere Pro, just those Slide and Slip functions with commands tucked away in the Premiere Elements Keyboard Customization/Windows/Timeline Window area.  Interestingly, some of the Premiere Pro and Premiere Elements Slide and Slip Commands involved are the same. But, even some Premiere Pro Slide and Slip Commands which are not identical to those in Premiere Elements appear to work in Premiere Elements. All this needs more defining in a future blog post after more exploration and experimentation of Slide and Slip as listed under Premiere Elements Edit Menu/Keyboard Customization/Windows/Timeline Window.

Update September 17, 2013.
More information on Slide and Slip Edits is found in the later blog post titled PE11: Slide and Slip Edits.
http://www.atr935.blogspot.com/2013/09/pe11-slip-and-slide-edits.html

Update January 30, 2014
Premiere Elements 4 through 11 Keyboard Shortcuts details present the same for the current version 12, with the minor exceptions as noted in item "0016. Premiere Elements 12 Keyboard Shortcuts" in the ongoing blog post titled "Premiere Elements 12 Daily Discoveries"

Update October 20, 2014
Important Corrrection Keyboard Customization PART 2 WINDOWS. See corrections in below.
Command was not placed by me on correct line for just these 4 functions (was off by one line).
Sorry about that. Just noticed this in cross checking Premiere Elements 11, 12, and 13 Keyboard Customization functions and commands.


ATR